INQMEGA ST-637-6M-20X-4G-US
INQMEGA 20X Zoom Dual View Solar Battery PTZ Camera User Manual
Model: ST-637-6M-20X-4G-US
1. Introduction
Thank you for choosing the INQMEGA 20X Zoom Dual View Solar Battery PTZ Camera. This manual provides detailed instructions for the setup, operation, and maintenance of your camera. Please read this manual thoroughly before use to ensure proper functionality and safety.
This camera is designed for outdoor surveillance, featuring a 20X optical zoom, dual-lens system, solar power, and 4G cellular connectivity for remote monitoring.

Image 1.1: The INQMEGA 20X Zoom Dual View Solar Battery PTZ Camera with its accompanying solar panel.
2. Safety Information
- Ensure the camera is installed in a secure location, out of reach of unauthorized individuals.
- Use only the provided power cable and solar panel for charging.
- Do not expose the camera to extreme temperatures or corrosive environments.
- Avoid direct exposure of the solar panel to shade for optimal charging.
- Do not attempt to disassemble or modify the camera, as this will void the warranty.
3. Package Contents
Verify that all items listed below are included in your package:
- Camera * 1
- Solar Panel * 1
- User Manual * 1
- Camera Bracket * 1
- Solar Panel Bracket * 1
- Power Cable * 1

Image 3.1: Visual representation of the items included in the product package.
4. Product Overview
Familiarize yourself with the components of your INQMEGA camera and solar panel:

Image 4.1: Labeled diagram of the camera and solar panel components with dimensions.
- Solar Panel: 6W panel for continuous power.
- Wide-Angle Lens: Provides a broad field of view.
- Zoom Lens: Offers 20X optical zoom for detailed viewing.
- White & IR LEDs: For effective night vision up to 50m.
- PIR Sensor: Passive Infrared sensor for human detection.
- Microphone: For audio input and two-way communication.
- Light Sensor: Detects ambient light for automatic night vision activation.
- Antennas: For 4G cellular connectivity.
- LED Indicator: Shows camera status.
5. Setup
5.1 Powering the Camera (Solar Panel Connection)
The camera is equipped with a 10050mAh built-in battery and a 6W solar panel for continuous power. Connect the solar panel to the camera to ensure uninterrupted operation.
- Mount the solar panel in a location that receives maximum direct sunlight throughout the day.
- Connect the solar panel's cable to the designated power input port on the camera.
- Ensure the connection is secure and waterproof.

Image 5.1: Illustration of the solar panel providing power to the camera.
5.2 SIM Card and TF Card Installation
This camera supports 4G cellular connectivity and local storage via a TF card (up to 128GB, not included).
- Locate the SIM card slot and TF card slot on the camera (refer to Product Overview diagram).
- Insert a valid 4G SIM card into the SIM card slot with the metal contacts facing down.
- Insert a formatted TF card (Class 10 or higher recommended) into the TF card slot.
- Ensure both cards are inserted correctly and securely.
5.3 App Installation and Initial Pairing
The camera uses the UBOX application for remote control and monitoring.
- Download the "UBOX" app from your smartphone's app store (iOS App Store or Google Play Store).
- Register for an account and log in.
- Follow the in-app instructions to add your camera. This typically involves scanning a QR code on the camera or manually entering its ID.
- Ensure your smartphone has an active internet connection during the pairing process.
6. Operating Instructions
6.1 Dual View Monitoring
The camera features a dual-lens system, providing both a wide-angle view and a zoom view simultaneously within the UBOX app.

Image 6.1: Dual video screens in the UBOX app, displaying wide-angle and zoom lens views.
- Open the UBOX app and select your camera.
- You will see two live video feeds. The top feed is typically the wide-angle lens, and the bottom feed is the zoom lens.
- Double-click on either view to switch between them or to make one full screen.
- Drag the screen of the wide-angle view to reposition the zoom lens's focus area. The zoom lens will follow the selected position.
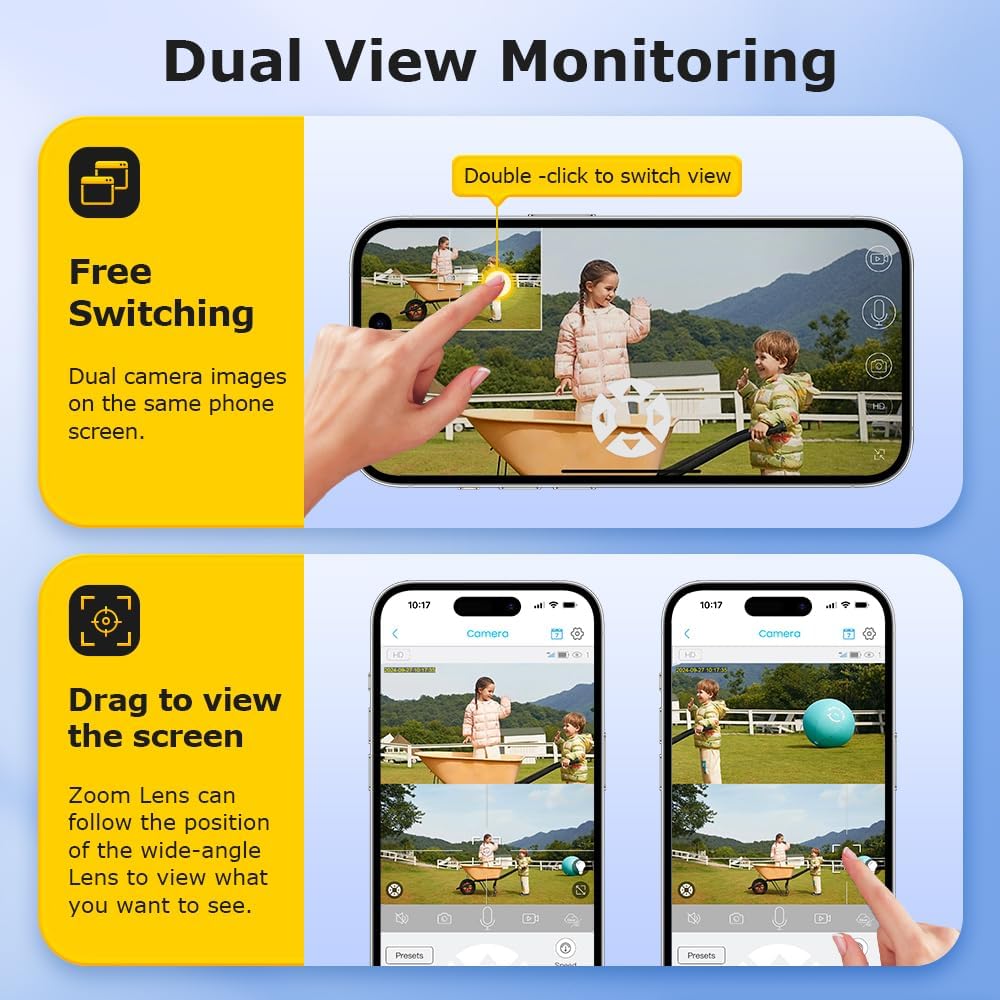
Image 6.2: Demonstrating free switching and drag-to-view functionality in the app.
6.2 PTZ Control and 20X Optical Zoom
The camera supports Pan-Tilt-Zoom (PTZ) functionality and a powerful 20X optical zoom.
- In the live view interface of the UBOX app, use the directional controls to pan (move horizontally) and tilt (move vertically) the camera.
- Utilize the zoom controls (e.g., a slider or +/- buttons) to activate the 20X optical zoom for detailed inspection of distant objects.
6.3 Night Vision
The camera provides clear visibility in low-light conditions with its infrared (IR) and white LED lights, offering an effective night vision range of up to 50 meters.
- The camera automatically switches to night vision mode when ambient light is low.
- You can typically configure night vision settings (e.g., IR only, white light only, or smart mode) within the UBOX app.
6.4 PIR Human Detection
The Passive Infrared (PIR) sensor detects human movement, triggering recordings and alerts.
- Enable PIR detection in the UBOX app settings.
- Adjust sensitivity levels to minimize false alarms.
- When motion is detected, the camera will record and send notifications to your smartphone.
6.5 Two-Way Audio
Communicate with visitors or deter intruders using the camera's built-in microphone and speaker.
- In the live view, tap the microphone icon to speak through the camera's speaker.
- Ensure your phone's microphone is enabled for the UBOX app.
6.6 Recording and Storage
The camera supports both local TF card storage and cloud storage for recorded footage.

Image 6.3: The camera provides 6MP Super HD video quality for clear and smooth recordings.

Image 6.4: Multiple storage methods available: TF Card and Cloud Storage.
- TF Card Storage: Recordings are saved directly to the inserted TF card. The app allows you to view and download these recordings.
- Cloud Storage: Subscribe to a cloud storage plan through the UBOX app for secure, remote backup of your footage.
- Configure recording settings (e.g., continuous recording, event-triggered recording) within the app.
7. Maintenance
- Cleaning: Regularly wipe the camera lenses and solar panel with a soft, damp cloth to remove dust and debris. Do not use harsh chemicals.
- Solar Panel Efficiency: Ensure the solar panel remains free from obstructions (leaves, snow, dirt) to maintain optimal charging efficiency.
- Battery Health: While the camera is designed for continuous solar power, avoid prolonged periods of complete discharge in environments without sunlight to preserve battery life.
- Firmware Updates: Check the UBOX app periodically for firmware updates to ensure your camera has the latest features and security enhancements.
8. Troubleshooting
| Problem | Possible Solution |
|---|---|
| Camera not powering on. |
|
| No 4G signal or offline. |
|
| PIR detection not working. |
|
| Poor night vision quality. |
|
9. Specifications
| Feature | Detail |
|---|---|
| Model Name | ST-637-6M-20X-4G-US |
| Indoor/Outdoor Usage | Outdoor |
| Power Source | Solar Powered (6W Solar Panel), Built-in 10050mAh Battery |
| Connectivity Protocol | Cellular (4G) |
| Controller Type | UBOX App |
| Video Capture Resolution | 6MP |
| Optical Zoom | 20X |
| Night Vision Range | Up to 50m (230 Feet) |
| PIR Detection Range | Max 12M |
| Storage Options | Amazon Cloud & TF Card (MAX 128GB, Not Included) |
| Water Resistance Level | Waterproof (IP66) |
| Special Features | 2-Way Audio, Dual View, Motion Sensor |
| Material | Plastic |
| Item Weight | 5.5 pounds |
10. Warranty and Support
Your INQMEGA camera comes with a standard manufacturer's warranty. Please refer to the warranty card included in your package or visit the official INQMEGA website for detailed warranty terms and conditions.
For technical support, troubleshooting assistance, or further inquiries, please contact INQMEGA customer service through the UBOX app or visit the INQMEGA Store on Amazon.
Ask a question about this manual
Ask about setup, troubleshooting, compatibility, parts, safety, or missing instructions. Manuals+ will review the question and use this page’s manual context to help answer it.