Lumoday LMD-36
Lumoday LMD-36 Nordic Wood Grain Digital Alarm Clock User Manual
Model: LMD-36
1. Introduction
Thank you for purchasing the Lumoday LMD-36 Digital Alarm Clock. This manual provides detailed instructions for setting up, operating, and maintaining your new alarm clock. Please read this manual thoroughly before use to ensure proper functionality and to maximize your product experience.
2. Package Contents
Please check the package contents upon unboxing:
- Lumoday LMD-36 Digital Alarm Clock (1 unit)
- USB Power Adapter (5V2.4A) (1 unit)
- USB-A to DC Power Cable (1 unit)
- User Manual (this document)
Note: AAA batteries for backup are not included and must be purchased separately.
3. Product Overview
The Lumoday LMD-36 features a large LED display with a Nordic wood grain design, blending seamlessly into various room decors. It offers multiple functions for convenience and reliability.

Figure 3.1: Front view of the Lumoday LMD-36 Digital Alarm Clock, showing the large LED display with time 5:25 AM.
Key Features:
- Large LED Display: 1.8-inch digits for clear visibility.
- 3-Level Brightness Adjustment: Customize display brightness for day or night.
- Dual Alarms: Set two independent alarms for different schedules (e.g., weekday and weekend).
- Adjustable Snooze Function: Snooze duration can be set to 5, 10, or 15 minutes.
- USB Charging Ports: Includes one USB-A and one USB-C port for charging external devices.
- Battery Backup: Maintains time and alarm settings for up to 72 hours during power outages (requires 2 AAA batteries, not included).
- Nordic Wood Grain Design: Aesthetic design to complement home decor.
4. Setup
4.1 Power Connection
- Insert the DC plug of the power cable into the DC IN port on the back of the alarm clock.
- Connect the USB-A end of the power cable to the provided 5V2.4A USB power adapter.
- Plug the power adapter into a standard wall outlet. The LED display will light up.

Figure 4.1: Rear view of the alarm clock, highlighting the USB-A, USB-C, and DC power input ports.
4.2 Battery Backup Installation
- Locate the battery compartment on the bottom of the alarm clock.
- Slide open the battery cover.
- Insert two (2) AAA batteries (not included) according to the polarity markings (+ and -).
- Close the battery cover securely.
The backup batteries will preserve time and alarm settings during a power outage but will not power the display or alarm sound.

Figure 4.2: Bottom view of the alarm clock, showing the battery compartment for AAA batteries.
5. Operating Instructions
5.1 Setting the Time
- Press and hold the TIME SET button (often labeled with a clock icon or "SET") until the hour digits begin to flash.
- Press the HR button to adjust the hour.
- Press the MIN button to adjust the minute.
- Press the TIME SET button again to confirm and exit time setting mode.
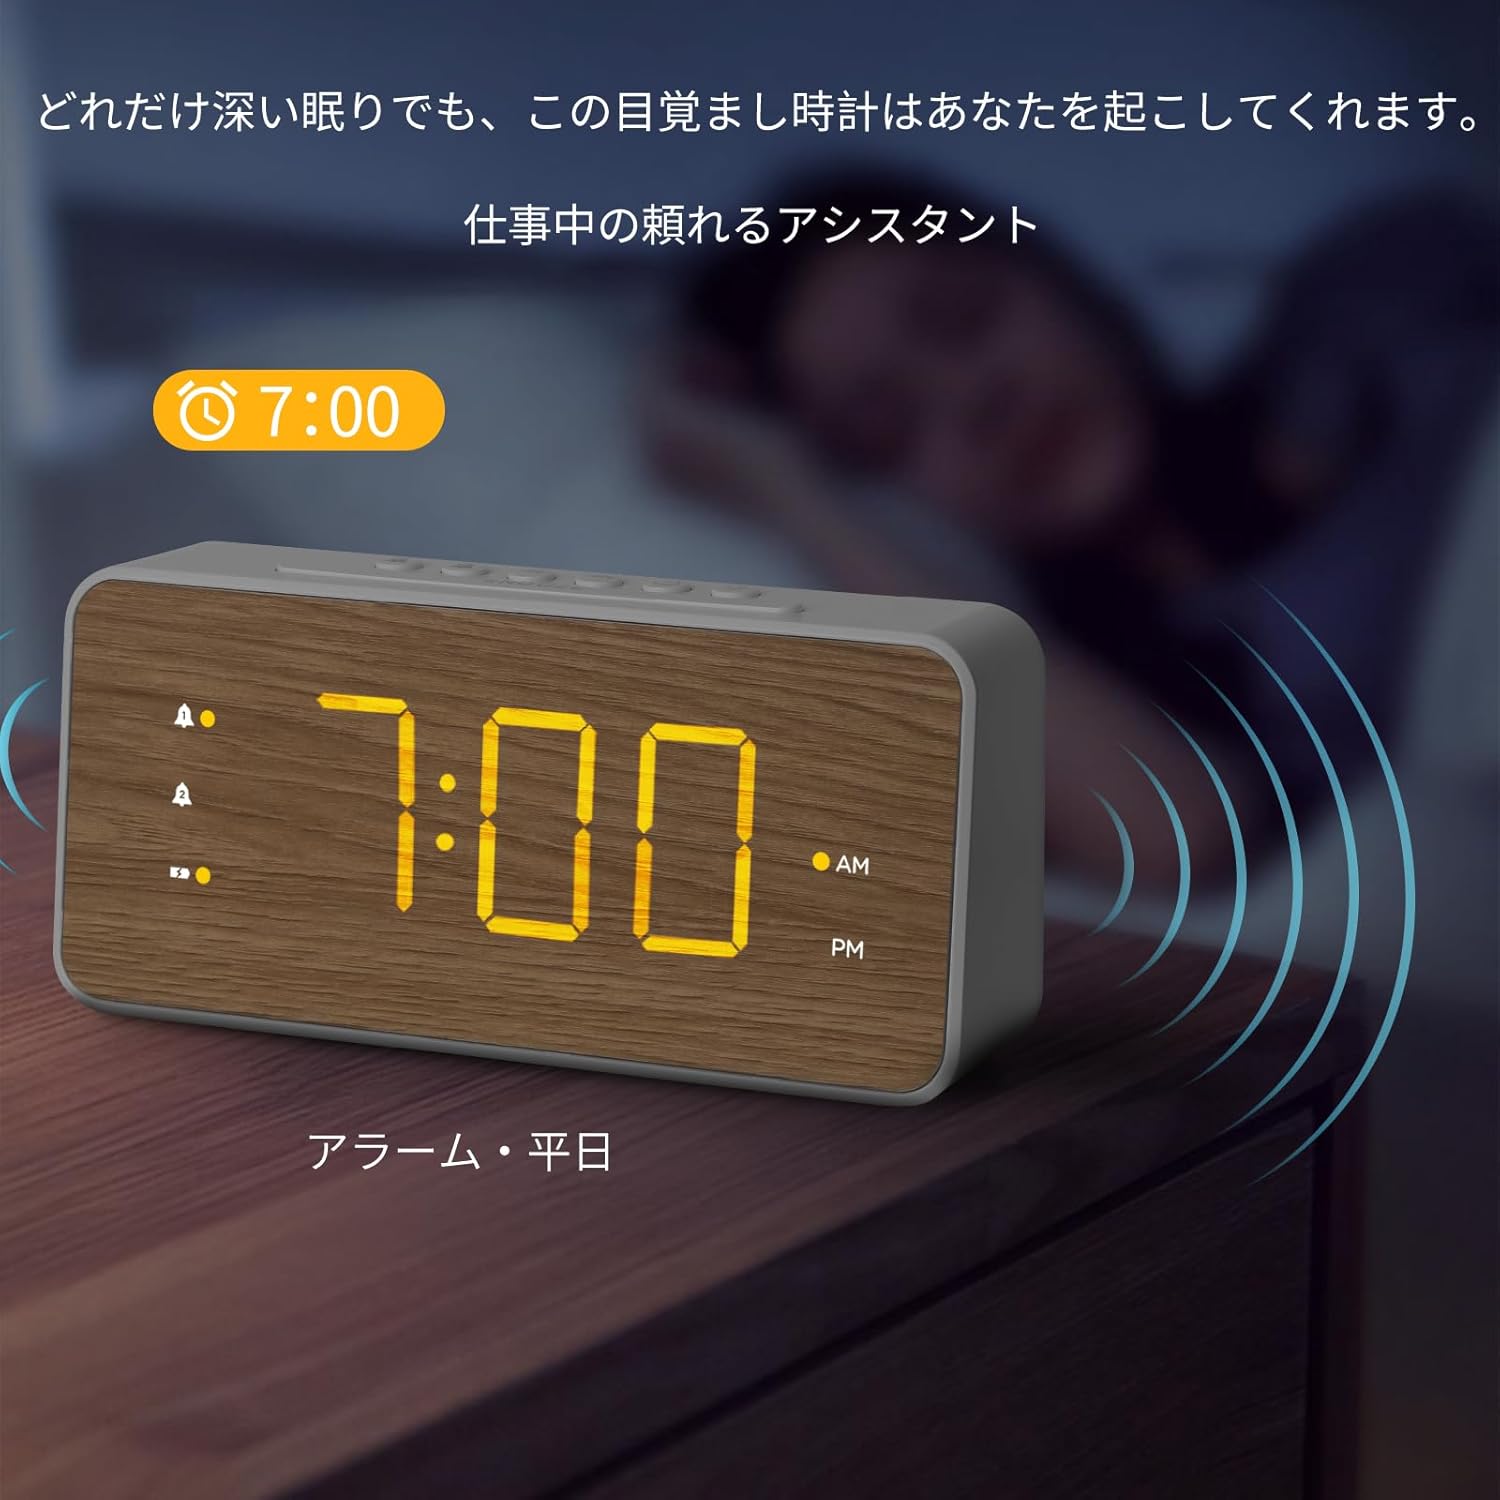
Figure 5.1: Top panel of the alarm clock with control buttons for setting time and alarms.
5.2 Setting Alarms (Alarm 1 and Alarm 2)
This clock supports two independent alarms. The process is identical for both.
- Press and hold the ALARM 1 button (bell icon with '1') until the hour digits for Alarm 1 begin to flash.
- Press the HR button to adjust the alarm hour.
- Press the MIN button to adjust the alarm minute.
- Press the ALARM 1 button again to confirm the time. The alarm icon will appear on the display, indicating it is active.
- To set Alarm 2, repeat steps 1-4 using the ALARM 2 button (bell icon with '2').
To deactivate an alarm, press the corresponding ALARM button once. The alarm icon will disappear from the display.

Figure 5.2: The alarm clock displaying an active alarm for 7:00 AM, suitable for weekday use.

Figure 5.3: The alarm clock displaying an active alarm for 10:00 AM, suitable for weekend use.
5.3 Adjusting Alarm Volume
The alarm volume can be adjusted to three levels.
- While an alarm is sounding, press the VOL button (speaker icon) repeatedly to cycle through the three volume levels (L1, L2, L3).
- The selected volume level will be displayed briefly.
5.4 Snooze Function
When an alarm sounds, press the large SNOOZE button on the top of the clock to temporarily silence the alarm. The alarm will sound again after the preset snooze duration.
To adjust the snooze duration (5, 10, or 15 minutes):
- Press and hold the SNOOZE button until the current snooze duration flashes.
- Press the HR or MIN button to cycle through 5, 10, or 15 minutes.
- Press the SNOOZE button again to confirm.
Figure 5.4: Top panel of the alarm clock, highlighting the SNOOZE button for temporary alarm silencing.
5.5 Display Brightness Adjustment
The LED display has three brightness levels.
- Press the BRIGHTNESS button (sun icon) repeatedly to cycle through the three brightness levels (High, Medium, Low).
- Select the desired brightness for comfortable viewing.

Figure 5.5: The alarm clock demonstrating various brightness levels of its LED display.
5.6 USB Charging Ports
The alarm clock is equipped with a USB-A and a USB-C charging port on the back.
- Connect your smartphone, earbuds, or other USB-powered devices to either the USB-A or USB-C port using their respective charging cables.
- The clock will provide power to charge your devices.
Figure 5.6: A smartphone connected to the USB-C port of the alarm clock for charging.
6. Maintenance
- Clean the clock with a soft, dry cloth. Do not use abrasive cleaners or solvents.
- Keep the clock away from direct sunlight, extreme temperatures, and high humidity.
- If the clock will not be used for an extended period, remove the AAA backup batteries to prevent leakage.
7. Troubleshooting
| Problem | Possible Cause | Solution |
|---|---|---|
| Display is blank or dim. | Power adapter not connected or faulty. Brightness set too low. | Ensure power adapter is securely connected. Press the BRIGHTNESS button to increase display brightness. |
| Alarm does not sound. | Alarm not activated. Alarm volume set too low. | Ensure the alarm icon is visible on the display. Adjust alarm volume using the VOL button. |
| Time/settings lost after power outage. | Backup batteries not installed or depleted. | Install new AAA batteries in the battery compartment. |
| USB charging not working. | Device cable faulty. Device not compatible. | Try a different USB cable or device. Ensure the clock is powered via the adapter. |
8. Specifications
| Feature | Detail |
|---|---|
| Model Number | LMD-36 |
| Brand | Lumoday |
| Display Type | LED |
| Display Size | 1.8-inch digits |
| Brightness Levels | 3 levels |
| Alarm Quantity | 2 (Dual Alarms) |
| Snooze Duration | 5, 10, 15 minutes (adjustable) |
| Charging Ports | 1 x USB-A, 1 x USB-C |
| Power Input | DC Power Cord (5V2.4A adapter included) |
| Battery Backup | 2 x AAA batteries (not included), up to 72 hours |
| Dimensions (W x H) | 20.7 cm x 9.6 cm (approx. 8.15 x 3.78 inches) |
| Material | ABS (Acrylonitrile Butadiene Styrene) |
| Color | White with Wood Grain finish |
9. Warranty and Support
Lumoday products come with a standard manufacturer's warranty. For specific warranty details, please refer to the warranty card included in your package or contact Lumoday customer support. If you encounter any issues or have questions regarding your LMD-36 Digital Alarm Clock, please contact our support team via the contact information provided on the product packaging or our official website.
10. Additional Product Information
Product Videos
Video 10.1: An overview of the Lumoday LMD-36 Digital Alarm Clock's features, including its design, dual alarm settings, brightness adjustment, snooze function, and USB charging capabilities. This video demonstrates the clock in various settings like a bedroom, office, and living room, showcasing its versatility and ease of use.
Ask a question about this manual
Ask about setup, troubleshooting, compatibility, parts, safety, or missing instructions. Manuals+ will review the question and use this page’s manual context to help answer it.