1. Introduction
This manual provides comprehensive instructions for the safe and efficient operation of your Generic IPC-9800ADH Pro Multifunctional CCTV Tester. Please read this manual thoroughly before using the device to ensure proper functionality and to prevent damage.

Figure 1: The Generic IPC-9800ADH Pro Multifunctional CCTV Tester, featuring a 7-inch IPS touch screen and various ports for camera and network testing.
The IPC-9800ADH Pro is a versatile tool designed for CCTV system installation and maintenance. It supports a wide range of camera types and network testing functions, including:
- 7-inch IPS touch screen with 1280*800 resolution.
- 8K H.265 video display via mainstream.
- HD IP camera testing.
- HDMI input (4K 30FPS) and output (4K 60FPS).
- VGA input (up to 1920*1080P).
- DC24V 2A, DC12V 3A, 48V PoE power output (max 30W).
- Dual gigabit Ethernet ports.
- UTP cable test and RJ45 cable TDR test.
- TesterPlay for remote control and voice intercom.
- Backlit buttons for low-light operation.
2. Setup
2.1 Unpacking and Inspection
Carefully unpack all components and verify that all items listed in the packing list are present and undamaged. If any items are missing or damaged, contact your vendor immediately.

Figure 2: Included accessories: IPC-9800ADH Pro unit, packing box, tool bag, lithium battery, power output cable, safety cord, audio test cable, charger, RS485 control cable, BNC cable, and cable tester remote.
2.2 Charging the Battery
The device includes a built-in Lithium Ion battery. Before first use, fully charge the device using the provided 12V charger. Connect the charger to the device's power input port and plug it into a standard electrical outlet. The charging indicator will show the charging status.
2.3 Powering On/Off
To power on the device, press and hold the power button located on the side panel until the screen illuminates. To power off, press and hold the power button again until the shutdown options appear, then select "Power Off".
3. Operating Instructions
3.1 IP Camera Testing (8K H.265)
The tester supports 8K H.265 IP camera testing, allowing real-time viewing of high-resolution camera images. Connect the IP camera to one of the tester's LAN ports. Navigate to the "IP Camera Test" application on the main screen to discover and configure IP cameras.

Figure 3: The interface for 8K H.265 IP camera testing, displaying a live feed from a connected IP camera at 8160x3616 resolution.
3.2 HD Coaxial Camera Testing (TVI/CVI/AHD/CVBS)
The device supports HD Coaxial 4.0 testing for TVI, CVI, AHD, and CVBS cameras. Connect the coaxial cable from the camera to the BNC input port on the tester. Use the "CVBS & HD Camera" application to access features such as snapshot, video record/playback, zoom, and OSD menu control over coaxial cable.

Figure 4: Diagram illustrating the connection for HD Coaxial 4.0 testing, showing CVI, TVI, AHD camera inputs and supported resolutions up to 8MP (4K).
3.3 Network Testing Functions
The tester features dual gigabit Ethernet ports for comprehensive network diagnostics. Access various network tools through the "Tools" or "NET TOOL PRO" applications.
3.3.1 Bandwidth and Error Packet Testing
Monitor real-time network status, bandwidth utilization, and detect error packets. This function helps in diagnosing network performance issues and signal quality.

Figure 5: Screenshots of the network testing interface, showing real-time network status, PING packet checking, and error packet statistics.
3.3.2 UTP Cable Test
Perform UTP cable sequence tests to check connection status and identify faults in RJ45 plugs. The screen displays the wiring sequence and highlights any breaks or short circuits.

Figure 6: The UTP cable test display, showing cable type, remote kit number, and a visual representation of the cable sequence with fault indicators.
3.3.3 RJ45 Cable TDR Test
The TDR (Time Domain Reflectometer) test measures cable pair status, length (up to 180m), and attenuation. This is particularly useful for network cables exceeding 10 meters. Connect one end of the network cable to the tester; the other end should not be connected to other devices for accurate results.

Figure 7: The RJ45 cable TDR test screen, showing cable length, attenuation, and pair status for a cable up to 180 meters.
3.3.4 PoE Switch Detection
Quickly detect PoE switch status, power supply protocol, cable pair, voltage, and power supply details. This helps in verifying PoE functionality and troubleshooting power issues for PoE-enabled devices.

Figure 8: The PoE switch detection screen, displaying PoE protocol (e.g., IEEE 802.3bt), power supply pair, and voltage (e.g., 56.0V).
3.4 HDMI Input/Output
The tester supports 4K HDMI input at 30FPS for video display, recording, and playback. It also provides 4K HDMI output at 60FPS to an external monitor, allowing you to view the tester's screen on a larger display.

Figure 9: Connection diagram showing a DVR/NVR connected to the tester via HDMI input, displaying 4K video at 60Hz.
3.5 VGA Input
Connect the VGA output of DVRs, NVRs, or other devices to the tester's VGA input port. Open the "VGA" application on the tester to display the output image from the connected device. This feature is suitable for testing various VGA-enabled equipment.
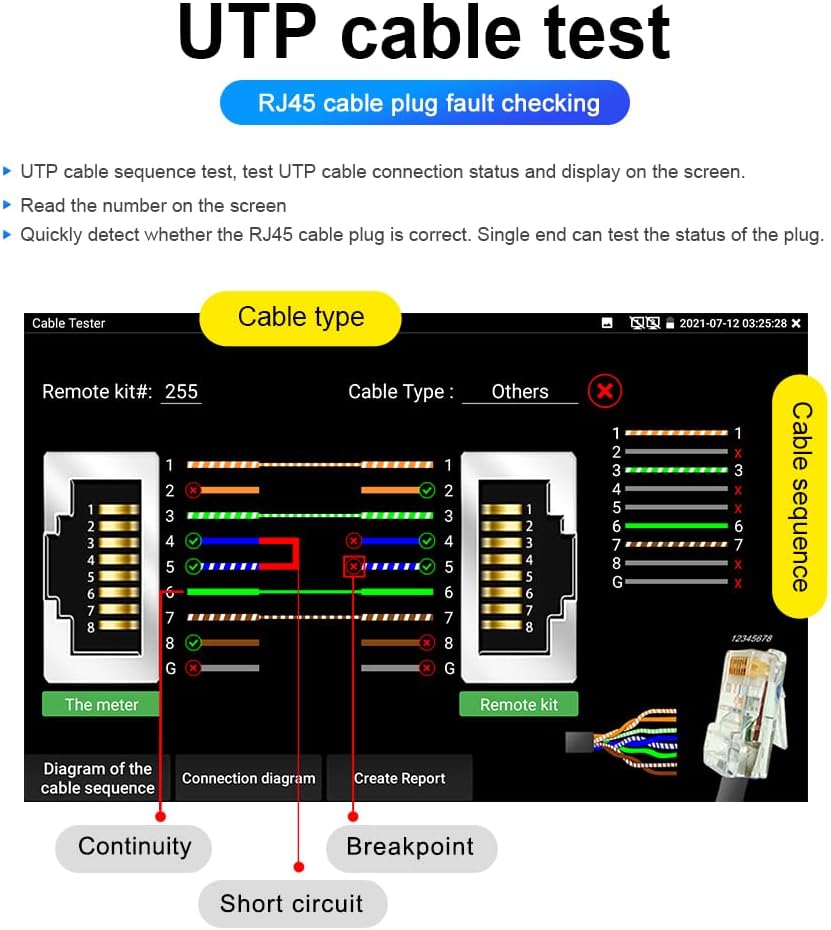
Figure 10: Diagram illustrating how to connect a DVR, Digital TV Receiver, or other devices via a splitter to the tester's VGA input.
4. Maintenance
4.1 Cleaning
Regularly clean the device with a soft, dry cloth. For stubborn dirt, use a slightly damp cloth. Avoid using abrasive cleaners, solvents, or strong chemicals, as these can damage the screen and casing.
4.2 Storage
When not in use, store the tester in a cool, dry place, away from direct sunlight and extreme temperatures. Use the provided tool bag for protection during transport and storage.
4.3 Battery Care
To prolong battery life, avoid fully discharging the battery frequently. If storing the device for an extended period, ensure the battery is charged to approximately 50-70% and recharge it every few months.
5. Troubleshooting
5.1 Device Does Not Power On
- Ensure the battery is sufficiently charged. Connect the charger and attempt to power on again.
- Verify that the power button is pressed and held correctly.
5.2 No Video Display from Camera
- Check all cable connections (Ethernet for IP, BNC for coaxial) to ensure they are secure.
- Verify the camera is powered on and functioning correctly.
- Ensure the correct camera test application is selected on the tester.
- For IP cameras, confirm network settings (IP address, subnet mask) are correct and the camera is discoverable.
5.3 Network Test Errors
- Ensure network cables are properly connected to the tester's LAN ports.
- For TDR tests, ensure the remote end of the cable is disconnected from other devices.
- Check for physical damage to network cables or connectors.
6. Specifications
| Feature | Detail |
|---|---|
| Display | 7-inch IPS touch screen, 1280*800 resolution |
| IP Camera Test | 8K H.265 video display, HD IP camera test |
| Analog Camera Test | 8MP TVI/CVI/AHD/CVBS (HD Coaxial 4.0) |
| HDMI Input | 4K 30FPS |
| HDMI Output | 4K 60FPS |
| VGA Input | Supports 1920*1080P |
| PoE Power Output | 48V, max 30W |
| DC Power Output | DC24V 2A, DC12V 3A |
| Ethernet Ports | Dual Gigabit Ethernet ports |
| Cable Tests | UTP cable test, RJ45 cable TDR test (up to 180m) |
| Operating System | Android 10.0 |
| Battery | 1 Lithium Ion battery (included) |
| Manufacturer | GUANGZHOU WANGLU TECHNOLOGY CO.,LTD |
7. Warranty and Support
For warranty information and technical support, please refer to the documentation provided with your purchase or contact the manufacturer directly. Keep your proof of purchase for warranty claims.


