1. Safety Information
Read all instructions carefully before beginning installation. If you are unfamiliar with electrical wiring, consult a qualified electrician. Always turn off power at the circuit breaker before installation or maintenance.
- Ensure the installation site can support the fan's weight.
- Do not use an electric drill to install solid wood/plywood blades to avoid damage.
- Maintain a minimum clearance of 7 feet from the floor to the bottom of the fan blades.
- Ensure all electrical connections comply with local codes and ordinances.
- This fan is designed for indoor use and is not for direct exposure to rain.
2. Package Contents
Verify that all components are present before beginning installation. If any parts are missing or damaged, contact customer support.

Image: All components of the YOUKAIN 52-inch RGB Ceiling Fan, including the motor housing, eight dual-finish blades, 6-inch and 10-inch downrods, remote control, and light kit.
- Motor Housing
- Fan Blades (8 pieces, dual finish: matte black/wooden)
- Downrods (6-inch and 10-inch)
- Hanger Bracket
- Canopy
- Light Kit (integrated LED with RGB)
- Remote Control
- Hardware Pack (screws, washers, wire connectors)
- Instruction Manual
3. Installation Guide
Follow these steps carefully to ensure proper and safe installation of your ceiling fan. Always ensure power is OFF at the circuit breaker before starting.
3.1. Install Hanger Bracket
Secure the hanger bracket to the ceiling junction box. Use appropriate screws for your ceiling type (wood tooth screws for wooden ceilings, expansion screws for concrete ceilings).

Image: Diagrams illustrating hanger bracket installation for both wooden and concrete ceilings, detailing the type of screws required for each.
3.2. Install Downrod
Remove the hanger ball from the downrod, insert the downrod into the motor housing, and secure it with the provided pin and screws. Then, slide the decorative cover over the downrod.
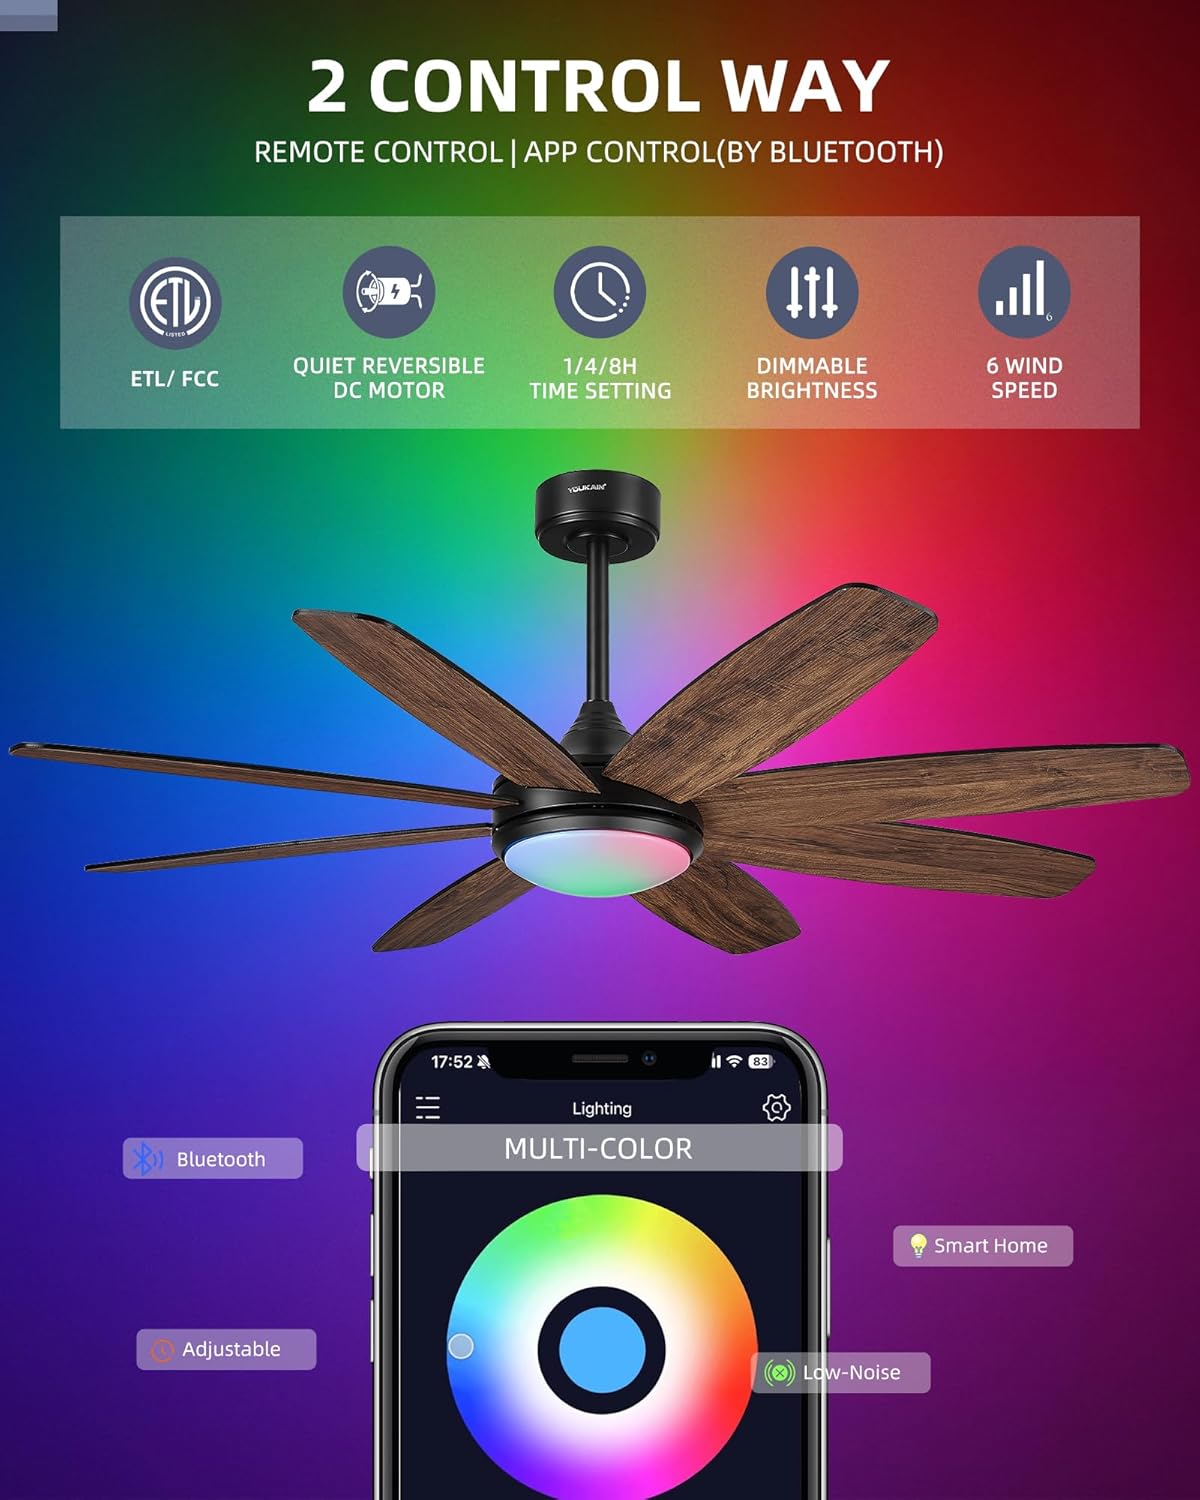
Image: A close-up view demonstrating the process of inserting the downrod into the fan motor housing and securing it.
3.3. Wire Fan and Hang
Connect the fan's wiring to the receiver, then carefully lift the fan assembly and hang it onto the installed hanger bracket. Ensure the slot on the hanger ball aligns with the tab on the bracket for secure placement. Connect the house wiring to the fan wiring (Green to Ground, White to Neutral, Black to Live) using wire connectors.
Video: Detailed step-by-step instructions on how to install the YOUKAIN 52-inch YJ811 RGB Ceiling Fan with Light, covering mounting, wiring, and assembly.
3.4. Attach Blades
Secure each fan blade to the motor housing using the provided screws and paper washers. Ensure all blades are firmly attached. Important: Do not use an electric drill for this step to prevent damage to the blades.

Image: A close-up shot showing a fan blade being carefully screwed into the motor housing.

Image: The dual-sided fan blades, offering a choice between a matte black finish and a wooden finish to match different decor styles.
3.5. Install Light Kit
Connect the light kit wires (LED and RGB connectors) and secure the light kit to the fan motor housing. Align the screw holes and tighten the three screws. Finally, attach the acrylic cover by twisting it into place.
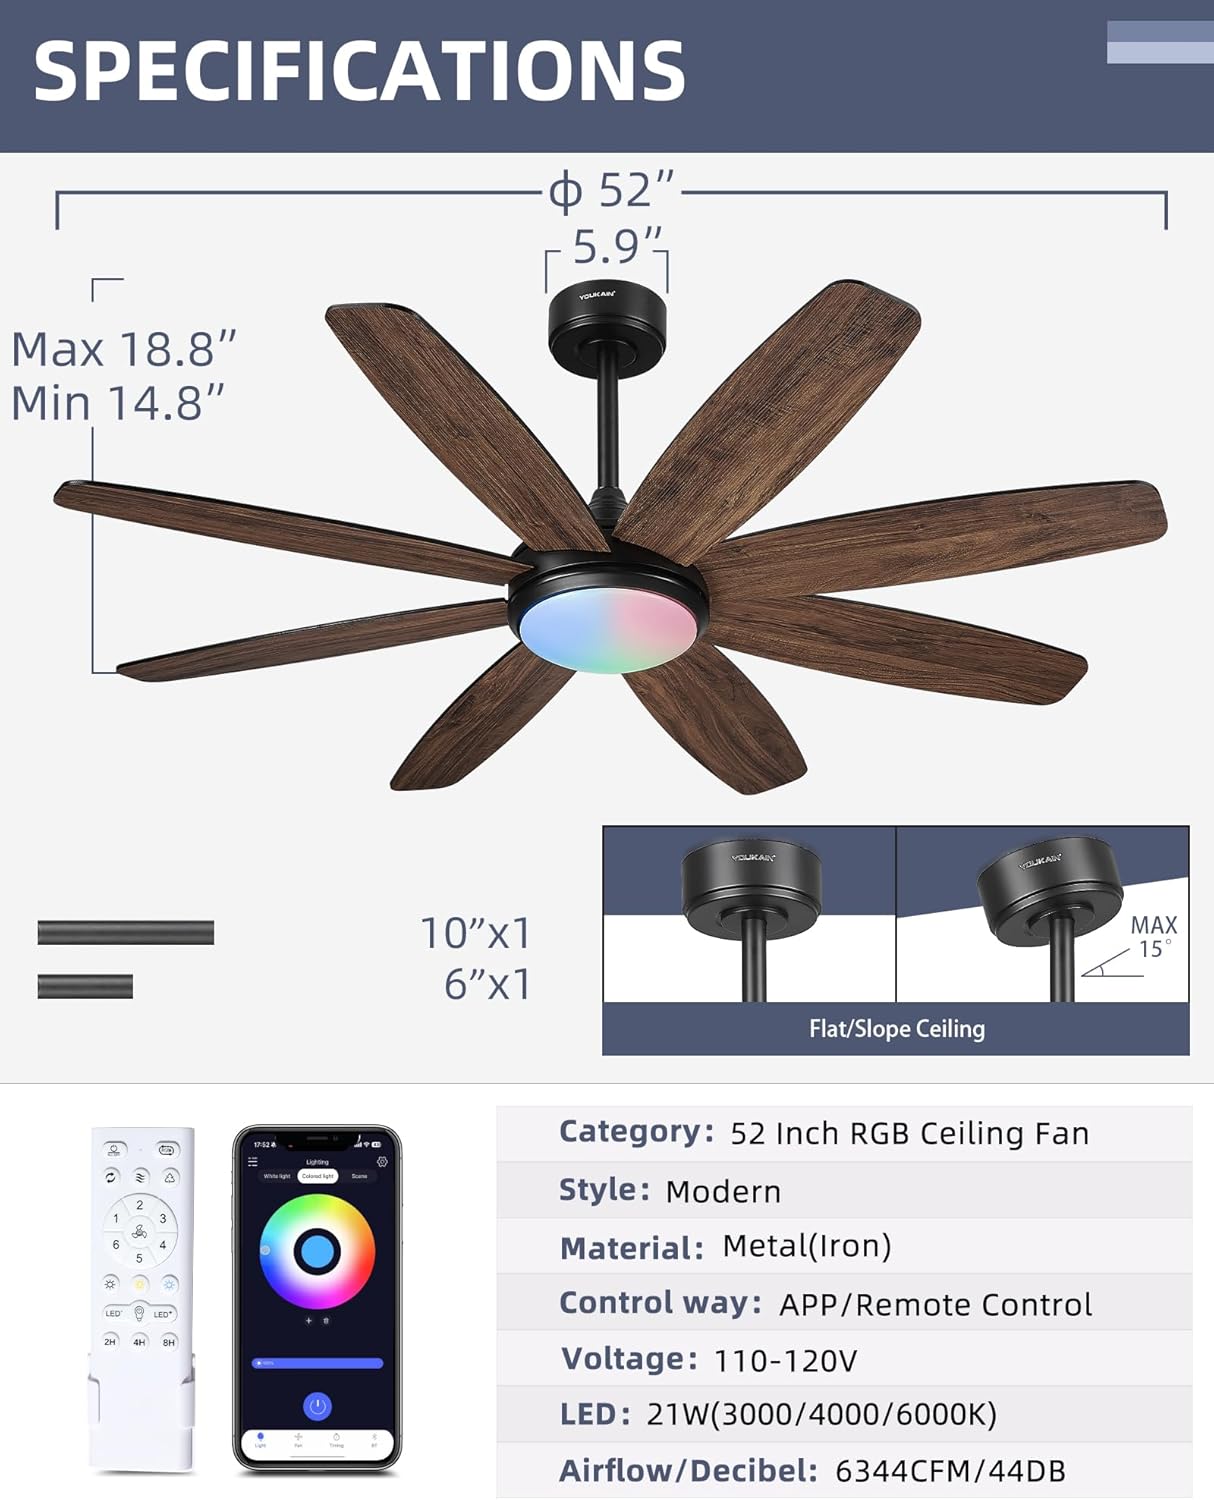
Image: Steps for installing the LED light kit, including connecting wires and attaching the acrylic cover.
4. Operating Instructions
Your YOUKAIN ceiling fan can be controlled via the included remote control or the dedicated smartphone application.
4.1. Remote Control Operation
The remote control provides full functionality for your fan and light. Ensure batteries are installed correctly.

Image: A comprehensive diagram of the remote control, highlighting each button and its corresponding function for fan speed, light control, and special features.
- LED Indicator: Shows remote activity.
- ALL OFF: Turns off both fan and light.
- RGB Rainbow Cycle: Cycles through RGB colors.
- Fan Reverse/Forward: Changes blade rotation direction for summer (downward airflow) or winter (upward airflow).
- Natural Wind: Simulates natural breeze.
- Switch RGB Lights: Toggles RGB lighting.
- 1-6 Speed Control: Adjusts fan speed from 1 (lowest) to 6 (highest).
- Only Fan ON/OFF: Controls fan power independently.
- LED 3-Color Temperature Change: Cycles through 3000K (warm white), 4000K (neutral white), and 6000K (cool white).
- LED Light Dim UP/DOWN: Adjusts light brightness from 5% to 100%.
- Only Light ON/OFF: Controls light power independently.
- 2H/4H/8H Timer: Sets the fan to turn off automatically after 2, 4, or 8 hours.
Video: Demonstrates the various features and controls of the YOUKAIN 52-inch RGB Ceiling Fan, including fan speeds, light temperature, and RGB lighting.
4.2. Smartphone App Control
Control your fan and light conveniently from your smartphone using the "i-light pro" app. The app offers advanced features including 16 million colors, smart scheduling, and scene modes.
- Download App: Scan the QR code provided in the product packaging or search for "i-light pro" on Google Play (Android) or App Store (iPhone).
- Enable Bluetooth: Ensure Bluetooth is enabled on your smartphone.
- Pairing: Power on the fan. Open the "i-light pro" app, search for the fan model, and tap to connect.
- Control: Once connected, you can control the light (ON/OFF, brightness, 3-color temperature, 16 million RGB colors, scene modes) and fan (ON/OFF, 6-speed settings, reversible motor, timing, buzzer) directly from the app.

Image: The smartphone application interface, displaying options for lighting control (white light, colored light, scenes) and fan functions.
Video: Instructions on how to connect and use the "i-light pro" app to control the YOUKAIN Model-811 ceiling fan, demonstrating light and fan functions.
5. Maintenance
Regular maintenance ensures optimal performance and longevity of your ceiling fan.
- Cleaning: Periodically clean the fan blades and motor housing with a soft, damp cloth. Do not use abrasive cleaners or solvents.
- Tighten Screws: Check all screws and connections annually to ensure they are secure. Loose connections can cause noise or malfunction.
- Blade Balance: If the fan wobbles, check that all blades are securely attached and balanced. A balancing kit (not included) can be used if necessary.
- Light Kit: The LED light kit is integrated and not user-replaceable. Contact customer support if the light malfunctions.
6. Troubleshooting
Refer to this section for common issues and their solutions.
| Problem | Possible Cause | Solution |
|---|---|---|
| Fan does not start | No power to the fan; loose wiring; remote not paired. | Check circuit breaker. Ensure all wires are tightly connected. Re-pair the remote control (long press the "Fan OFF" button). |
| Fan wobbles | Loose blades; unbalanced blades; loose mounting bracket. | Ensure all blade screws are tight. Check mounting bracket for secure installation. Use a balancing kit if needed. |
| Light does not work | Loose light kit wiring; faulty LED driver. | Check light kit connections. If issue persists, contact customer support. |
| Remote control not working | Dead batteries; remote not paired; interference. | Replace batteries. Re-pair the remote. Ensure no obstructions between remote and fan. |
| App connection issues | Bluetooth off; fan not powered; app not updated. | Ensure phone Bluetooth is on. Verify fan has power. Update "i-light pro" app. Try restarting the app and fan. |
7. Specifications
Detailed technical specifications for the YOUKAIN 52-Inch RGB Ceiling Fan Model 52-YJ811.
| Feature | Detail |
|---|---|
| Model Name | YJ811 |
| Size | 52 inches |
| Product Dimensions | 52 x 52 x 17.31 inches |
| Material | Iron, Metal, Plastic (Plywood blades) |
| Blade Finish | Dual Finish: Matte Black / Wooden (Walnut) |
| Motor Type | DC Motor |
| Airflow Efficiency | Maximum 6344 CFM |
| Noise Level | Minimum 44 dB |
| Fan Speeds | 6-Speed Settings |
| Reversible Motor | Yes (Summer/Winter mode) |
| Light Source Type | Integrated LED |
| Light Output | 1400 Lumens, 21 Watts |
| Color Temperature | 3000K / 4000K / 6000K (Adjustable) |
| Brightness | 5% - 100% Dimmable |
| RGB Lighting | 16 Million Colors Adjustable |
| Control Method | Remote Control, App Control (Bluetooth) |
| Timer Function | 2H / 4H / 8H (Remote), Smart Scheduling (App) |
| Downrods Included | 6-inch and 10-inch |
| Certifications | ETL/DOE/FCC |
| Voltage | 110 Volts |
8. Warranty & Support
YOUKAIN provides comprehensive support for your product.
- Warranty: 2 years free replacement quality services.
- Customer Support: 24 hours a day technical support service.
- Contact: If you have any questions about installation or use, please contact YOUKAIN customer support. Refer to your purchase documentation for specific contact details.