Thermalright PA120 Digital ARGB
Thermalright Peerless Assassin 120 Digital ARGB CPU Cooler User Manual
Model: PA120 Digital ARGB | Brand: Thermalright
1. Introduction
This manual provides detailed instructions for the installation, operation, and maintenance of your Thermalright Peerless Assassin 120 Digital ARGB CPU Cooler. Please read this manual thoroughly before installation and retain it for future reference. This cooler features a dual-tower design with dual fans, 6 pure copper heat pipes, and a digital display for real-time CPU/GPU temperature and usage monitoring.
2. Safety Information
Always handle components with care to prevent damage. Ensure your system is powered off and unplugged before installation. Avoid touching the heatsink fins as they can be sharp. Keep small parts away from children. If you are unsure about any step, consult a qualified technician.
3. Package Contents
Verify that all items are present in your package:
- Thermalright Peerless Assassin 120 Digital ARGB CPU Cooler (Heatsink with Digital Top Cover)
- 2 x 120mm ARGB Fans
- Intel Mounting Brackets (LGA1851/1700/115X/1200)
- AMD Mounting Brackets (AM4/AM5)
- Intel Backplate (LGA1700/1851)
- Intel Spacers (LGA115X/1200, LGA1851/1700)
- AMD Spacers (AM4/AM5)
- Intel Screws
- AMD Screws
- Fan Y-Cable
- Thermal Compound
- Fan Clips (4 pieces)

Image: The Thermalright Peerless Assassin 120 Digital ARGB CPU Cooler shown with its various components, including mounting hardware for Intel and AMD platforms, thermal compound, and fan cables.
4. Setup and Installation
Follow these steps carefully for proper installation. An installation video is provided for visual guidance.
Video: Official installation guide for the Thermalright PA120 Digital series radiator, demonstrating the physical mounting process on a motherboard.
4.1. Intel LGA1700/1851 Installation
- Adjust the backplate mounting hole position to 1700 for LGA1700 motherboards.
- Install the backplate from the back side of the motherboard.
- Install the blue LGA1700/1851 spacers onto the backplate from the front side of the motherboard.
- Place the Intel brackets on the spacers and secure them with the Intel screws. Ensure the Intel screws pass through the LGA1700/1851 holes on the brackets.

Image: Illustrates the CPU compatibility for Intel LGA1851/1700/115X/1200 and AMD AM5/AM4 sockets.
4.2. AMD AM5/AM4 Installation
- Remove the motherboard's original plastic brackets. Keep the motherboard backplate.
- Install the four pink AMD spacers onto the motherboard.
- Place the two metal AMD brackets on the spacers and secure them with the provided AMD screws using a screwdriver.
4.3. Common Installation Procedures
- Apply thermal compound onto the CPU IHS (Integrated Heat Spreader).
- Remove the top panel from the heatsink before installing the heatsink onto the CPU.
- Remove the heatsink protective sticker from the base.
- Carefully place the heatsink onto the CPU, ensuring the heatsink bracket nuts align with the screws on the installed brackets.
- Tighten both nuts on the bracket with a screwdriver to apply mounting pressure. Tighten in an alternating pattern for even pressure.
- Install the fan clips onto the two 120mm fans.
- Attach the fans to the heatsink using the fan clips.
- Connect the fan 4-pin connectors to the fan Y-cable to synchronize fan speed.
- Connect the fan Y-cable to the motherboard's CPU_FAN header.
- For ARGB lighting, connect the 3-pin ARGB headers to sync the lighting effect.
- Connect the ARGB lighting cable to the motherboard's +5V 3-pin ARGB header.
- Install the top panel back onto the heatsink.
- Connect the USB cable from the cooler to a USB 2.0 header on the motherboard for digital display functionality.

Image: The dual-tower heatsink design with two 120mm ARGB fans, highlighting the cooling capabilities.
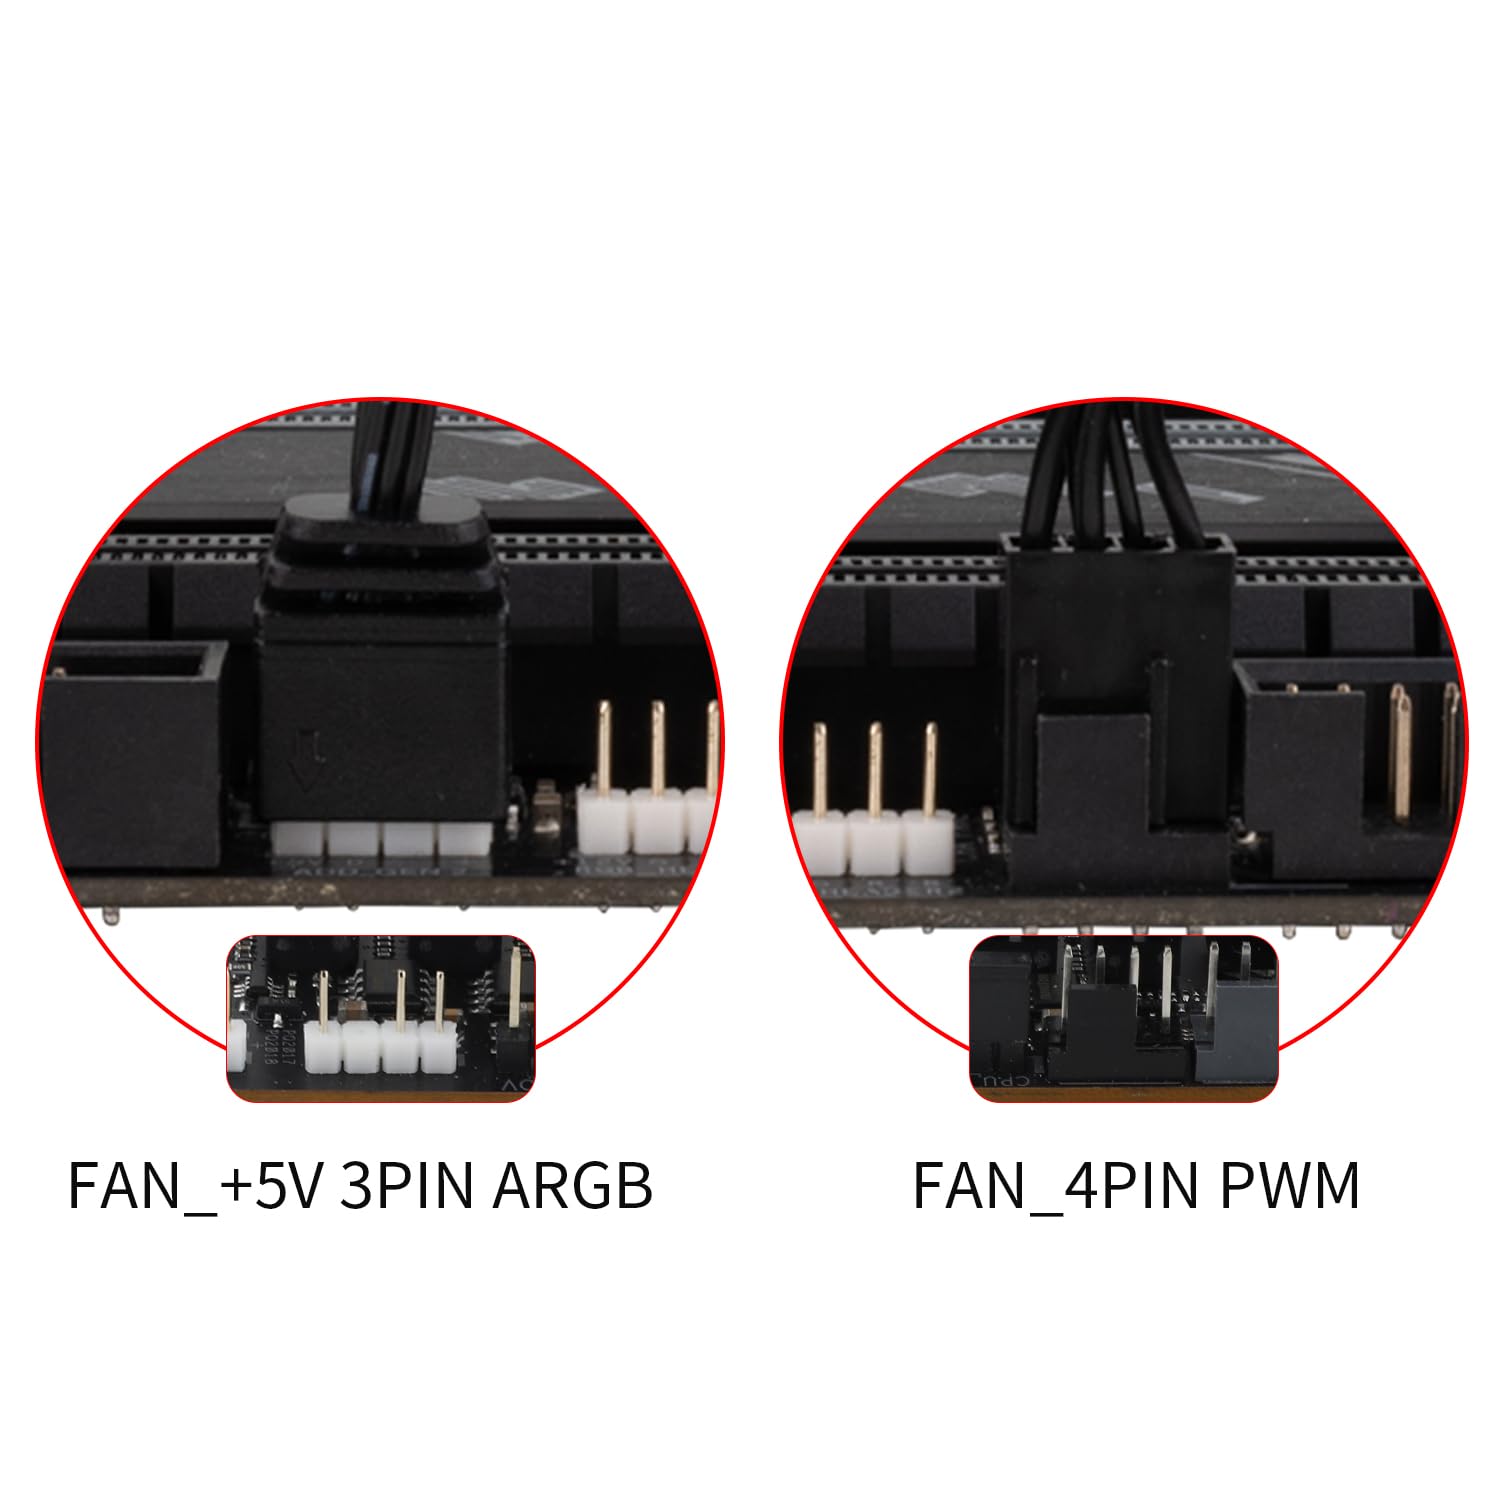
Image: Details of the 4-pin PWM fan connector and the +5V 3-pin ARGB connector for lighting control.
5. Operating the Digital Display and TRCC Software
The Peerless Assassin 120 Digital ARGB CPU Cooler features a magnetic top cover with a digital display. This display can show real-time CPU and GPU temperature and usage. To customize the display and its lighting effects, use the TRCC control software.
Video: Tutorial on how to install and use the TRCC software for the digital display, including color and display settings.
5.1. TRCC Software Installation
- Download the TRCC software from the official Thermalright website: www.thermalright.com/support/download/
- Unzip the downloaded file and run the installer.
- Follow the on-screen prompts to complete the installation.
- Double-click the TRCC shortcut to launch the software.
5.2. Digital Display Customization
Within the TRCC software, you can:
- Adjust Color: Manually adjust the display color using RGB values or select from a color ring.
- Apply Color Effects: Choose from different color effects like monochrome, breathe, color cycle, or rainbow.
- Dynamic Color Change: Set the display color to automatically change based on system load or temperature.
- Brightness Control: Drag the brightness slider to adjust the digital display's brightness.
- Individual Color Control: Deselect 'SELECT ALL' to change the color of individual display elements (CPU temp, GPU temp, etc.).
- Display Content: Click on the 'M' module to change the temperature or usage reading point if the displayed temperature is incorrect.
- Power On/Off: Click the power button within the software to switch the display on or off.
- Automatic Start: Enable 'Automatic start' to launch TRCC software at OS boot.

Image: The TRCC software interface showing options for color adjustment, effects, and display content selection for the digital screen.
6. Maintenance
To ensure optimal performance and longevity of your CPU cooler:
- Cleaning Fans: Periodically clean the fan blades and heatsink fins to remove dust buildup. Use compressed air or a soft brush. Ensure fans are not spinning during cleaning.
- Thermal Compound: Reapply thermal compound if you remove the heatsink from the CPU. Old thermal compound should be cleaned off thoroughly before applying new compound.
- Cable Management: Ensure all cables are properly routed and secured to prevent interference with fan operation or other components.
7. Troubleshooting
If you encounter issues with your CPU cooler, refer to the following common problems and solutions:
- Fans not spinning: Check if the fan Y-cable is securely connected to the motherboard's CPU_FAN header. Ensure the power supply is adequate.
- No ARGB lighting: Verify the 3-pin ARGB cable is correctly connected to the motherboard's +5V ARGB header. Check motherboard software for ARGB control.
- Digital display not working: Ensure the USB cable is connected to a USB 2.0 header on the motherboard. Confirm TRCC software is installed and running.
- High CPU temperatures: Check if the heatsink is properly mounted and tightened. Ensure sufficient thermal compound was applied. Verify fans are spinning at appropriate speeds. Clean any dust buildup.
- Incorrect temperature/usage readings on display: Use the TRCC software to adjust the 'M' module settings to select the correct reading point for your CPU/GPU.
8. Specifications
| Feature | Specification |
|---|---|
| Model | Peerless Assassin 120 Digital ARGB |
| Overall Size | 138 x 125 x 162mm (L x W x H) |
| Fan Size | 120 x 120 x 28mm |
| Fan Speed | 1850 RPM ±10% |
| Wind Pressure | 2.21 mm H2O |
| Air Volume | 88.89 CFM |
| Operating Noise | ≤25.6 dB(A) |
| Fan Power Supply Interface | 4-Pin PWM |
| ARGB Lighting Interface | 5V 3-Pin ARGB |
| Bearing Type | S-FDB Bearings |
| Heat Pipes | 6 x Pure Copper |
| Base Material | Pure Copper |
| Compatible Platforms | AMD: AM4/AM5; Intel: LGA1851/1700/1150/1151/1155/1156/1200 |
| Product Dimensions | 5.43 x 4.92 x 6.38 inches |
| Item Weight | 3.51 Pounds |
| Material | Aluminum (fins) |
| Voltage | 12 Volts (DC) |
9. Warranty and Support
Thermalright products come with a standard manufacturer's warranty. For specific warranty details, duration, and terms, please refer to the warranty card included with your product or visit the official Thermalright website. For technical support, troubleshooting assistance, or to download the latest TRCC software, please visit the Thermalright support page at www.thermalright.com/support/.
Ask a question about this manual
Ask about setup, troubleshooting, compatibility, parts, safety, or missing instructions. Manuals+ will review the question and use this page’s manual context to help answer it.