MELLCOM 10x20FT White
MELLCOM Motorized Louvered Pergola User Manual
Model: 10x20FT White
1. Introduction
Thank you for choosing the MELLCOM Motorized Louvered Pergola. This manual provides essential information for the safe assembly, operation, and maintenance of your new outdoor shelter. Designed for comfort and convenience, this pergola features a motorized louvered roof, integrated LED lighting, and retractable side screens, all controllable via remote or integrated post buttons. Its robust aluminum construction ensures durability and weather resistance, making it a perfect addition to your outdoor living space.

Figure 1.1: The MELLCOM Motorized Louvered Pergola (10x20FT White) illuminated at night, positioned next to a swimming pool, showcasing its integrated LED lighting and side screens.
2. Safety Information
Please read and understand all safety warnings and instructions before assembly and operation. Failure to follow these instructions may result in serious injury or property damage.
- Ensure the pergola is assembled on a level and stable surface. Anchoring to the ground is highly recommended for stability, especially in windy conditions.
- Keep children and pets away from the assembly area.
- Use appropriate safety gear during assembly, including gloves and eye protection.
- Do not operate the motorized components if any part is damaged or not functioning correctly.
- Disconnect power before performing any maintenance or cleaning.
- Do not climb on the pergola structure.
- In extreme weather conditions (heavy snow, strong winds), it is advisable to open the louvers to prevent snow accumulation and reduce wind resistance. Retract side screens during high winds.
3. Setup and Assembly
The MELLCOM Motorized Louvered Pergola is designed for straightforward assembly, typically requiring 5-8 hours with two people. All necessary pre-drilled bases and anchor bolts are included. A ladder is recommended for certain steps.
3.1 Unpacking and Inspection
- Carefully unpack all components and verify against the parts list provided in the separate assembly guide.
- Inspect all parts for any damage during shipping. Contact customer support immediately if any parts are missing or damaged.
3.2 Assembly Steps
Refer to the detailed step-by-step assembly guide included with your product for specific instructions. Key steps include:
- Assemble the main frame structure, including posts and beams.
- Install the louvered roof panels and their motorized mechanisms.
- Attach the side screens and their retraction systems.
- Connect the electrical components for the motor and LED lighting.
- Securely anchor the pergola to the ground using the provided anchor bolts.
Video 3.1: An official MELLCOM assembly video demonstrating key steps for setting up the Electric Louvered LED Pergola. This video provides a visual guide to complement the written instructions.

Figure 3.1: Detailed dimensions of the 10x20FT MELLCOM Motorized Louvered Pergola, including length, width, and height, crucial for planning your installation space.
4. Operating Instructions
Your MELLCOM pergola offers advanced electric control for its various features, ensuring maximum comfort and convenience.
4.1 Powering the Pergola
The pergola is equipped with both plug-in and high-efficiency solar charging capabilities. Excess solar energy is stored for uninterrupted operation, even during nighttime or cloudy days.

Figure 4.1: Illustration of the pergola's dual power system, highlighting the high-efficiency solar panel and the electric control mechanism for the side screens.
4.2 Louvered Roof Control
The louvered roof can be adjusted to control sunlight, shade, and provide waterproof shelter. Use the remote control or the integrated post buttons to open or close the louvers.
- Press the OPEN button on the remote or post control to fully open the louvers.
- Press the CLOSE button to fully close the louvers, creating a waterproof seal.
- Use the STOP button to pause the louvers at any desired angle for partial shade or ventilation.
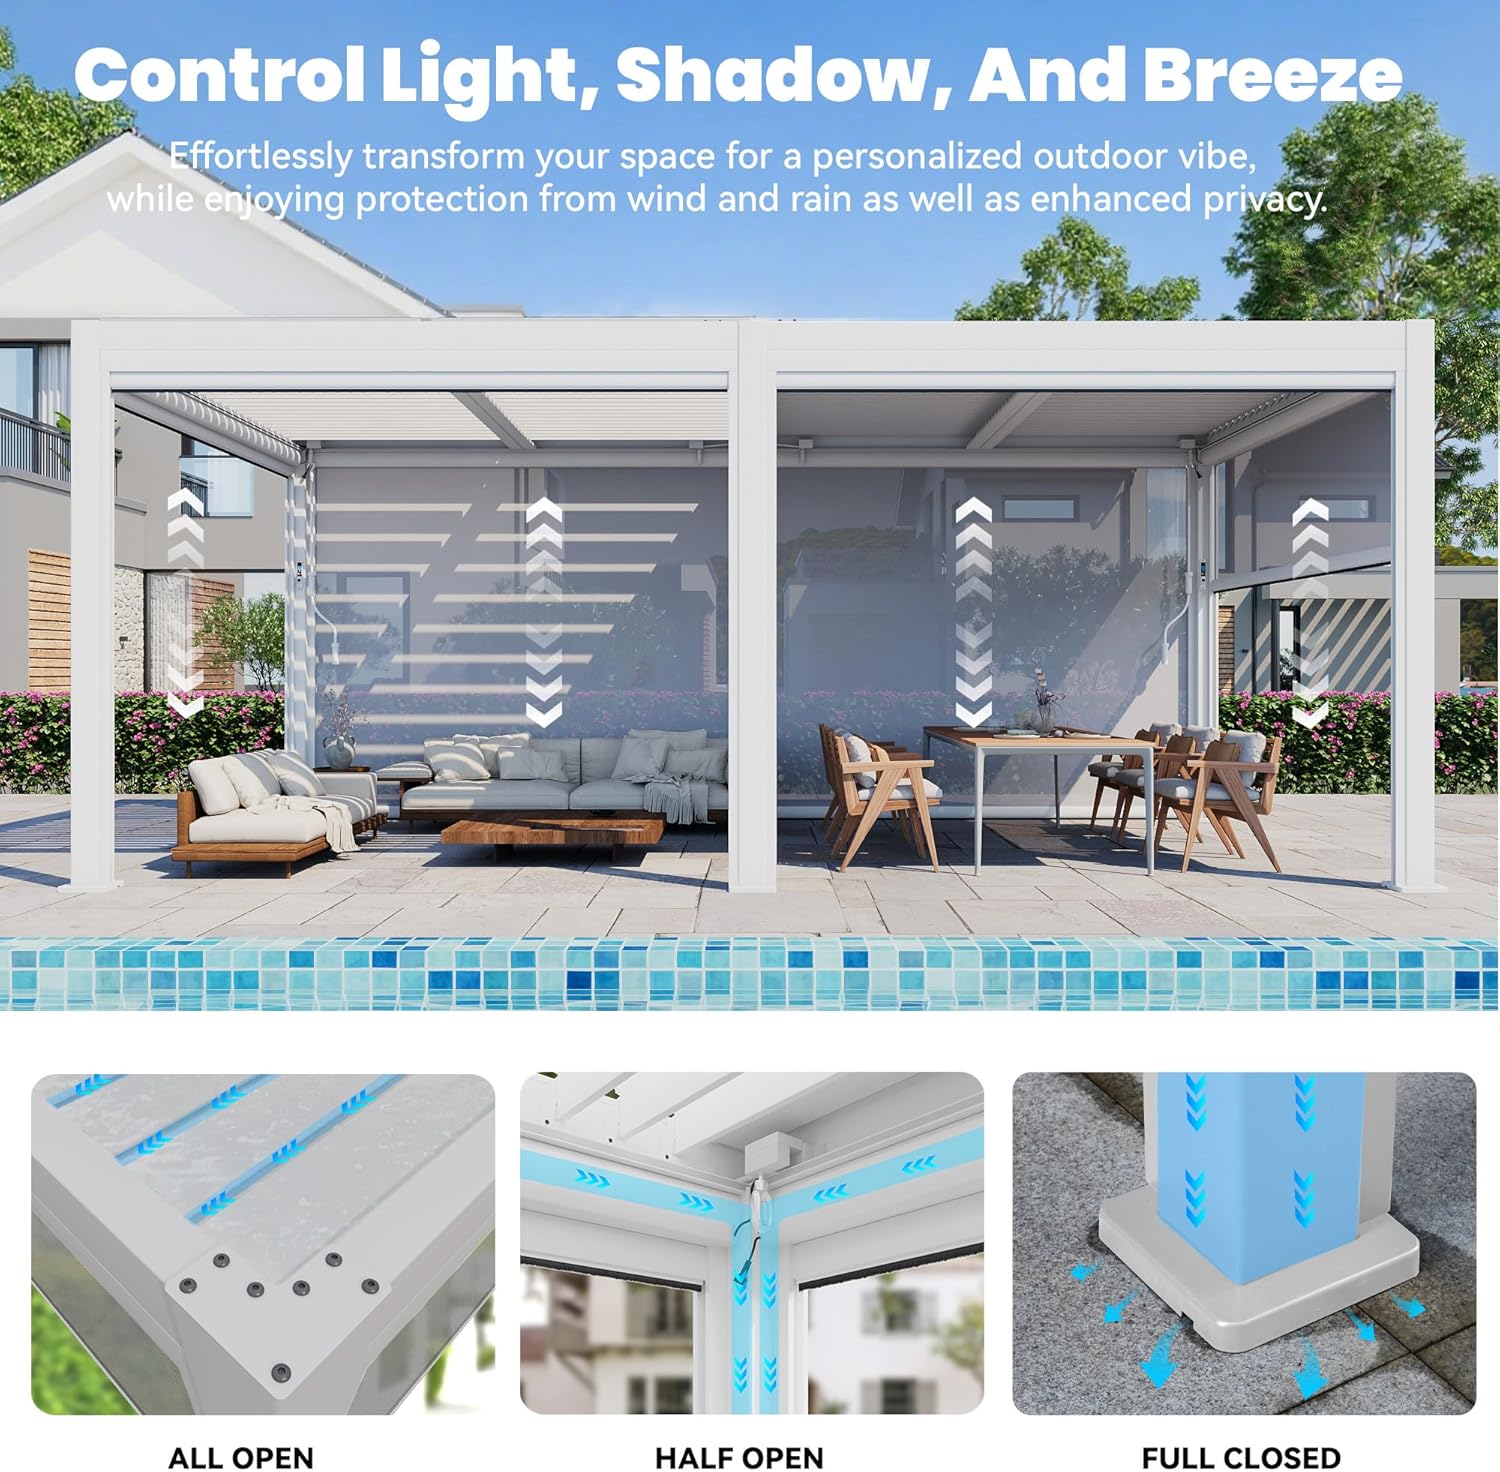
Figure 4.2: Visual representation of the louvered roof's adjustable positions: fully open for maximum sunlight, half open for partial shade and ventilation, and fully closed for complete weather protection.
4.3 Side Screen Operation
The six pull-down side screens offer privacy and protection from wind, rain, and sun. They can be controlled independently or simultaneously.
- Use the dedicated buttons on the integrated post control or remote to raise or lower each screen.
- The screens provide varying levels of privacy and light control depending on their position.
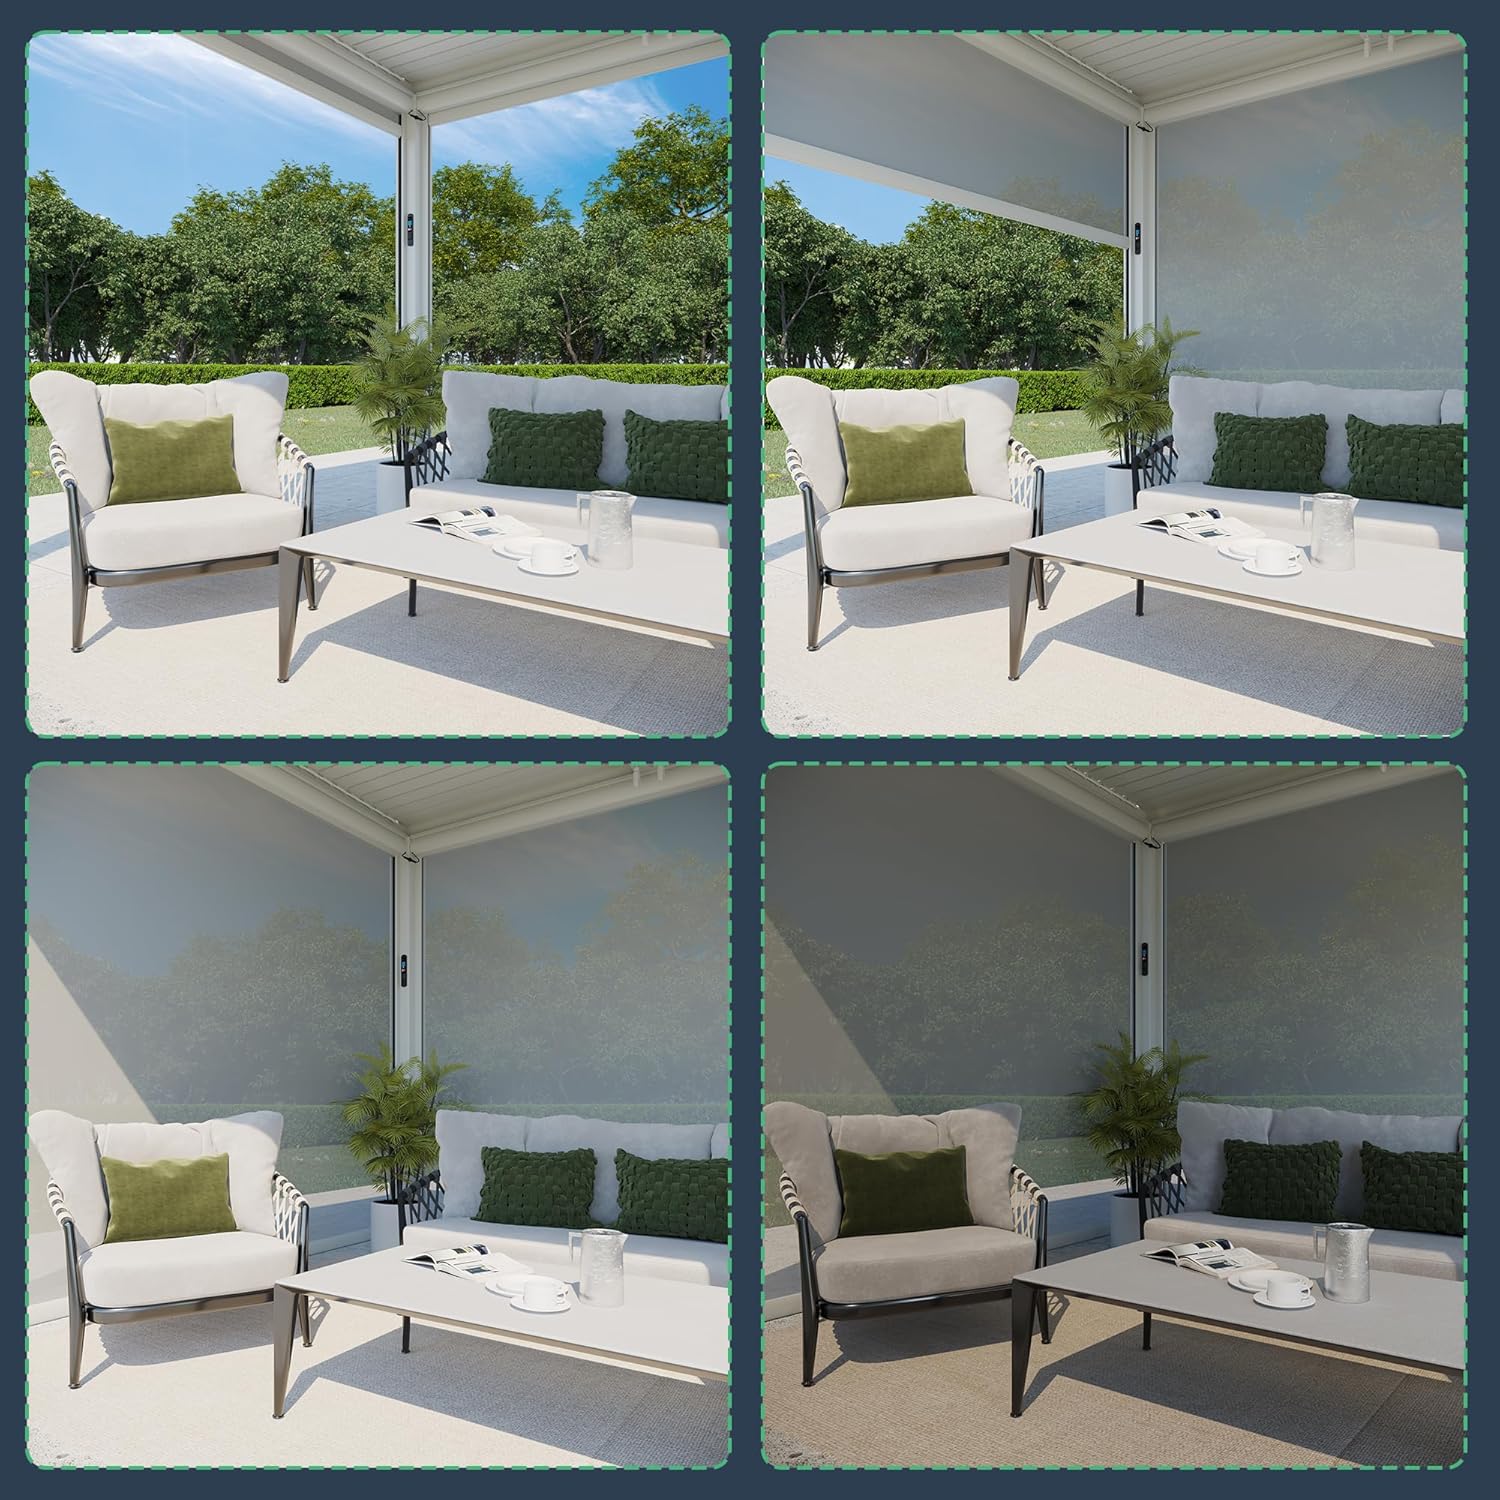
Figure 4.3: Demonstrates the versatility of the side screens, showing various levels of retraction to adjust privacy and environmental protection.
4.4 LED Lighting Control
The integrated LED lighting enhances your outdoor ambiance. You can adjust the color temperature and brightness.
- Use the remote control to cycle through different color temperature options (e.g., 3000K Warm, 4500K Neutral, 6000K Cool).
- Adjust the brightness to your preference using the dimmer controls.

Figure 4.4: The remote control for the LED lighting, illustrating the available color temperature options (3000K, 4500K, 6000K) and adjustable brightness settings.
5. Maintenance
Regular maintenance will ensure the longevity and optimal performance of your MELLCOM pergola.
- Cleaning: Clean the aluminum frame and roof panels with a soft cloth, mild soap, and water. Avoid abrasive cleaners or harsh chemicals that could damage the powder-coated finish.
- Drainage System: Periodically check the integrated drainage system for any blockages (leaves, debris) to ensure proper water flow. The system channels rainwater through the beams and down the legs.
- Motorized Components: Keep the motorized parts clean and free of debris. Do not lubricate unless specified by the manufacturer.
- Side Screens: Clean screens with a damp cloth. Ensure they are dry before retracting for extended periods to prevent mildew.
- Fasteners: Periodically check all bolts and fasteners to ensure they are tight. Re-tighten if necessary.

Figure 5.1: An illustration detailing the pergola's built-in drainage system, showing how water flows from the louvered roof through channels in the beams, down the posts, and discharges at the bottom, ensuring a dry space underneath.
6. Troubleshooting
This section addresses common issues you might encounter with your pergola.
| Problem | Possible Cause | Solution |
|---|---|---|
| Motorized roof/screens not responding. | No power, remote battery low, motor obstruction. | Check power connection. Replace remote batteries. Inspect for debris obstructing motor or louvers/screens. |
| Water pooling on roof when closed. | Drainage system clogged. | Clear any debris from the louver channels, beams, and leg drainage points. |
| LED lights not working. | Power issue, loose connection, remote battery low. | Check power supply. Ensure all electrical connections are secure. Replace remote batteries. |
| Pergola feels unstable. | Improper anchoring, loose fasteners. | Ensure the pergola is securely anchored to a level surface. Tighten all assembly fasteners. |
If you encounter issues not listed here or if the suggested solutions do not resolve the problem, please contact MELLCOM customer support for assistance.
7. Specifications
| Feature | Detail |
|---|---|
| Brand | MELLCOM |
| Model | 10x20FT White |
| Material | Aluminum |
| Style | Modern |
| Product Dimensions | 226.2"L x 115.4"W x 94.5"H |
| Item Weight | 725 Pounds |
| Water Resistance Level | Waterproof |
| Shape | Rectangular |
| Ultraviolet Light Protection | 100% |
| Assembly Required | Yes |
| Color | White |
| Wind Resistance | Up to 80 MPH |
| Power Source | Solar and Electric Powered |
| Lighting | Integrated LED (Adjustable Color & Brightness) |
| Side Screens | 6 Retractable Screens |
8. Warranty and Support
For warranty information, product support, or to order replacement parts, please contact MELLCOM customer service directly. Keep your purchase receipt and model number handy for faster service.
You can typically find contact information on the MELLCOM official website or through your original point of purchase.