1. Safety Instructions
Always read and understand all safety warnings, instructions, illustrations, and specifications provided with this power tool. Failure to follow all instructions listed below may result in electric shock, fire, and/or serious injury.
- Work Area Safety: Keep the work area clean and well-lit. Cluttered or dark areas invite accidents. Do not operate power tools in explosive atmospheres, such as in the presence of flammable liquids, gases, or dust.
- Electrical Safety: Power tool plugs must match the outlet. Never modify the plug in any way. Do not abuse the cord. Never use the cord for carrying, pulling, or unplugging the power tool. Keep the cord away from heat, oil, sharp edges, or moving parts.
- Personal Safety: Always wear eye protection. Use hearing protection when operating the tool for extended periods. Wear appropriate clothing; avoid loose clothing or jewelry. Secure long hair.
- Tool Use and Care: Do not force the power tool. Use the correct power tool for your application. Disconnect the plug from the power source before making any adjustments, changing accessories, or storing power tools.
- Service: Have your power tool serviced by a qualified repair person using only identical replacement parts. This will ensure that the safety of the power tool is maintained.
2. Package Contents
The Enventor 7.5 Amp Hammer Drill package includes the following items:
- 1 x Enventor 7.5 Amp Impact Drill (Blue)
- 1 x Auxiliary Handle (360° Rotatable)
- 1 x Chuck Key
- 1 x Depth Gauge
- 1 x User Manual
- 3 x 1/2 inch Drill Bits for Concrete
- 3 x 1 inch Drill Bits for Wood
- 3 x 3/8 inch Drill Bits for Steel
3. Product Overview
Familiarize yourself with the components of your Enventor Hammer Drill:

Figure 1: Enventor 7.5 Amp Hammer Drill with labeled parts.
- 1/2" Metal Keyed Chuck: Securely holds various drill bits.
- Depth Gauge: Allows for precise control over drilling depth.
- 360° Auxiliary Handle: Provides enhanced control and comfort during operation.
- 2-in-1 Function Switch: Toggles between drill mode and hammer drill mode.
- Heat Dissipation Hole: Ensures proper cooling of the motor during use.
- Forward and Reverse Switch: Changes the rotation direction of the chuck.
- Lock Button: Locks the variable speed trigger for continuous operation.
- Variable Speed Trigger: Controls the drilling speed based on pressure applied.
- Speed Adjustment Knob: Provides 12 adjustable speed levels for different applications.
- Ergonomic Rubberized Grip: Enhances user comfort and reduces fatigue.
4. Setup
4.1 Attaching the Auxiliary Handle
The 360° rotatable auxiliary handle can be adjusted for optimal comfort and control:
- Loosen the auxiliary handle by rotating it counter-clockwise.
- Slide the handle onto the front of the drill body.
- Adjust the handle to your desired position and angle.
- Tighten the handle by rotating it clockwise until secure.
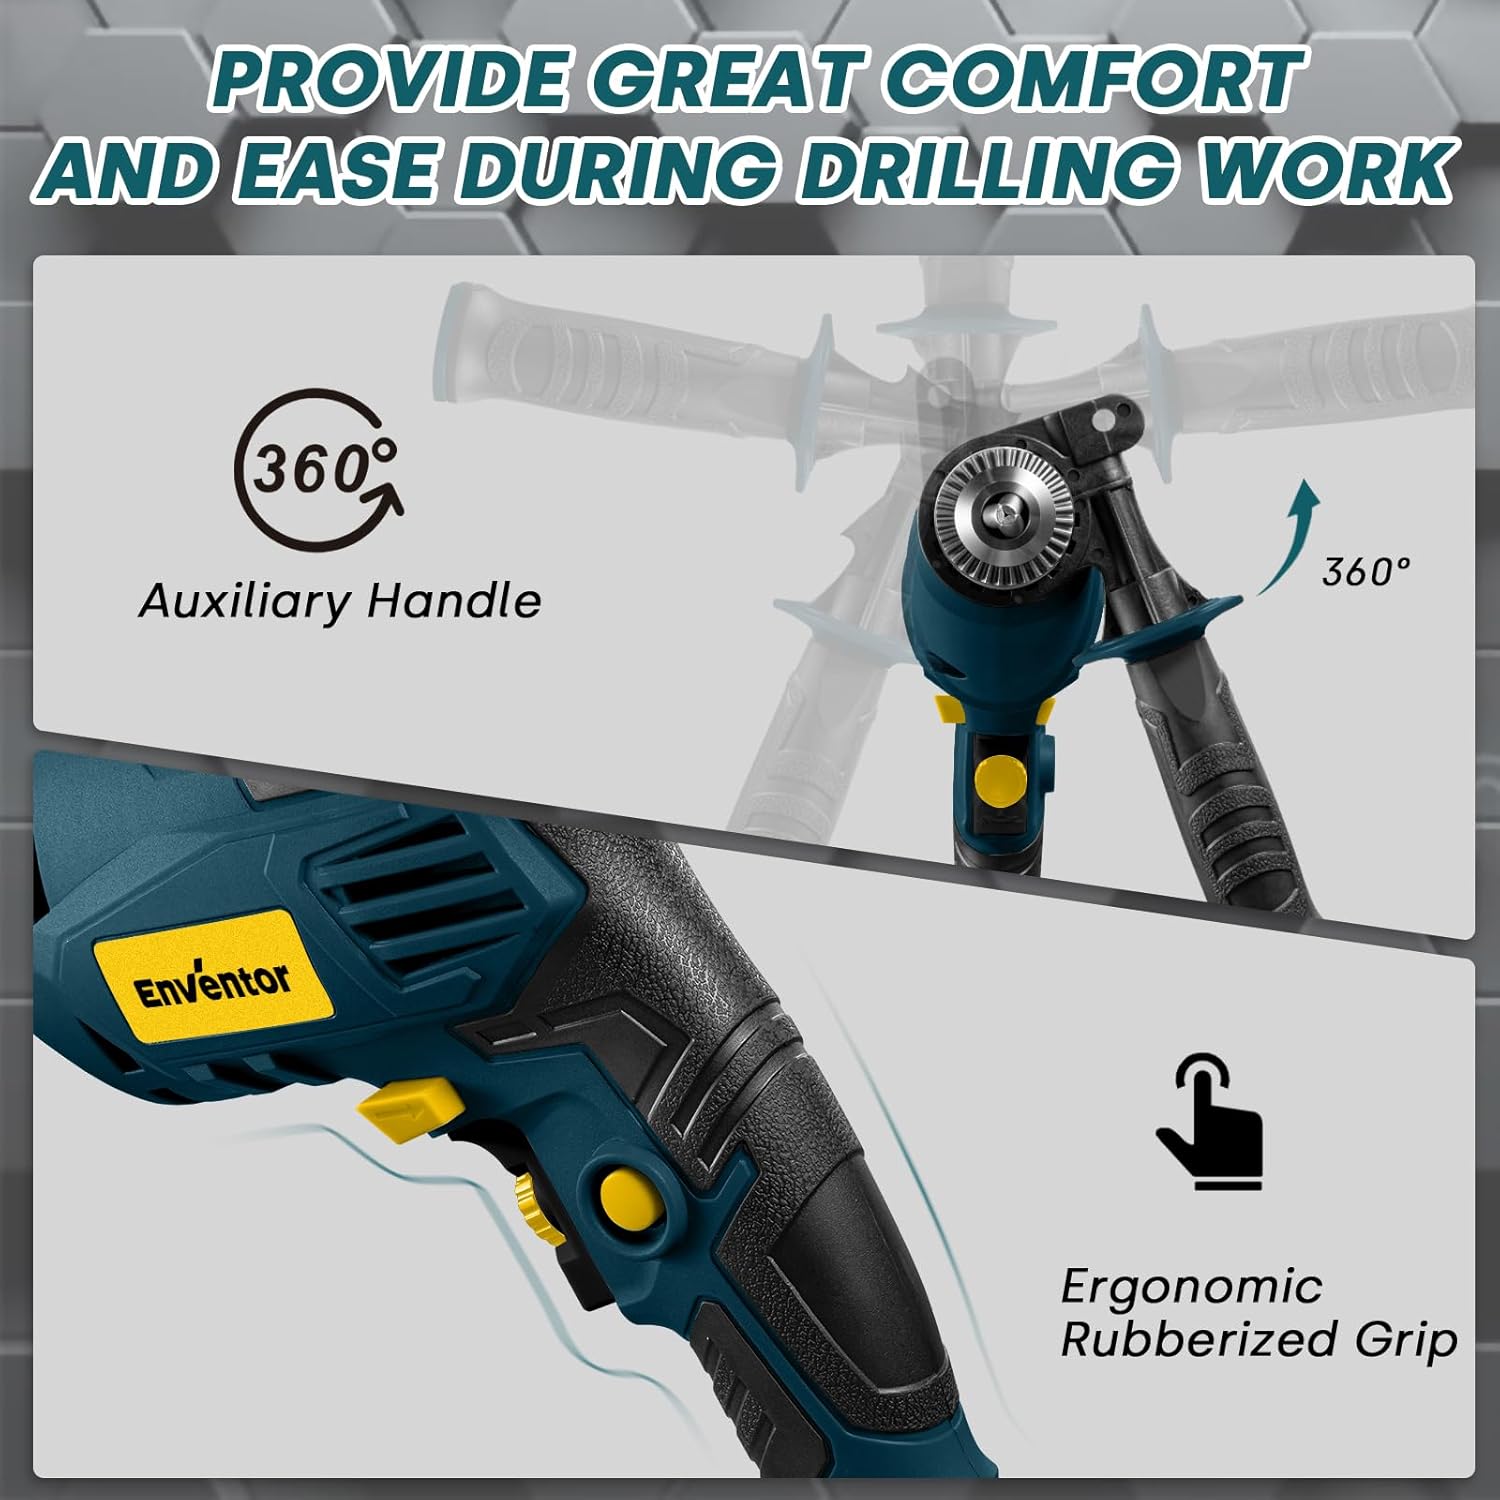
Figure 2: The auxiliary handle can be rotated 360 degrees for comfortable use.
4.2 Inserting and Changing Drill Bits
To insert or change a drill bit:
- Ensure the drill is unplugged from the power source.
- Insert the chuck key into one of the holes on the chuck.
- Rotate the chuck key counter-clockwise to open the chuck jaws.
- Insert the desired drill bit into the chuck, ensuring it is centered.
- Rotate the chuck key clockwise to tighten the chuck jaws securely around the drill bit. Remove the chuck key before operating the drill.
4.3 Connecting to Power
Plug the drill's power cord into a suitable 120V AC power outlet. Ensure the power outlet is grounded and meets local electrical codes.
5. Operating Instructions
5.1 Power On/Off and Variable Speed Control
The drill features a variable speed trigger and a speed adjustment knob:
- To turn the drill on, press the variable speed trigger. The speed increases as you apply more pressure.
- To turn the drill off, release the trigger.
- For continuous operation, press the lock button while the trigger is depressed. To release, press the trigger again.
- Use the speed adjustment knob to pre-select one of 12 speed levels (0-3000 RPM) suitable for your material and application.

Figure 3: Adjusting the speed and using the lock button for continuous operation.
5.2 Forward/Reverse Switch
The forward/reverse switch is located above the trigger. Push it to the left for forward rotation (drilling) and to the right for reverse rotation (removing screws or freeing a stuck bit).
5.3 2-in-1 Function Switch (Drill Mode / Hammer Drill Mode)
Select the appropriate mode using the gray dual-mode switch on top of the drill:
- Drill Mode: For drilling into softer materials like wood, metal, and plastic.
- Hammer Drill Mode: For drilling into harder materials such as lightweight concrete and brickwork. This mode combines rotation with a hammering action.

Figure 4: The 2-in-1 function switch allows selection between drill and hammer drill modes.
5.4 Maximum Drilling Capacities
The maximum drilling capacities for various materials are:
- Concrete: 1/2" (13 mm)
- Steel: 3/8" (10 mm)
- Wood: 1" (25 mm)
Note: This hammer drill is designed for lightweight applications and is not suitable for reinforced concrete stone.

Figure 5: Maximum drilling diameters for different materials.
5.5 Using the Depth Gauge
The depth gauge allows you to drill holes to a consistent, predetermined depth:
- Loosen the auxiliary handle.
- Insert the depth gauge into the hole on the auxiliary handle.
- Adjust the depth gauge to the desired drilling depth. The tip of the drill bit should extend beyond the end of the depth gauge by the desired depth.
- Tighten the auxiliary handle to secure the depth gauge in place.
5.6 Demonstration of Functions
Watch this video for a visual guide on the functions and accessory installation of a similar hammer drill:
Video 1: Demonstration of hammer drill functions and accessory installation.
6. Maintenance
6.1 Cleaning
Regular cleaning ensures optimal performance and extends the tool's lifespan:
- Always unplug the tool before cleaning.
- Use a soft, damp cloth to wipe down the exterior of the drill. Do not use harsh chemicals or abrasive cleaners.
- Keep the ventilation openings clear of dust and debris to prevent overheating. Use compressed air if necessary.
- Clean the chuck jaws regularly to ensure proper grip on drill bits.
6.2 Storage
When not in use, store the drill in a clean, dry, and secure location, out of reach of children. Protect it from direct sunlight and extreme temperatures.
7. Troubleshooting
If you encounter issues with your Enventor Hammer Drill, refer to the following common troubleshooting tips:
- Drill does not start: Check if the power cord is securely plugged into a working outlet. Ensure the trigger is fully depressed and the forward/reverse switch is not in the center (locked) position.
- Loss of power during operation: Verify that the power source is stable and not overloaded. Check for any visible damage to the power cord.
- Excessive vibration or noise: Ensure the drill bit is properly inserted and tightened in the chuck. Check if the auxiliary handle is securely fastened.
- Drill bit not cutting effectively: Confirm you are using the correct drill bit for the material. Ensure the drill is in the appropriate mode (Drill or Hammer Drill) and the speed setting is suitable.
For persistent issues, contact Enventor customer support.
8. Specifications
Detailed technical specifications for the Enventor 7.5 Amp Hammer Drill:
| Specification | Value |
|---|---|
| Brand | Enventor |
| Model Number | WD60190 |
| Power Source | Corded Electric |
| Voltage | 120 Volts |
| Wattage | 900 Watts |
| Amperage | 7.5 Amps |
| Maximum Rotational Speed | 3000 RPM |
| Maximum Chuck Size | 0.5 Inches (1/2 inch) |
| Material | Metal, Plastic |
| Item Weight | 2.5 kg |
| Product Dimensions | 26 x 6 x 25 cm |
| Batteries Required? | No |
| Country of Origin | China |
9. Warranty and Support
For warranty information, technical support, or replacement parts, please refer to the contact details provided in the original product packaging or visit the official Enventor website. Keep your purchase receipt as proof of purchase for warranty claims.