1. Introduction
This manual provides detailed instructions for the setup, operation, and maintenance of your SOVMIKU Vicohome 2K AI Solar Security Camera. Please read this manual thoroughly before using the product to ensure proper functionality and safety.
The SOVMIKU Vicohome 2K AI Solar Security Camera offers advanced surveillance features including 2K ultra-high-definition video, AI human detection, color night vision, two-way audio, and solar power capabilities for continuous operation. It integrates seamlessly with the Vicohome app for remote monitoring and control.
2. Package Contents
Verify that all items listed below are included in your package. If any items are missing or damaged, please contact customer support.
- Camera Body
- Mounting Bracket
- Solar Panel
- USB Cable
- User Manual
- Screws and Wall Plugs
- SIM Card & SD Card (if included in specific model variant)

Image: Contents of the SOVMIKU Vicohome Solar Security Camera package.
3. Setup
3.1 Initial Charging
Before first use, fully charge the camera using the provided USB cable. Connect the USB cable to the camera's USB-C port and a standard 5V/2A USB power adapter (not included).

Image: USB-C charging port and reset button on the camera.
3.2 Vicohome App Installation
Download the free "Vicohome" app from the Google Play Store or Apple App Store. Follow the in-app instructions to create an account and add your camera. The app allows for real-time monitoring, playback, and alert management.
3.3 MicroSD Card Installation (Optional)
The camera supports a built-in microSD slot for local storage, up to 128GB. Insert a compatible microSD card into the designated slot. Ensure the camera is powered off before inserting or removing the card.

Image: Inserting a microSD card into the camera.
4. Installation
4.1 Mounting the Camera
Choose a suitable location for your camera, ensuring it has a clear view of the area you wish to monitor and is within Wi-Fi range. Use the provided mounting bracket and screws to securely attach the camera to a wall or other stable surface.

Image: Installation steps for the camera and solar panel.
4.2 Solar Panel Placement
For optimal performance, install the solar panel in a location that receives direct sunlight for several hours each day. The panel should be angled to maximize sun exposure, especially during midday. The 9.8ft cable allows for flexible placement.

Image: Guide for optimal solar panel placement.
Ensure the "Auto-on After Charging" function is enabled in the app settings. This feature automatically powers on the device after charging if the battery was depleted.

Image: Vicohome app setting for 'Auto-on After Charging'.
5. Operating Instructions
5.1 Vicohome App Compatibility
The camera is designed for seamless integration with the Vicohome app, allowing you to manage multiple Vicohome-enabled devices from a single interface. You can view up to 4 cameras simultaneously.

Image: Vicohome app interface showing multiple camera views.
5.2 Motion Detection
The camera features a Passive Infrared (PIR) sensor for accurate motion detection. When a human or animal body passes, the PIR sensor triggers the camera and can activate a spotlight at night. You can enable push notifications in the Vicohome app to receive alerts on your smartphone or smartwatch.

Image: Motion detection alert on a smartphone.
5.3 Two-Way Audio
Utilize the built-in microphone and speaker for two-way communication. This allows you to speak with visitors or deter intruders directly through the Vicohome app.
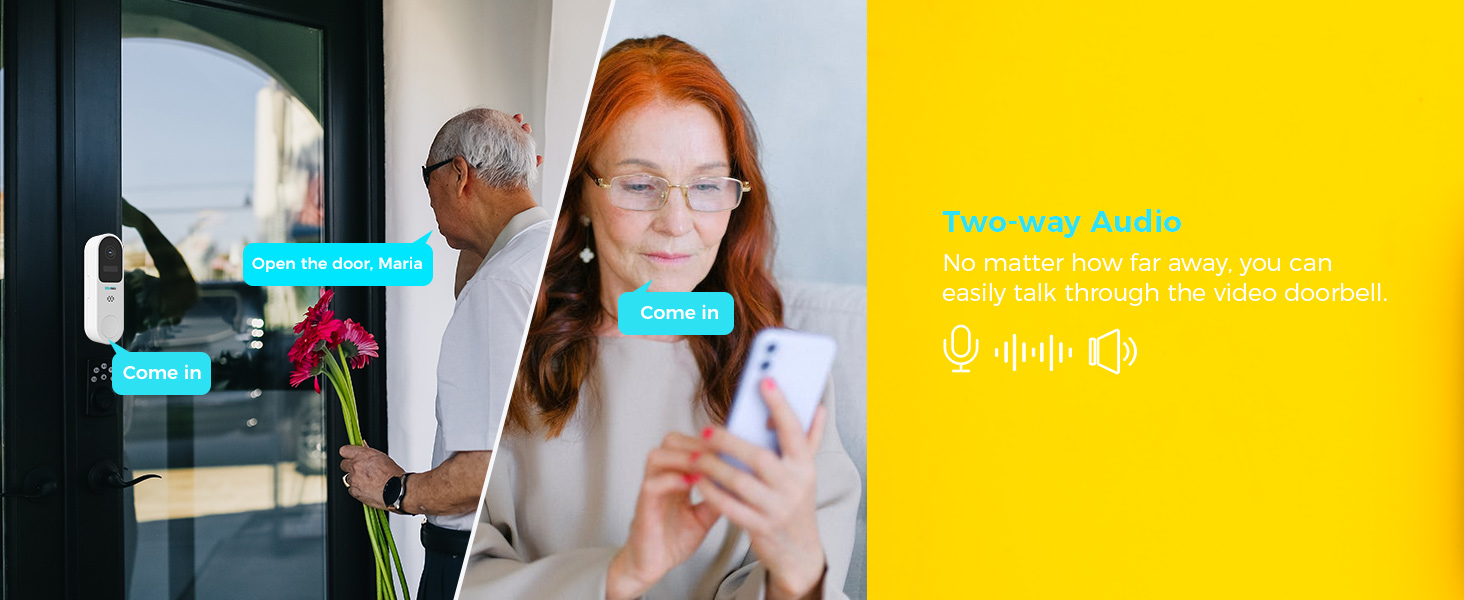
Image: Two-way audio communication via the camera and app.
5.4 Night Vision and Audible Flashlight Siren
The camera provides color night vision for clear images in low-light conditions. It also features an audible flashlight siren. If the alarm flash feature is enabled, the device will automatically flash when motion is detected. If the audible alarm is turned on, the camera will sound a siren.

Image: Camera demonstrating color night vision and flashlight siren at night.
5.5 Storage Options
The camera supports both local storage via a microSD card (up to 128GB) and encrypted cloud storage. Cloud storage ensures your recordings are safe even if the camera is physically compromised.

Image: Local and cloud storage options.
6. Maintenance
6.1 Solar Panel Care
Regularly wipe the solar panels to remove dust, dirt, and debris. This ensures optimal energy conversion and charging efficiency. In temperatures below 0°C, the solar panel's power output may be reduced.

Image: Solar panel maintenance reminder.
6.2 General Cleaning
Wipe the camera lens and body with a soft, dry cloth. Avoid using harsh chemicals or abrasive materials that could damage the device.
7. Specifications
- Resolution: 2K (3MP) Ultra-High Definition
- Sensor: High tolerance CMOS and PIR Sensor
- Night Vision: Color Night Vision
- Audio: Two-Way Audio
- Storage: MicroSD Card (up to 128GB), Cloud Storage
- Connectivity: Wi-Fi
- Weather Resistance: IP65 (Splash, water, and dust resistant)
- Operating Temperature: -10°C to 45°C (14°F to 113°F)
- Battery: Built-in high-capacity 21700 batteries (up to 9000mAh)
- Video Compression: H.265+ Efficient Encoding
8. Troubleshooting
8.1 Camera Not Connecting to Wi-Fi
- Ensure your Wi-Fi network is 2.4GHz. The camera may not support 5GHz networks.
- Check that the camera is within range of your Wi-Fi router.
- Verify your Wi-Fi password is entered correctly in the Vicohome app.
- Try resetting the camera by pressing the reset button for 5 seconds.
8.2 Poor Image Quality
- Clean the camera lens with a soft cloth.
- Ensure there are no obstructions in front of the lens.
- Check your internet connection speed. A stable connection is required for optimal streaming.
8.3 Solar Panel Not Charging
- Ensure the solar panel is placed in direct sunlight and is free from obstructions.
- Clean the surface of the solar panel regularly.
- Verify the cable connection between the solar panel and the camera is secure.
- Note that charging efficiency decreases in cold weather (below 0°C).
9. Warranty and Support
SOVMIKU offers a 180-day exchange policy. If you are not satisfied with the product, you can submit a request for a solution within 24 hours. For technical support or warranty claims, please contact SOVMIKU customer service via telephone or email. We aim to respond to all inquiries within 12 hours.
Your feedback is valuable for product improvement. We may offer new cameras or extra cameras as gifts for valuable suggestions.

Image: SOVMIKU 180-day exchange policy details.