
Introduction
This instruction manual provides detailed guidance for the assembly, operation, and maintenance of your RWYHG Farmhouse 6 Drawer Dresser Set of 2. Designed with a blend of farmhouse and modern style, this dresser offers ample storage and a classic aesthetic for various living spaces. Please read all instructions carefully before assembly and use to ensure safety and proper function.
Product Features
- Farmhouse Tall Dresser: Blends farmhouse and modern styles with a natural texture surface. Features 4 large drawers and 2 small drawers.
- Chic Design: Roman Column details and cylindrical base add rustic charm. Equipped with metal slide rails for smooth drawer operation and metal handles for easy access.
- Ample Storage Space: Overall dimensions: 31.5" x 15.75" x 43.5". Two different drawer sizes for organized storage of clothes, baby essentials, or other items. Suitable for bedroom, living room, entryway, and dorm.
- Sturdy & Durable: Crafted from quality material with a thickened desktop for heavier weight capacity. Features 4 solid wood legs for enhanced durability and stability.
- Careful Packaging & Easy Assembly: Packaged with thick foam, protective paper, and strong cardboard. Includes comprehensive assembly manual and marked parts/tools for straightforward setup.
Safety Information
- Always assemble the dresser on a soft, clean surface to prevent scratches.
- Ensure all screws and fasteners are securely tightened before use. Periodically check and re-tighten as needed.
- Do not allow children to climb on the dresser. Always use the included anti-tip kit to secure the dresser to a wall.
- Keep small parts and packaging materials away from children and pets to prevent choking hazards.
- Distribute weight evenly in drawers and on the top surface to prevent tipping.
- Lift with assistance when moving the assembled dresser due to its weight.
Package Contents
Before beginning assembly, verify that all components listed below are present and undamaged. If any parts are missing or damaged, please contact customer support.
- Dresser units (x2)
- All necessary hardware (screws, dowels, cam locks, etc.)
- Assembly tools (e.g., Allen wrench)
- Instruction Manual
- Anti-tip kit
Assembly Instructions
Follow these steps carefully for proper assembly. It is recommended to have two people for assembly.
- Unpack and Identify Parts: Carefully unpack all components and lay them out on a clean, soft surface. Refer to the parts list in your included manual to identify each piece.
- Assemble the Main Frame: Begin by connecting the side panels to the top and bottom panels using the provided hardware. Ensure all connections are snug but do not overtighten.
- Install Drawer Slides: Attach the metal drawer slides to the interior side panels of the dresser frame. Ensure they are level and facing the correct direction for drawer insertion.
- Assemble Drawers: For each drawer, connect the front, back, and side panels. Insert the bottom panel into the grooves. Attach the drawer slides to the sides of the assembled drawers.
- Attach Legs: Securely attach the solid wood gourd-shaped legs to the bottom of the dresser frame.
- Insert Drawers: Carefully slide each assembled drawer into its corresponding slot in the dresser frame. Ensure they glide smoothly.
- Attach Handles: Fasten the metal handles to the front of each drawer.
- Install Anti-Tip Kit: For safety, attach the anti-tip kit to the back of the dresser and secure it to a wall stud according to the separate anti-tip kit instructions.
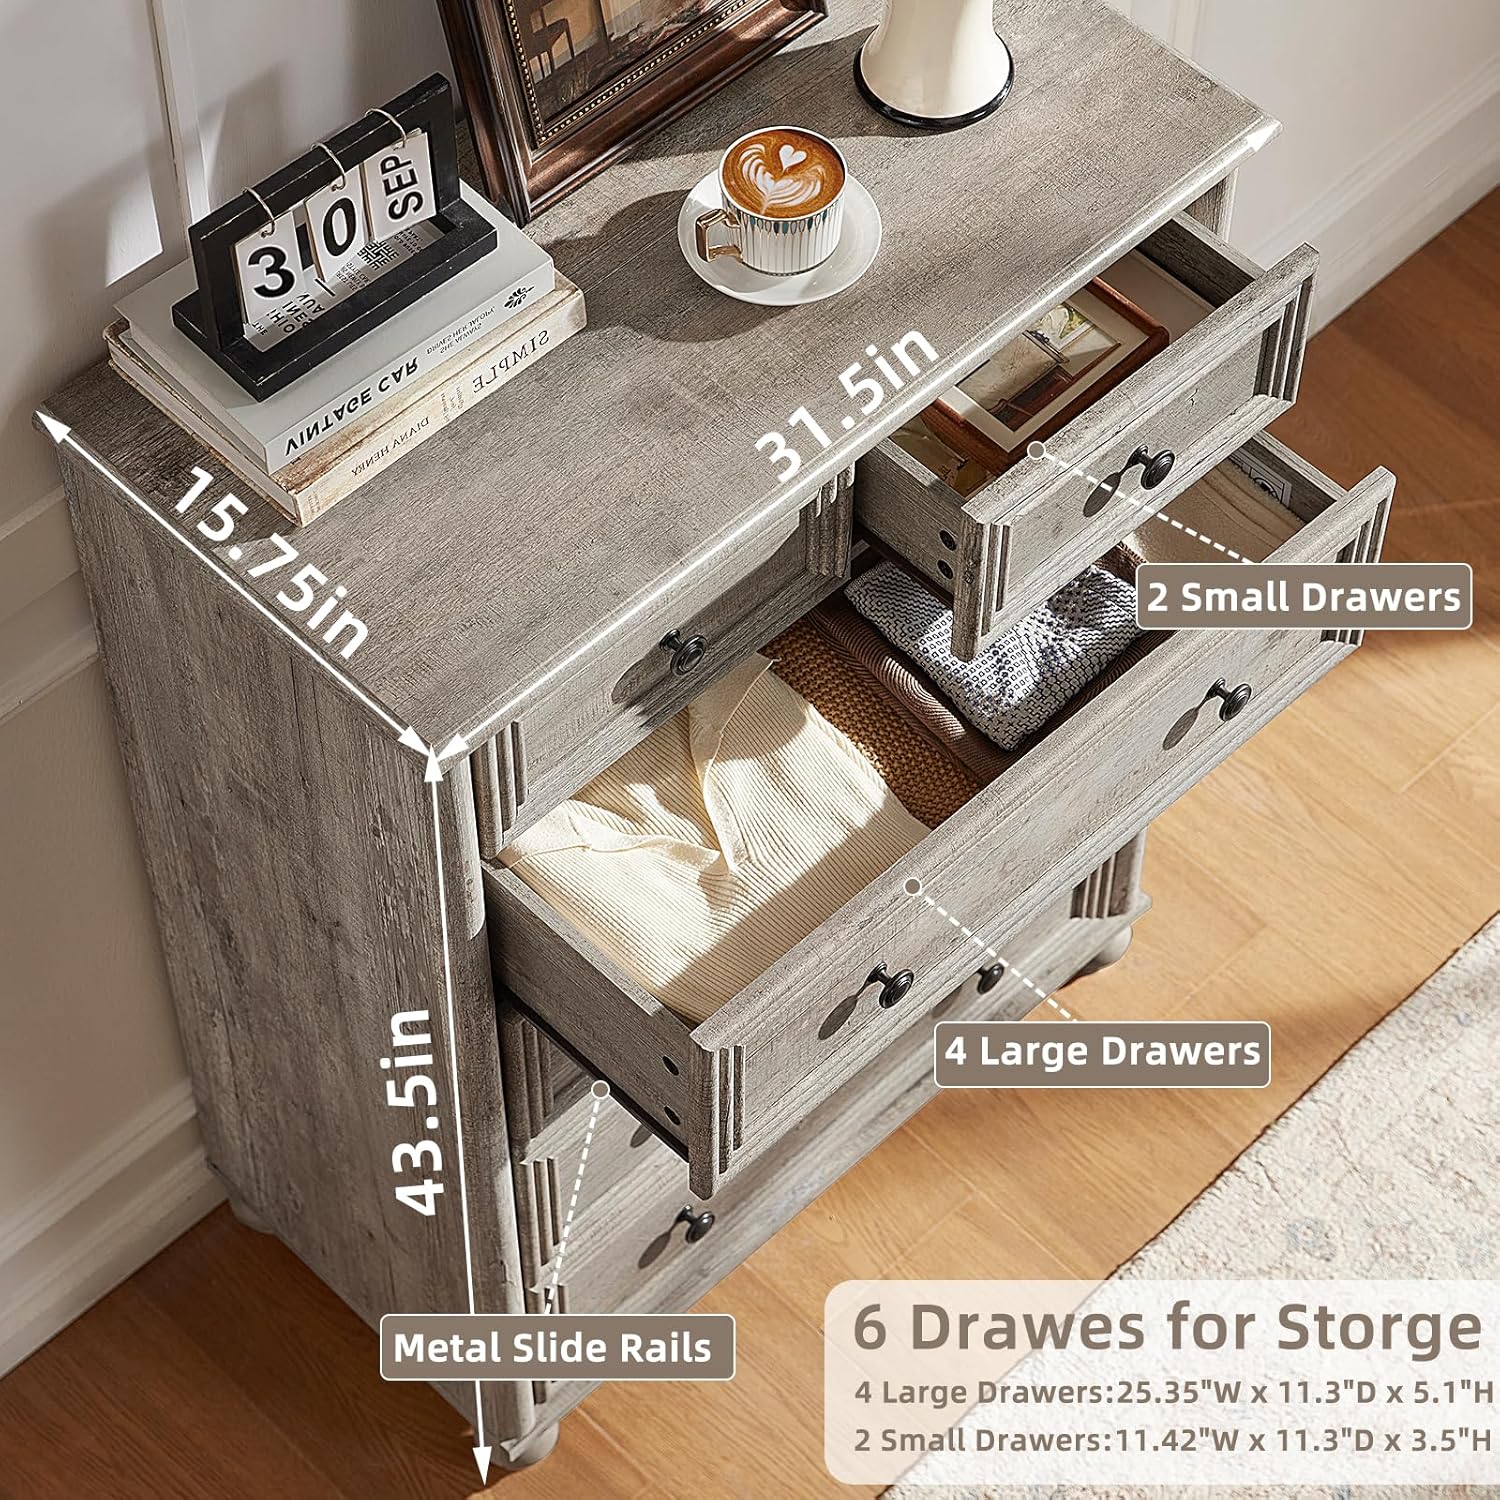
Figure 1: Dresser dimensions and drawer configuration.

Figure 2: Key design features including desktop thickness, Roman column texture, and leg design.

Figure 3: Detail of the metal drawer slide rails.
Operating Instructions
To ensure the longevity and smooth operation of your dresser:
- Opening and Closing Drawers: Use the metal handles to gently pull and push drawers. Avoid forcing drawers, especially if they feel stiff.
- Weight Distribution: Distribute items evenly within drawers. Avoid overloading drawers, as this can strain the slides and frame. The top surface can hold decorative items, but avoid excessive weight.
- Placement: Place the dresser on a level surface to prevent wobbling and ensure proper drawer alignment.
Maintenance
Regular maintenance will help preserve the appearance and function of your dresser:
- Cleaning: Wipe surfaces with a soft, damp cloth. Avoid using harsh chemicals, abrasive cleaners, or polishes that may damage the finish.
- Hardware Check: Periodically check all screws, bolts, and fasteners to ensure they are tight. Re-tighten as necessary to maintain stability.
- Drawer Slides: If drawers become stiff, a small amount of silicone lubricant can be applied to the metal slides.
- Sunlight Exposure: Avoid prolonged exposure to direct sunlight to prevent fading or discoloration of the wood finish.
Troubleshooting
| Problem | Possible Cause | Solution |
|---|---|---|
| Dresser is wobbly | Uneven floor; loose hardware | Adjust leg levelers (if applicable) or place shims under legs. Check and tighten all assembly screws. |
| Drawers stick or do not close smoothly | Misaligned drawer slides; overloaded drawer; debris in slides | Ensure drawer slides are correctly installed and aligned. Reduce contents of the drawer. Clean debris from slides and apply silicone lubricant if needed. |
| Drawer front is loose | Loose screws connecting handle or drawer front | Tighten screws on the inside of the drawer front that secure the handle or the front panel. |
Specifications
| Feature | Detail |
|---|---|
| Brand | RWYHG |
| Material | Wood |
| Finish Type | Wood |
| Product Dimensions (D x W x H) | 31.5" x 15.75" x 45" |
| Number of Drawers | 12 (6 per dresser unit) |
| Item Weight | 185 Pounds (for the set) |
| Mounting Type | Manual installation |
| Additional Features | Farmhouse style |
| Number of Pieces | 2 (dresser units) |
| Color | Gray Oak |
| Shape | Rectangular |
| Room Type | Bedroom, Hallway, Living Room, Office |
| Required Assembly | Yes |
Warranty and Support
For any questions regarding assembly, missing parts, or product defects, please contact RWYHG customer support. Refer to your purchase documentation for specific warranty details and contact information. Please retain your proof of purchase for warranty claims.