Introduction
This manual provides detailed instructions for the installation, operation, and maintenance of your Generic 36V/48V 22A E-Bike Brushless Controller. This controller is designed for 500W e-bike motors and features a square wave output, waterproof connectors, and an aluminum alloy casing for efficient heat dissipation. It is compatible with KT LCD displays.
Key Features:
- Sine Wave Technology: Ensures improved efficiency and smoother motor operation.
- Aluminum Alloy Design: Protects internal circuits and enhances heat dissipation.
- Waterproof Connectivity: Features secure, waterproof connectors for reliable performance in various conditions.
- Enhanced Riding Experience: Provides sensitive speed control and responsive braking.
Safety Information
Please read all safety instructions carefully before installation and operation. Failure to follow these instructions may result in electric shock, fire, or serious injury.
- Always disconnect the e-bike battery before performing any installation, maintenance, or repair work.
- Ensure all connections are secure and properly insulated to prevent short circuits.
- Do not expose the controller to extreme temperatures, direct sunlight for prolonged periods, or corrosive environments.
- Avoid disassembling the controller. Unauthorized modifications will void the warranty and may cause damage.
- Keep the controller away from water and moisture, despite its waterproof connectors, to ensure optimal performance and longevity.
Product Components and Connections
The controller features several waterproof connectors designed for specific functions. Proper identification and connection are crucial for correct operation.
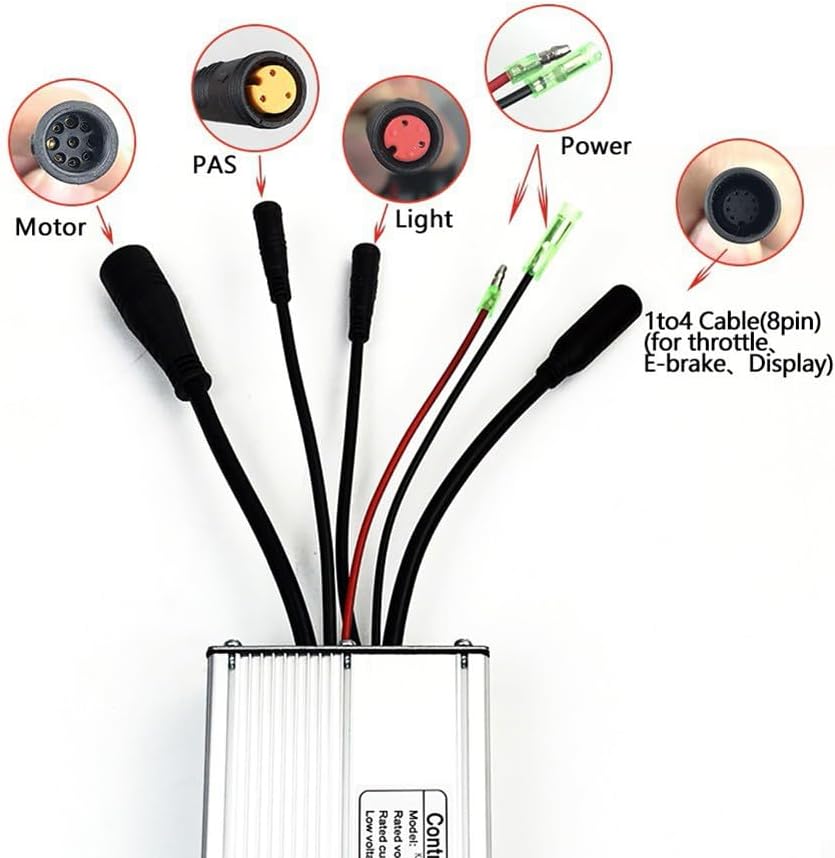
Image 1: Overview of the controller and its various waterproof connectors. This image shows the main unit with cables extending, each terminating in a distinct connector type, clearly labeled for Motor, PAS, Light, Power, and the 1-to-4 cable for throttle, e-brake, and display.
- Motor Connector (9-pin waterproof): Connects to the e-bike motor.
- PAS Connector (3-pin waterproof): Connects to the Pedal Assist System sensor.
- Light Cable: For connecting e-bike lights.
- Power Cable: Connects to the e-bike battery.
- 1-to-4 Cable (8-pin): This cable typically branches out to connect the throttle, e-brake levers, and the display unit.

Image 2: Detailed view of individual connector types. This image provides a closer look at each connector, showing their distinct shapes and pin configurations, making it easier to identify them during installation.
Setup and Installation
Follow these steps to properly install the brushless controller onto your e-bike. Ensure the e-bike battery is disconnected before starting.
- Mount the Controller: Securely mount the controller to your e-bike frame in a location that is protected from physical damage and allows for good airflow for heat dissipation.
- Connect the Motor: Connect the 9-pin waterproof motor cable from the controller to your e-bike motor. Ensure the connection is firm and fully seated.
- Connect the PAS Sensor: Attach the 3-pin waterproof PAS cable to your e-bike's Pedal Assist System sensor.
- Connect the Power: Connect the power cable from the controller to your e-bike battery. Pay close attention to polarity (positive to positive, negative to negative).
- Connect 1-to-4 Cable: Connect the 8-pin 1-to-4 cable to your throttle, e-brake levers, and the KT LCD display. This controller must be used with a KT display (e.g., KT LED790-900S, LCD1-LCD8 series).
- Connect Lights (Optional): If your e-bike has lights, connect them to the designated light cable from the controller. The headlight function is controlled via the display.
- Secure Cables: Use cable ties or similar fasteners to neatly secure all cables, preventing them from interfering with moving parts or getting damaged.
- Final Check: Double-check all connections to ensure they are correct and secure before reconnecting the e-bike battery.

Image 3: Side view of the controller with cables. This image illustrates how the cables extend from the controller body, providing a visual reference for cable management and connection points.
Operating Instructions
Once the controller is correctly installed and connected to a compatible KT display, you can begin operating your e-bike.
- Power On: Turn on your e-bike system using the power button on your KT display.
- Speed Setting: Adjust the speed settings (1-4.2V) via your KT display. Refer to your specific KT display manual for detailed instructions on changing assistance levels and speed modes.
- Throttle Control: Use the throttle for direct power application, if installed. The controller provides sensitive and responsive throttle control.
- Pedal Assist System (PAS): Engage the PAS by pedaling. The controller will provide motor assistance based on your selected assistance level.
- Braking: The controller offers sensitive control of braking. When e-brake levers are connected, they will cut off motor power immediately upon activation.
- Headlight Function: If connected, the headlight can be switched on/off directly from your KT display.
Maintenance
Regular maintenance helps ensure the longevity and optimal performance of your e-bike controller.
- Keep Clean: Periodically clean the exterior of the controller with a dry or slightly damp cloth. Avoid using harsh chemicals or abrasive materials.
- Check Connections: Regularly inspect all cable connections for tightness and signs of wear or corrosion. Ensure waterproof connectors are properly sealed.
- Heat Dissipation: Ensure the controller's aluminum alloy casing is not obstructed, allowing for proper heat dissipation. Avoid covering it with insulating materials.
- Environmental Protection: While the connectors are waterproof, avoid submerging the controller in water. Store your e-bike in a dry, temperate environment when not in use.
Troubleshooting
If you encounter issues with your controller, refer to the following common problems and solutions.
| Problem | Possible Cause | Solution |
|---|---|---|
| Motor not responding | Loose motor connection, battery low, display error, faulty throttle/PAS. | Check all motor and power connections. Ensure battery is charged. Check display for error codes. Test throttle/PAS functionality. |
| Intermittent power | Loose power cable, damaged wiring, overheating. | Inspect power cables for damage and ensure secure connection. Allow controller to cool down if it feels hot. |
| Display not turning on | Controller not receiving power, display cable loose/damaged. | Verify battery connection to controller. Check the 1-to-4 cable connection to the display. |
| Controller feels excessively hot | Overload, insufficient airflow, prolonged high power usage. | Reduce load on the motor. Ensure controller mounting allows for adequate airflow. Avoid continuous high power output. |
If problems persist after attempting these solutions, please contact customer support.
Specifications
Technical specifications for the 36V/48V 22A E-Bike Brushless Controller:
- Product Name: 36V/48V 22A E-bike Brushless Controller Square Wave 500W
- Material: Aluminum alloy
- Size: Approximately 13 x 7 x 4 cm
- Weight: Approximately 375g
- Maximum Current: 22 ± 1A
- Power: 500W
- Rated Voltage: DC36V/48V
- Speed Setting: 1-4.2V
- Rated Current: 11A
- Brake Input: Low level
- Low Voltage Protection: DC30/40 ± 0.5V
- Compatibility: Must be used with a KT display (e.g., KT LED790-900S, LCD1-LCD8 series).

Image 4: Top view of the controller with specification label. This image displays the product label, which includes model information and key electrical specifications, serving as a quick reference.
Warranty and Support
This product comes with a standard manufacturer's warranty. For specific warranty details, including duration and coverage, please refer to the documentation provided at the time of purchase or contact the seller directly.
For technical support, troubleshooting assistance beyond this manual, or warranty claims, please contact the retailer or manufacturer through their official support channels. Ensure you have your purchase details and product model information readily available.