1. Introduction
This manual provides detailed instructions for the installation, operation, and maintenance of your Filterelated 4-Stage Aquarium RO/DI System. This system is designed to produce high-purity deionized water, essential for maintaining a healthy aquatic environment in both freshwater and saltwater aquariums. Please read this manual thoroughly before installation and use to ensure proper function and longevity of the product.
2. Product Overview
The Filterelated 4-Stage Aquarium RO/DI System is a comprehensive water purification unit engineered to reduce total dissolved solids (TDS) and various contaminants from your tap water. It is specifically designed to meet the stringent water quality requirements for aquariums.
2.1 Key Features
- 4-Stage Filtration: Utilizes a combination of sediment, carbon, reverse osmosis, and deionization filters.
- 100 GPD Capacity: Produces up to 100 gallons per day of purified water at 60 psi.
- Low TDS Output: Designed to achieve ultra-pure water with 0 TDS.
- Contaminant Reduction: Effectively reduces arsenic, lead, fluoride, mercury, cadmium, and other impurities.
- Flushing Valve: Integrated valve for easy RO membrane flushing to extend its lifespan.
- Quick Connections: Simplifies filter cartridge removal and replacement.
- Compact Design: Suitable for installation in various locations, including under cabinets or in confined spaces.
2.2 Filtration Stages
The system employs a multi-stage purification process:
- Stage 1: PP Cotton (Sediment Filter)
Removes dirt, rust, sand, and other large particulate matter. - Stage 2: Activated Carbon Cartridge (GAC Filter)
Adsorbs chlorine, chloramines, volatile organic compounds (VOCs), and other chemicals that cause bad taste and odor. - Stage 3: RO Reverse Osmosis Membrane (100 GPD)
Filters water down to 0.0001 micron, rejecting dissolved solids, heavy metals, and other microscopic impurities. This membrane is NSF certified. - Stage 4: DI Resin Filter (Mixed-Bed Indicator Resin)
Polishes the water to achieve ultra-low or 0 TDS output, crucial for sensitive aquatic environments.

Image 1: Diagram of the 4-stage Premium RO+DI Filtration, showing the sequence of PMB (Sediment), GAC (Activated Carbon), RO Membrane, and DI Resin filters.

Image 2: The complete Filterelated 4-Stage Aquarium RO/DI System, showcasing its compact design and the individual filter cartridges. An additional DI resin filter is displayed alongside, emphasizing its role in achieving ultra-pure water.
3. Setup and Installation
Before beginning installation, ensure all components are present and undamaged. The system includes all necessary accessories for operation, including clips and expansion screws for wall mounting, and a 13-foot hose for custom length adjustments.
3.1 Unpacking and Component Identification
Carefully unpack the system and identify the following components:
- Main RO/DI unit with pre-installed filters (Sediment, GAC, RO Membrane, DI Resin)
- Flushing valve
- Water inlet and outlet tubing
- Mounting clips and screws
- 13-foot hose
- User manual
3.2 Installation Steps
- Choose a Location: Select a suitable location for the system, such as under a cabinet or mounted on a wall. Ensure it is close to a cold water source and a drain for wastewater.
- Mount the Unit: Use the provided clips and expansion screws to securely mount the RO/DI unit to a wall, if desired.
- Connect Water Inlet: Connect the water inlet line (typically blue or marked 'Water Inline') to your cold water supply. Ensure only cold water enters the system.
- Connect Wastewater Line: Connect the wastewater line (typically black or marked 'Waste Water') to a suitable drain.
- Connect Filtered Water Line: Connect the filtered water line (typically white or marked 'Filtered Water') to your collection container.
- Check Connections: Verify all connections are secure to prevent leaks.
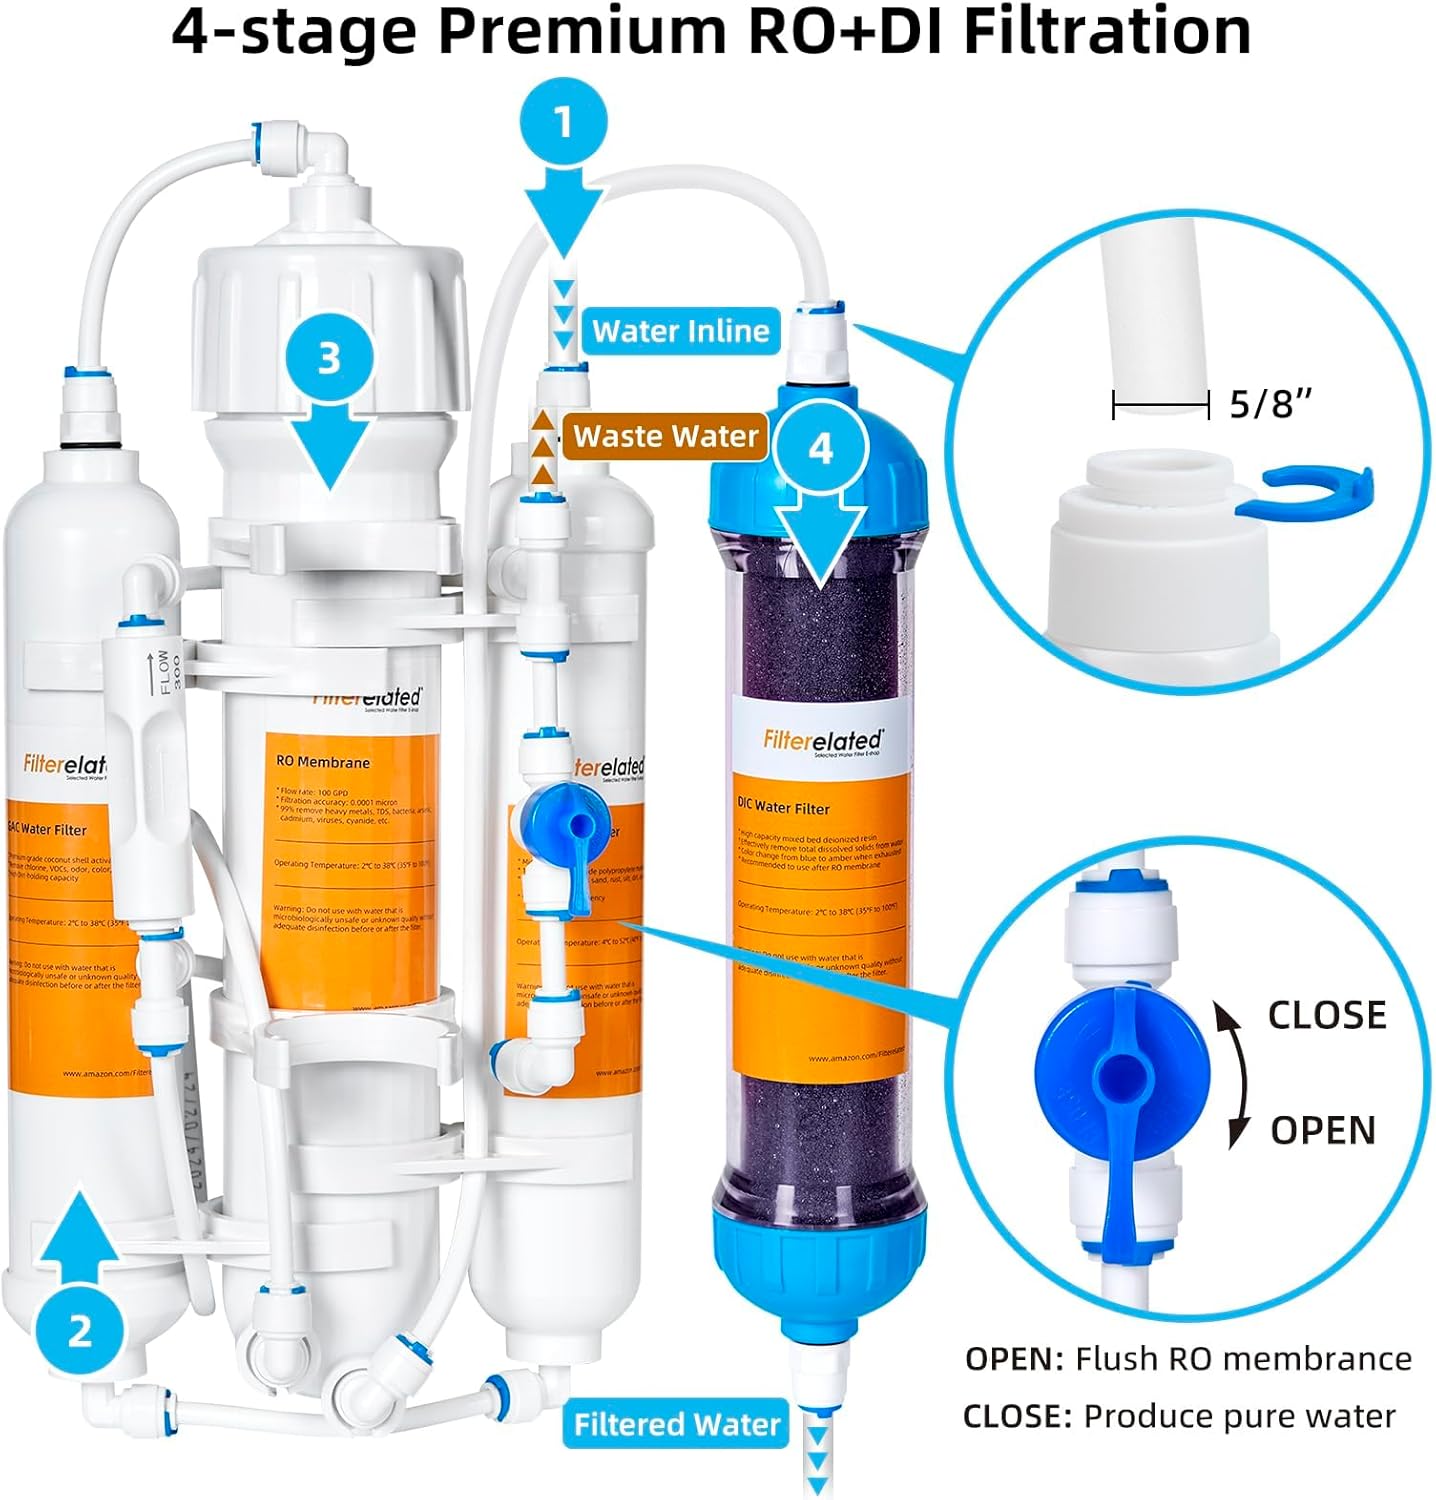
Image 3: Detailed diagram illustrating the water inlet, wastewater outlet, and filtered water outlet. It also shows the flushing valve with 'OPEN' and 'CLOSE' positions, indicating its function for flushing the RO membrane or producing pure water.
3.3 Initial Flushing Procedure
Before first use, the RO membrane requires flushing to remove manufacturing preservatives and fine carbon dust. This step is crucial for optimal performance and water quality.
- Ensure all connections are secure.
- Set the flushing valve to the ON position (as indicated in Image 3).
- Turn on the cold water supply to the system.
- Allow water to flow through the system and out the wastewater line for approximately five minutes. This flushes the RO diaphragm filter.
- After five minutes, turn the flushing valve to the OFF position to begin producing pure water.
4. Operation
Operating your Filterelated RO/DI system is straightforward once installed. The primary control is the flushing valve.
4.1 Flushing Valve Function
- ON Position: This position allows for flushing of the RO membrane. It directs more water through the membrane to rinse away accumulated contaminants, extending the membrane's lifespan. Use this position for initial setup and periodic maintenance.
- OFF Position: This is the normal operating position for producing pure water. In this position, water flows through all four stages, including the DI resin, to achieve ultra-pure output.
4.2 Pure Water vs. Wastewater
Reverse osmosis systems produce two streams of water:
- Filtered Water (Pure Water): This is the deionized water collected for your aquarium. It has significantly reduced TDS and contaminants.
- Wastewater (Concentrated Water): This water contains the rejected contaminants and a higher concentration of dissolved solids. It is safely discharged to a drain. While not suitable for aquariums, it can be used for watering plants or other non-potable applications.

Image 4: Visual representation of how RO units produce both filtered water for aquariums and concentrated wastewater, which can be used for other purposes like watering plants.
4.3 Monitoring Water Quality
To ensure the system is producing optimal water quality, it is recommended to periodically test the TDS of the filtered water. The DI resin is designed to achieve 0 TDS output.

Image 5: This image demonstrates the effectiveness of the DI cartridge in achieving 'TDS=0' as shown on a TDS meter. It also visually explains that the DI resin changes color from purple (active) to green (exhausted), indicating when replacement is necessary.
5. Maintenance
Regular maintenance, primarily filter replacement, is crucial for the continued performance and efficiency of your RO/DI system.
5.1 Filter Replacement Schedule
The lifespan of filters varies depending on incoming water quality and usage volume. General guidelines are:
- Sediment (PP Cotton) & GAC (Activated Carbon) Filters: Replace every 6-12 months.
- RO Membrane: Replace every 2-3 years, or when water production significantly decreases, or TDS levels rise consistently. Regular flushing helps extend its life.
- DI Resin Filter: Replace when the resin changes color from purple to green, or when the TDS of the filtered water begins to rise above 0 ppm. (Refer to Image 5).
5.2 Replacing Filter Cartridges
The quick connections make filter replacement simple:
- Turn off the water supply to the RO/DI system.
- Depress the collet on the quick-connect fitting and pull out the tubing.
- Unscrew the old filter cartridge.
- Insert the new filter cartridge, ensuring it is properly seated and tightened.
- Reconnect the tubing to the quick-connect fittings.
- Turn on the water supply and check for leaks.
- Perform an initial flush for new RO membranes or DI resin as described in Section 3.3.
6. Troubleshooting
This section addresses common issues you might encounter with your RO/DI system.
6.1 Low Water Production
- Clogged Filters: Sediment and carbon filters may be clogged. Replace them if they are past their recommended lifespan or if water pressure is noticeably low.
- Clogged RO Membrane: The RO membrane may be fouled. Try flushing the membrane using the flushing valve. If production does not improve, the membrane may need replacement.
- Low Water Pressure: Ensure your incoming water pressure is adequate (typically 40-80 psi). If pressure is too low, a booster pump may be required.
- Cold Water Temperature: RO systems produce less water in colder temperatures. Ensure the incoming water is not excessively cold.
6.2 High TDS Output
- Exhausted DI Resin: The DI resin is likely exhausted and needs replacement. Check the color of the resin (should be purple, not green).
- Damaged RO Membrane: If the DI resin is new and TDS is still high, the RO membrane may be damaged or failing. Test the TDS of the water *before* the DI stage to confirm.
- Leaking Connections: Check for any leaks that might be allowing unfiltered water to bypass a stage.
6.3 Leaks
- Loose Fittings: Ensure all quick-connect fittings and threaded connections are tight and properly seated.
- Damaged O-rings: Check O-rings on filter housings for proper placement and damage. Replace if necessary.
- Cracked Housing: Inspect filter housings for any cracks. If found, the housing will need to be replaced.
7. Specifications
| Parameter | Value |
|---|---|
| Model | 4-Stage Aquarium RO/DI System |
| Filtration Stages | 4 (PP Cotton, GAC, RO Membrane, DI Resin) |
| RO Membrane Capacity | 100 Gallons Per Day (GPD) |
| Filter Precision | 0.0001 micron (RO Membrane) |
| Recommended Water Source | Cold Tap Water |
| Connections | Quick-Connect Fittings |
8. Warranty and Support
For warranty information and technical support, please refer to the product packaging or contact Filterelated customer service directly. Keep your purchase receipt as proof of purchase.
Contact Information: Please visit the official Filterelated website or refer to your purchase documentation for the most current support contact details.