AWithZ UKF10
AWithZ UKF10 Farad Capacitor Spot Welder 10.2KW Instruction Manual
Model: UKF10 | Brand: AWithZ
1. Introduction
Thank you for choosing the AWithZ UKF10 Farad Capacitor Spot Welder. This device is engineered for high-performance spot welding, ideal for battery pack assembly and repair. Featuring a 10.2KW peak power output and advanced capacitor technology, it provides stable and efficient welding for various materials, including pure nickel and nickel-plated strips. This manual provides essential information for safe operation, setup, maintenance, and troubleshooting to ensure optimal performance and longevity of your spot welder.
2. Safety Instructions
Please read and understand all safety warnings and instructions before operating the AWithZ UKF10 Spot Welder. Failure to follow these instructions may result in electric shock, fire, serious injury, or property damage.
- Electrical Safety: Always connect the device to a grounded power outlet. Do not operate in wet conditions. Ensure hands are dry before handling the power plug or operating the device.
- Personal Protective Equipment (PPE): Wear appropriate eye protection (welding goggles or safety glasses) to shield against sparks and bright flashes. Use heat-resistant gloves to protect hands.
- Ventilation: Operate the spot welder in a well-ventilated area to dissipate any fumes or heat generated during welding.
- Material Compatibility: This device is designed for welding pure nickel (up to 0.2mm) and nickel-plated strips (up to 0.35mm). Do not attempt to weld copper, gold, silver, aluminum, or jewelry, as this can damage the machine and pose safety risks.
- Battery Safety: When working with batteries, ensure they are not damaged or leaking. Improper welding can cause batteries to overheat, explode, or release hazardous chemicals. Always work with caution and follow battery manufacturer guidelines.
- Electrode Care: Ensure welding electrodes are clean and sharp. Dull or dirty electrodes can lead to poor welds and increased sparking. Polish the oxide layer on the tips regularly.
- Children and Bystanders: Keep children and unauthorized persons away from the operating area.
- Power Source: The UKF10 requires a power source to operate; it does not run on internal battery power. Ensure it is connected to a stable power supply.
3. Package Contents
Verify that all items listed below are included in your package. If any items are missing or damaged, please contact customer support.
- 1 x AWithZ UKF10 Main Unit
- 2 x Welding Pens (WP120-6 + WP110-6)
- 2 x Replacement Welding Needles
- 1 x Foot Pedal
- 1 x Power Adapter (EU Power Plug)
- 1 x USB-C to USB-C Power Cable
- 1 x USB-A to USB-C Power Cable
- 1 x Nickel-plated Strip (sample)
- 1 x Sandpaper
- 1 x Multilingual Instruction Manual
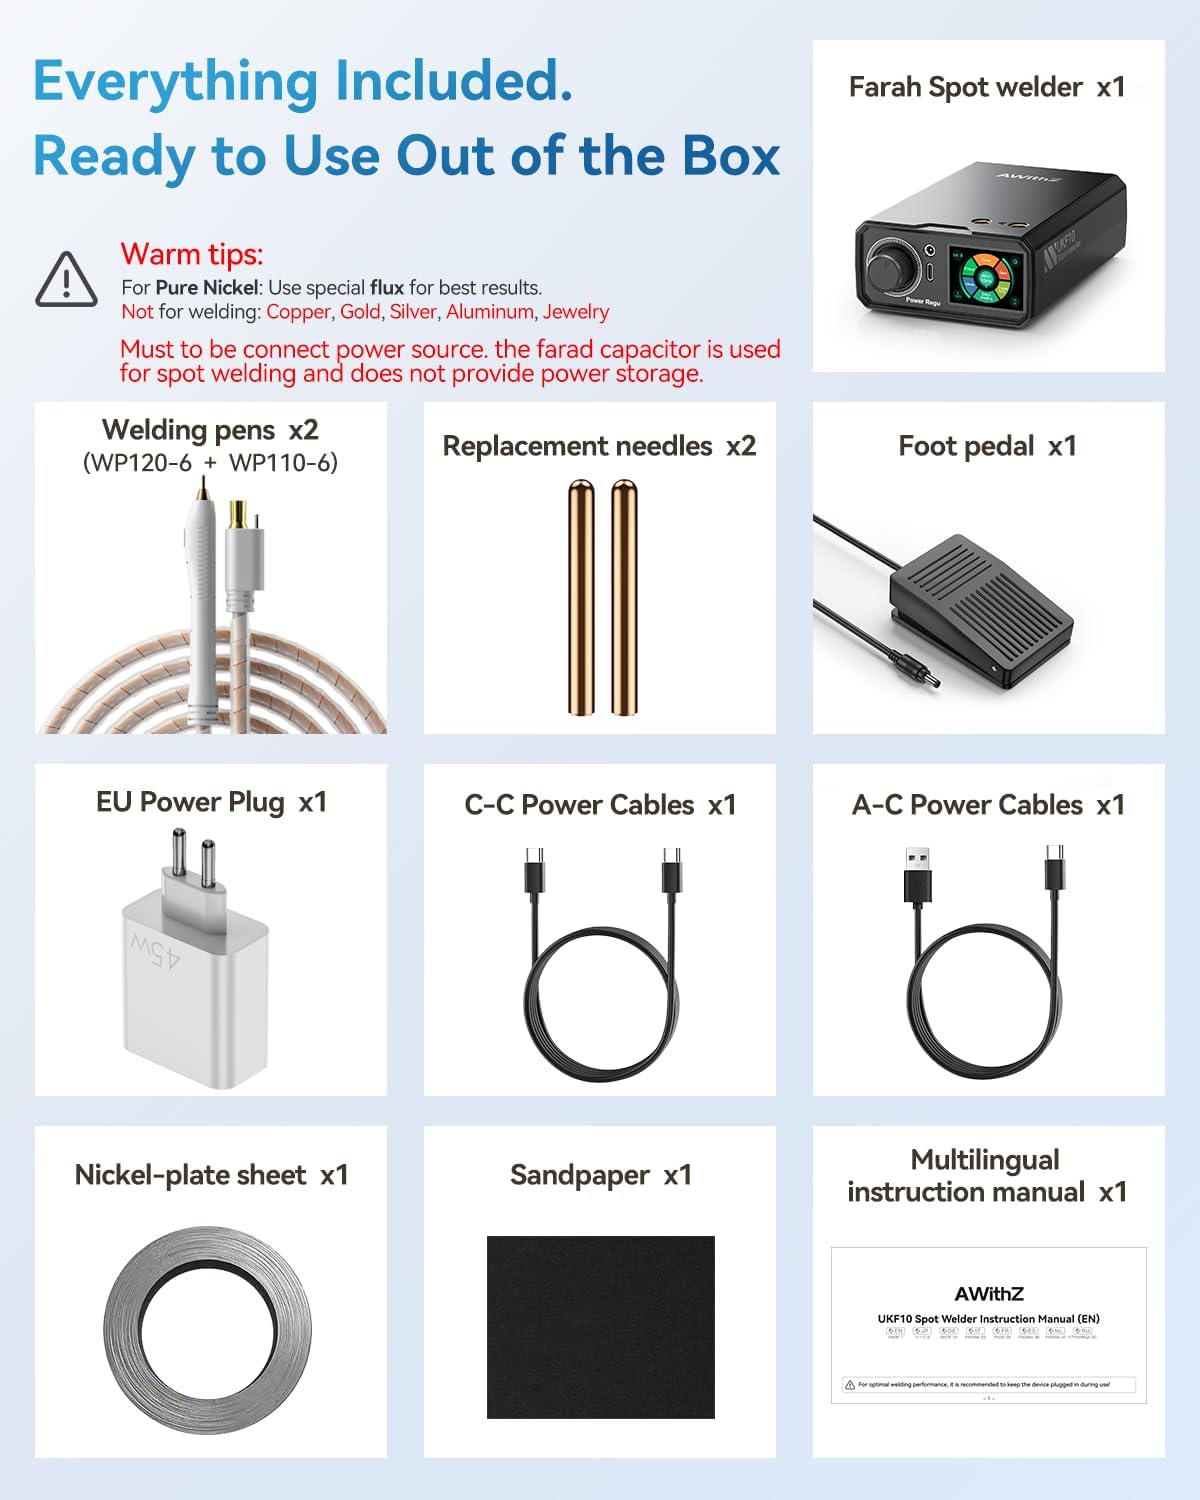
Image: All components included in the AWithZ UKF10 Spot Welder package.
4. Product Overview
The AWithZ UKF10 features a compact design with intuitive controls and multiple ports for accessories.

Image: Front and side view of the AWithZ UKF10 main unit, highlighting key ports and controls.
Key Components:
- Main Unit: Houses the Farad capacitors, control circuitry, and display.
- Multi-Function Knob: Used for adjusting welding parameters (gear, mode, trigger time, preheat, stitch welding) and navigating the menu on the color display.
- Color Display: A 2-inch screen providing real-time information on settings, temperature, and welding status. Supports multi-language UI.
- Welding Pen Ports: Connect the welding pens for direct contact welding.
- Smart Pen Port: For connecting the intelligent welding pen, offering enhanced precision.
- Foot Pedal Port: Connects the foot pedal for hands-free welding activation.
- Charging Port: For connecting the power adapter to power the unit.
- Welding Pens: Ergonomically designed pens with #6 thick copper cables for excellent conductivity and flexible operation.
- Foot Pedal: Provides convenient activation of the welding process, allowing for precise positioning of materials.
5. Setup
Follow these steps to prepare your AWithZ UKF10 Spot Welder for operation.
- Unpack: Carefully remove all components from the packaging and verify against the package contents list.
- Connect Power: Connect the provided power adapter to the charging port on the main unit and plug it into a suitable power outlet. The unit requires continuous power to operate.
- Capacitor Charging: Upon initial connection, the internal Farad capacitors will begin charging. This process may take a few minutes. The display will indicate when the unit is ready for use.
- Connect Welding Pens: Insert the welding pens into the designated welding pen ports on the main unit. Ensure a secure connection.
- Connect Foot Pedal (Optional): If using the foot pedal for activation, plug it into the foot pedal port.
- Prepare Electrodes: Ensure the welding needles are securely installed in the welding pens. If new, or after extended use, gently polish the tips of the welding needles with the provided sandpaper to remove any oxidation and ensure optimal conductivity.
- Work Area: Set up your welding station in a well-ventilated area, clear of flammable materials. Ensure you have adequate lighting and are wearing appropriate PPE.

Image: The AWithZ UKF10 Spot Welder in operation, connected to a power source and actively welding battery cells.
6. Operating Instructions
The AWithZ UKF10 offers three intelligent welding modes and adjustable parameters for precise control.
6.1 Power On/Off
- Power On: Connect the power adapter. The unit will automatically power on and begin charging the capacitors.
- Power Off: Disconnect the power adapter. The unit will power down.
6.2 Adjusting Welding Parameters
Use the multi-function knob to navigate the menu and adjust settings on the color display.

Image: Detailed view of the control knob and color display interface for setting welding parameters.
- Gear (1-100): Adjusts the welding power output. Higher numbers indicate more power. Start with lower settings and gradually increase as needed.
- Mode: Selects the welding activation method.
- Trigger Time: Sets the delay before welding activates (in automatic modes).
- Preheat: Applies a small pre-pulse to prepare the material for welding, improving weld quality.
- Stitch Welding: For continuous welding applications.
6.3 Welding Modes
The UKF10 offers three distinct welding modes to suit different applications.

Image: Visual representation of the three welding modes: Auto, Smart Pen, and Foot Pedal.
- Auto Mode:
Description: Simple operation, ideal for beginners and fast jobs. The welder automatically detects contact and fires the weld pulse.
Usage: Place both welding pen tips firmly on the nickel strip over the battery terminal. The device will automatically trigger the weld.
- Smart Pen Mode:
Description: Offers precision control, suitable for delicate repairs. The welding pen itself has a trigger mechanism.
Usage: Position the welding pen tips. Press the trigger button on the smart pen to initiate the weld.
- Foot Pedal Mode:
Description: Focuses on positioning, suitable for high-efficiency batch assembly. Provides hands-free activation.
Usage: Position the welding pen tips on the material. Press the foot pedal to activate the weld.
6.4 Welding Process
For best results, practice on scrap material before welding your final project.
- Material Preparation: Ensure the nickel strips and battery terminals are clean and free of dirt, oil, or oxidation. Use sandpaper if necessary.
- Positioning: Place the nickel strip firmly against the battery terminal. Position the two welding pen tips on the nickel strip, ensuring they are parallel and approximately 2-3mm apart, directly over the desired weld point. Apply firm, even pressure.
- Activate Weld: Depending on your selected mode, either wait for automatic activation, press the smart pen trigger, or press the foot pedal.
- Inspect Weld: After each weld, visually inspect the joint. A good weld will be strong and have a small, clean spot. If the weld is weak or the strip can be easily peeled off, increase the "Gear" setting. If the weld burns through the strip, decrease the "Gear" setting.
- Repeat: Move to the next weld point and repeat the process.

Image: Demonstrating the welding capability for 0.2mm pure nickel and 0.35mm nickel-plated materials.
7. Maintenance
Regular maintenance ensures the longevity and optimal performance of your spot welder.
- Electrode Cleaning: After each use, or if weld quality degrades, polish the tips of the welding needles with fine-grit sandpaper to remove any carbon buildup or oxidation. This ensures good electrical contact.
- Replacement Needles: Replace welding needles when they become too short or severely pitted, affecting weld consistency.
- Unit Cleaning: Keep the main unit clean and free of dust and debris. Use a soft, dry cloth to wipe down the exterior. Do not use liquid cleaners or solvents.
- Storage: Store the spot welder in a dry, cool place away from direct sunlight and moisture.
- Regular Charging: If storing for extended periods, recharge the unit regularly (e.g., every 3-6 months) to maintain capacitor health, even though it operates directly from a power source.
8. Troubleshooting
If you encounter issues with your AWithZ UKF10 Spot Welder, refer to the following common problems and solutions.
| Problem | Possible Cause | Solution |
|---|---|---|
| No weld or weak weld |
|
|
| Welding burns through material |
|
|
| Electrodes stick to material |
|
|
| Unit does not power on |
|
|
9. Specifications
| Brand | AWithZ |
| Model Number | UKF10 |
| Power Output | 10.2 KW (Peak) |
| Welding Thickness (Pure Nickel) | Up to 0.2 mm |
| Welding Thickness (Nickel-Plated) | Up to 0.35 mm |
| Welding Gears | 1-100 adjustable levels |
| Welding Modes | Auto Mode, Smart Pen Mode, Foot Pedal Mode |
| Capacitor Lifespan | 500,000+ cycles |
| Material | Plastic shell |
| Power Type | AC (requires external power adapter) |
| Dimensions (Package) | 18.7 x 13.1 x 11.7 cm |
| Weight (Package) | 1.16 kg |
10. Support
AWithZ is committed to providing quality products and reliable service. If you have any questions, concerns, or require technical assistance regarding your UKF10 Spot Welder, please do not hesitate to contact our customer support team. Refer to the contact information provided with your purchase or on the official AWithZ website.