NEEWER HGS02
NEEWER Basics Silent Aeroponics Growing System Kit HGS02 User Manual
Model: HGS02 | Brand: NEEWER
Introduction
This manual provides detailed instructions for the assembly, operation, and maintenance of your NEEWER Basics Silent Aeroponics Growing System Kit, model HGS02. This system is designed for indoor soilless gardening, utilizing aeroponic technology to promote efficient plant growth. It can nurture up to 15 plants simultaneously, featuring three growing modes, adjustable lighting, and a telescopic design. The upgraded misting system promotes up to 65% faster plant growth compared to traditional soil planting, ensuring higher yields while maintaining a clean indoor environment. Please read this manual thoroughly before using the product to ensure proper function and longevity.
Package Contents
Verify that all items listed below are included in your package. If any components are missing or damaged, please contact customer support.

Image: Overview of all components included in the NEEWER HGS02 Aeroponics Growing System Kit.
- 1 x Light Board
- 1 x Water Tank Cover
- 1 x Water Tank
- 1 x Water Filling Cap
- 15 x Planting Sponge
- 15 x Planting Pod
- 1 x Cover (for atomizer)
- 15 x Seedling Cover
- 1 x Cleaning Brushes
- 1 x Power Adapter
- 2 x Bottle of Nutrient Solution (A & B)
- 15 x Sticker
- 1 x Telescopic Aluminum Rod
Product Diagram
Familiarize yourself with the various parts of the aeroponics growing system using the diagram below.
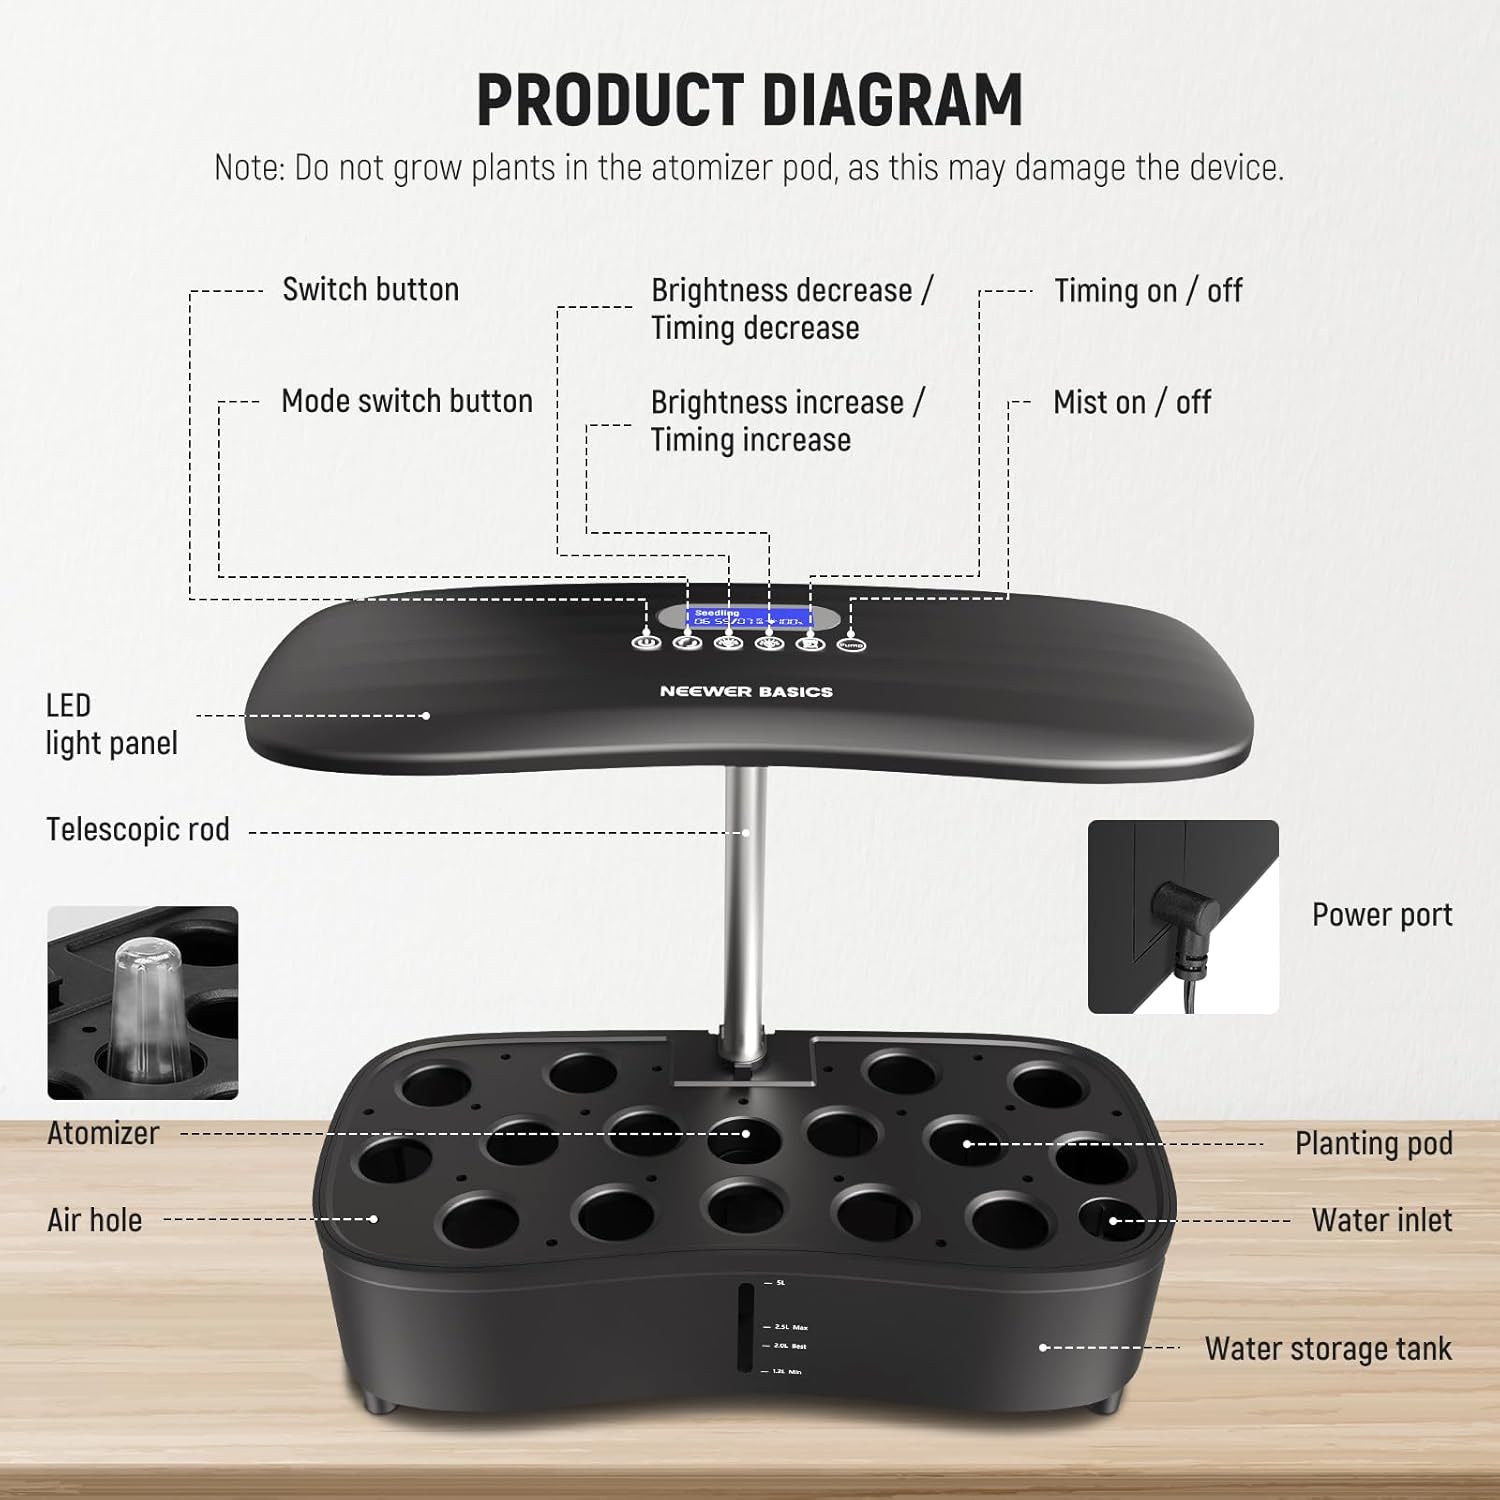
Image: Labeled diagram of the NEEWER HGS02 system components, including the LED light panel, telescopic rod, atomizer, planting pods, water storage tank, control panel, and power port.
- 1. LED Light Panel: Provides full-spectrum light for plant growth.
- 2. Telescopic Rod: Allows adjustment of the light panel height.
- 3. Atomizer: Creates fine mist for root hydration.
- 4. Air Hole: Ensures proper air circulation.
- 5. Planting Pod: Holds the planting sponge and seedling.
- 6. Water Inlet: Point for adding water to the tank.
- 7. Water Storage Tank: Reservoir for water and nutrient solution.
- 8. Control Panel: Features buttons for power, mode, brightness, timing, and mist control, with an LCD display.
- 9. Power Port: Connection point for the power adapter.
Note: Do not grow plants in the atomizer pod, as this may damage the device.
Setup Instructions
- Assemble the Telescopic Rod and Light Panel: Insert the telescopic aluminum rod into the designated slot on the water tank cover. Attach the LED light panel to the top of the telescopic rod. Ensure it is securely fastened.
- Place the Atomizer: Insert the atomizer into its dedicated slot within the water tank. Ensure the atomizer is fully submerged when the water tank is filled.
- Prepare Planting Pods:
- Place one planting sponge into each planting pod.
- Insert your chosen seeds into the center of each planting sponge.
- Cover each planting pod with a seedling cover (dome) to create a humid environment for germination.
- Fill the Water Tank: Open the water filling cap and carefully pour water into the water storage tank. Refer to the water level markings on the tank:
- Recommended Upper Limit: 2.5L
- Optimal Fill Level: 2L
- Minimum Required Level: 1.2L
It is recommended to fill to the optimal level (2L) initially. Do not exceed the upper limit.
- Add Nutrient Solution: Once the water tank is filled, add the appropriate amount of nutrient solution (Parts A and B) according to the plant type and growth stage. Refer to the nutrient solution instructions for specific ratios.
- Connect Power: Plug the power adapter into the power port on the system and then into a standard electrical outlet.
Operating Instructions

Image: Close-up of the control panel and LCD display, illustrating the Seedling, Veg, and Bloom modes.
Control Panel Functions:
- Switch Button: Powers the system on or off.
- Mode Switch Button: Cycles through the three growing modes: Seedling, Vegetative, and Bloom.
- Brightness Decrease / Timing Decrease Buttons: Adjusts light brightness down or decreases timer duration.
- Brightness Increase / Timing Increase Buttons: Adjusts light brightness up or increases timer duration.
- Timing On/Off Button: Activates or deactivates the automatic light timer.
- Mist On/Off Button: Manually controls the atomizer.
Growing Modes:
The system offers three specialized growing modes to optimize plant development at different stages:
- Seedling Mode: Ideal for germination and early growth. Provides gentle light and misting.
- Vegetative Mode: Suitable for leafy greens and plants in their growth phase. Offers balanced light for foliage development.
- Bloom Mode: Designed for flowering and fruiting plants. Provides light spectrums conducive to bloom and fruit production.
Select the appropriate mode using the Mode Switch Button on the control panel. The current mode will be displayed on the LCD screen.
Light Adjustment:
- Brightness: The LED grow light offers 10 brightness levels. Use the Brightness Increase/Decrease buttons to adjust the intensity.
- Height: The telescopic rod allows for height adjustment of the light panel up to 17.7 inches (45cm). Adjust the height to maintain an optimal distance of 6-8 inches (15-20cm) between the light panel and the top of your plants.
Timer Settings:
The built-in timer allows automated light cycles from 1 to 23 hours. Press the Timing On/Off button to activate the timer, then use the Timing Increase/Decrease buttons to set the desired duration. The system will automatically turn the lights on and off according to your set schedule.
Atomization System:
The whisper-quiet atomizer automatically starts once powered on and runs for 3 minutes every 5 minutes in a cycle. You can also manually control the misting function using the Mist On/Off button on the control panel.
Maintenance
- Water Level: Regularly check the water level in the tank. Refill with fresh water when the level approaches the minimum mark (1.2L).
- Nutrient Solution: Replenish nutrient solution as needed, typically every 1-2 weeks, or when changing the water. Follow the nutrient solution manufacturer's guidelines for dosage.
- Cleaning: Periodically clean the water tank and atomizer to prevent algae buildup and ensure optimal performance. Use the provided cleaning brushes for thorough cleaning. Disconnect power before cleaning.
- Planting Sponges: Replace planting sponges for each new planting cycle to ensure proper hygiene and support for new seedlings.
Troubleshooting
| Problem | Possible Cause | Solution |
|---|---|---|
| System does not power on. | Power adapter not connected or faulty; power outlet issue. | Ensure power adapter is securely connected to the system and a working electrical outlet. Test the outlet with another device. |
| Plants are not growing or appear unhealthy. | Incorrect light settings (mode, brightness, height); insufficient nutrients; improper water level; old seeds. | Adjust light mode, brightness, and height according to plant stage. Check nutrient solution levels and concentration. Ensure water level is between optimal and minimum. Use fresh, viable seeds. |
| Atomizer is not producing mist. | Atomizer clogged or not properly submerged; water level too low. | Ensure the atomizer is clean and fully submerged. Check water level and refill if necessary. Clean the atomizer with the provided brush. |
| Algae growth in water tank. | Excessive light exposure to water; infrequent cleaning. | Ensure all unused planting holes are covered. Clean the water tank regularly. Consider using opaque covers for the water tank if light penetration is an issue. |
Specifications
| Feature | Detail |
|---|---|
| Model | HGS02 |
| Application | Indoor Plant Growing |
| Main Material | Plastic |
| Item Type | Aeroponics Growing System |
| Growing Modes | Seedling / Veg / Bloom |
| Color | Black |
| Brightness Levels | 10 |
| Water Tank Capacity | 5L |
| Max Height | 22.4" / 57cm |
| Adjustment Range | 17.7" / 45cm |
| LED Quantity | 192 |
| Timer | 1 - 23 hours |
| Power (Seedling Mode) | 37W |
| Power (Veg Mode) | 34.8W |
| Power (Bloom Mode) | 38W |
| Product Dimensions | 11.81 x 4.72 x 3.15 inches |
| Item Weight | 1.1 pounds |
Customer Support
For technical assistance, warranty information, or to report missing/damaged parts, please contact NEEWER customer support. Refer to the product packaging or the official NEEWER website for current contact details.
You can visit the official NEEWER store for more information: NEEWER Store on Amazon.
Ask a question about this manual
Ask about setup, troubleshooting, compatibility, parts, safety, or missing instructions. Manuals+ will review the question and use this page’s manual context to help answer it.