7000LBS
Portable Car Lift User Manual
Model: 7000LBS
Brand: Generic
1. Product Overview
This manual provides essential information for the safe and effective operation and maintenance of your Portable Car Lift. Please read this manual thoroughly before initial use.
The Portable Car Lift is designed for lifting vehicles in home DIY garages and small workshops, facilitating maintenance tasks. It features a robust carbon steel construction and adjustable components to accommodate various vehicle types.
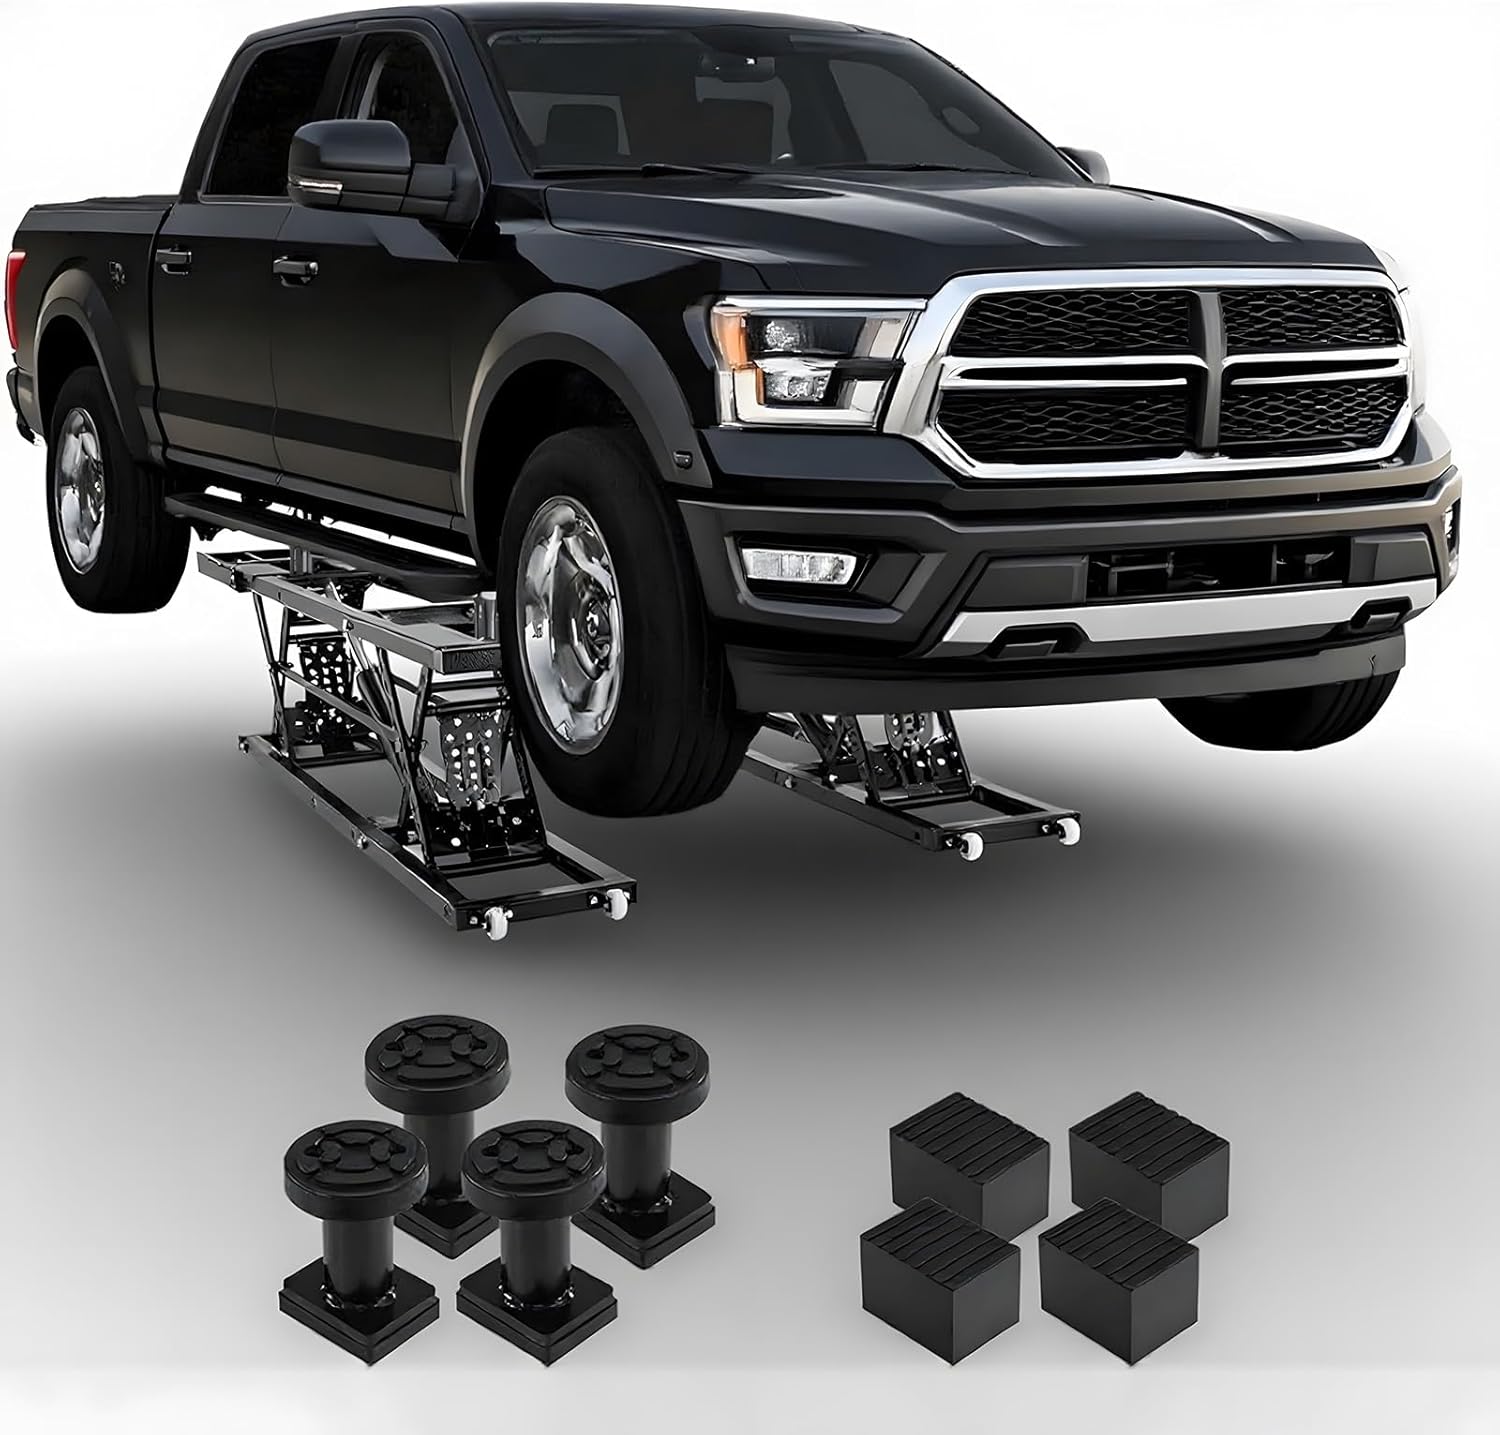
Image: The Portable Car Lift in use, supporting a black pickup truck. Also shown are the included rubber pads and lifting columns, which are key components for safe vehicle support.
2. Safety Warnings and Precautions
WARNING: Failure to follow these safety instructions may result in serious injury or property damage.
- Always operate the car lift on a flat, level, and stable surface. Do not use on slopes.
- Ensure the vehicle is centered and stable on the lifting pads before raising.
- Never exceed the specified weight capacity of 7000 LBS for this model.
- Always engage the mechanical safety locks once the desired height is reached.
- Before lowering the vehicle, manually release the safety locks.
- Keep hands and feet clear of moving parts during operation.
- Do not work under a vehicle supported only by the lift's hydraulic system. Always use safety stands or ensure safety locks are engaged.
- Ensure all accessories (rubber pads, lifting columns) are correctly installed and secured.
- Disconnect power when not in use or during maintenance.
3. What's in the Box
Verify that all components are present and undamaged upon unpacking.

Image: All components included in the accessory set. This includes extension plates, lifting columns, rubber pads, hoses, handles, wheels, and various mounting screws.
- 4 x Rubber Pads
- 4 x Lifting Columns
- 2 x Hoses
- 2 x Extension Plates
- 2 x Handles
- 4 x Casters (Wheels)
- Mounting Bolts (M8×16mm & M10×55mm)
- Washers and Nuts
- 1 x User Manual (this document)
4. Setup and Assembly
Follow these steps for initial setup and assembly of your portable car lift.
- Unpack Components: Carefully remove all parts from the packaging and lay them out on a clean, flat surface. Refer to the "What's in the Box" section to ensure all parts are present.
- Attach Casters: Securely attach the four nylon casters to the designated points on the lift frames using the provided mounting bolts. These casters facilitate easy mobility of the folded lift.
- Install Extension Plates: If required for your vehicle's wheelbase, attach the 11-inch extension plates to the main lift frames. Ensure they are firmly bolted for stable support.
- Connect Hoses: Connect the hydraulic hoses between the two lift units. Ensure connections are tight to prevent leaks.
- Install Lifting Columns and Rubber Pads: Place the lifting columns onto the lift's support points. The rubber pads should be placed on top of the lifting columns to prevent slippage and protect the vehicle's chassis.
- Power Connection: Connect the lift to a standard 120V/60Hz power outlet.

Image: Illustration of the adjustable lifting height, demonstrating the lift supporting a truck at its maximum height of 26.8 inches. Details of the lifting columns and pads are also provided.
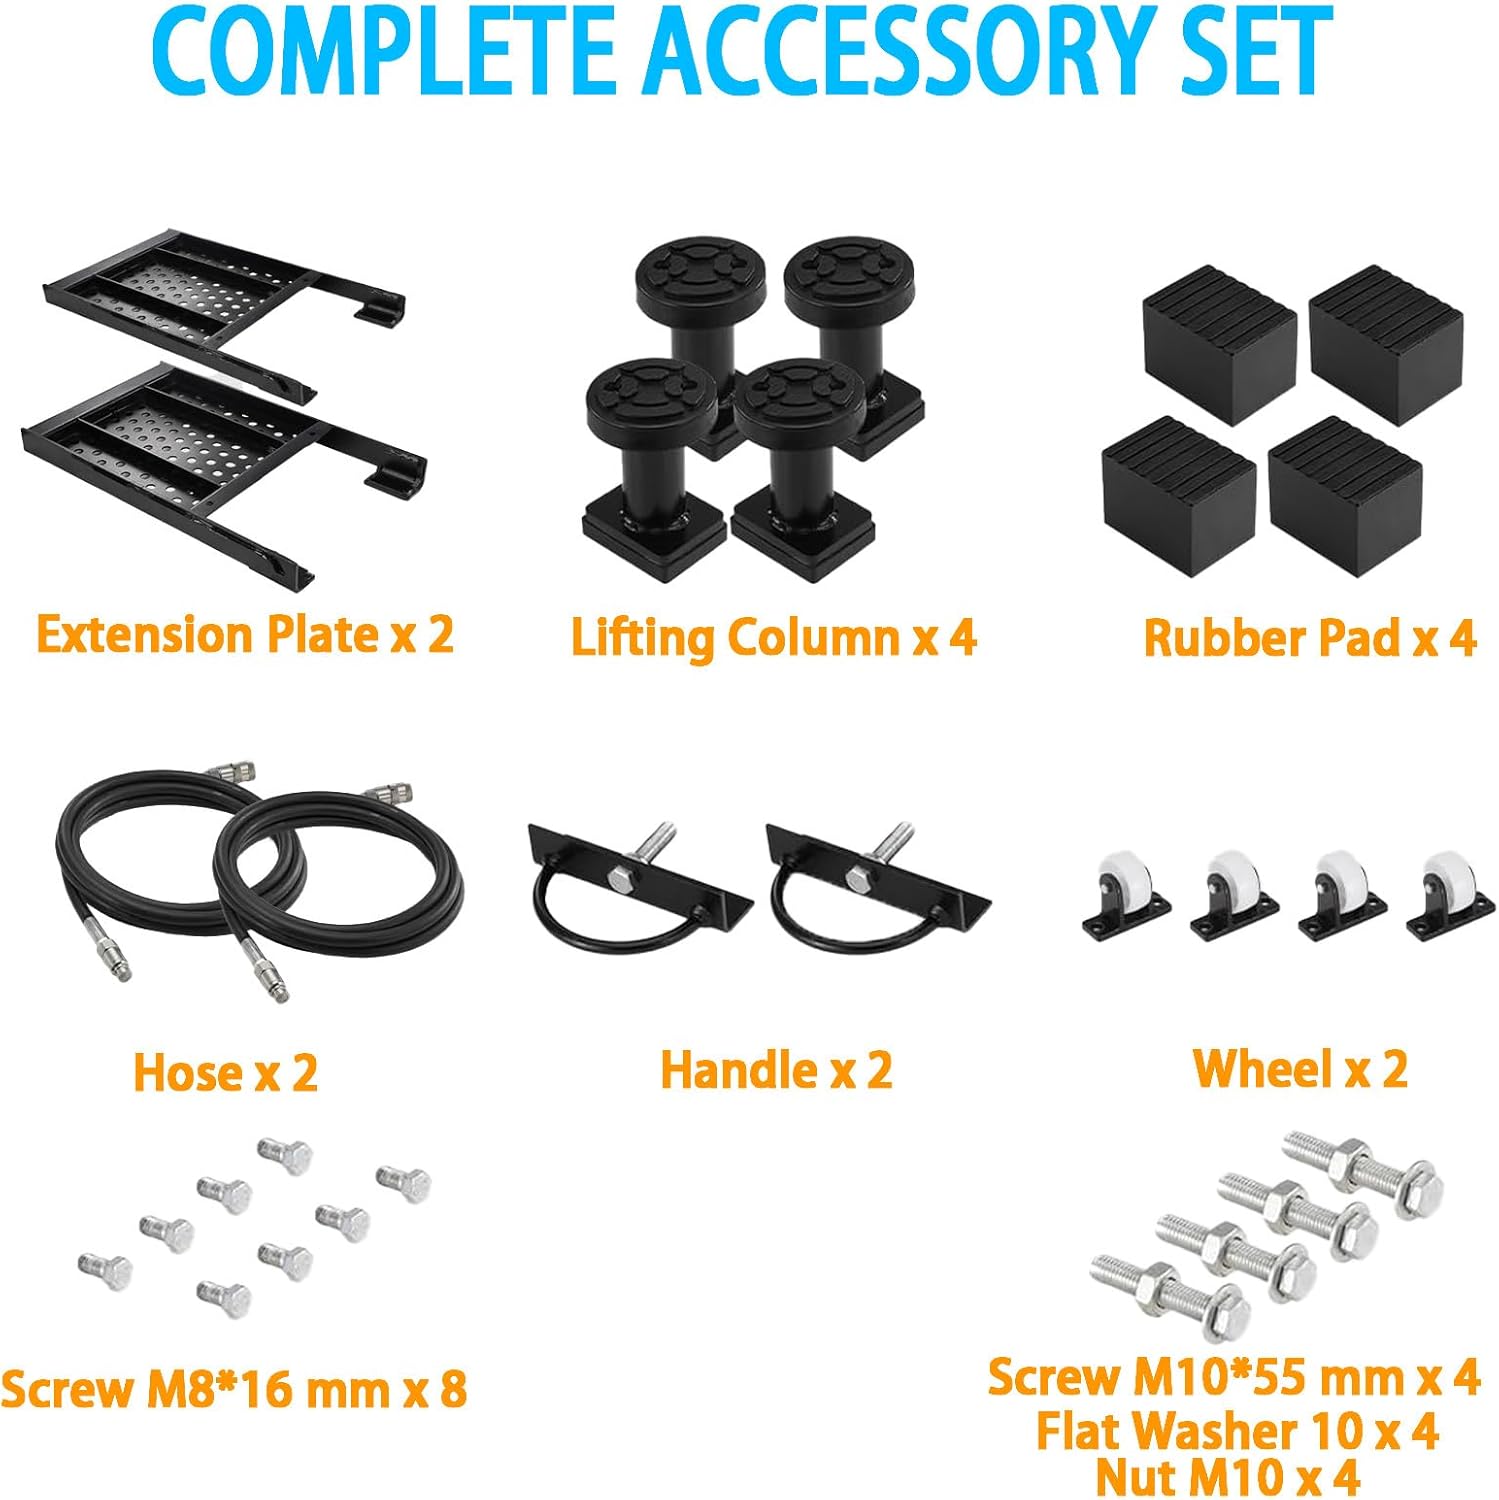
Image: The portable car lift shown in various configurations, including folded for compact storage and extended for use, demonstrating its design and mobility features.
5. Operating Instructions
Follow these steps for safe operation of the Portable Car Lift.
- Position the Lift: Roll the folded lift into position under the vehicle. Ensure the lift is on a flat, stable surface.
- Unfold and Align: Unfold the lift and position the lifting pads directly under the vehicle's designated lifting points. Adjust the 4 adjustable lifting columns (up to 3.2 inches max adjustment per column) to match varying chassis heights.
- Raise the Vehicle: Using the control unit, slowly raise the vehicle. Monitor the lift and vehicle for any instability or misalignment.
- Engage Safety Locks: Once the desired working height is reached, ensure the mechanical safety locks automatically engage. These locks provide a secure mechanical stop, preventing accidental lowering.
- Lower the Vehicle: Before lowering, ensure the area around the lift is clear. Manually release the safety locks. Then, slowly lower the vehicle using the control unit until it is fully on the ground.
- Fold and Store: Once the vehicle is off the lift, you can fold the lift for compact storage. Use the wall-mount handles (hooks not included) for easy hoisting and storage.

Image: Demonstrates the 7000 LBS capacity and stability of the lift, supporting a truck. Key features like the extension plate and carbon steel construction are highlighted. Vehicle compatibility for sedans, SUVs, and pickup trucks is also shown.
6. Maintenance
Regular maintenance ensures the longevity and safe operation of your car lift.
- Regular Inspection: Before each use, inspect the lift for any signs of damage, wear, or loose components. Check hydraulic hoses for leaks.
- Cleanliness: Keep the lift clean and free of dirt, grease, and debris. This prevents interference with moving parts and extends component life.
- Lubrication: Periodically lubricate pivot points and moving parts as recommended in the detailed user manual (if provided separately).
- Storage: When not in use, store the lift in a dry, clean area, preferably folded to save space.
7. Troubleshooting
This section addresses common issues you might encounter.
| Problem | Possible Cause | Solution |
|---|---|---|
| Lift does not raise | No power; hydraulic fluid low; overload | Check power connection; check fluid level and refill if necessary; ensure vehicle weight is within capacity. |
| Lift lowers slowly or unevenly | Air in hydraulic system; fluid leak; worn seals | Bleed air from system; inspect for leaks and repair; contact support for seal replacement. |
| Safety locks not engaging | Obstruction; mechanical issue | Clear any obstructions; inspect locking mechanism for damage. Do not use if locks are not functional. |
8. Technical Specifications

Image: Visual representation of the technical specifications, including electrical requirements, material, weight, and folded dimensions of the lift.
| Specification | Value (7000LBS Model) |
|---|---|
| Load Capacity | 7000 LBS |
| Max Lifting Height | 26.8 inches |
| Min Height | 10.24 inches |
| Pad Range | 6.5 - 20 inches |
| Adjustable Column Travel | 3.2 inches (per column) |
| Voltage | 120V/60Hz |
| Rated Power | 0.75 kW |
| Material | Carbon Steel |
| Net Weight | 417.8 lbs |
| Folded Dimensions (L x W x H) | 74.1 x 15.4 x 6.5 inches |
9. Warranty and Support
For warranty information or technical support, please contact the manufacturer directly. Refer to the product packaging or purchase documentation for specific contact details.
Manufacturer: FR52VD
Model: 7000LBS
ASIN: B0FJ15JLKC
Ask a question about this manual
Ask about setup, troubleshooting, compatibility, parts, safety, or missing instructions. Manuals+ will review the question and use this page’s manual context to help answer it.