1. Introduction
This manual provides detailed instructions for the installation, setup, and operation of your Beok BOT-R3X-WIFI Smart Wireless Thermostat. This device is designed to control gas boilers and water-based underfloor heating systems, offering advanced features like Wi-Fi connectivity, voice control, and daily programming for enhanced comfort and energy efficiency.
2. Package Contents
Verify that all items listed below are included in your package:
- 1 x Smart Thermostat (batteries not included)
- 1 x Receiver
- 1 x Thermostat Stand
- 1 x Product Manual
- 2 x Screws
- 1 x USB-C Cable
- 1 x Jumper Wire

Image: All components included in the Beok BOT-R3X-WIFI Smart Thermostat package.
3. Product Overview
The Beok BOT-R3X-WIFI system consists of a wireless thermostat unit with a touchscreen display and a receiver unit. The thermostat allows you to set and monitor temperatures, while the receiver connects to your heating system.
3.1. Thermostat Display Icons

Image: Explanation of icons on the thermostat screen.
- Ambient Temperature: Current room temperature.
- Set Temperature: Desired temperature.
- Wi-Fi Connected: Indicates Wi-Fi network status.
- Battery Level: Shows remaining battery power.
- Paired: Indicates successful pairing with the receiver.
- Key Lock: Screen lock status.
- Heating Mode: Active heating function.
- Output: Heating output status.
- Cooling Mode: Active cooling function (if supported by system).
- Frost Activated: Frost protection mode.
- Automatic Mode: Programmed schedule is active.
- Manual Mode: Manual temperature setting is active.
- Away Mode: Energy-saving mode for when you are away.
4. Installation
4.1. Receiver Wiring
The receiver unit must be connected to your heating system. Most boilers connect to the NO (Normally Open) and COM (Common) terminals. Some boilers may require connection to COM and NC (Normally Closed).

Image: Receiver wiring diagram for various heating systems.
Important: Ensure power is off before performing any wiring. If you are unsure, consult a qualified electrician.
4.2. Thermostat Power Modes
The wireless thermostat can be powered by batteries or via a USB-C cable.

Image: Thermostat and receiver power supply options.
- Receiver: Connects to 220V AC power. An installation box is not mandatory.
- Thermostat (Battery Power): Uses 3 AAA batteries (not supplied).
- Thermostat (USB Power): Uses a USB-C cable for continuous power.
If switching from USB power to battery power, disconnect the USB cable before inserting batteries to avoid a "low battery" alarm.
5. Setup
5.1. Pairing the Thermostat with the Receiver
Typically, the thermostat and receiver are pre-paired at the factory. If re-pairing is necessary, follow these steps:

Image: Pairing instructions for the thermostat and receiver.
- Receiver Configuration: With the receiver powered on, press and hold the pairing button until the "Wireless" LED blinks.
- Thermostat Configuration: With the thermostat powered on, press and hold the "Up" arrow button until the receiver's "Wireless" LED remains steadily lit.
- Pairing Confirmation: Set the thermostat to heating mode and adjust the temperature above the ambient temperature. If all three lights on the receiver illuminate, pairing is successful.
5.2. Connecting to the Mobile App (Tuya / Smart Life)
Control your thermostat remotely using the "Tuya" or "Smart Life" smartphone application. A 2.4 GHz Wi-Fi network is required.

Image: Mobile app connection guide.
- Download App: Scan the QR code in the product manual or search for "Tuya" or "Smart Life" in your app store. Create an account.
- Activate Wi-Fi Pairing on Thermostat: On the thermostat, press and hold the "Up" arrow button for 5 seconds until the Wi-Fi icon blinks.
- Connect via App: Open the app. It should automatically detect the thermostat. Follow the in-app instructions to connect, entering your 2.4 GHz Wi-Fi password when prompted.
- Control: Once connected, you can control the thermostat from your smartphone.
6. Operating Instructions
6.1. Control Modes
The Beok BOT-R3X-WIFI thermostat offers multiple control methods for your convenience.
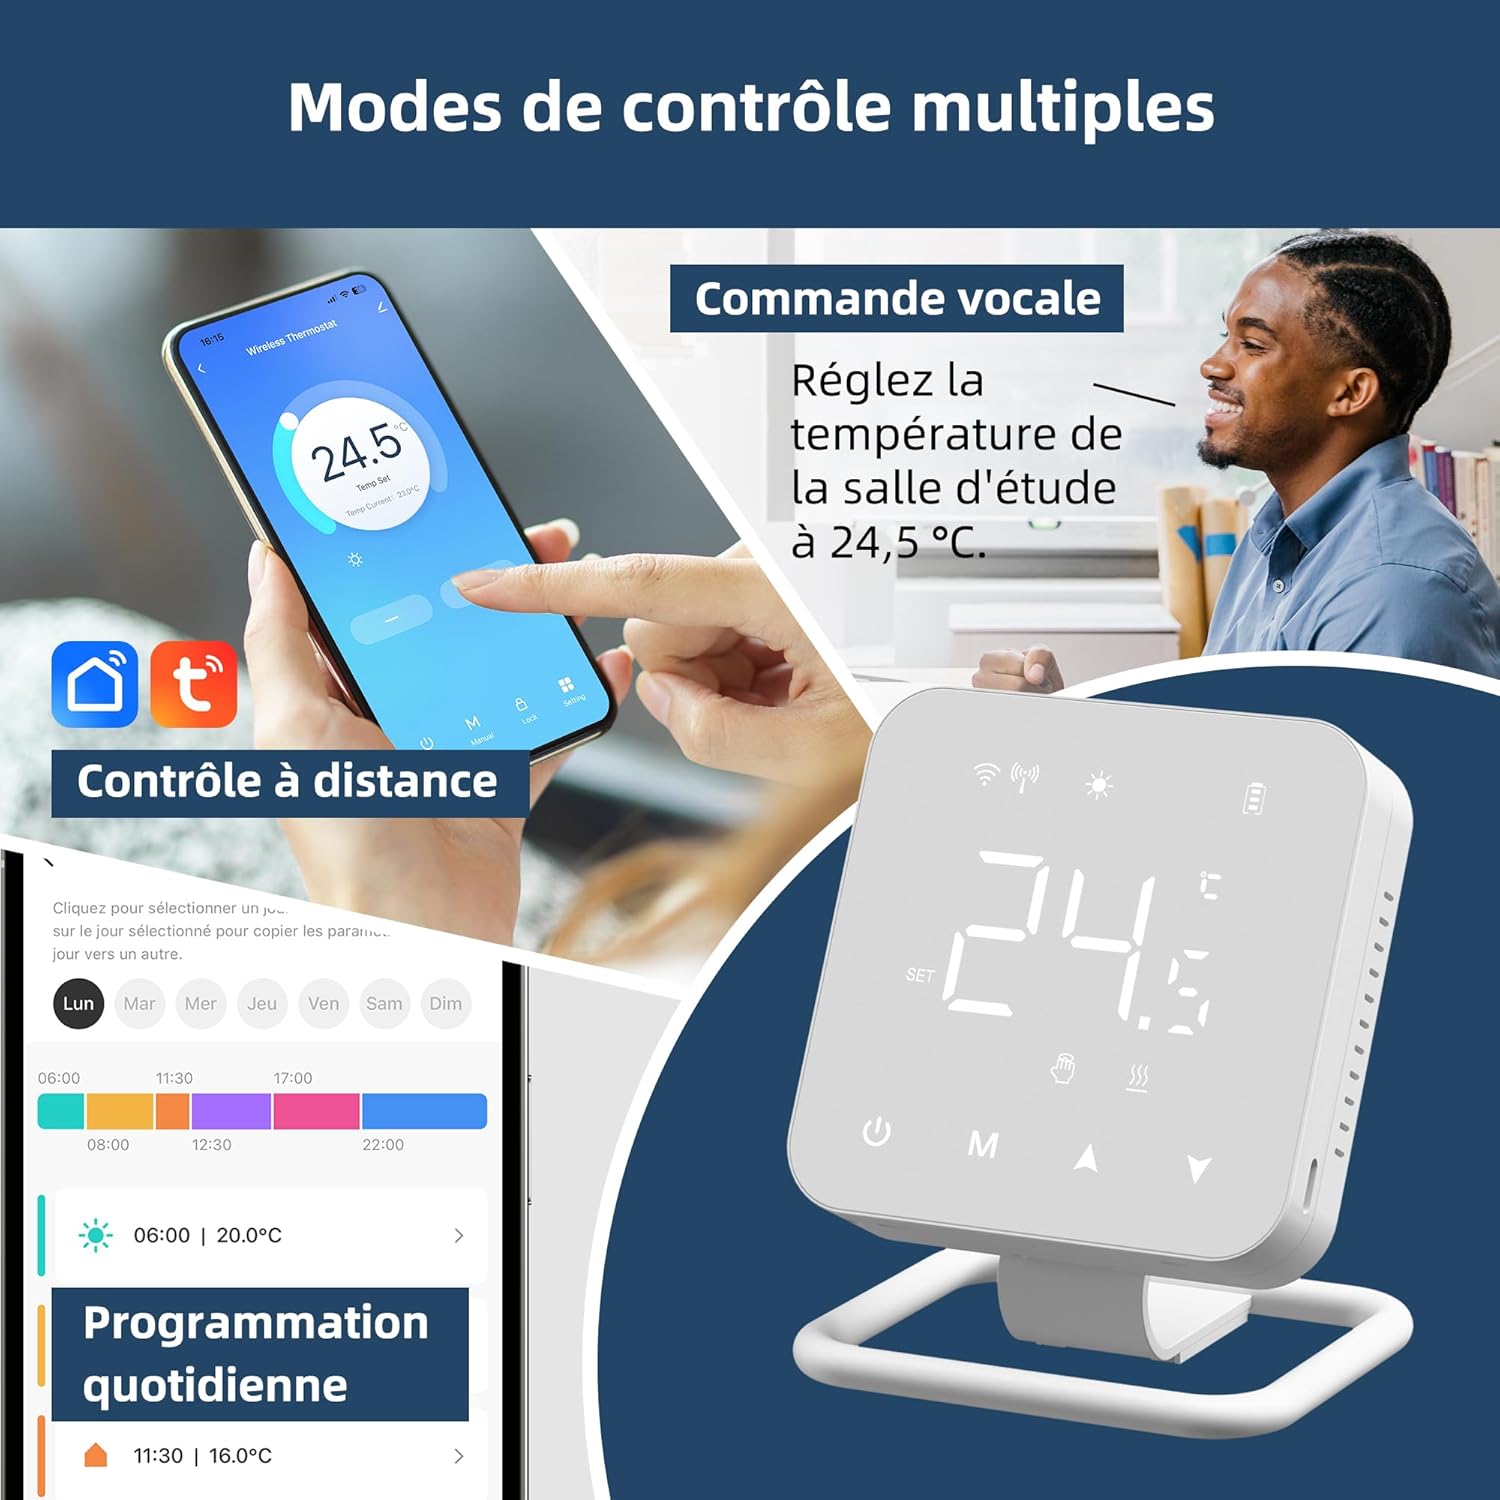
Image: Overview of available control modes.
- Manual Control: Adjust temperature directly on the thermostat's touchscreen.
- Remote Control (App): Use the "Tuya" or "Smart Life" app to control the thermostat from anywhere.
- Voice Control: Compatible with Alexa and Google Assistant for hands-free temperature adjustments.
6.2. Daily Programming
Set a daily heating schedule to match your lifestyle and optimize energy savings. You can define up to 6 different temperature settings per day.
- Access the programming menu through the thermostat or the mobile app.
- Set desired temperatures and times for each period of the day (e.g., morning, daytime, evening, night).
- Save your schedule. The thermostat will automatically follow this program.
6.3. Multi-User Control
Share access to your thermostat with family members through the mobile application, allowing everyone in the household to manage the heating settings.

Image: Multi-user control via the mobile app.
7. Compatibility
The Beok BOT-R3X-WIFI thermostat is designed for specific heating systems:

Image: Compatible heating system types.
- Gas Boilers: Suitable for gas boilers with dry contact.
- Water Underfloor Heating Systems: Compatible with water-based underfloor heating.
- Thermoelectric Heads, Electric Valves, Pumps: Can control these components.
- Not Applicable: This thermostat is not suitable for electric underfloor heating systems.
8. Specifications
| Feature | Specification |
|---|---|
| Brand | BEOK CONTROLS |
| Model | BOT-R3X-WIFI |
| Color | White |
| Product Dimensions (L x W x H) | 8.6 x 8.6 x 2.5 cm |
| Item Weight | 260 Grams |
| Special Features | App and Voice Control, Advanced Scheduling |
| Controller Type | Touchscreen, Voice Control |
| Temperature Control Type | Programmable and Smart |
| Connectivity Technology | RF, Wi-Fi (2.4 GHz only) |
| Power Source | Battery Powered (3x AAA, not included) or USB-C |
| Display Type | Touchscreen |
| Wireless Range (Thermostat to Receiver) | Up to 30 meters (433MHz RF signal) |
9. Troubleshooting
This section addresses common issues you might encounter with your Beok BOT-R3X-WIFI thermostat.
9.1. Pairing Issues
- Thermostat and Receiver not pairing: Ensure both devices are powered on. Follow the pairing steps in Section 5.1 carefully. Make sure the receiver's "Wireless" LED blinks during its configuration step and then stays lit after thermostat configuration.
- "Low Battery" alarm after connecting USB: If you switch from USB power to battery power, ensure the USB cable is disconnected before inserting the batteries.
9.2. Wi-Fi Connection Issues
- Unable to connect to Wi-Fi: Ensure your Wi-Fi network is 2.4 GHz. The thermostat does not support 5 GHz networks.
- App not detecting thermostat: Make sure the thermostat's Wi-Fi icon is blinking, indicating it's in pairing mode. Ensure your smartphone is connected to the same 2.4 GHz Wi-Fi network.
- Intermittent connection: Check the signal strength of your Wi-Fi network near the thermostat. Ensure the thermostat is within range of your router.
9.3. Heating System Not Responding
- Boiler not turning on/off: Verify the receiver is correctly wired to your boiler (refer to Section 4.1). Check the receiver's indicator lights to ensure it's receiving commands from the thermostat.
- Temperature inaccuracy: The thermostat has a detection range (hysteresis) of 0.5 degrees. For example, if set to 20.5°C, heating may activate at 20°C and stop at 21°C. This is normal operation.
10. Warranty and Support
For warranty information and technical support, please refer to the documentation included with your product or visit the official BEOK CONTROLS store on Amazon: BEOK CONTROLS Store.
Keep your purchase receipt as proof of purchase for any warranty claims.