Tenda A23
Tenda AX1500 WiFi 6 Range Extender (Model A23) User Manual
Model: A23 | Brand: Tenda
1. Setup Guide
This section provides instructions for setting up your Tenda AX1500 WiFi 6 Range Extender. The extender supports both Wireless Extension and Access Point (AP) modes.
1.1 Package Contents
- 1 x Tenda WiFi Extender Body
- 1 x Instruction Manual
1.2 Extender Placement
Optimal placement is crucial for effective signal extension. The extender should be placed halfway between your main router and the Wi-Fi dead zone.

Image: Diagram illustrating correct and incorrect placement of the extender. Correct placement is halfway between the router and the Wi-Fi dead zone, resulting in a good signal and fast speed. Incorrect placement too close or too far leads to poor signal or too much overlap.
1.3 Powering On
Plug the extender into a wall socket. The system will start up when the indicator blinks green.

Image: The Tenda AX1500 WiFi 6 Range Extender plugged into a standard wall outlet.
1.4 Wireless Extension Setup (App Method)
For a quick and easy setup, use the Tenda WiFi App.
- Download the Tenda WiFi App by scanning the QR code or visiting http://download.cloud.tenda.com.cn/down/app.
- Connect your smartphone to the extender's default Wi-Fi network (e.g., Tenda_EXT).
- Open the Tenda WiFi App. The app should detect the unconfigured extender. Tap 'Configure'.
- Select the Wi-Fi network you wish to extend and enter its password.
- Set the Wi-Fi information for the extender (Wi-Fi name, password). If no changes are needed, tap 'Next'.
- Once the extension is completed, the extender's indicator will turn solid green.
Video: APP Installation Guide. This video demonstrates the step-by-step process of setting up the Tenda AX1500 WiFi 6 Range Extender using the mobile application for wireless extension.
1.5 Wireless Extension Setup (Web UI Method)
Alternatively, you can set up the extender using a web browser.
- Connect your computer or smartphone to the extender's default Wi-Fi network (e.g., Tenda_EXT).
- Open a web browser and navigate to the extender's web UI (usually re.tenda.cn).
- Follow the on-screen instructions to select your home router's Wi-Fi network and enter its password.
- Configure the extender's Wi-Fi name and password.
- Confirm settings to complete the extension. The indicator will turn solid green upon successful setup.
Video: Web Installation Guide. This video provides a detailed walkthrough of configuring the Tenda AX1500 WiFi 6 Range Extender via its web user interface for wireless extension.
1.6 Access Point (AP) Mode Setup
AP Mode is suitable for rooms with existing Ethernet cables, providing a new Wi-Fi network from a wired connection.
- Connect an Ethernet cable from your router's LAN port (or a wall Ethernet port) to the Gigabit Ethernet port on the Tenda extender.
- Plug the extender into a wall socket.
- Connect your smartphone or PC to the extender's default Wi-Fi network (e.g., Tenda_EXT).
- Open the Tenda WiFi App or a web browser (re.tenda.cn) and follow the instructions to set up the extender in AP mode.
- Set the desired Wi-Fi name and password for the new AP network.
- The indicator will turn solid green when the AP mode is successfully configured and providing internet access.

Image: Illustration of the Gigabit Ethernet Port on the extender, demonstrating its use for wired connections and AP mode.
2. Operating Instructions
2.1 Connecting to the Extended Network
After successful setup, your Tenda AX1500 extender will broadcast a new Wi-Fi network. The default name will be your original Wi-Fi name with '_EXT' appended (e.g., MyHomeWiFi_EXT). Connect your Wi-Fi enabled devices (smartphones, laptops, smart TVs, game consoles) to this new network using the same password as your main router's Wi-Fi.
2.2 Understanding LED Indicators
The LED indicator on the extender provides important status information:
- Solid Green: Good connection, optimal placement.
- Solid Yellow: Fair connection, consider adjusting placement.
- Solid Red: Poor connection or too far from the router. Relocate the extender closer to the router.
- Blinking Green: System starting up.

Image: Visual guide to the LED Signal Indicator, explaining what each color (green, yellow, red) signifies regarding signal strength and placement.
2.3 Advanced Features
- Dual-Band Bridging: The extender automatically selects the most stable band (2.4GHz or 5GHz) to extend, ensuring network stability.
- MU-MIMO & OFDMA: These technologies reduce network congestion, allowing for reliable performance with 30+ connected devices simultaneously.
- Gigabit Ethernet Port: Use this port to connect wired devices like smart TVs, PCs, or gaming consoles for faster, more stable connections. It also enables AP mode functionality.
- WPS Easy Setup: For compatible routers, press the WPS button on both the router and the extender for quick, one-click setup.
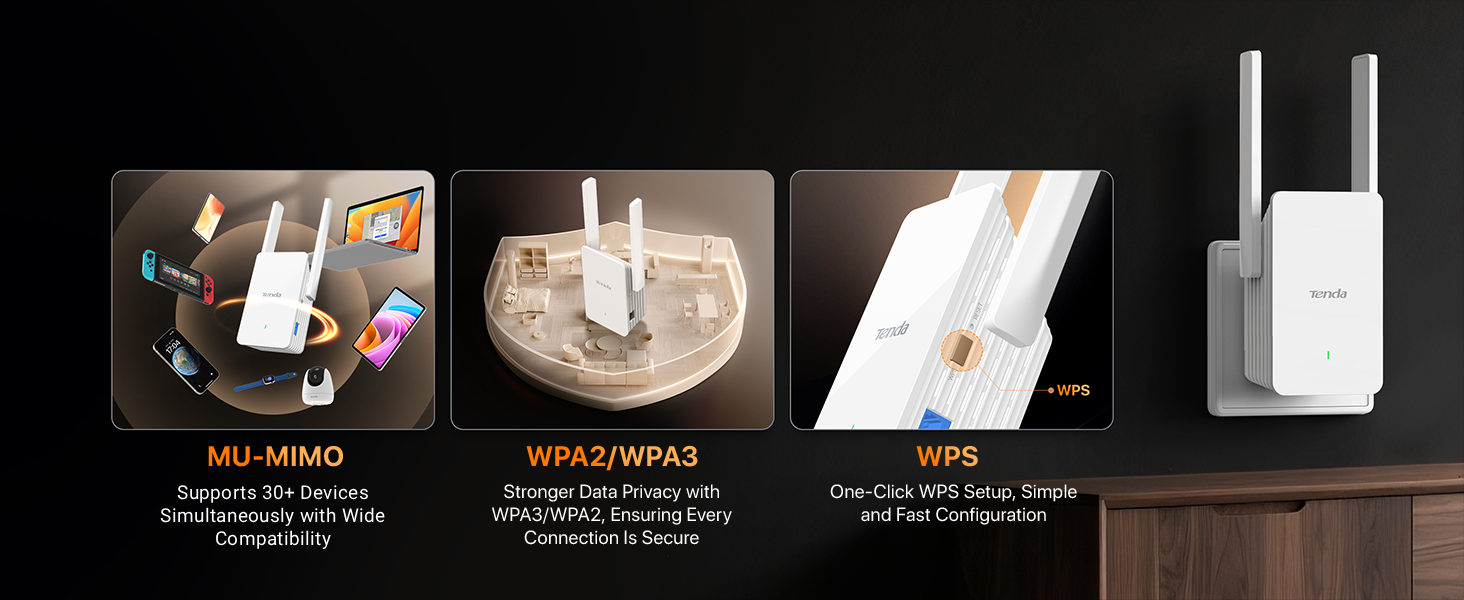
Image: Features of the Tenda AX1500 Extender, including MU-MIMO for multiple devices, WPA2/WPA3 for stronger data privacy, and WPS for one-click setup.
3. Maintenance
To ensure optimal performance and longevity of your Tenda AX1500 WiFi 6 Range Extender, follow these maintenance guidelines:
- Keep Clean: Regularly wipe the device with a soft, dry cloth to prevent dust accumulation, which can affect performance and thermal efficiency.
- Proper Ventilation: Ensure the extender is placed in an area with adequate airflow. Avoid covering ventilation openings.
- Firmware Updates: Check the Tenda website or the Tenda WiFi App periodically for firmware updates. Keeping the firmware updated ensures the best performance and security.
- Avoid Extreme Conditions: Do not expose the device to extreme temperatures, humidity, or direct sunlight.
4. Troubleshooting
If you encounter issues with your Tenda AX1500 WiFi 6 Range Extender, refer to the following common troubleshooting steps:
- No Internet Access After Setup:
- Check the extender's LED indicator. If it's red, the extender is too far from the router. Relocate it closer until the LED turns green.
- Verify that your main router has internet access.
- Ensure you entered the correct Wi-Fi password for your main router during setup.
- Weak Signal or Slow Speed:
- Adjust the extender's position. The LED indicator should be solid green for optimal performance.
- Ensure there are no major obstructions (thick walls, metal objects) between the router and the extender, or between the extender and your devices.
- Note that extenders improve coverage, not directly increase internet speed.
- Cannot Access Web UI or App:
- Ensure your device is connected to the extender's Wi-Fi network (e.g., Tenda_EXT).
- Try restarting the extender and your device.
- If using a smartphone, disable mobile data traffic before accessing the web UI.
- Forgot Extender's Wi-Fi Password:
- You can reset the extender to factory default settings by pressing and holding the reset button for about 8-10 seconds. After resetting, you will need to set it up again.
5. Specifications
| Feature | Detail |
|---|---|
| Brand | Tenda |
| Model Number | A23 |
| Wireless Communication Standard | 802.11a/b/g/n/ac, 802.11ax (WiFi 6) |
| Data Transfer Rate | Up to 1500 Megabits Per Second (300Mbps on 2.4GHz + 1201Mbps on 5GHz) |
| Frequency Band Class | Dual-Band (2.4GHz, 5GHz) |
| Special Features | Light Indicator, Lightweight, Mountable, MU-MIMO, OFDMA, Efficient Thermal Design |
| Compatible Devices | Desktop, Game Console, Laptop, Router, Smart Television |
| Connector Type | RJ45 (Gigabit Ethernet Port) |
| Item Weight | 100 Grams |
| Item Dimensions (D x W x H) | 1.87"D x 2.83"W x 4.84"H |
| UPC | 885397278214 |
6. Warranty Information
The Tenda AX1500 WiFi 6 Range Extender (Model A23) comes with a 3-Year Warranty. Please retain your proof of purchase for warranty claims. For detailed warranty terms and conditions, refer to the official Tenda website or contact customer support.
7. Customer Support
For technical assistance, troubleshooting, or any product-related inquiries, please contact Tenda Customer Support:
- Email: support.usa@tenda.cn (Monday to Friday)
- Phone: +1 800-570-5892
- Website: For more information and resources, visit www.tendacn.com

Image: Tenda customer support details, including email and phone number.
Ask a question about this manual
Ask about setup, troubleshooting, compatibility, parts, safety, or missing instructions. Manuals+ will review the question and use this page’s manual context to help answer it.