1. Introduction
This user manual provides comprehensive instructions for the installation, operation, and maintenance of your ALOEU Android 15 9-inch Car Multimedia System. This system is designed for Nissan Serena 4 C26 models manufactured between 2010 and 2016. Please read this manual thoroughly before using the product to ensure proper functionality and safety.
2. Safety Information
- Professional Installation Recommended: While installation is designed to be straightforward, professional installation is recommended to prevent damage to the unit or vehicle.
- Vehicle Compatibility: Ensure the product is compatible with your specific vehicle model and year (Nissan Serena 4 C26, 2010-2016). Contact support with your car model, year, and a picture of your center console for verification if unsure.
- Power Supply: Connect the unit only to a 12V DC power supply with a negative ground.
- Avoid Distractions: Do not operate the system in a way that distracts you from driving. Always prioritize road safety.
- Temperature: Avoid exposing the unit to extreme temperatures or direct sunlight for prolonged periods.
- Cleaning: Use a soft, dry cloth for cleaning. Do not use abrasive cleaners or solvents.
3. Package Contents
Please verify that all items listed below are included in your package:
- 1 × Car Radio Unit
- 1 × RCA Cable
- 2 × USB Cables
- 1 × Camera Cable
- 1 × 4G Antenna
- 1 × GPS Antenna
- 1 × User Manual (this document)
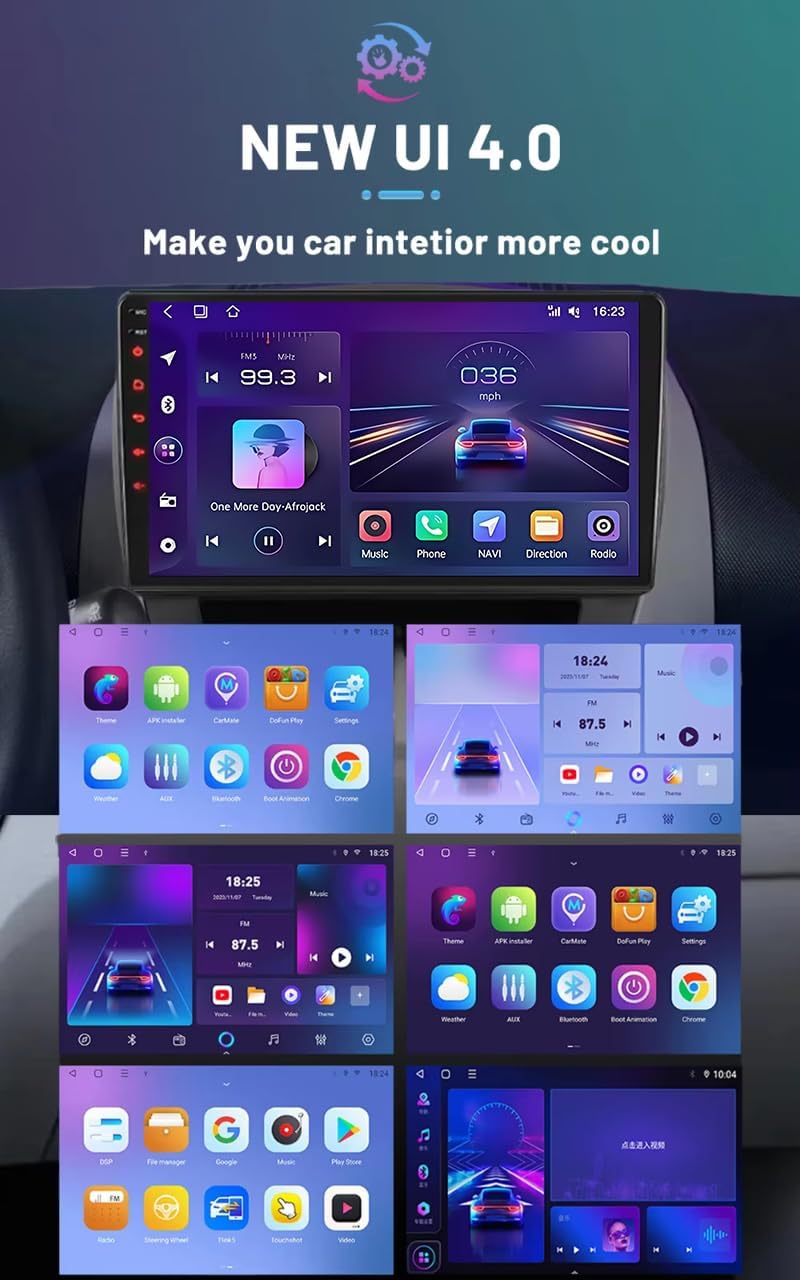
Figure 3.1: Included Components. This image displays the main car multimedia unit along with its accessories: power harness, RCA cable, two USB cables, camera cable, and GPS antenna.
4. Product Overview
The ALOEU Android 15 Car Multimedia System features a 9-inch touchscreen display, offering a range of functionalities for an enhanced in-car experience. It integrates navigation, entertainment, and communication features.

Figure 4.1: Front View of the Multimedia System. The image shows the 9-inch touchscreen display with an Android interface, including a radio tuner, music player, navigation, and phone icons.
4.1 Key Features
- Android 15 Operating System
- 9-inch Touchscreen Display
- Wireless Carplay & Android Auto (8-core configurations)
- Bluetooth 5.0 for hands-free calling and audio streaming
- GPS/GLONASS/BEIDOU Navigation
- FM/AM Radio with RDS support
- Mirror Link functionality (iOS/Android)
- Split Screen multitasking
- Steering Wheel Control compatibility
- AHD Reversing Camera input
- Built-in DSP (Digital Sound Processor)
- 4G and WiFi connectivity
- Cooling Fan (8-core configurations)
4.2 System Configurations
The system is available in various configurations, primarily differing in CPU cores, RAM, and ROM. Higher configurations offer enhanced performance and additional features.

Figure 4.2: Product Configuration Details. This table outlines the specifications for various models, including RAM/ROM, Android version, CPU (4-core or 8-core), radio chip, amplifier IC, display resolution, internet connectivity (WiFi/4G), GPS, DSP, RDS, USB ports, and Carplay/Android Auto support.
5. Setup and Installation
The installation process is designed to be plug-and-play for compatible vehicles. However, careful attention to wiring and vehicle-specific requirements is essential.
5.1 Pre-Installation Check
- Confirm vehicle compatibility: Nissan Serena 4 C26 (2010-2016).
- Ensure all package contents are present.
- Disconnect the vehicle's battery before starting installation to prevent electrical shorts.
5.2 Installation Steps
- Carefully remove the existing car radio or blank panel from your vehicle's dashboard. Refer to your vehicle's service manual for specific instructions.
- Connect the main power harness to the corresponding port on the multimedia unit and to your vehicle's wiring harness. Ensure all connections are secure.
- Connect the RCA cables, USB cables, camera cable, 4G antenna, and GPS antenna to their respective ports on the unit. Route cables neatly to avoid interference and damage.
- Mount the multimedia unit into the dashboard opening. Secure it using the provided mounting brackets or screws.
- Reconnect the vehicle's battery.
- Turn on the vehicle's ignition and power on the multimedia system to test functionality.

Figure 5.1: Installation Example in Nissan Serena 4 C26. This image shows the dashboard before and after the multimedia system is installed, demonstrating the integrated fit.

Figure 5.2: Rear Panel Connections. This image illustrates the various input and output ports on the back of the unit, including connections for power, RCA, USB, camera, and antennas.
6. Operating Instructions
This section details the primary functions and how to operate your multimedia system.
6.1 Basic Operations
- Power On/Off: Press and hold the power button (usually on the left side of the unit) to turn the system on or off. A short press typically mutes/unmutes audio.
- Volume Control: Use the volume buttons or the touchscreen interface to adjust audio levels.
- Touchscreen Navigation: Swipe, tap, and pinch gestures are used to navigate the Android interface.
6.2 Radio (FM/AM)
Access the "Radio" application from the main menu. The system supports automatic station search and manual tuning. You can save your favorite stations for quick access.
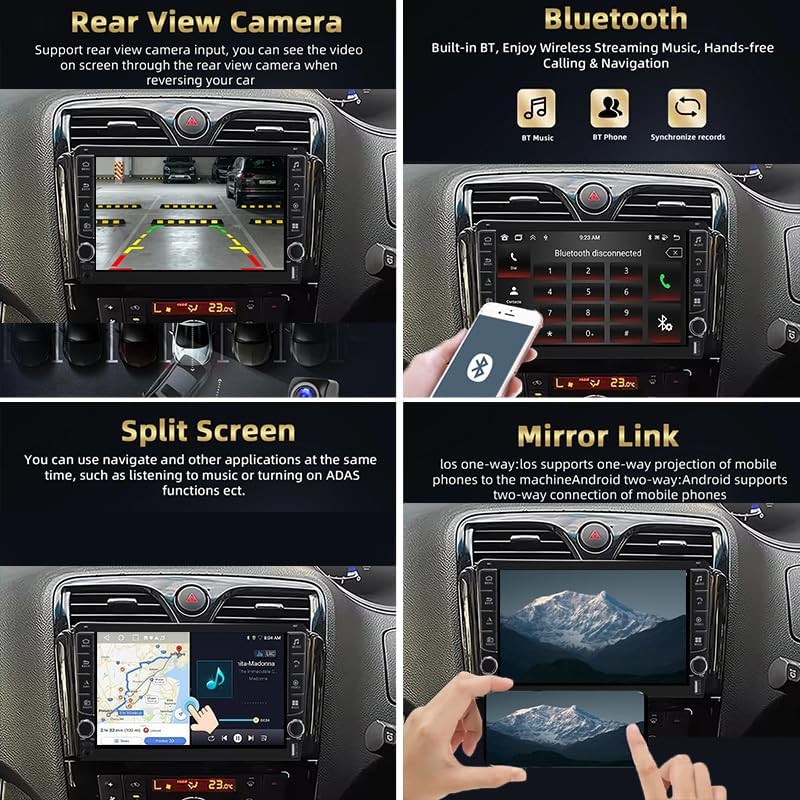
Figure 6.1: FM/RDS Radio Interface. The image displays the radio application with frequency display, station presets, and tuning controls.
6.3 Bluetooth 5.0
Pair your smartphone via Bluetooth for hands-free calling, contact synchronization, and audio streaming.
- Go to "Settings" and enable Bluetooth.
- On your phone, search for available Bluetooth devices and select the unit's name (e.g., "CarBT").
- Confirm the pairing code on both devices.
- Once paired, you can make/receive calls and play music through the car speakers.

Figure 6.2: Bluetooth Functionality. This image shows the Bluetooth menu with options for music playback, phone calls, and contact synchronization.
6.4 Wireless Carplay & Android Auto
For 8-core configurations, the system supports wireless Carplay and Android Auto. This allows seamless integration of your smartphone's features (navigation, music, messages, calls) onto the car's display.
- Ensure your phone's Wi-Fi and Bluetooth are enabled.
- Open the Carplay/Android Auto app on the multimedia unit.
- Follow the on-screen prompts to connect your phone wirelessly.
Figure 6.3: Carplay/Android Auto Interface. The image shows the integrated smartphone interface with map and music applications.
6.5 Mirror Link
Mirror Link allows you to display your smartphone screen on the multimedia unit. Connect via USB cable or Wi-Fi.
- For iOS: One-way projection (phone to unit).
- For Android: Two-way connection (control phone from unit).
Figure 6.4: Mirror Link Functionality. This image demonstrates a smartphone screen being mirrored onto the car's display, allowing access to phone applications.
6.6 GPS Navigation
The system supports various navigation applications (e.g., Yandex, Sygic, Waze, Google Maps). Access the "NAVI" or "Maps" application from the main menu.
- Ensure the GPS antenna is properly installed and has a clear view of the sky.
- Download and update maps as needed via Wi-Fi or 4G.
Figure 6.5: GPS Navigation Interface. The image displays a map application providing real-time navigation and route information.
6.7 Split Screen
The split-screen feature allows you to run two applications simultaneously, such as navigation and a music player.
- Open the first application.
- Press and hold the recent apps button or swipe up from the bottom (depending on UI) to enter split-screen mode.
- Select the second application to display alongside the first.
Figure 6.6: Split Screen Functionality. This image illustrates the display divided into two sections, showing a navigation app on one side and a music player on the other.
6.8 Steering Wheel Control
If your vehicle supports it, the system can be integrated with your steering wheel controls. This allows you to adjust volume, change tracks, and answer calls without taking your hands off the wheel.
- Access the "Steering Wheel Control" settings in the system menu.
- Follow the on-screen instructions to program the buttons.
Figure 6.7: Steering Wheel Control Interface. The image shows the settings menu for configuring steering wheel buttons to control the multimedia system.
6.9 Rear View Camera
The system supports AHD reversing cameras. When the vehicle is in reverse gear, the display will automatically switch to the camera view, providing a clear image of the area behind your vehicle.
- Ensure the camera is properly installed and connected to the "CAM IN" port.
- Test the camera functionality after installation.
Figure 6.8: Rear View Camera Display. This image shows the screen automatically switching to the rear camera view when the car is in reverse.
6.10 User Interface (UI 4.0)
The system features a modern and intuitive User Interface (UI 4.0) designed for ease of use and customization. You can personalize themes and app layouts.
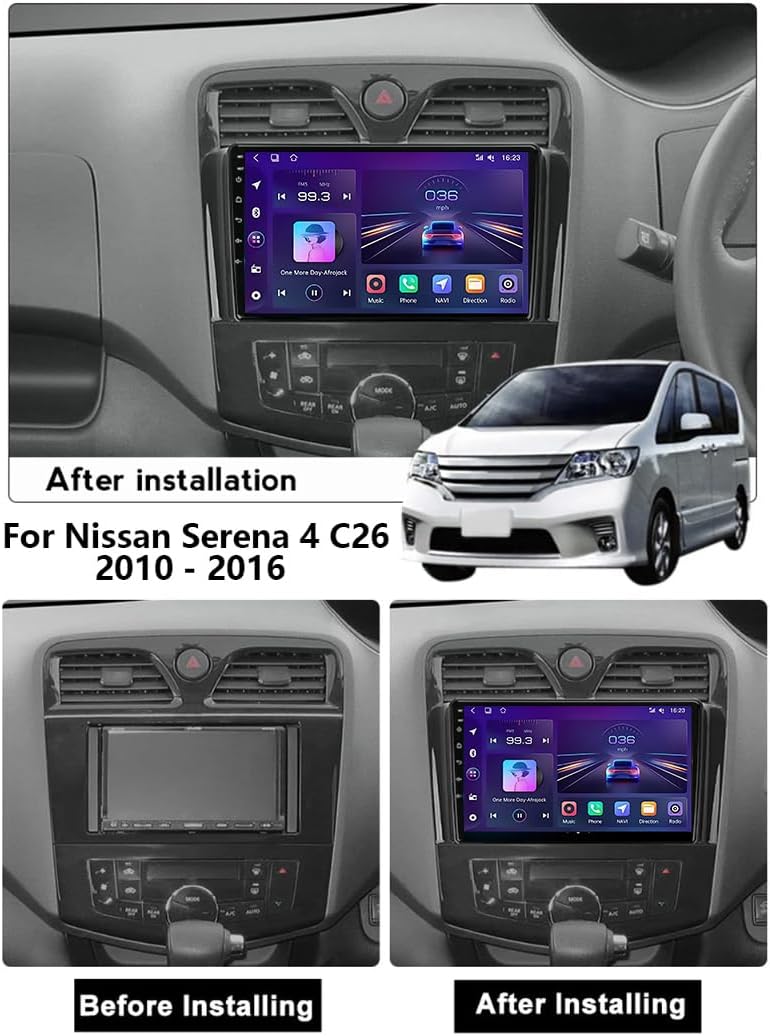
Figure 6.9: NEW UI 4.0. This image showcases different visual themes and application arrangements available within the system's user interface.
7. Maintenance
- Screen Cleaning: Use a soft, lint-free cloth to gently wipe the touchscreen. For stubborn smudges, slightly dampen the cloth with water or a screen-safe cleaner. Avoid harsh chemicals.
- Software Updates: Periodically check for software updates through the system settings to ensure optimal performance and access to new features.
- Cooling System (8-core models): The built-in cooling fan helps maintain optimal operating temperature. Ensure the vents are not obstructed.
8. Troubleshooting
| Problem | Possible Cause | Solution |
|---|---|---|
| No power | Loose power connection, blown fuse, vehicle battery issue. | Check power harness connections. Inspect vehicle fuses. Ensure vehicle battery is charged. |
| No sound | Volume muted, speaker wires disconnected, incorrect audio output settings. | Check volume level and mute status. Verify speaker wire connections. Adjust audio settings in the system menu. |
| GPS signal lost/inaccurate | GPS antenna obstructed or improperly installed, outdated maps. | Ensure GPS antenna has a clear view of the sky. Check antenna connection. Update navigation maps. |
| Bluetooth not connecting | Bluetooth off on phone/unit, incorrect pairing process, interference. | Ensure Bluetooth is enabled on both devices. Re-attempt pairing. Clear previous pairings. |
| Touchscreen unresponsive | System frozen, temporary software glitch. | Restart the unit (press and hold power button). If issue persists, perform a factory reset (data will be lost). |
If you encounter issues not listed here or if the suggested solutions do not resolve the problem, please contact customer support.
9. Specifications
| Feature | Detail |
|---|---|
| Brand | ALOEU |
| Model Number | 86550_ALOEU-940043-03 |
| Operating System | Android 15 |
| Display Size | 9 inches |
| CPU | 4 Core / 8 Core (depending on configuration) |
| RAM | 2GB, 4GB, 6GB, 8GB, 12GB (depending on configuration) |
| ROM | 32GB, 64GB, 128GB, 256GB (depending on configuration) |
| Bluetooth Version | 5.0 |
| Connectivity | 4G, Wi-Fi (2.4G) |
| GPS | GPS / GLONASS / BEIDOU |
| Product Dimensions | 15 x 30 x 50 cm (approximate) |
| Product Weight | 3 kg (approximate) |
10. Warranty and Support
For professional technical support, compatibility checks, installation guidance, or any post-sales inquiries, please contact the seller, Amarsi XQXA. They offer assistance before and after purchase, including video tips during installation.
- Return Policy: The product is subject to a 31-day return/replacement policy.
- Contact Support: Refer to your purchase platform for direct contact information for Amarsi XQXA.