1. Introduction
This manual provides detailed instructions for the installation, operation, and maintenance of your Briidea HSCG-09DE Chlorinator Salt Water System. Please read this manual thoroughly before installation and use to ensure proper function and safety. Keep this manual for future reference.
2. Safety Information
Always observe the following safety precautions to reduce the risk of injury, electric shock, fire, or property damage:
- Electrical Safety: Ensure the unit is connected to a properly grounded outlet. Do not operate if the power cord is damaged. Disconnect power before performing any service or maintenance.
- Water and Chemicals: This device works with salt water. Always handle pool chemicals with care and follow manufacturer guidelines. Avoid direct contact with the salt cell electrodes.
- Installation: Installation must be performed by a qualified professional or in accordance with local electrical and plumbing codes.
- Children: Keep the device and its components out of reach of children.
- Operating Environment: The unit is designed for outdoor use with an IP66 waterproof rating, but avoid submerging it.
3. Product Overview
The Briidea HSCG-09DE is a salt water chlorinator designed to efficiently sanitize your pool. It features intelligent monitoring and protection, a durable titanium salt cell, and a user-friendly control interface.
3.1 Key Components and Features
- Control Panel: Digital display for various parameters and intuitive buttons for settings adjustment.
- Titanium Salt Cell: Equipped with 3 titanium salt cells designed for a lifespan of up to 2 years.
- Magnetic Water Flow Switch: Ensures reliable operation and protects the system by detecting water flow.
- Replaceable Electrodes: Allows for cost-effective maintenance and flexible installation.
- IP66 Waterproof Design: Provides protection against dust and powerful water jets, suitable for various weather conditions.
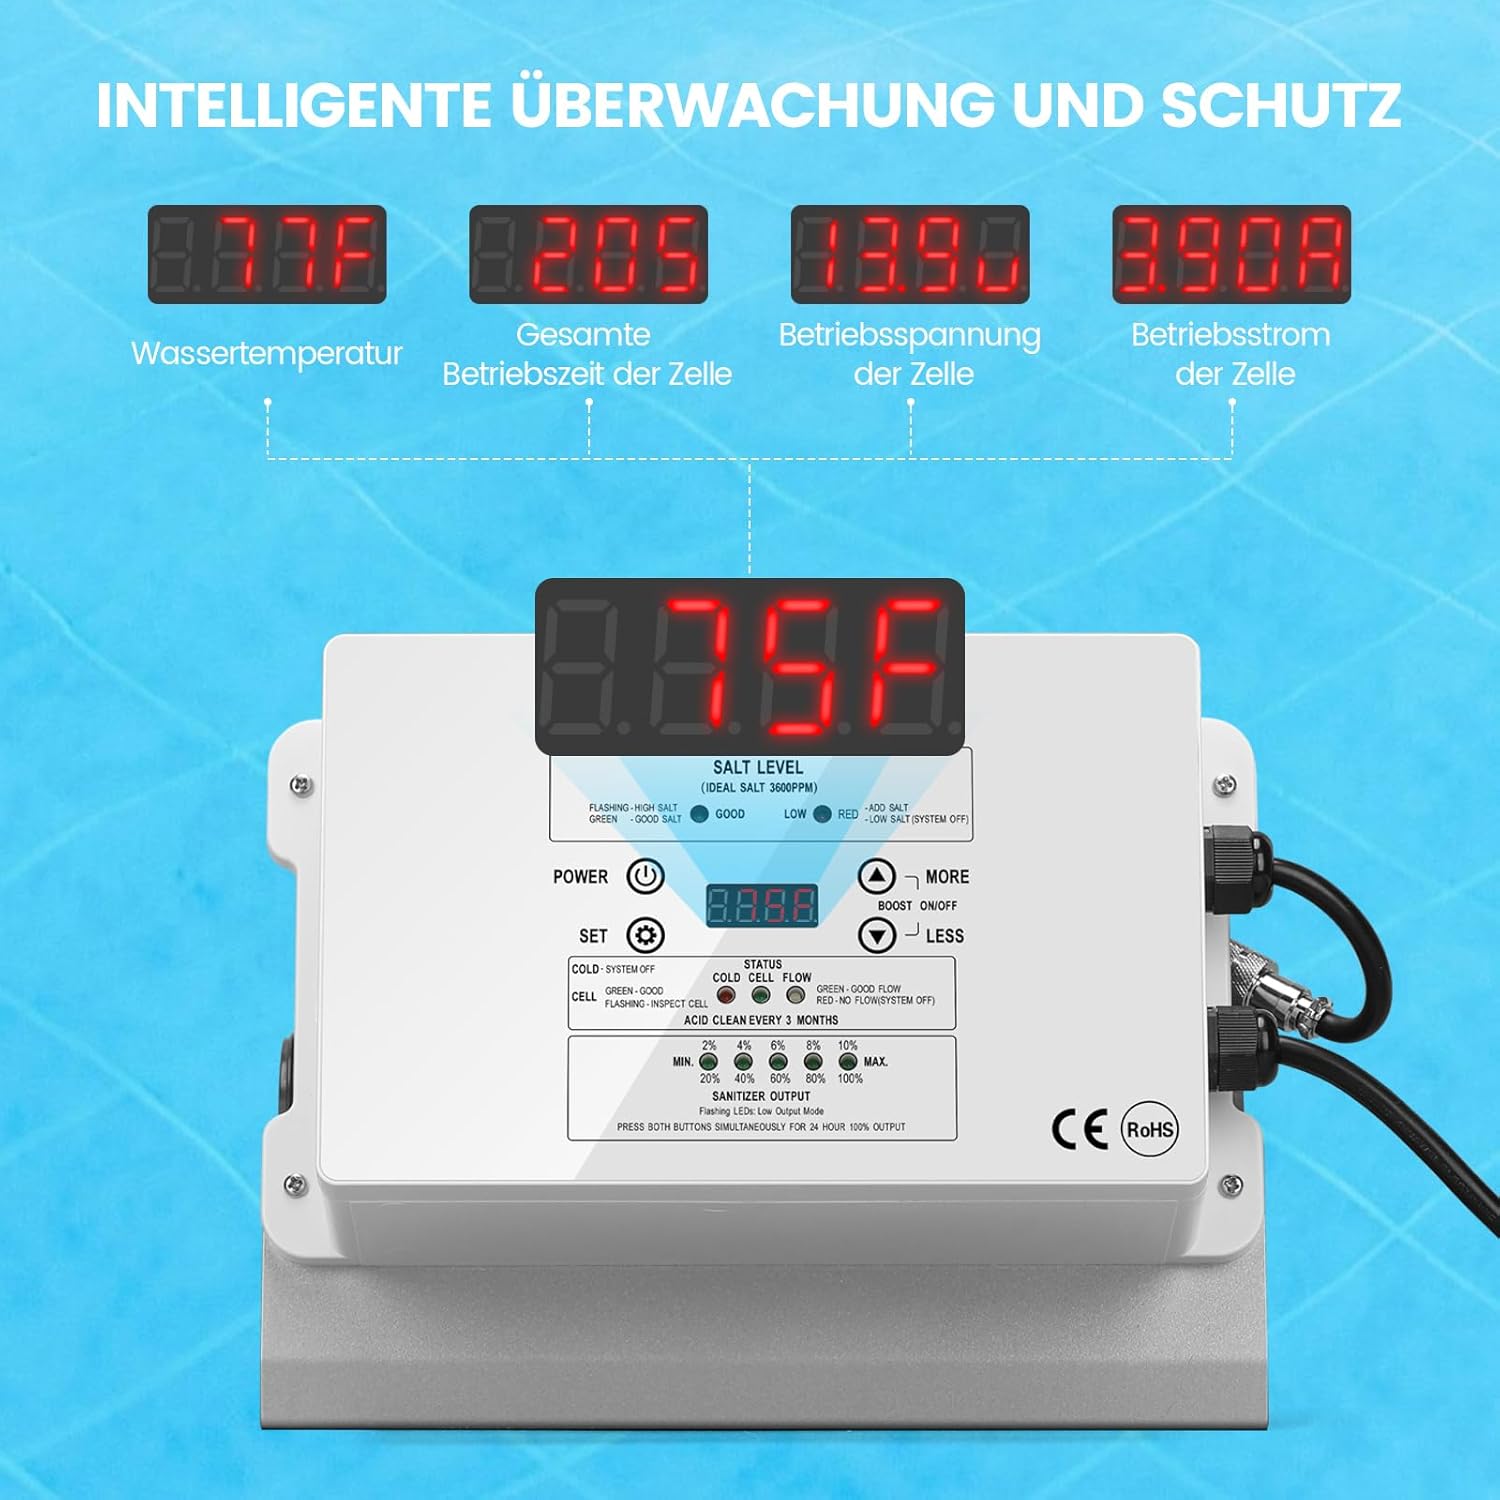
Figure 1: Front view of the Briidea HSCG-09DE control unit, showing the digital display and control buttons.

Figure 2: Close-up view of the USA-made titanium salt cell, highlighting its three plates and 2-year lifespan.

Figure 3: Illustration of smart design elements including the magnetic water flow switch, individually replaceable titanium electrodes, and IP66 waterproof rating.
4. Setup and Installation
Proper installation is crucial for the efficient and safe operation of your chlorinator. Refer to the diagram below for guidance.

Figure 4: Diagram illustrating the typical installation of the chlorinator in a pool filtration system.
4.1 Installation Steps
- Choose Location: Select a suitable location for the chlorinator unit, ensuring it is easily accessible for operation and maintenance, and protected from direct sunlight if possible.
- Mount the Unit: Securely mount the chlorinator control unit to a vertical surface using appropriate fasteners.
- Plumbing Connection: Integrate the chlorinator cell into your pool's filtration system after the filter pump and before the return to the pool. Ensure the water flows through the cell in the correct direction. The system is designed for ID 1-1/4" (32mm) hoses.
- Electrical Connection: Connect the chlorinator to a dedicated, grounded electrical outlet. Ensure all electrical connections are secure and waterproof.
- Initial Pool Chemistry: Before operating the chlorinator, ensure your pool water is balanced. Add pool salt to achieve the ideal salt level (typically 3000 PPM, as indicated on the unit).
- Leak Check: After plumbing, run the pool pump and check for any leaks around the chlorinator connections.

Figure 5: Physical dimensions of the chlorinator unit and a display of included accessories such as hose adapters and mounting hardware.
5. Operating Instructions
The control panel allows you to monitor and adjust the chlorinator's operation. Familiarize yourself with the display and buttons.
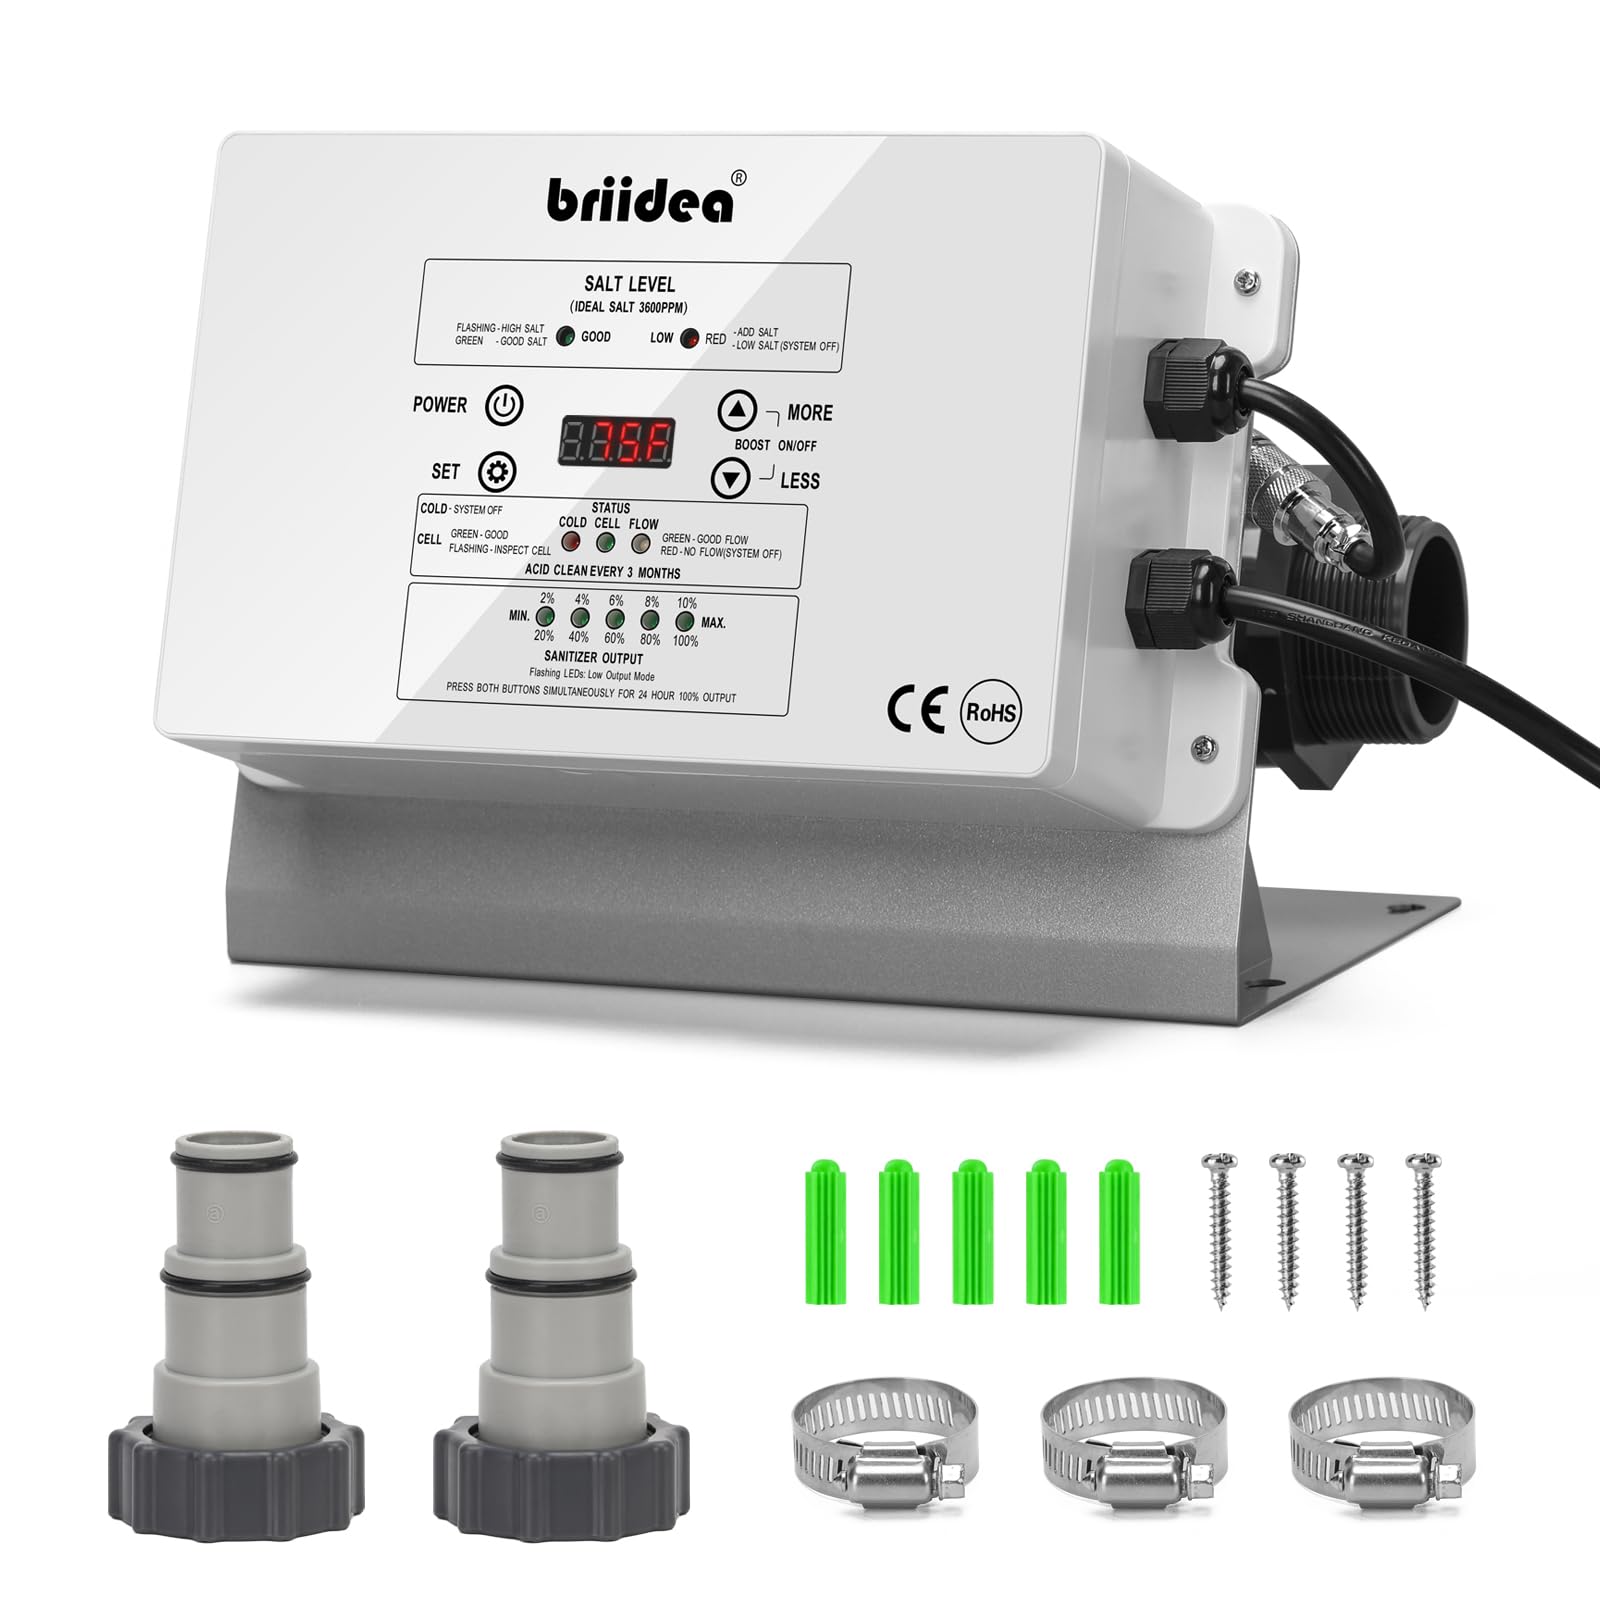
Figure 6: Detailed view of the chlorinator's control panel, showing the digital display, status indicators, and control buttons.
5.1 Control Panel Functions
- POWER Button: Press to turn the unit ON or OFF.
- SET Button: Used to enter settings mode or confirm selections.
- MORE / LESS Buttons: Adjust sanitizer output levels or navigate through menu options.
5.2 Digital Display Readings
The display cycles through various operational parameters:
- Water Temperature: Current pool water temperature.
- Total Cell Operating Time: Accumulated hours of cell operation.
- Cell Operating Voltage: Current voltage across the salt cell.
- Cell Operating Current: Current flowing through the salt cell.
- Salt Level (IDEAL SALT 3000PPM): Displays the detected salt concentration in parts per million (PPM).
5.3 Status Indicators
- FLASHING - HIGH SALT: Indicates salt level is too high.
- GREEN - GOOD SALT: Indicates salt level is within the ideal range.
- LOW - RED - LOW SALT: Indicates salt level is too low. Add salt as needed.
- RED - SYSTEM OFF: Indicates the system is off or experiencing an error.
- COLD - SYSTEM OFF: Indicates water temperature is too low for safe operation.
- CELL - GREEN - GOOD: Indicates the salt cell is functioning correctly.
- FLASHING - INSPECT CELL: Suggests the cell may need inspection or cleaning.
- ACID CLEAN EVERY 3 MONTHS: Reminder for periodic acid cleaning of the cell.
5.4 Sanitizer Output Adjustment
Use the MORE and LESS buttons to adjust the chlorine production level. The output can be set from MIN to MAX (0% to 100%) in increments:
- MIN (0%)
- 20%
- 40%
- 60%
- 80%
- 100%
- MAX (Boost ON/OFF - Press both buttons simultaneously for 24-hour 100% output)
Adjust the output based on your pool size, bather load, and desired chlorine residual.
6. Maintenance
Regular maintenance ensures the longevity and optimal performance of your chlorinator.
6.1 Salt Cell Cleaning
- The "ACID CLEAN EVERY 3 MONTHS" indicator will remind you when it's time to clean the salt cell.
- Procedure:
- Turn off the chlorinator and pool pump.
- Disconnect power to the unit.
- Remove the salt cell from the plumbing.
- Inspect the cell plates for scale buildup.
- If scale is present, soak the cell in a diluted acid solution (e.g., muriatic acid diluted with water, following safety guidelines) until the scale dissolves. Do not scrape the plates with metal objects.
- Rinse the cell thoroughly with fresh water.
- Reinstall the cell and restore power.
- Note: The titanium electrodes are individually replaceable, which can extend the life of the cell unit.
6.2 General Cleaning
- Keep the control unit clean and free from dust and debris. Wipe with a damp cloth as needed.
- Ensure all electrical connections remain dry and secure.
7. Troubleshooting
This section addresses common issues you might encounter with your chlorinator.
| Problem | Possible Cause | Solution |
|---|---|---|
| System Off (RED - SYSTEM OFF) | No power, low water flow, or internal error. | Check power supply. Ensure pool pump is running and water is flowing through the cell. Restart the unit. If the problem persists, contact support. |
| Low Salt (RED - LOW SALT) | Insufficient salt concentration in the pool water. | Test pool salt level with a reliable kit. Add pool salt as needed to reach 3000 PPM. Allow time for salt to dissolve and circulate before re-checking. |
| High Salt (FLASHING - HIGH SALT) | Excessive salt concentration in the pool water. | Partially drain the pool and refill with fresh water to dilute the salt concentration. Retest salt level. |
| No Chlorine Production | Low salt, dirty cell, low flow, or incorrect output setting. | Check salt level. Clean the salt cell if "INSPECT CELL" indicator is on. Ensure pump is running and flow is adequate. Increase sanitizer output setting. |
| Cold Water (COLD - SYSTEM OFF) | Pool water temperature is below the operating threshold. | The system will automatically resume operation when the water temperature rises to an acceptable level. |
| Inspect Cell (FLASHING - INSPECT CELL) | Scale buildup on cell plates or cell nearing end of life. | Perform an acid clean of the salt cell as described in the Maintenance section. If the issue persists after cleaning, the cell may need replacement. |
8. Specifications
| Feature | Detail |
|---|---|
| Brand | Briidea |
| Model Number | HSCG-09DE (Part No: br-075) |
| ASIN | B0FHV65RHK |
| Maximum Pool Volume | Up to 56,800 Liters (approx. 15,000 Gallons) |
| Ideal Salt Level | 3000 PPM (Parts Per Million) |
| Salt Cell Type | Titanium (3 plates) |
| Estimated Cell Lifespan | 2 years |
| Waterproof Rating | IP66 |
| Hose Connection Size | ID 1-1/4" (32mm) |
| Dimensions (Control Unit) | Approx. 23.1 cm (L) x 17.5 cm (W) x 15 cm (H) (excluding plumbing connections) |

Figure 7: Illustrative image of a pool, indicating the chlorinator's capacity for pools up to 56,800 liters.
9. Warranty and Support
9.1 Warranty Information
Specific warranty details for the Briidea HSCG-09DE Chlorinator Salt Water System may vary. Please refer to the warranty card included with your product or contact the retailer/manufacturer directly for precise terms and conditions.
9.2 Customer Support
For technical assistance, troubleshooting beyond this manual, or spare parts inquiries, please contact Briidea customer support. Have your model number (HSCG-09DE or br-075) and purchase date ready when contacting support.
Contact information can typically be found on the product packaging, the manufacturer's official website, or through your point of purchase.