Product Overview
The Ratakee Digital Alarm Clock Radio RA01 is designed for ease of use and clear readability, making it suitable for bedrooms, offices, and kitchens. It features a large 1.4-inch LED display, AM/FM radio with presets, multiple alarm tones, a sleep timer, and a convenient snooze function. Dual power options ensure reliability, even during power outages.
Key Features:
- Easy Operation: Simplified controls with switches for alarm functions.
- Large LED Display: 1.4-inch green LED digits for clear visibility.
- Digital AM/FM Radio: Tune into favorite stations with 20 AM and 20 FM presets.
- Multiple Alarm Tones: Choose from AM/FM radio, music, or classic beep.
- Adjustable Alarm Volume: Levels 5-15 for personalized wake-up experience.
- Dimmable Display: Rotary knob for 0-100% brightness adjustment.
- Sleep Timer: Auto-off radio function (10-90 minutes).
- Earphone Jack: For private listening with stereo sound.
- Dual Power: AC 120V outlet or 3 AA batteries (not included) for backup.
- Large Snooze Button: Provides an extra 9 minutes of sleep.
Getting Started
Unboxing and Initial Setup
Upon receiving your Ratakee Digital Alarm Clock Radio, carefully remove it from its packaging. The package includes the alarm clock radio, a user manual, and a warranty card.
Video Description: This video provides a comprehensive guide to the Ratakee Digital Alarm Clock Radio. It covers unboxing the device, connecting it to power, setting the time, adjusting the display brightness, and demonstrating the classic beep and music alarm sounds. Specific segments include unboxing (0:00-0:29), plugging into a receptacle (0:30-0:49), setting the time (0:50-1:50), adjusting the dimmer (1:51-2:09), setting the alarm to beep (2:10-2:17), and setting the alarm to music (2:18-2:53).
Power Connection
The alarm clock radio offers two power methods: AC power and battery backup.
- AC Power: Insert the AC power cord into the port on the back of the unit, then plug it into a standard AC 110-120V outlet. The display will light up.
- Battery Backup: For battery backup, open the battery compartment on the bottom of the unit. Install 3 AA batteries (not included), ensuring correct polarity. Close the compartment cover. In case of AC power loss, the batteries will power the clock, alarm, and radio, though the display will auto-dim after 20 seconds of no operation to conserve power.

Image Description: This image illustrates the dual power options for the Ratakee Digital Alarm Clock Radio. It shows the clock displaying '1:02 AM', an AC power plug ready to be connected, and three AA batteries, emphasizing that the device can be powered by an outlet or batteries for backup.
Basic Operation
Control Layout
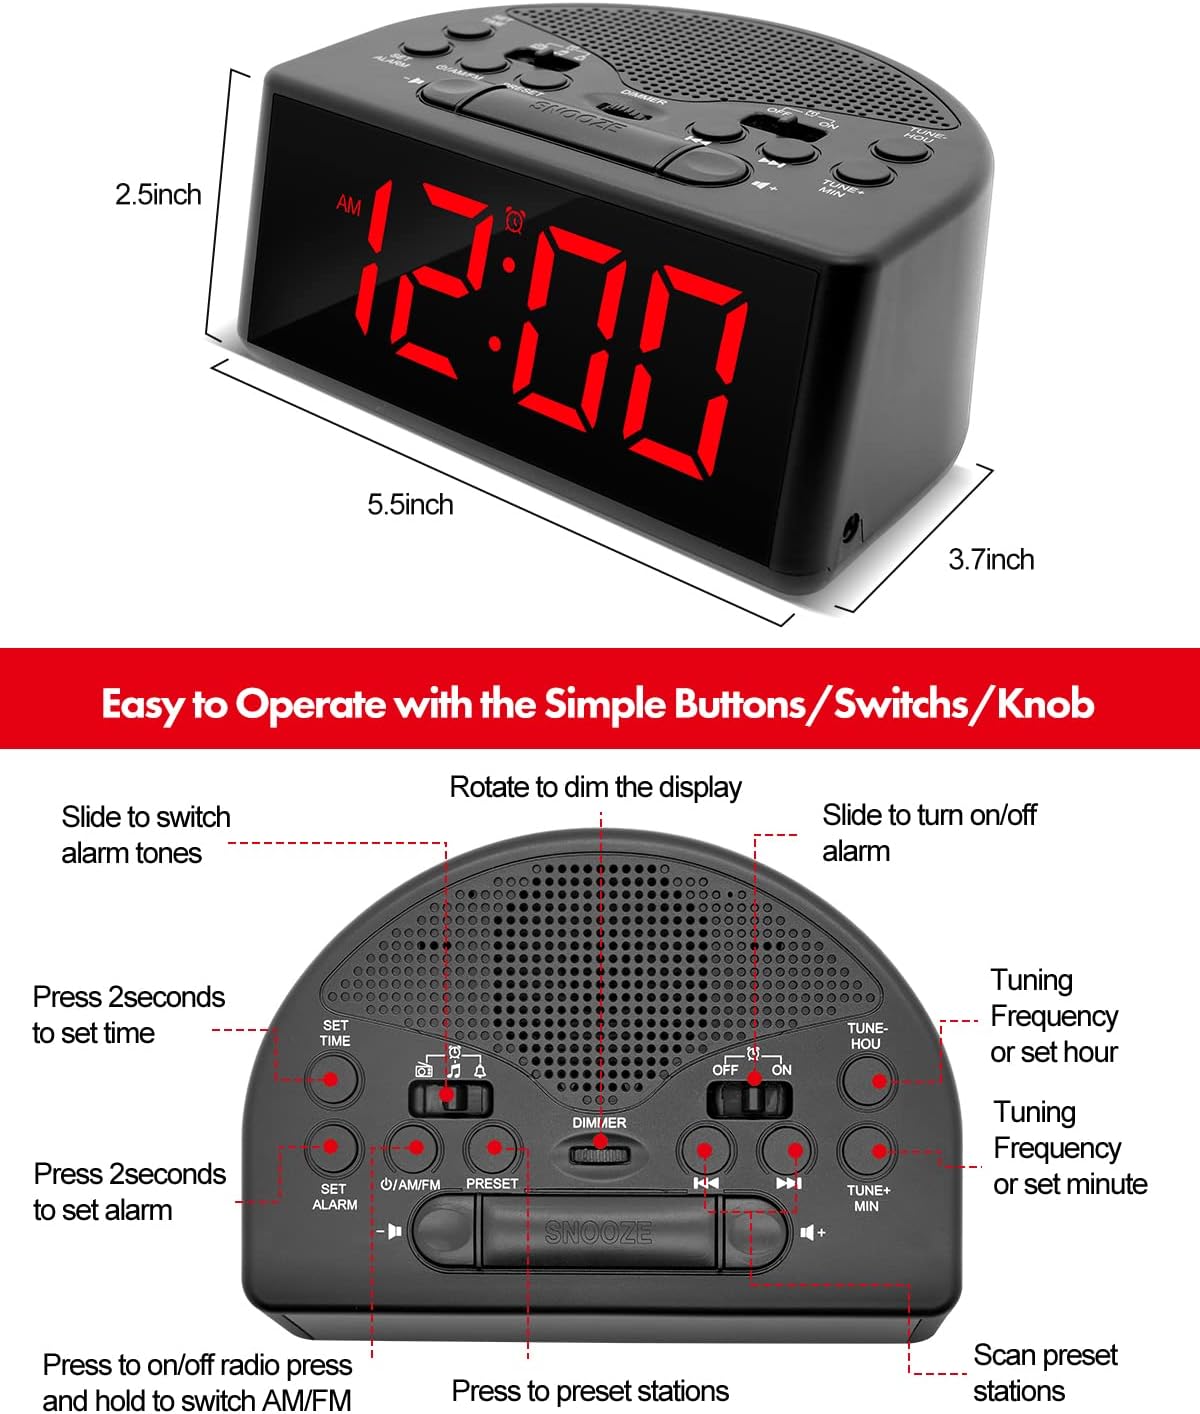
Image Description: A detailed top-down view of the Ratakee Digital Alarm Clock Radio, labeling its various controls. These include buttons for 'SET TIME', 'SET ALARM', 'ON/OFF', 'PRESET', 'TUNE+ MIN', 'TUNE- HOU', and a large 'SNOOZE' button. It also shows switches for 'AM/FM' radio, alarm tone selection (music/beep/radio), and 'OFF/ON' for the alarm, along with a 'DIMMER' rotary knob.
Setting the Time
- Press and hold the SET TIME button for 2 seconds until the display flashes.
- Use the TUNE+ HOU button to adjust the hour and the TUNE+ MIN button to adjust the minutes. Observe the AM/PM indicator.
- Press SET TIME again to confirm and exit time setting mode.
Video Description: This segment of the instructional video demonstrates how to set the current time on the Ratakee Digital Alarm Clock Radio. It shows the user pressing the 'SET TIME' button and then using the hour and minute adjustment buttons to set the desired time.
Setting the Alarm
The alarm clock offers three selectable alarm sounds: classic beep, music, or AM/FM radio.
- Press and hold the SET ALARM button for 2 seconds until the alarm time flashes.
- Use the TUNE+ HOU button to adjust the alarm hour and the TUNE+ MIN button to adjust the alarm minutes.
- Slide the alarm tone switch (located near the AM/FM switch) to select your desired alarm sound: Beep (bell icon), Music (note icon), or Radio (radio icon).
- Press SET ALARM again to confirm.
- To activate the alarm, slide the ON/OFF alarm switch (located on the right side of the top panel) to the 'ON' position.
- The alarm volume is adjustable from levels 5-15. The default is 10. Adjust using the volume buttons.

Image Description: This image highlights the three selectable alarm sounds on the Ratakee Digital Alarm Clock Radio. It displays '12:00 AM' and shows visual cues for 'Beep', 'Radio', and 'Music' alarm options, along with an adjustable alarm volume bar.
Video Description: This segment demonstrates setting the alarm to the classic beep sound. The clock displays '8:29 PM' and the beep alarm activates.
Video Description: This segment demonstrates setting the alarm to a music melody. The clock displays '8:30 PM' and a pleasant melody plays as the alarm sound.
AM/FM Radio Operation
- Slide the ON/OFF radio switch to 'ON' to turn on the radio.
- Slide the AM/FM switch to select between AM or FM bands.
- Use the TUNE+ or TUNE- buttons to manually tune to a station. Press and hold to auto-scan for the next available station.
- Setting Presets: To save a station, tune to the desired frequency, then press and hold the PRESET button until the preset number flashes. Use TUNE+ or TUNE- to select a preset number (up to 20 AM and 20 FM stations), then press PRESET again to save.
- Recalling Presets: Briefly press the PRESET button to cycle through saved stations.
- Sleep Timer: While the radio is on, press the SLEEP TIMER button (often integrated with other controls, refer to the control layout image) to set a duration (10-90 minutes) after which the radio will automatically turn off.

Image Description: This image showcases the AM/FM radio capabilities of the Ratakee Digital Alarm Clock Radio. It displays 'FM 102 MHz' with illustrative radio wave graphics and icons indicating features like AM/FM Radio, Radio Volume (1-16 Levels), Auto Search and Storage, and Good Reception.
Display Dimmer
Adjust the brightness of the LED display from 0% (off) to 100% using the rotary dimmer knob located on the top panel. This allows you to customize the display intensity for comfort, especially in dark environments.

Image Description: This image displays three Ratakee Digital Alarm Clock Radios, each showing '10:10 AM' but with varying display brightness levels. A slider graphic illustrates the 0-100% dimmable range, emphasizing the rotary knob for brightness adjustment.
Video Description: This segment of the instructional video demonstrates the full dimmable range of the display using the rotary knob. The clock's display brightness changes from bright to dim and back, showing the flexibility of the dimmer function.
Snooze Function
When the alarm sounds, press the large SNOOZE button located on the top center of the unit to temporarily silence the alarm for 9 minutes. You can use the snooze function up to 3 times. To stop the alarm completely until the next day, press any other button except SNOOZE.

Image Description: This image shows a person's hand pressing the prominent snooze button on the Ratakee Digital Alarm Clock Radio, which displays '9:00 AM'. The scene suggests the ease of using the snooze function for extra rest.
Earphone Port
A 3.5mm earphone jack is provided on the side of the unit for private listening to the radio. When earphones are connected, the stereo mode will automatically activate, providing an enhanced listening experience without disturbing others.
Maintenance
Cleaning and Care
- To clean the unit, wipe it with a soft, dry cloth.
- Do not use abrasive cleaners, waxes, or solvents as they may damage the finish.
- Keep the unit away from direct sunlight, extreme temperatures, and moisture.
- Ensure proper ventilation and do not block the speaker grille.
Troubleshooting
Common Issues and Solutions
| Problem | Possible Cause | Solution |
|---|---|---|
| No display/Unit not powering on | AC power cord not connected or loose; batteries depleted or incorrectly installed. | Ensure AC cord is securely plugged in. Check battery installation and replace if necessary. |
| Alarm not sounding | Alarm is not activated; alarm volume is too low; incorrect alarm time set. | Slide the alarm ON/OFF switch to 'ON'. Increase alarm volume. Verify alarm time and AM/PM setting. |
| Poor radio reception | Weak signal; antenna not extended; interference from other electronics. | Extend and adjust the FM wire antenna for better reception. For AM, rotate the unit. Move away from other electronic devices. |
| Display too bright/dim | Dimmer setting needs adjustment. | Rotate the dimmer knob on the top panel to adjust brightness to your preference. |
Specifications
- Brand: Ratakee
- Model Number: RA01
- Display Type: Digital LED
- Power Source: Corded Electric (AC 120V) / 3 AA Batteries (backup, not included)
- Product Dimensions: 5.4"W x 2.44"H
- Item Weight: 7.2 ounces
- Room Type: Bedroom
- Special Features: Adjustable Brightness, Adjustable Volume, Large Display, Loud Alarm, AM/FM Radio, Earphone Port, Sleep Timer, Snooze
- Material: Plastic
Warranty and Support
This Ratakee product comes with a 1-year limited warranty and a 90-day money-back guarantee. For any support inquiries, troubleshooting assistance, or warranty claims, please refer to the contact information provided on your warranty card or visit the official Ratakee support website.


