Important Safety Information
Please read and understand all instructions before beginning assembly. Failure to follow these instructions may result in serious injury or damage to the product.
- Keep all small parts away from children during assembly.
- Ensure all bolts and screws are securely tightened before use. Periodically check and re-tighten as necessary.
- Do not stand on the bed frame or use it as a ladder.
- Do not exceed the recommended weight capacity for a twin bed frame.
- For electrical components (LED lights, charging station), ensure proper connection to a suitable power source. Do not overload the charging station.
- Always unplug the bed frame from the power source before cleaning or performing any maintenance on electrical components.
- Assembly requires at least two adults.
Product Specifications
| Size | Twin |
| Material | Alloy Steel Frame, Velvet Upholstery |
| Product Dimensions (L x W x H) | 77" x 41" x 44.1" |
| Item Weight | 79 Pounds |
| Color | Beige |
| Special Features | LED Lights, Hidden Storage Headboard, Charging Station, No Box Spring Needed |
| Included Components | Light kit, 2 Fabric Drawers |
Note: All dimensions are approximate and may vary slightly.
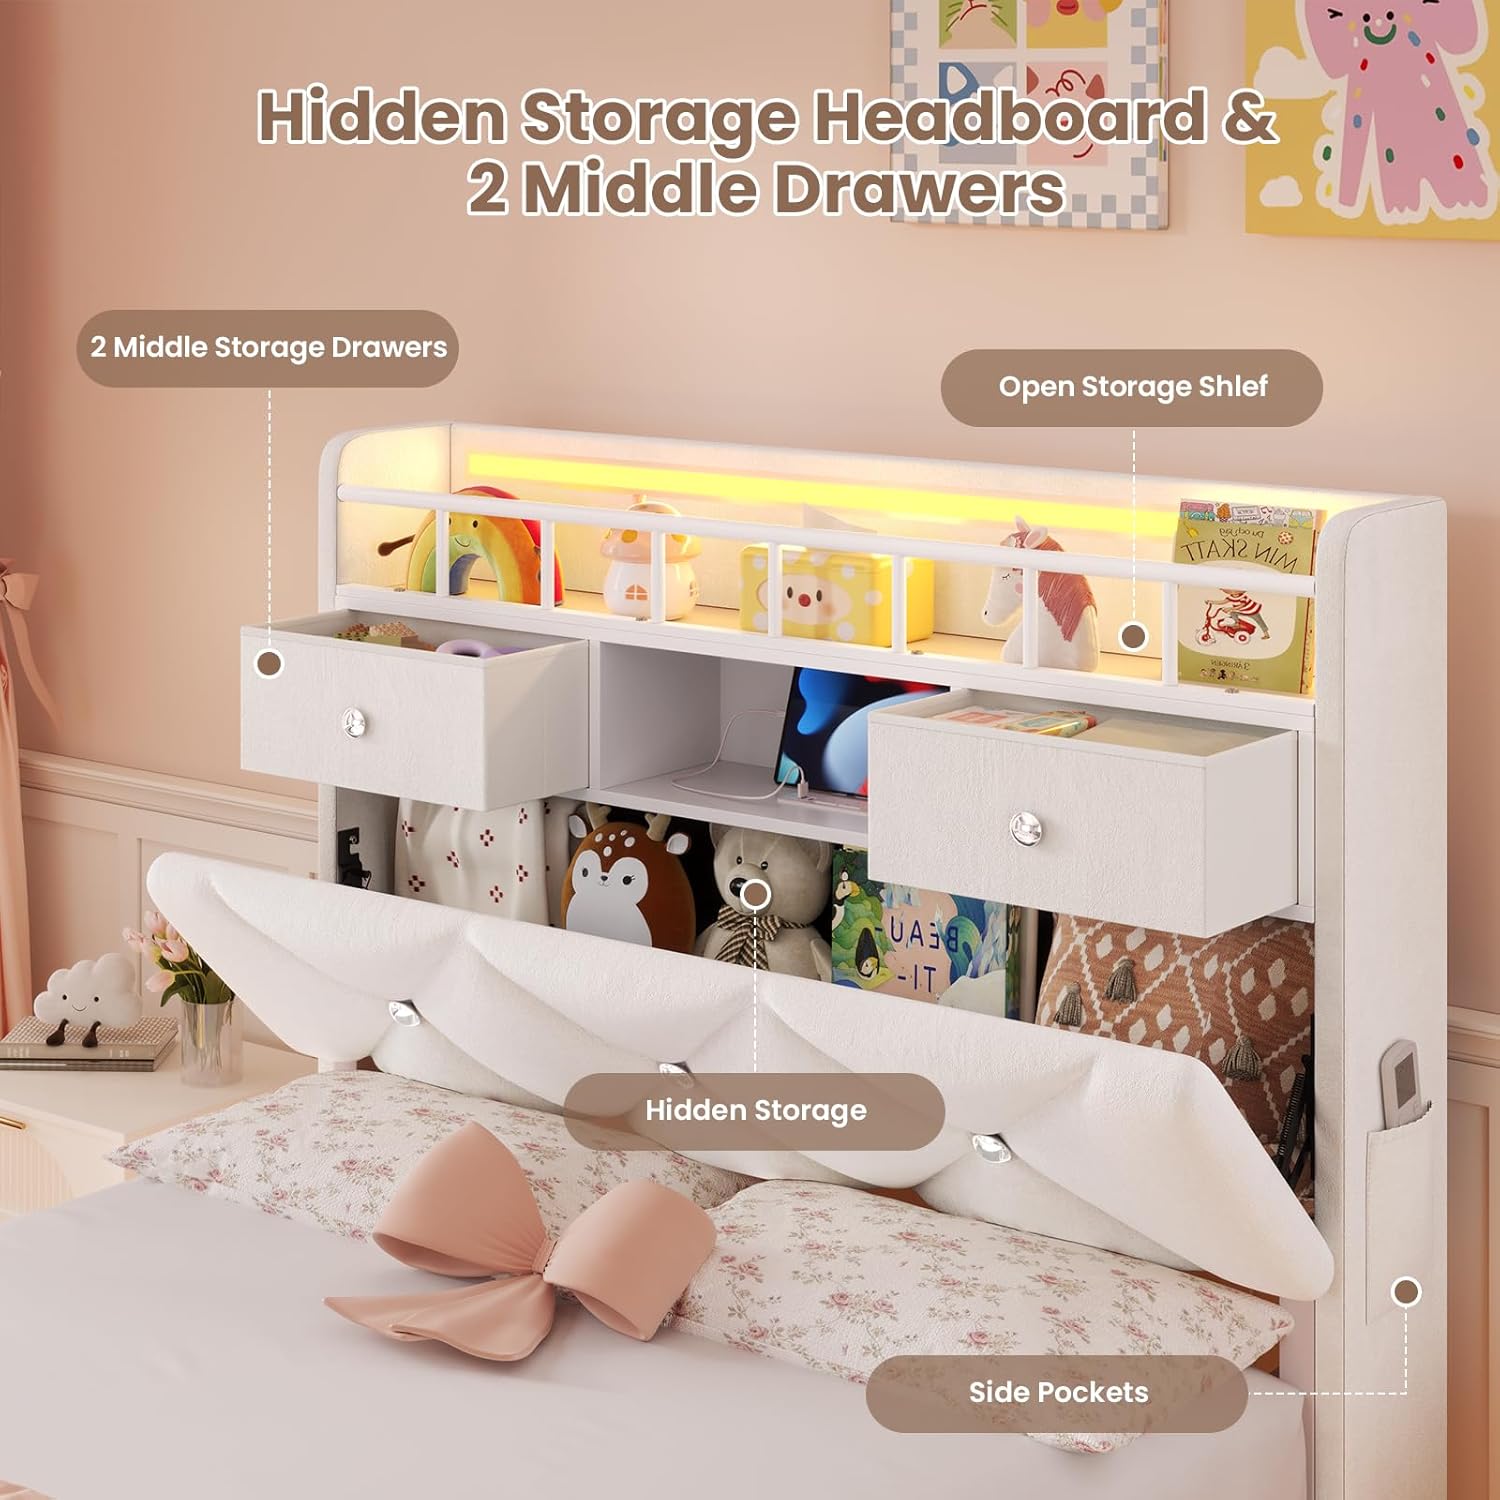
Image: Overall dimensions of the BTHFST Twin LED Bed Frame.
Package Contents
Before assembly, ensure all parts listed in your packaging are present and undamaged. If any parts are missing or damaged, please contact customer service.
- Headboard with integrated storage and charging station
- Footboard
- Side Rails (Left and Right)
- Center Support Beam(s)
- Wooden Slats
- 2 Fabric Storage Drawers
- LED Light Strips (for headboard and under-bed)
- Remote Control for LED Lights
- Assembly Hardware (bolts, screws, washers, Allen wrench)
- Instruction Manual (this document)

Image: Key components and structural elements of the bed frame.
Setup & Assembly Instructions
Follow these steps carefully for proper assembly. It is recommended to assemble the bed frame in the room where it will be used.
Step 1: Prepare the Area and Identify Parts
- Clear a spacious area for assembly.
- Unpack all components and lay them out on a soft, clean surface to prevent scratches.
- Refer to the parts list (if provided separately in packaging) and identify each component.
Step 2: Assemble the Bed Frame Base
- Attach the side rails to the footboard using the provided hardware. Ensure connections are secure but do not fully tighten bolts until the entire frame is assembled.
- Connect the headboard to the assembled side rails.
- Install any center support beams or legs as indicated in the specific assembly diagram.

Image: Illustration of the bed frame's structural support, including legs and metal slats.
Step 3: Install Wooden Slats
- Place the wooden slats across the bed frame, ensuring even spacing.
- Secure the slats to the side rails using the provided fasteners or velcro strips. The slats are designed for noise-free operation.

Image: Detail of slat attachment for easy assembly.
Step 4: Assemble Headboard Storage and Charging Station
- The headboard features open storage shelves, two middle drawers, and a hidden storage compartment.
- Install the charging station into the designated slot within the headboard. Ensure it is flush and secure.

Image: Headboard with hidden storage, drawers, and open shelves.
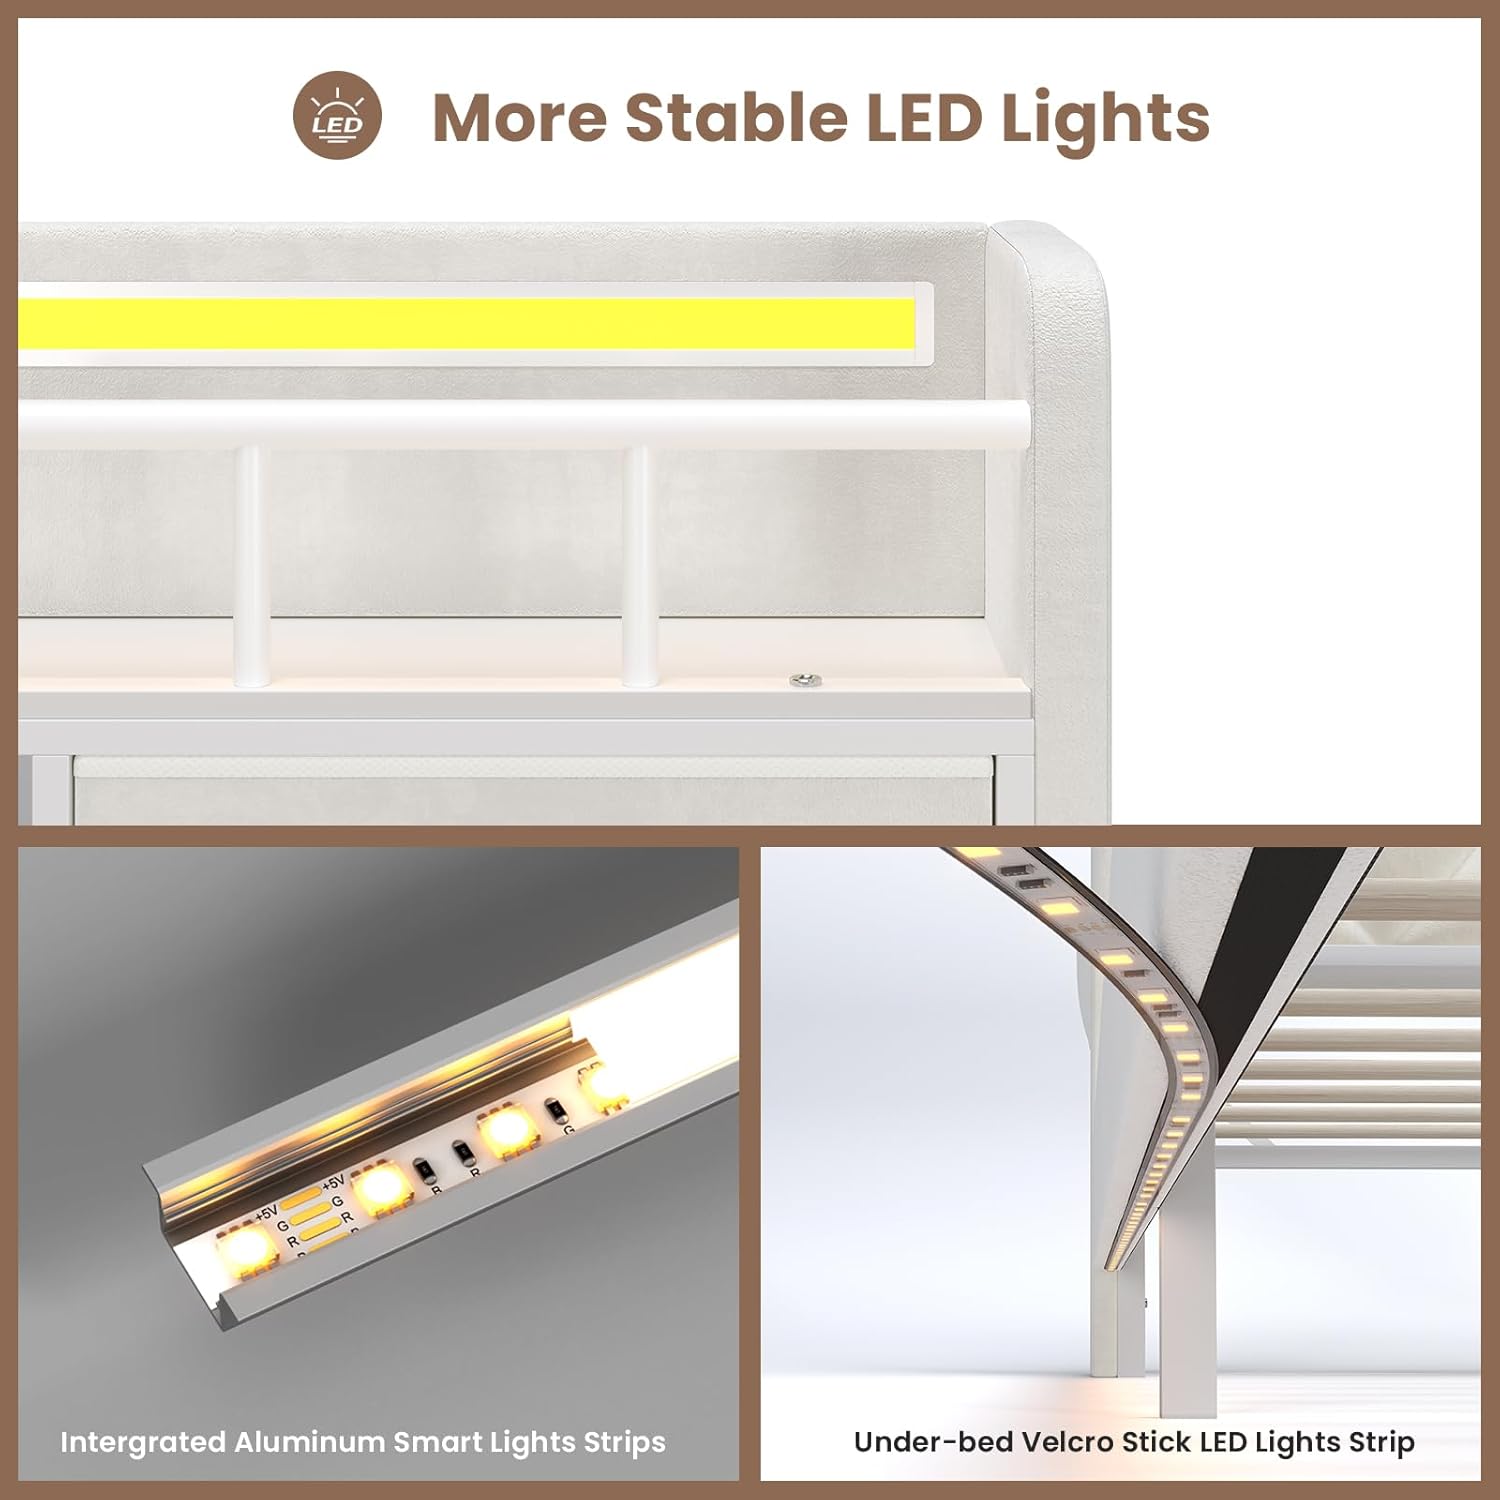
Image: Built-in charging station details.
Step 5: Install LED Light Strips
- Carefully attach the integrated aluminum smart light strips to the headboard.
- Attach the under-bed velcro stick LED light strips to the underside of the bed frame.
- Connect the LED light strips to the control box and power adapter.
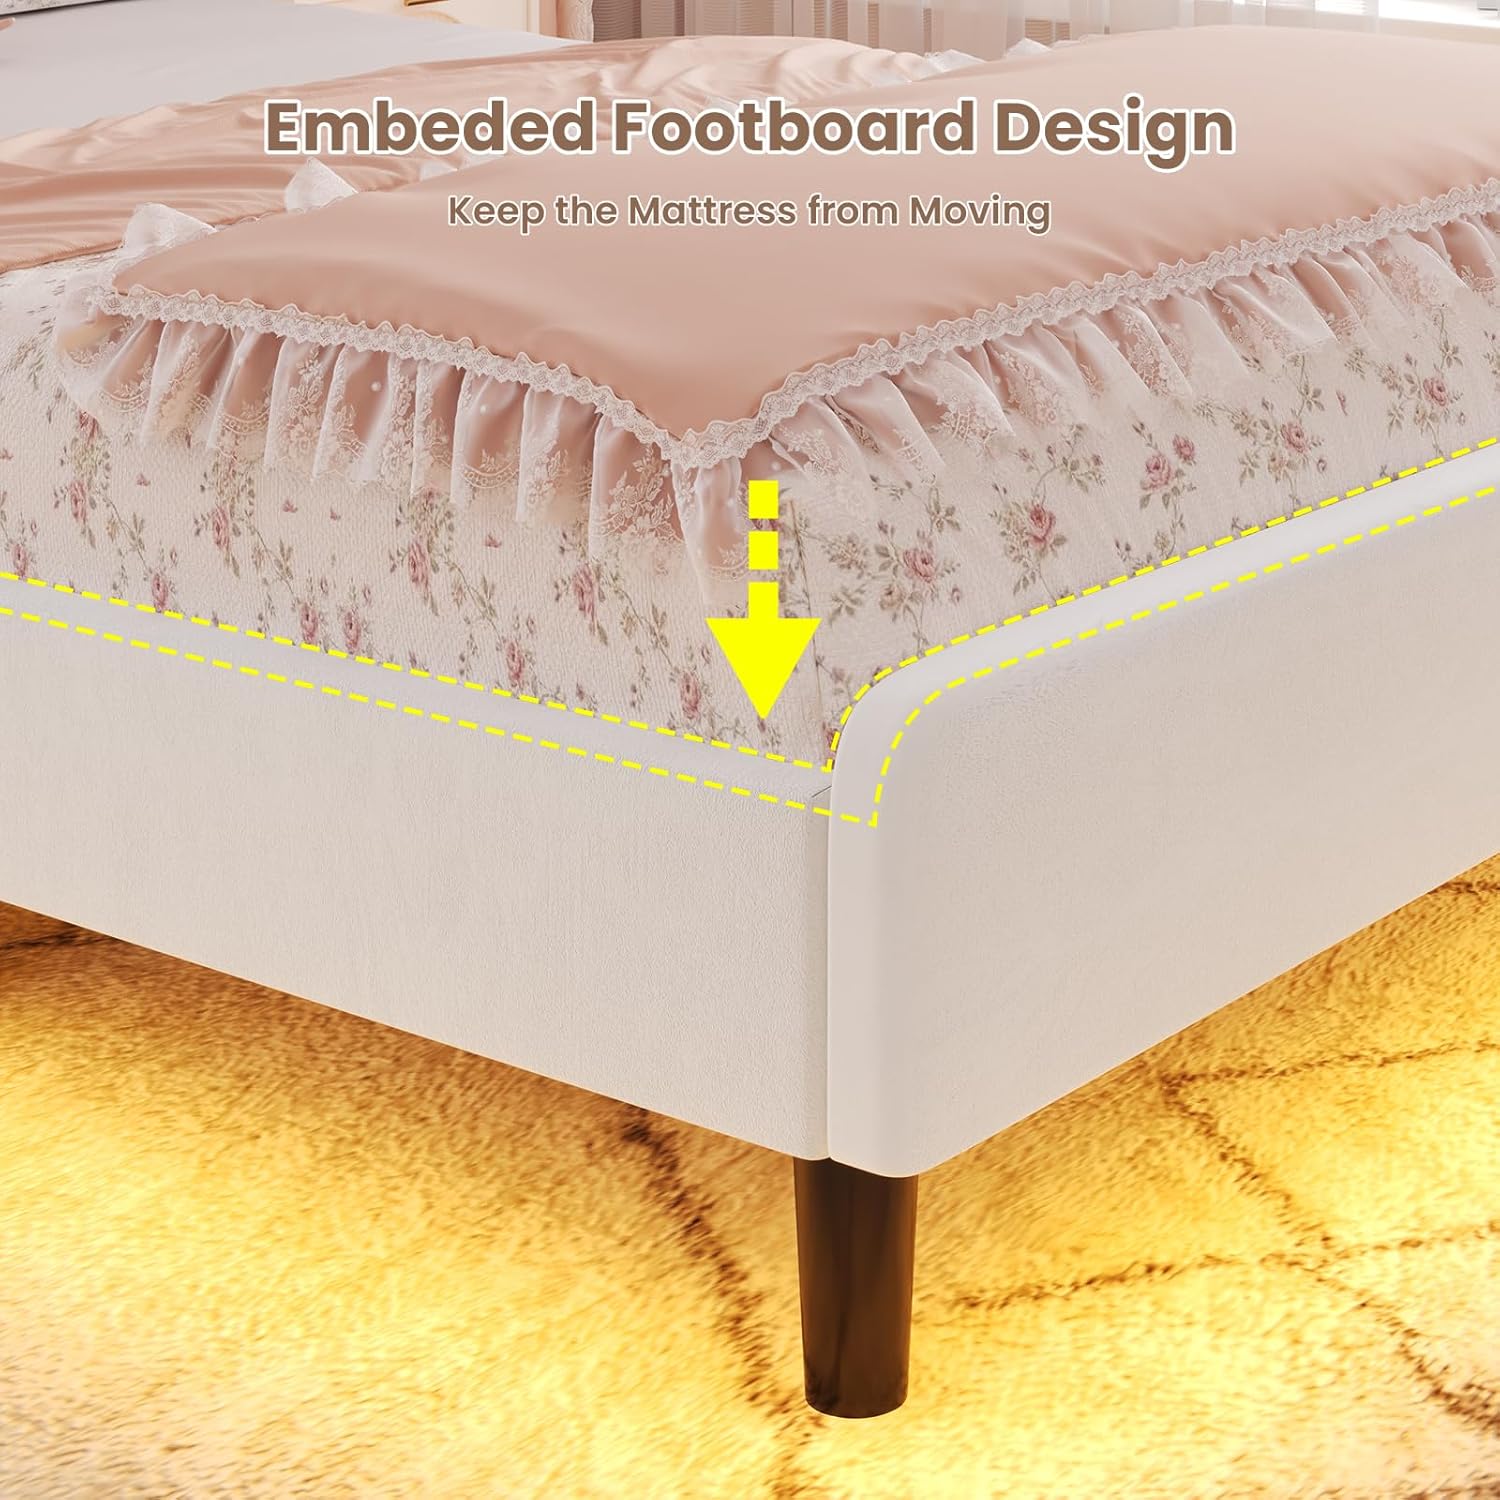
Image: Details of the LED light strip installation.
Step 6: Insert Fabric Drawers
- Assemble the two fabric drawers according to their individual instructions (if separate).
- Slide the assembled drawers into their designated slots under the bed frame.
Step 7: Final Tightening and Placement
- Once all components are in place, go back and fully tighten all bolts and screws.
- Position the bed frame in its desired location.
- Ensure the embedded footboard design properly secures the mattress from moving.
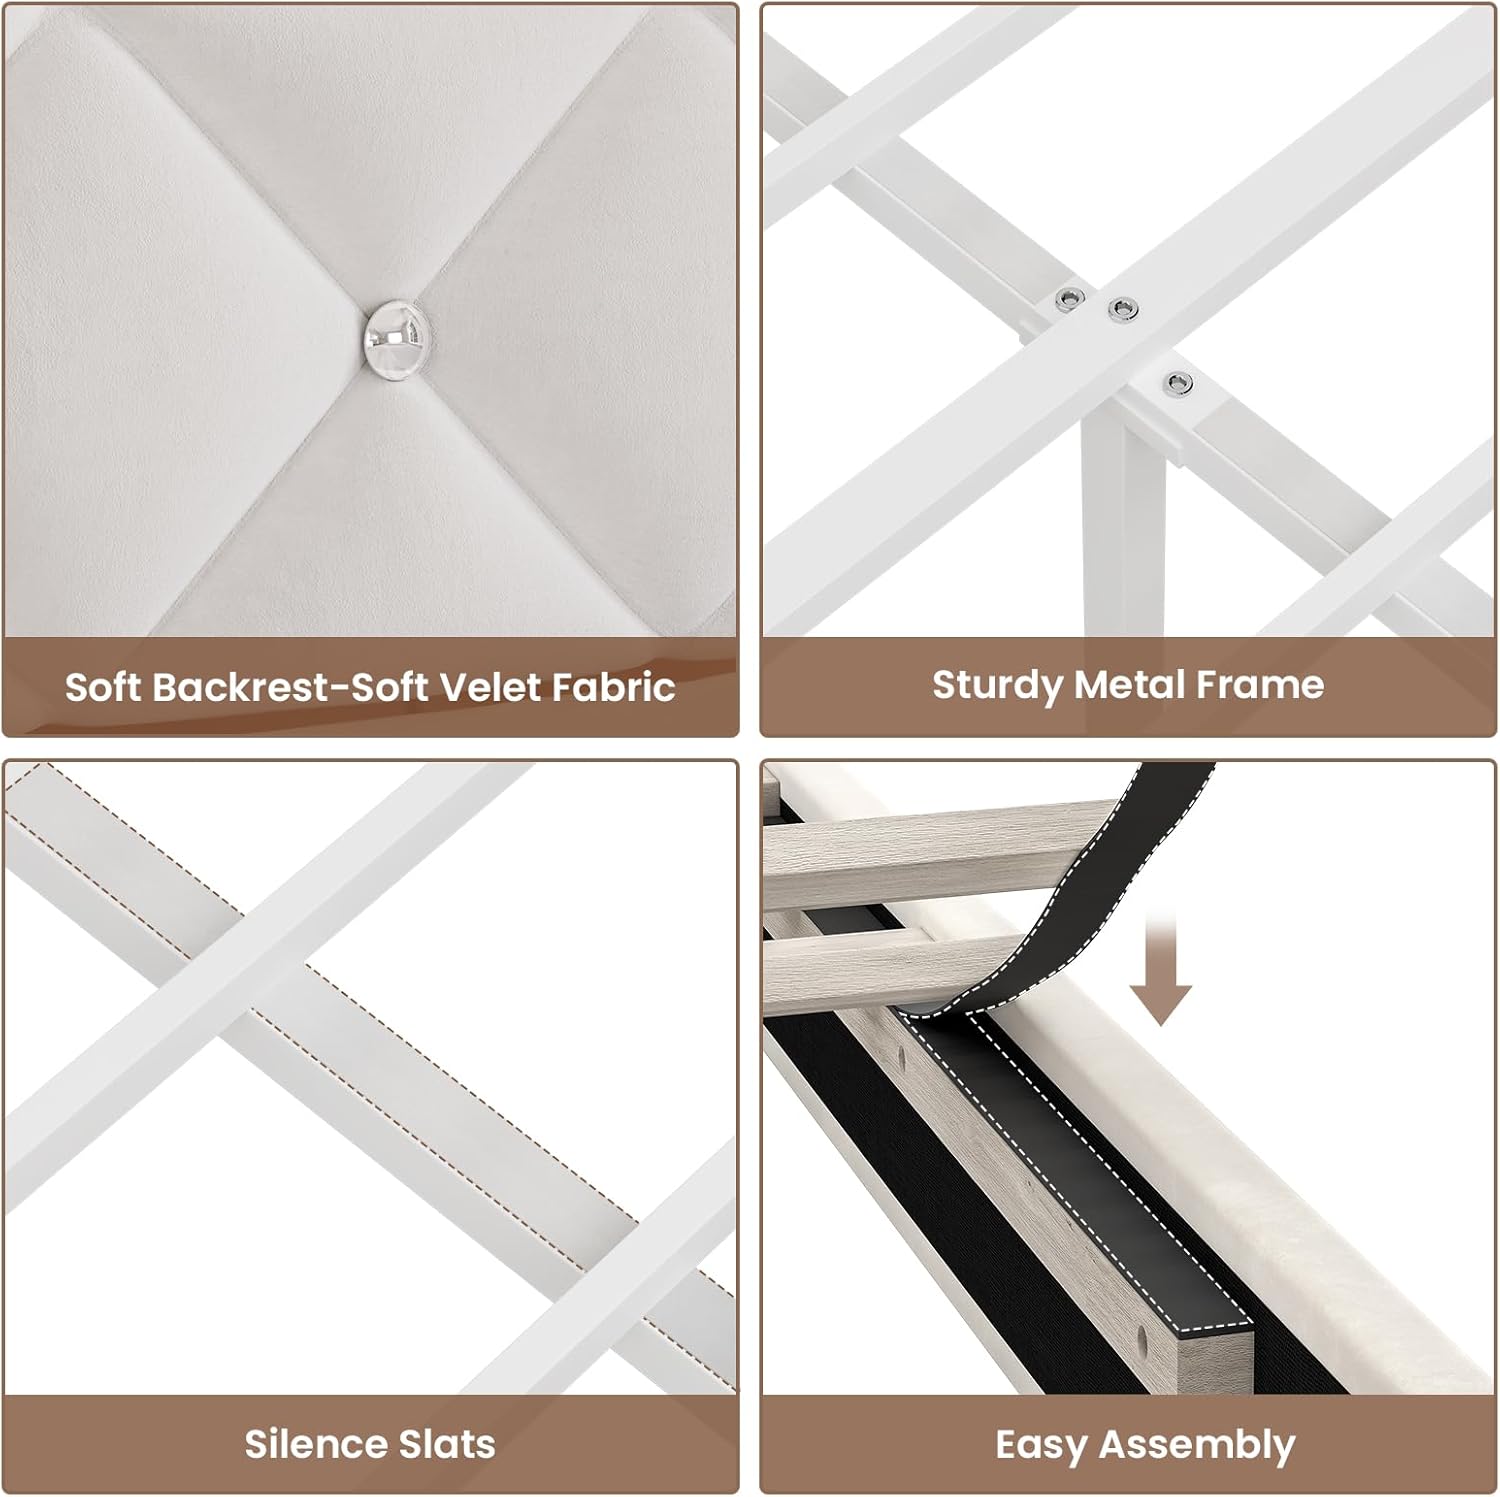
Image: Embedded footboard design to keep the mattress in place.
Operating Instructions
LED Lights Operation
The RGB LED lights can be controlled via the included remote control or a mobile application.
- Remote Control: Point the remote at the LED receiver. Use the buttons to change colors (over 60,000 options), adjust brightness, select dynamic modes, music mode, or mic mode, and set timing functions.
- Mobile APP Control: Download the specified app (refer to packaging or a QR code on the LED controller). Follow the app's instructions to pair your device with the LED lights. The app offers advanced control over colors, modes, and timing.

Image: RGB LED light features and control options.
Charging Station Usage
The built-in charging station provides convenient power access for your electronic devices.
- AC Outlets: Two 125V/12A AC outlets are available for standard plugs.
- USB Ports: One 5V/2.1A USB-A port and one 5V/2.1A USB-C port are provided for charging compatible devices.
- Ensure devices are compatible with the output specifications to prevent damage.
Storage Features
- Hidden Storage Headboard: Lift the upholstered panel on the headboard to access a large hidden compartment, ideal for linens or seasonal items.
- Open Storage Shelves: Use the two-tier shelves with a fence on the headboard for books, decor, or frequently accessed items.
- Fabric Drawers: Utilize the two middle velvet fabric drawers for personal items, journals, or small accessories.
- Side Pockets: The headboard also includes side pockets for additional small item storage.

Image: Overview of the headboard's various storage options.
Maintenance
Regular maintenance helps prolong the life and appearance of your bed frame.
- Cleaning Velvet Upholstery: Gently vacuum the velvet fabric regularly to remove dust and debris. For spills, blot immediately with a clean, dry cloth. For tougher stains, consult a professional upholstery cleaner or use a mild fabric cleaner designed for velvet, testing on an inconspicuous area first.
- Frame Care: Periodically check all bolts and screws to ensure they remain tight. Re-tighten as needed to maintain stability and prevent noise.
- LED Lights: Keep the LED strips clean and free of dust. If lights malfunction, check all connections.
- Charging Station: Keep the charging ports free of dust and debris. Do not force plugs into ports.
Troubleshooting
If you encounter issues with your BTHFST Twin LED Bed Frame, refer to the following common problems and solutions:
- Problem: LED lights are not working or are unresponsive.
-
- Solution: Check if the power adapter is securely plugged into both the wall outlet and the LED control box.
- Solution: Ensure all LED strip connections to the control box are firm.
- Solution: If using the remote, check the battery and ensure there are no obstructions between the remote and the LED receiver.
- Solution: If using the app, ensure your device's Bluetooth is on and the app is correctly paired with the lights.
- Problem: Bed frame makes squeaking or creaking noises.
-
- Solution: Re-tighten all bolts and screws on the bed frame, headboard, and footboard.
- Solution: Ensure all wooden slats are properly seated and secured. The silence slats are designed to minimize noise.
- Solution: Verify that the center support legs are making firm contact with the floor.
- Problem: Difficulty during assembly.
-
- Solution: Review the assembly instructions carefully, paying close attention to diagrams and part orientation.
- Solution: Ensure all parts are correctly identified and oriented before tightening.
- Solution: Do not fully tighten bolts until the entire section is assembled, allowing for minor adjustments.
- Solution: Confirm all required hardware is present. If parts are missing, contact customer support.
Warranty & Customer Support
BTHFST is committed to providing quality products. For any questions, missing parts, or issues not covered in this manual, please contact our customer support team. Please have your model number (Bed736) and purchase information ready when contacting us.
Contact information can typically be found on the product packaging or the retailer's website where you purchased the item.