1. Introduction
Thank you for choosing the SUKFLOW NBQ 1000W Solar Micro-inverter. This device is designed to convert direct current (DC) from solar panels into alternating current (AC) for your home or balcony power system. It features advanced MPPT technology, Wi-Fi and Bluetooth connectivity for monitoring, and a robust IP67 waterproof design for reliable outdoor operation.
What's in the Box:
- SUKFLOW NBQ 1000W PV Solar Micro-inverter
- 5-meter AC Cable
- Mounting Accessories
- User Manual
2. Safety Information
Please read all safety instructions carefully before installation and operation. Failure to follow these instructions may result in electric shock, fire, or serious injury.
- Electrical Safety: The micro-inverter operates with a maximum DC input voltage of 60V, reducing high voltage risks. However, always ensure all power sources are disconnected before making any electrical connections.
- Installation Environment: Install the inverter in a well-ventilated area, away from flammable materials. Despite its IP67 rating, avoid submerging the unit.
- Qualified Personnel: Installation and maintenance should only be performed by qualified personnel familiar with electrical systems and local electrical codes.
- Children and Pets: Keep the device out of reach of children and pets.
3. Setup and Installation
The SUKFLOW NBQ 1000W micro-inverter is designed for plug-and-play installation. Follow these steps for a safe and efficient setup.
3.1 Component Overview
Familiarize yourself with the micro-inverter's components before installation.
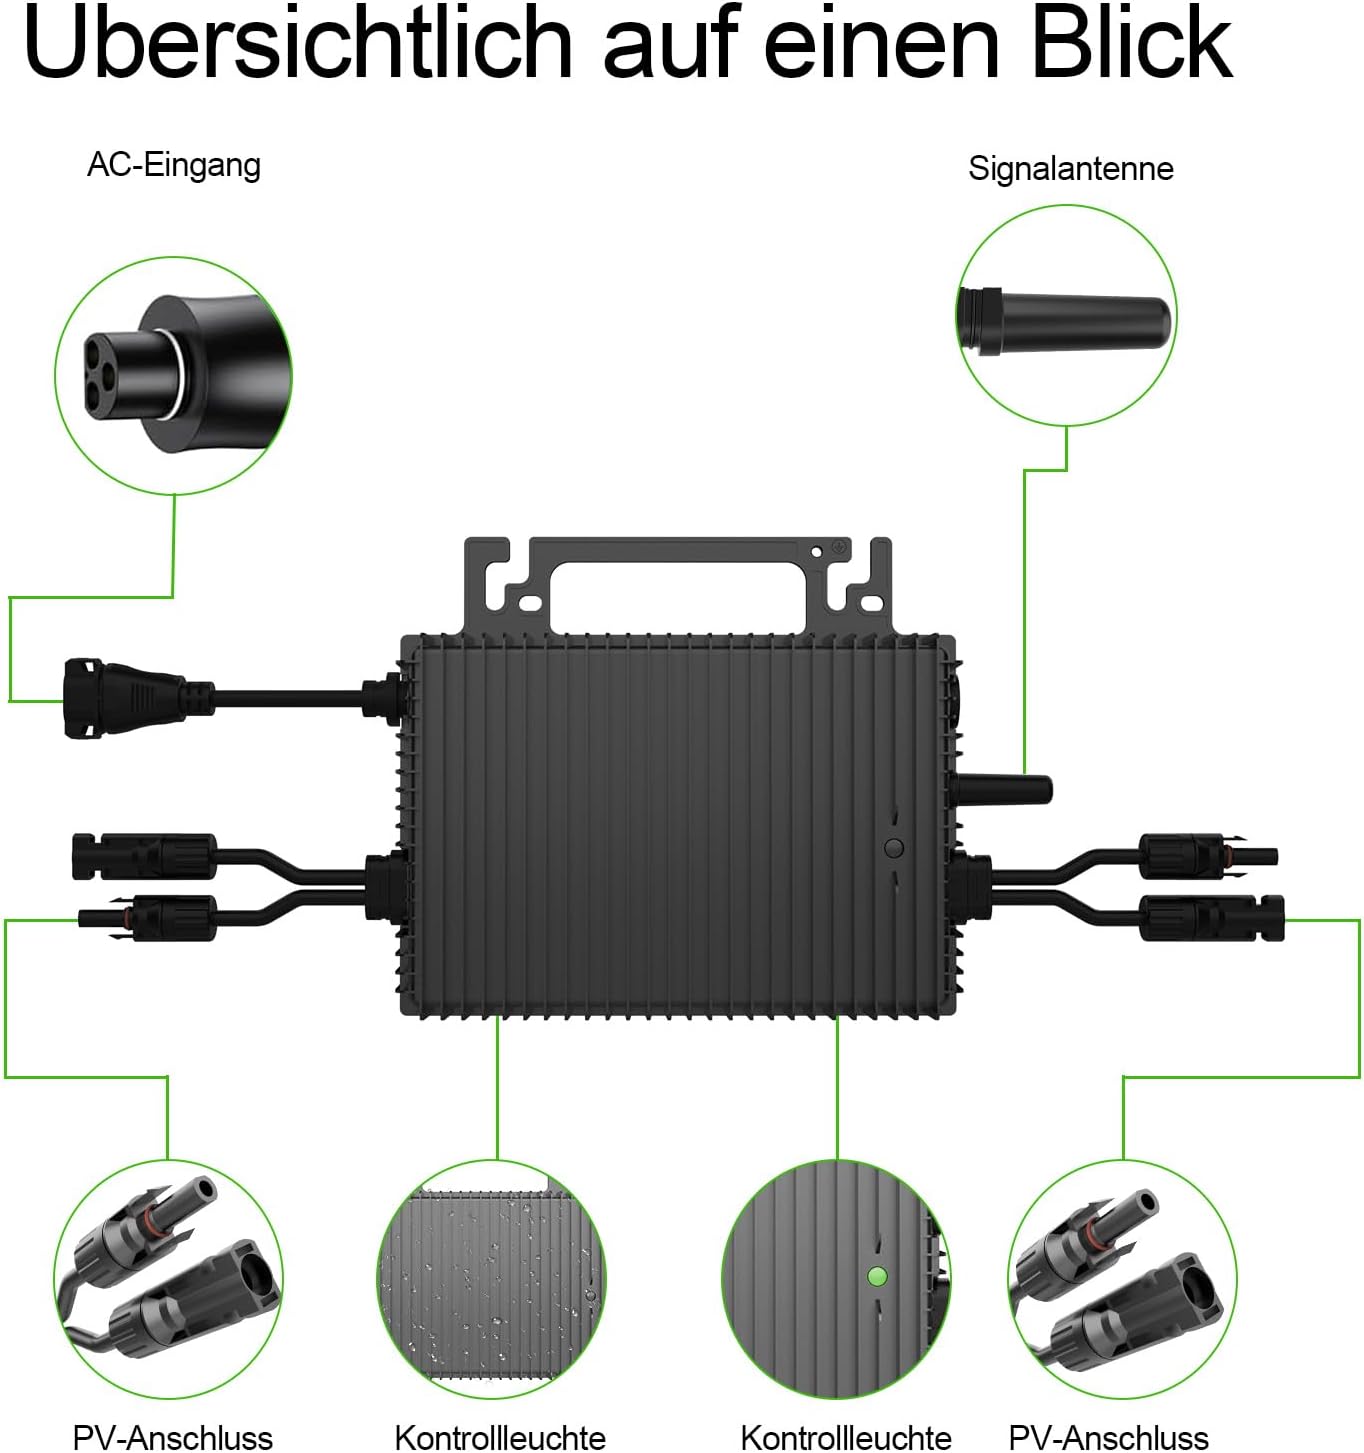
Image Description: An overhead diagram of the SUKFLOW micro-inverter, highlighting its key connection points: the AC input port, signal antenna, and two sets of PV input connectors. It also shows the location of the control lights.
3.2 Connection Steps
The installation process involves connecting your solar panels to the inverter and then connecting the inverter to your AC power outlet.
- Mount the Micro-inverter: Securely mount the micro-inverter in a suitable location, typically near your solar panels, using the provided mounting accessories. Ensure good ventilation.
- Connect Solar Panels: Connect your solar panels to the PV input connectors on the micro-inverter. The NBQ 1000W has two independent MPPT channels, allowing connection of two PV modules (200-625W each). Ensure correct polarity (positive to positive, negative to negative).
- Connect AC Cable: Connect the supplied 5-meter AC cable to the AC output port of the micro-inverter.
- Plug into Outlet: Plug the other end of the AC cable into a standard household electrical outlet.

Image Description: A visual guide illustrating the three main steps for connecting the micro-inverter: first, showing the inverter with its PV inputs; second, demonstrating the connection of the AC cable to the inverter; and third, depicting the AC cable being plugged into a standard wall socket.

Image Description: A detailed connection diagram showing two solar panels (DC input) feeding into the micro-inverter. The inverter then connects to an EU standard wall socket using the included 5-meter AC cable, illustrating a complete balcony solar system setup.
3.3 Installation Examples
The SUKFLOW NBQ 1000W micro-inverter offers versatile installation options for various settings.

Image Description: A collage of four images demonstrating diverse installation methods for solar panels and the micro-inverter. These include setups on a flat rooftop, a ground-mounted system, panels integrated into a tiled residential roof, and a balcony railing installation, showcasing the product's adaptability.
4. Operating Instructions
Once installed, the micro-inverter will automatically begin converting solar energy. Use the integrated Wi-Fi and Bluetooth for smart monitoring.
4.1 Initial Power-Up
After connecting the solar panels and plugging the AC cable into the grid, the micro-inverter will perform a self-test. The control lights will indicate its status. Once stable, it will start feeding power into your home grid.
4.2 Mobile Application Monitoring
The micro-inverter features integrated Wi-Fi and Bluetooth for remote monitoring via a dedicated mobile application. This allows you to track energy yield, adjust power settings, and receive over-the-air (OTA) updates.

Image Description: A scene depicting a family interacting with a tablet, overlaid with a close-up of a smartphone screen showing the mobile application for intelligent monitoring of the micro-inverter. The app displays real-time data and settings, emphasizing the smart control feature.
Download the official SUKFLOW monitoring application from your device's app store. Follow the in-app instructions to connect your micro-inverter via Wi-Fi or Bluetooth. The app provides:
- Real-time energy production data
- Historical performance analysis
- Remote power adjustment
- Firmware updates (OTA)
5. Maintenance
The SUKFLOW NBQ 1000W micro-inverter is designed for durability and requires minimal maintenance.
5.1 Regular Checks
- Visual Inspection: Periodically inspect the inverter and all connections for any signs of damage, corrosion, or loose wiring.
- Cleanliness: Ensure the inverter's cooling fins are free from dust, debris, or obstructions to maintain optimal heat dissipation. Use a soft, dry cloth for cleaning.
- Cable Integrity: Check the AC and DC cables for any wear or damage. Replace any compromised cables immediately.
5.2 Environmental Resilience
The IP67 certified casing and natural convection cooling ensure reliable operation across a wide temperature range (-40°C to +65°C), making it resistant to various weather conditions.

Image Description: The micro-inverter is shown under a simulated water splash, accompanied by icons representing various weather conditions: rain, sun, wind, and dust. This visually emphasizes the product's robust, weatherproof, and durable design, suitable for outdoor environments.
6. Troubleshooting
If you encounter issues with your SUKFLOW NBQ 1000W micro-inverter, refer to the following common problems and solutions.
6.1 No Power Output
- Check AC Connection: Ensure the AC cable is securely plugged into both the inverter and the wall outlet. Check if the outlet has power.
- Check DC Connection: Verify that the solar panels are correctly connected to the inverter's PV inputs and that polarity is correct.
- Sufficient Sunlight: Ensure there is adequate sunlight reaching the solar panels. The inverter will not produce power in low light conditions.
- Inverter Status Lights: Consult the inverter's control lights. Refer to the manual's specific light indicators for error codes or status.
6.2 App Connectivity Issues
- Wi-Fi/Bluetooth Enabled: Ensure Wi-Fi or Bluetooth is enabled on your mobile device.
- Inverter Range: Make sure your device is within range of the inverter's Wi-Fi/Bluetooth signal.
- Router Connection: If using Wi-Fi, ensure the inverter is connected to your home Wi-Fi network and the router is functioning correctly.
- App Update: Ensure the mobile application is updated to the latest version.
- Reset Inverter: If issues persist, try power cycling the inverter by disconnecting both AC and DC power for a few minutes, then reconnecting.
6.3 Low Power Production
- Panel Cleanliness: Clean your solar panels to remove any dirt, dust, or debris that may be obstructing sunlight.
- Shading: Check for any shading on the solar panels from trees, buildings, or other obstructions.
- Panel Orientation: Ensure solar panels are optimally oriented towards the sun for maximum exposure.
- Weather Conditions: Cloud cover or adverse weather will naturally reduce power output.
7. Specifications
Detailed technical specifications for the SUKFLOW NBQ 1000W Solar Micro-inverter.

Image Description: A graphic displaying the technical specifications of the micro-inverter, including its physical dimensions (227mm x 195.5mm) and various electrical parameters such as recommended solar module input power, number of DC input ports, operating voltage range, maximum output power, efficiency, and communication link mode (Wi-Fi/Bluetooth).
| Feature | Specification |
|---|---|
| Brand | SUKFLOW |
| Model Name | NBQ 1000w |
| Power Source | Solar Powered |
| Output Power | 1000 Watts |
| Peak Output Power | 1000 Watts |
| Input Voltage (DC) | 60 Volts (Max) |
| Output Voltage (AC) | 230 Volts |
| Efficiency | 96% |
| MPPT Efficiency | >99.5% |
| Output Waveform | Pure Sine Wave |
| Operating Temperature | -40°C to +65°C |
| Protection Rating | IP67 |
| Communication | Wi-Fi, Bluetooth |
| Certifications | EN 50549, VDE 4105, IEC 62321 |
| Country of Origin | China |
8. Warranty and Support
SUKFLOW is committed to providing high-quality products and excellent customer service.
8.1 Warranty Information
The SUKFLOW NBQ 1000W Solar Micro-inverter comes with a 2-year limited warranty from the date of purchase. This warranty covers defects in materials and workmanship under normal use. It does not cover damage caused by improper installation, misuse, accidents, or unauthorized modifications.
8.2 Customer Support
If you have any questions regarding the installation, operation, or troubleshooting of your micro-inverter, please do not hesitate to contact SUKFLOW customer support. We aim to respond to all inquiries within 24 hours.
For support, please refer to the contact information provided with your product packaging or visit the official SUKFLOW website.