
1. Introduction
Thank you for choosing the HUANLEGO Shoe Cabinet Storage for Entryway. This manual provides essential information for the safe assembly, proper operation, and effective maintenance of your new 4-drawer shoe cabinet. Please read these instructions carefully before beginning assembly and retain them for future reference.
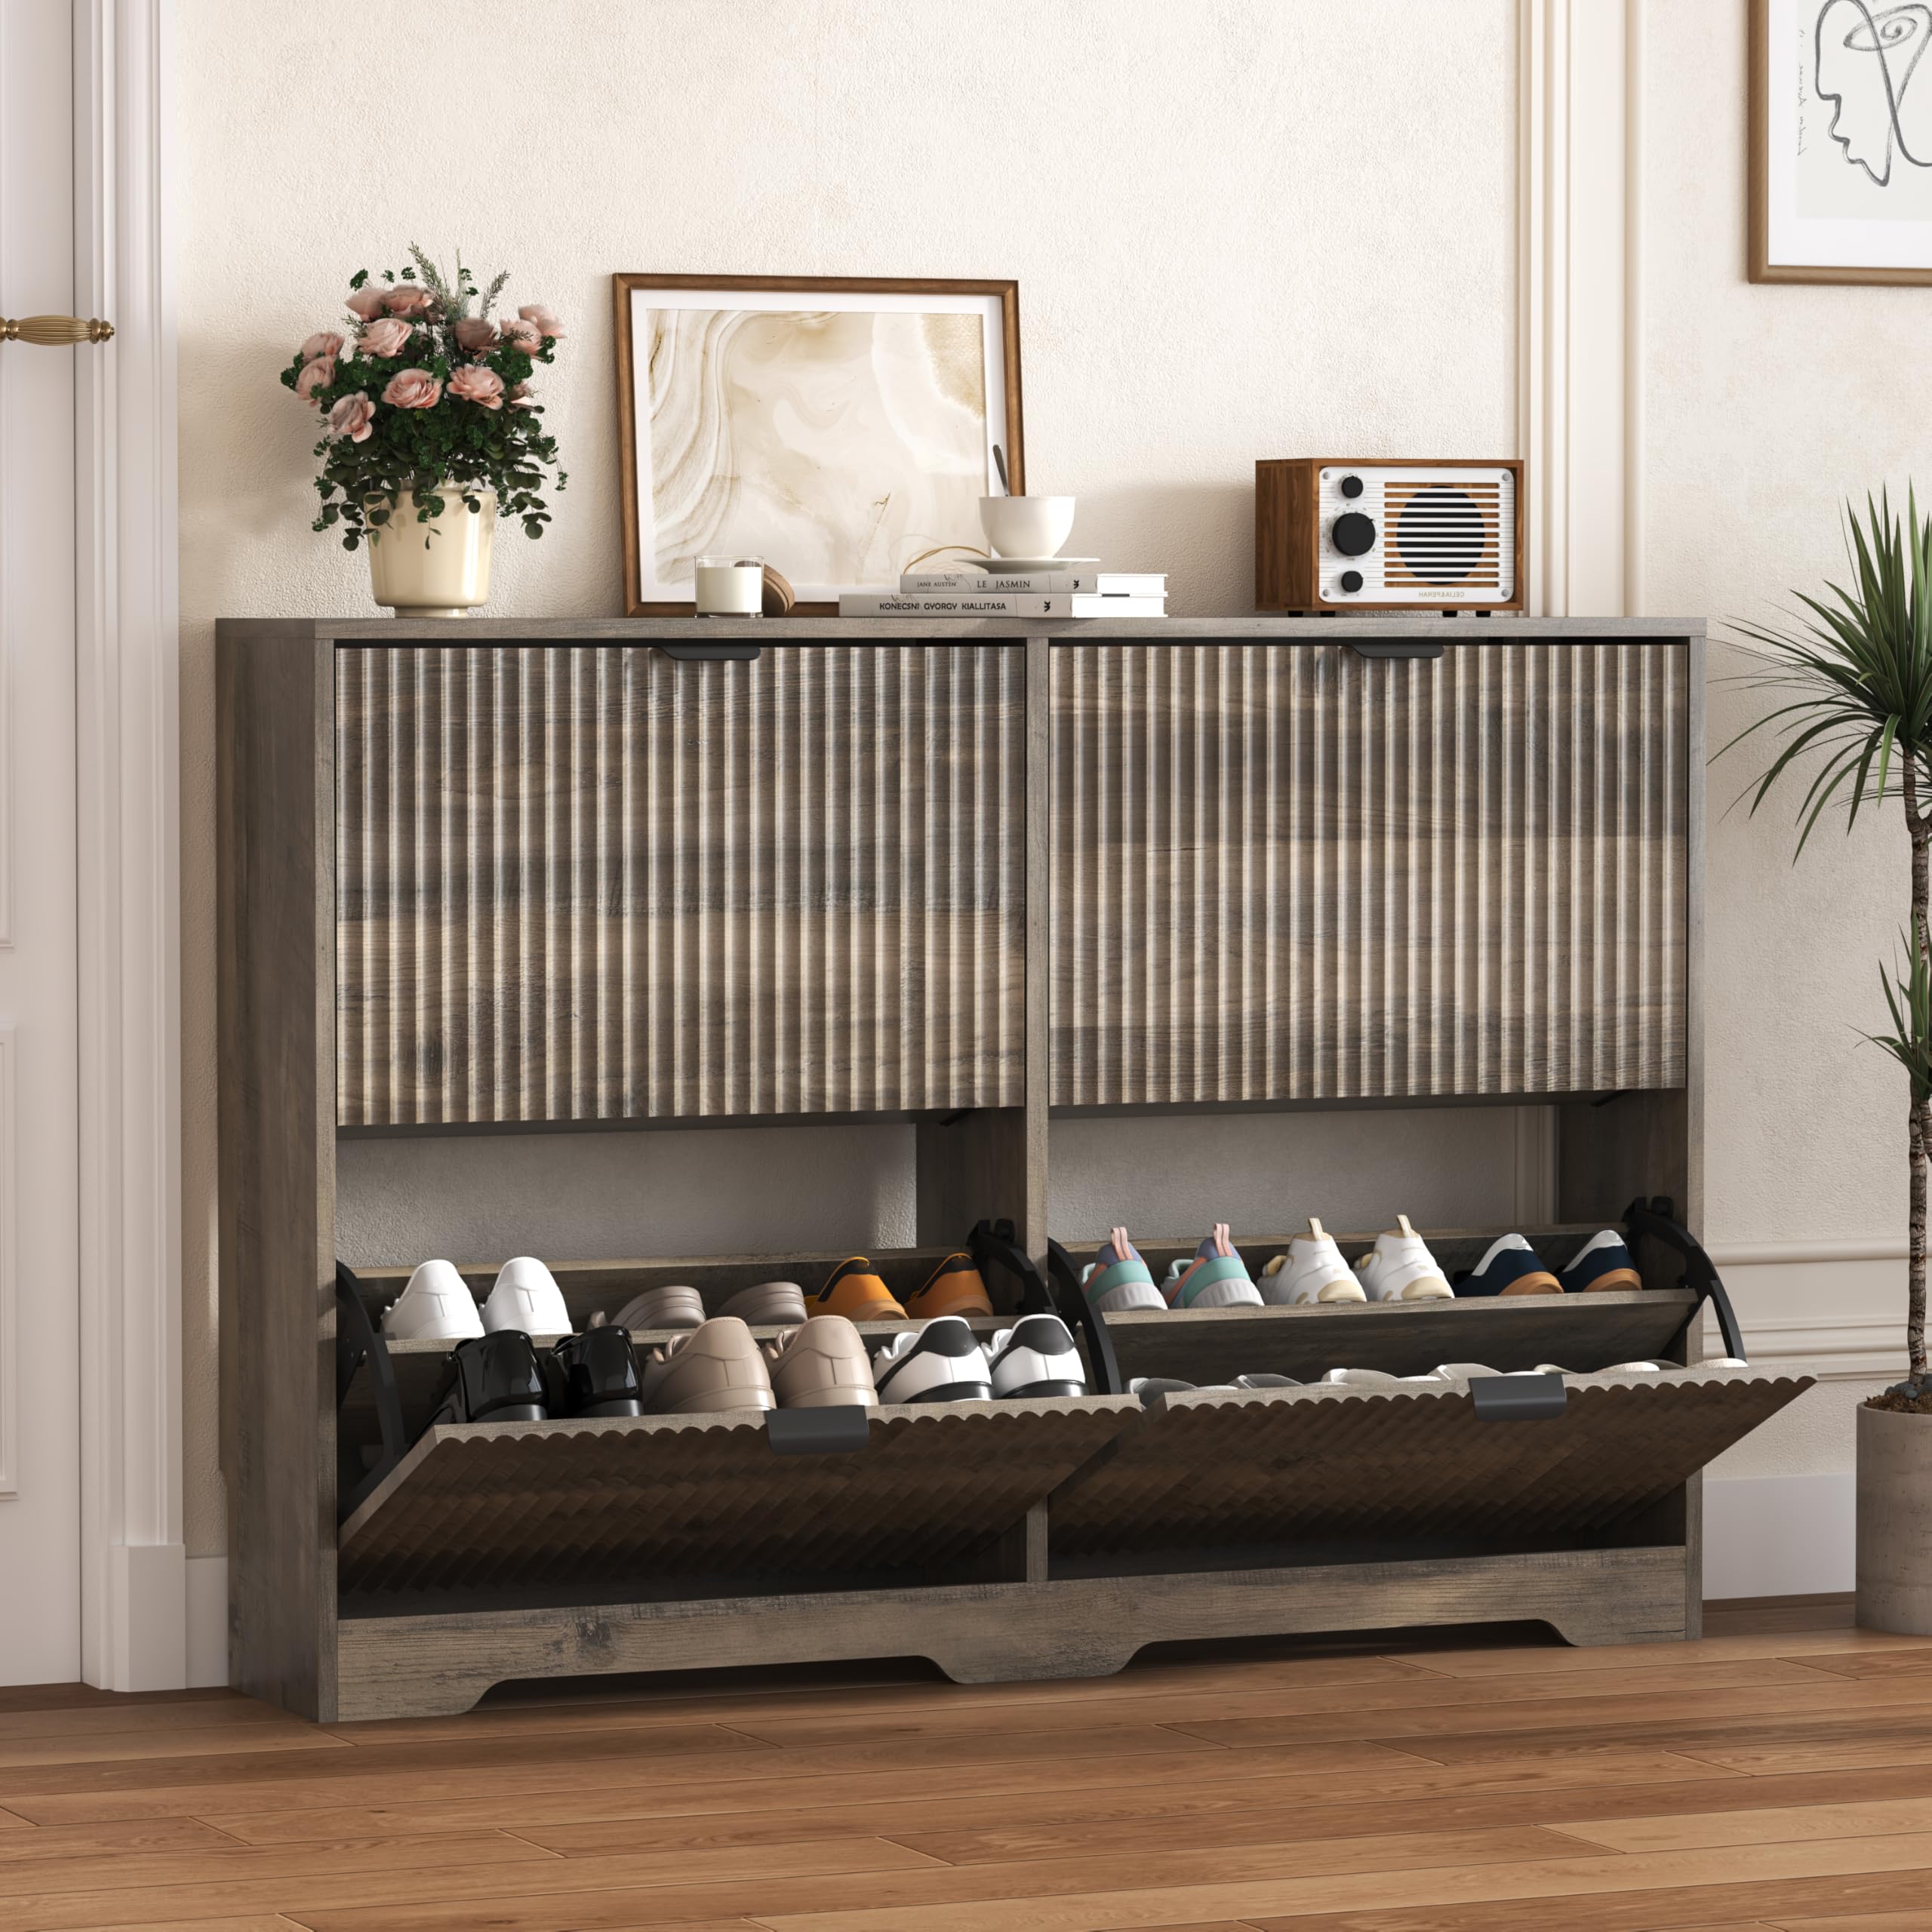
Figure 1: HUANLEGO Grey 4-Drawer Shoe Cabinet, Model HLG090.
2. Safety Information
WARNING: Anti-Tipping Device Must Be Installed.
To prevent accidental tipping or shaking, it is crucial to anchor the shoe cabinet to the wall using the provided anti-tipping devices. Failure to do so can result in serious injury, especially to children.
- Always install the anti-tipping device as instructed.
- Do not allow children to climb on or play with the cabinet.
- Ensure all hardware is securely tightened during assembly.
- Place the cabinet on a flat, stable surface.

Figure 2: Illustration of the anti-toppling device for wall anchoring.
3. Product Features
- Fluted Flip Drawers: The cabinet features a fluted design on its flip drawers, offering both functionality and a modern aesthetic.
- Generous Storage Capacity: Designed to maximize shoe capacity while maintaining a slim profile, ideal for entryways and tight spaces. This 4-drawer model can hold approximately 24-28 pairs of shoes.
- Multifunctional Design: Each flip drawer includes an adjustable shelf, allowing customization for various shoe sizes and styles. The top surface provides additional open storage for keys, wallets, and decorative items.
- Ventilated Back: The ventilated back design helps prevent odor buildup and is suitable for wall fixing.
- Sturdy Construction: Made from engineered wood with a robust wood base for enhanced stability and durability.
- Space-Saving: Its narrow design efficiently stores adult shoes, including low boots, high heels, leather shoes, flats, sandals, and casual shoes, making it suitable for entryways and hallways.

Figure 3: Key design elements and features of the shoe cabinet.

Figure 4: Example of shoe storage capacity for different shoe types.
4. Specifications
| Attribute | Detail |
|---|---|
| Brand | HUANLEGO |
| Model Number | HLG090 |
| Color | Grey |
| Material | Engineered Wood |
| Product Dimensions (D x W x H) | 9.4" x 47.2" x 33" |
| Item Weight | 64 pounds |
| Number of Drawers | 4 |
| Number of Shelves (per drawer) | 1 (adjustable) |
| Installation Type | Freestanding |
| Mounting Type | Floor Mount (with wall anchor) |
| Included Components | Hardware kit |

Figure 5: Detailed product dimensions.
5. Assembly Instructions
The HUANLEGO Shoe Cabinet is designed for straightforward assembly. Please follow the detailed instructions provided in the packaging. All components are labeled with assembly numbers to simplify the process.
5.1. Before You Begin
- Unpack all components and verify against the parts list in your instruction manual.
- Ensure you have all necessary tools (typically a screwdriver and hammer, not always included).
- Clear a spacious, clean area for assembly.
- Keep children and pets away from the assembly area.
5.2. Step-by-Step Assembly (General Guide)
- Identify Components: Match each part to its corresponding label in the instruction manual.
- Assemble Frame: Connect the side panels, top, and bottom panels using the provided hardware. Ensure all connections are secure.
- Install Back Panel: Attach the ventilated back panel.
- Assemble Drawers: Construct each of the four flip drawers. Pay attention to the orientation of the fluted panels.
- Install Drawer Mechanisms: Attach the flip mechanisms to the cabinet frame and the drawers.
- Insert Adjustable Shelves: Place the adjustable shelves inside each flip drawer. These can be repositioned later.
- Attach Handles: Secure the metal handles to the front of each flip drawer.
- Install Anti-Tipping Device: This is a critical safety step. Securely attach the anti-tipping device to the top-rear of the cabinet and then to a wall stud or appropriate wall anchor. Refer to the specific instructions for your wall type.
For detailed diagrams and specific hardware usage, please refer to the assembly manual included in your product packaging.
6. Operating Instructions
6.1. Using the Flip Drawers
- To open a drawer, gently pull the handle outwards. The drawer will tilt forward, revealing the shoe compartments.
- To close, push the drawer back into the cabinet until it is flush with the cabinet front.
6.2. Adjusting Shelves
Each flip drawer contains one adjustable shelf. This allows you to customize the storage space for different shoe heights.
- Open the flip drawer completely.
- Carefully lift the adjustable shelf from its current position.
- Align the shelf with the desired slots on the side panels of the drawer.
- Lower the shelf into place, ensuring it is level and secure.
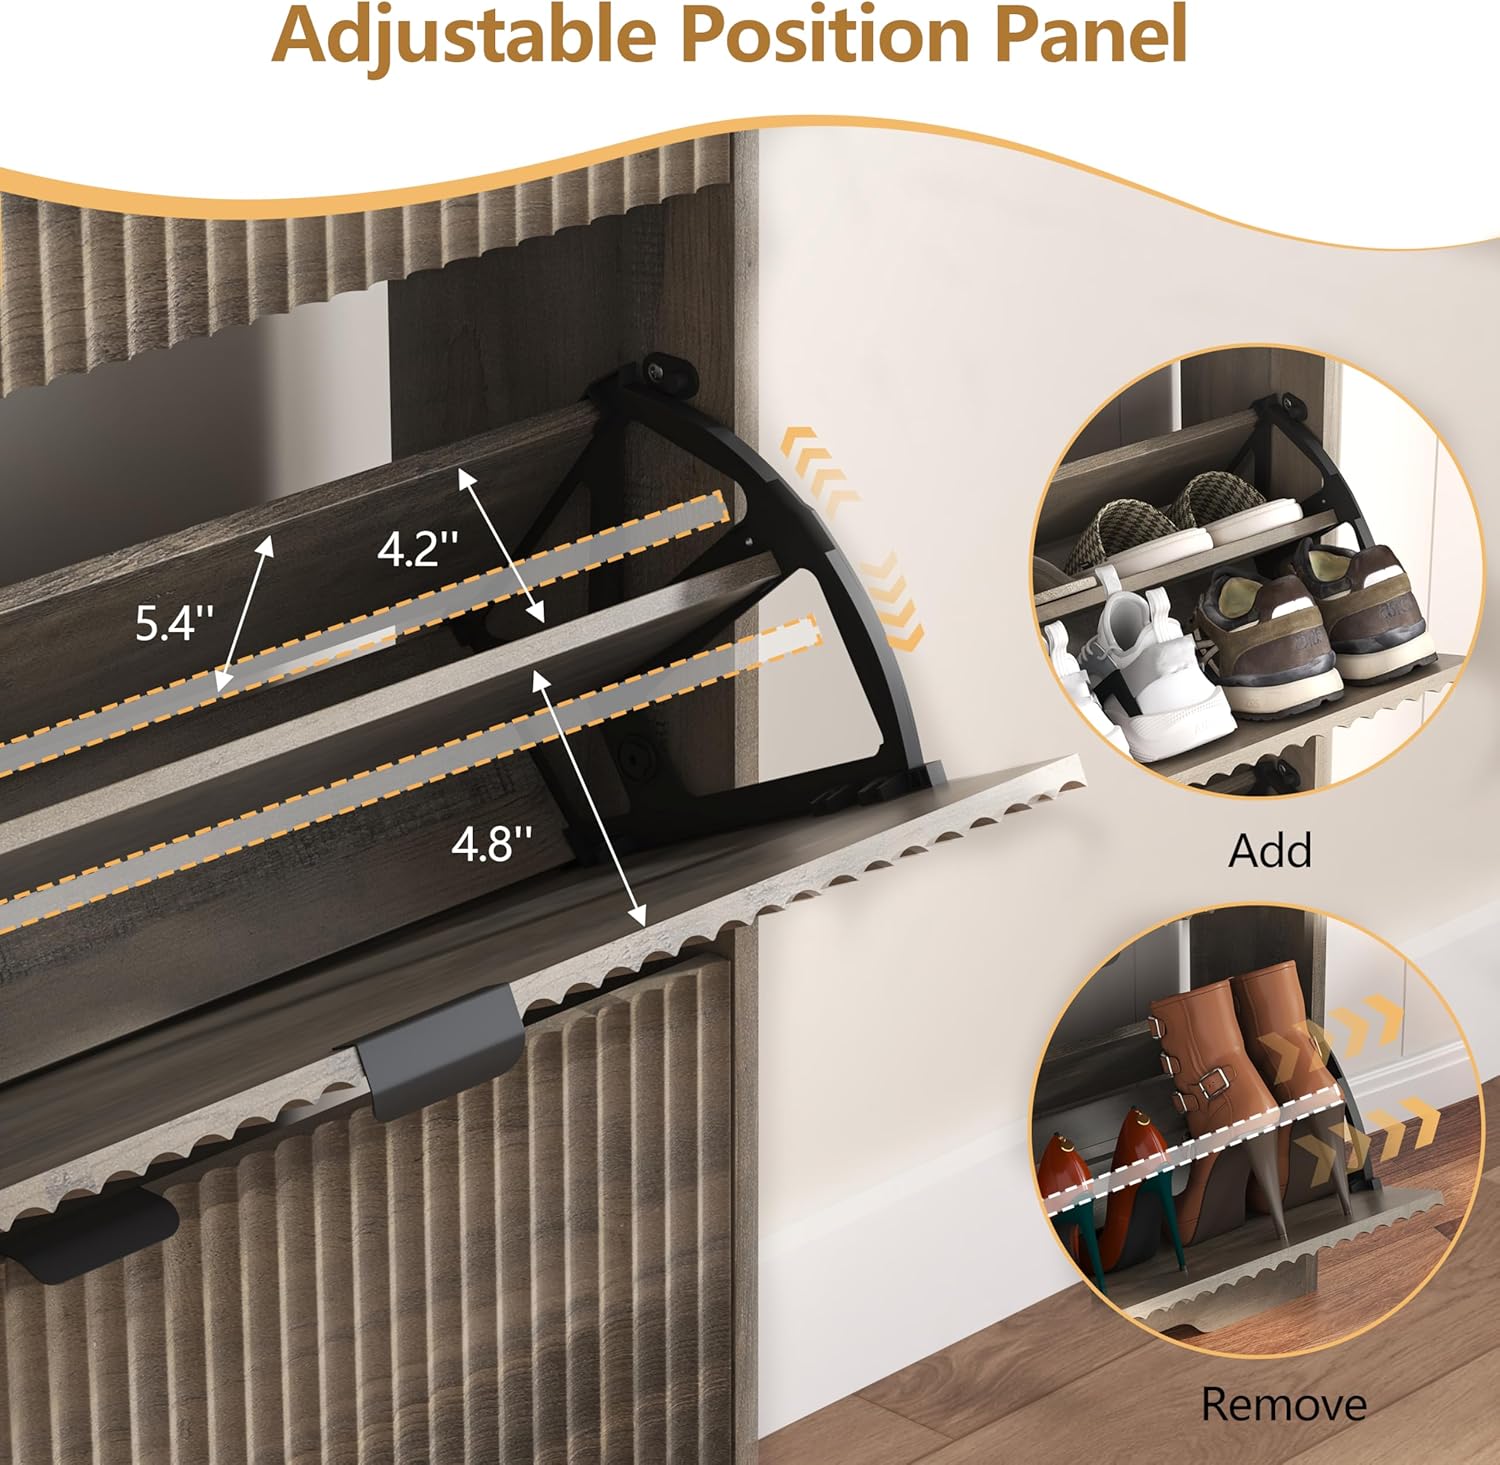
Figure 6: Adjusting the internal shelf for different shoe sizes.
6.3. Top Surface Storage
The top surface of the cabinet can be used for displaying decorative items, storing keys, wallets, or other small essentials. Ensure items placed on top do not exceed the cabinet's weight capacity and are stable to prevent falling.
7. Maintenance
7.1. Cleaning
- Wipe the cabinet surfaces with a soft, damp cloth.
- Avoid using harsh chemicals, abrasive cleaners, or excessive moisture, as these can damage the engineered wood finish.
- For spills, wipe immediately with a dry cloth.
7.2. General Care
- Periodically check all screws and connections to ensure they remain tight. Retighten if necessary.
- Ensure the anti-tipping device remains securely anchored to the wall.
- Avoid exposing the cabinet to direct sunlight or extreme temperature changes, which can cause warping or fading.
- Do not overload the drawers or the top surface beyond reasonable capacity.
8. Troubleshooting
| Problem | Possible Cause | Solution |
|---|---|---|
| Drawers do not close properly. | Shoes are too large or improperly placed; drawer mechanism is misaligned. | Adjust or remove shoes. Check assembly of drawer mechanism and ensure it is correctly installed. |
| Cabinet feels unstable or wobbly. | Not properly leveled; anti-tipping device not installed or loose; loose hardware. | Ensure cabinet is on a flat surface. Install or re-secure the anti-tipping device to the wall. Tighten all assembly hardware. |
| Odor buildup inside drawers. | Lack of air circulation. | The cabinet has a ventilated back. Ensure it is not pushed too tightly against a wall that would block airflow. Consider using shoe deodorizers. |
9. Warranty and Customer Support
HUANLEGO is committed to providing quality products and customer satisfaction. Your shoe cabinet comes with a hassle-free after-sales service.
- Professional Online Customer Service: A dedicated team is available to assist with any questions or concerns you may have after purchase.
- Problem Resolution: If you encounter any issues, or if parts are damaged or missing, please contact us directly. We are prepared to offer solutions and provide replacements as needed.
For assistance, please refer to the contact information provided in your purchase documentation or visit the official HUANLEGO store page on Amazon.

