RED MOUNTAIN VALLLEY 2A-OC300
Red Mountain Valley 36 Inch Fire Pit Ring User Manual
Model: 2A-OC300
Brand: RED MOUNTAIN VALLLEY
1. Introduction
Thank you for choosing the Red Mountain Valley 36 Inch Fire Pit Ring. This durable and versatile fire pit ring is designed to enhance your outdoor gatherings, providing warmth, ambiance, and the option for cooking. Crafted from sturdy steel with a high-temperature paint finish, it features a unique forest and wildlife design, making it a beautiful and functional addition to any patio, camping trip, or beach bonfire.

Figure 1: The 36-inch round campfire ring set up in an outdoor patio area, showcasing its size and design.

Figure 2: Detail of the fire pit ring's sturdy and durable construction, highlighting the quality steel frame and heat/rust resistant coating.
2. Safety Information
Please read and understand all safety warnings and instructions before assembling or using this fire pit ring. Failure to follow these instructions may result in property damage, personal injury, or even death.
- Outdoor Use Only: This fire pit ring is designed for outdoor use exclusively. Do not use it indoors or in enclosed spaces.
- Cool Down Period: Do not touch the product before it has completely cooled down after use. The steel material retains heat for an extended period.
- Spark Control: The integrated mesh backing helps prevent sparks from escaping, enhancing safety during use. However, always exercise caution and maintain a safe distance from flammable materials.
- Stable Surface: Always place the fire pit ring on a stable, level, non-combustible surface.
- Supervision: Never leave a burning fire unattended. Keep children and pets away from the fire pit.
- Fuel Type: Use only natural wood as fuel. Do not use gasoline, kerosene, diesel fuel, lighter fluid, or alcohol to start or rekindle a fire.
- Emergency Preparedness: Keep a fire extinguisher, water hose, or sand nearby in case of an emergency.
3. Package Contents
Before beginning assembly, ensure all parts are present and undamaged. If any parts are missing or damaged, do not attempt to assemble or use the product. Contact customer support for assistance.
| Item | Description | Quantity |
|---|---|---|
| Fire Pit Ring Sections | Pre-cut steel sections with forest and wildlife design and mesh backing. | 4 |
| Assembly Hardware | Bolts and nuts for connecting sections. | Sufficient quantity |
| Small Wrench | Tool for assembly. | 1 |
4. Setup and Assembly
The Red Mountain Valley Fire Pit Ring is designed for easy and quick assembly. Follow these steps to set up your fire pit:
- Unpack Components: Carefully remove all parts from the packaging and lay them out on a clean, flat surface.
- Connect Sections: Take the four fire pit ring sections. Align the pre-drilled holes on the edges of two sections.
- Secure with Hardware: Insert the provided bolts through the aligned holes and secure them with the nuts using the small wrench. Do not overtighten.
- Form the Ring: Continue connecting the remaining sections in the same manner until a complete 36-inch diameter ring is formed.
- Final Tightening: Once all sections are connected, go back and gently tighten all bolts to ensure a secure and stable structure.
- Placement: Position the assembled fire pit ring on your desired outdoor location, ensuring it is on a stable, non-combustible surface, away from any flammable materials or structures.

Figure 3: Visual guide for assembling the fire pit ring sections using the provided hardware and wrench.

Figure 4: Detail of the easy installation process, showing how to connect the quarter arcs with screws.
5. Operating Instructions
Once assembled and placed safely, your Red Mountain Valley Fire Pit Ring is ready for use.
5.1 Starting a Fire
- Place dry kindling (small twigs, paper, or fire starters) in the center of the fire pit.
- Arrange larger pieces of dry wood on top of the kindling in a teepee or log cabin style.
- Ignite the kindling. The cutouts and hollow design of the fire pit ring promote constant oxygen flow, which helps the fire burn consistently and efficiently.
- Gradually add more wood as the fire grows, ensuring not to overload the fire pit.

Figure 5: The cutout and hollow design of the fire pit ring allows for boosted airflow, promoting efficient burning of bonfires.
5.2 Cooking and Grilling (Optional)
This fire pit is suitable for cooking and grilling. A grill net (not included) can be placed on top of the fire pit ring. Ensure the grill net is stable and rated for high temperatures. Adjust the heat by managing the amount of wood and the intensity of the fire.
5.3 Enjoying the Ambiance
The 360° forest and wildlife design adds a rustic and aesthetic touch to your outdoor space. The elevated design allows for better heat distribution, providing warmth and a cozy atmosphere for gatherings. The sturdy steel construction ensures durability and safety.

Figure 6: The fire pit ring with a vibrant fire, highlighting the intricate forest and wildlife patterns that add visual interest.
6. Maintenance
Proper maintenance will extend the life of your Red Mountain Valley Fire Pit Ring and ensure continued safe operation.
- Cool Down Completely: Always allow the fire pit to cool down completely before attempting any cleaning or maintenance.
- Ash Removal: Regularly remove ashes and debris from the fire pit basin. Accumulated ashes can hinder airflow and promote corrosion.
- Cleaning: Wipe down the exterior surfaces with a damp cloth. For stubborn residue, a mild soap solution can be used, followed by thorough rinsing and drying. Avoid abrasive cleaners or harsh chemicals.
- Rust Prevention: While the fire pit has a high-temperature paint finish, prolonged exposure to moisture can lead to rust. Consider placing the fire pit on elevated bricks or a stand to prevent direct contact with ground moisture.
- Storage/Covering: When not in use, especially during inclement weather or off-season, it is highly recommended to cover the fire pit with a weather-resistant cover (not included) or store it in a dry location to protect it from the elements.
7. Troubleshooting
This section addresses common issues you might encounter with your fire pit ring. For problems not listed here, please contact customer support.
| Problem | Possible Cause | Solution |
|---|---|---|
| Fire not burning well / Low flame | Insufficient airflow; Wet wood; Too much ash buildup. | Ensure cutouts are clear for airflow. Use dry wood. Remove excess ash from the basin. |
| Rust appearing on surface | Prolonged exposure to moisture; Lack of protective cover. | Clean affected areas and apply high-temperature rust-resistant paint. Store in a dry place or use a weather-resistant cover when not in use. Elevate the fire pit to prevent ground moisture contact. |
| Sections not aligning during assembly | Incorrect orientation of sections; Manufacturing tolerance. | Double-check the orientation of each section. Loosen all bolts slightly, adjust alignment, then re-tighten. If severe, contact customer support. |
8. Product Specifications
| Feature | Detail |
|---|---|
| Brand | RED MOUNTAIN VALLLEY |
| Model Number | 2A-OC300 |
| Material | Metal (Steel) |
| Finish Type | Polished (High-temperature paint) |
| Product Dimensions | 36"D x 8.5"W x 36"H (As per product data, note the 8.5"W is likely a typo for height, as the image shows 9"H) |
| Item Weight | 11.38 pounds |
| Fuel Type | Wood |
| Design | 360° Forest & Wildlife (Deer, Tree, Bear patterns) |
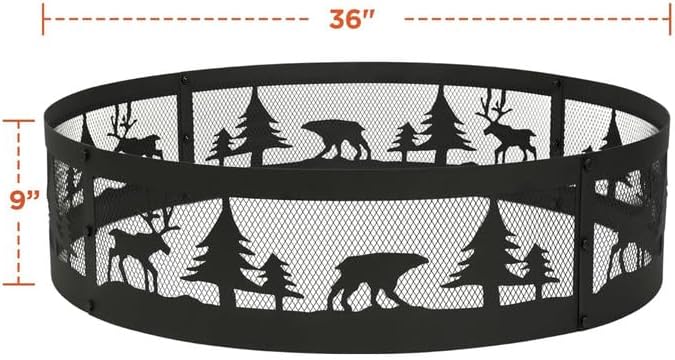
Figure 7: Dimensional overview of the fire pit ring, indicating a 36-inch diameter and 9-inch height.
9. Warranty and Support
Specific warranty information for the Red Mountain Valley 36 Inch Fire Pit Ring is not provided in this manual. For details regarding warranty coverage, product support, or to report any issues, please refer to the product packaging or contact the manufacturer directly through their official website or the retailer where the product was purchased.
Ask a question about this manual
Ask about setup, troubleshooting, compatibility, parts, safety, or missing instructions. Manuals+ will review the question and use this page’s manual context to help answer it.