1. Introduction
This manual provides essential information for the safe and efficient operation, installation, and maintenance of your VEVOR Electric Hoist with Premium Trolley, Model PA800. Please read this manual thoroughly before operating the equipment to ensure proper use and to prevent injury or damage.

Figure 1: VEVOR Electric Hoist with Premium Trolley, Model PA800.
The VEVOR Electric Hoist with Premium Trolley is designed for lifting various items in industrial, warehouse, and construction environments. It features a robust design, powerful motor, and safety mechanisms to ensure reliable performance.

Figure 2: Electric Hoist and Trolley in a typical industrial application.
2. Safety Instructions
WARNING: Failure to follow these safety instructions may result in serious injury or death.
- Always inspect the hoist, trolley, and wire rope for damage before each use. Do not operate if any components are damaged.
- Ensure the mounting structure can support the hoist's weight and the maximum load capacity.
- Do not exceed the rated load capacity (800 kg / 1760 lbs for double line, 400 kg / 880 lbs for single line).
- Keep hands and body clear of moving parts, especially the wire rope and hook.
- Do not use the hoist to lift people or animals.
- Ensure the load is properly secured to the hook before lifting. Use the safety latch on the hook.
- Operate the hoist using the remote control from a safe distance.
- In case of emergency, press the emergency stop button on the remote control.
- Avoid operating the hoist in adverse weather conditions or in environments with corrosive substances.
- Ensure proper ventilation for the motor to prevent overheating.
- Regularly check the limit switch functionality.

Figure 3: Key safety features including the remote control with emergency stop, robust aluminum alloy shell, and galvanized steel wire rope.
3. Product Overview
The VEVOR Electric Hoist with Premium Trolley is a versatile lifting solution. Key components include:
- Electric Hoist Unit: Contains the motor, gearbox, wire rope drum, and control system.
- Premium Trolley: A four-wheel trolley made of Q235 steel, designed for anti-corrosion and robustness, allowing horizontal movement along an I-beam. It features an adjustable track width from 3 to 4.3 inches (80-110 mm).
- Wire Rope: Galvanized steel wire, 40 feet (12 meters) long with a 0.2 inch (5.1 mm) diameter, resistant to erosion and rust.
- Hooks: Mn-steel hooks with safety latches to prevent accidental disengagement of the load. Includes a single hook and a double-line hook with a pulley block.
- Remote Control: Wired remote with Up, Down, Left, Right buttons for hoist and trolley movement, and an emergency stop button. The control cord length is 4.6 feet (1.4 meters).
- Limit Switch: Automatically stops lifting when the hook reaches its maximum height, preventing over-winding.
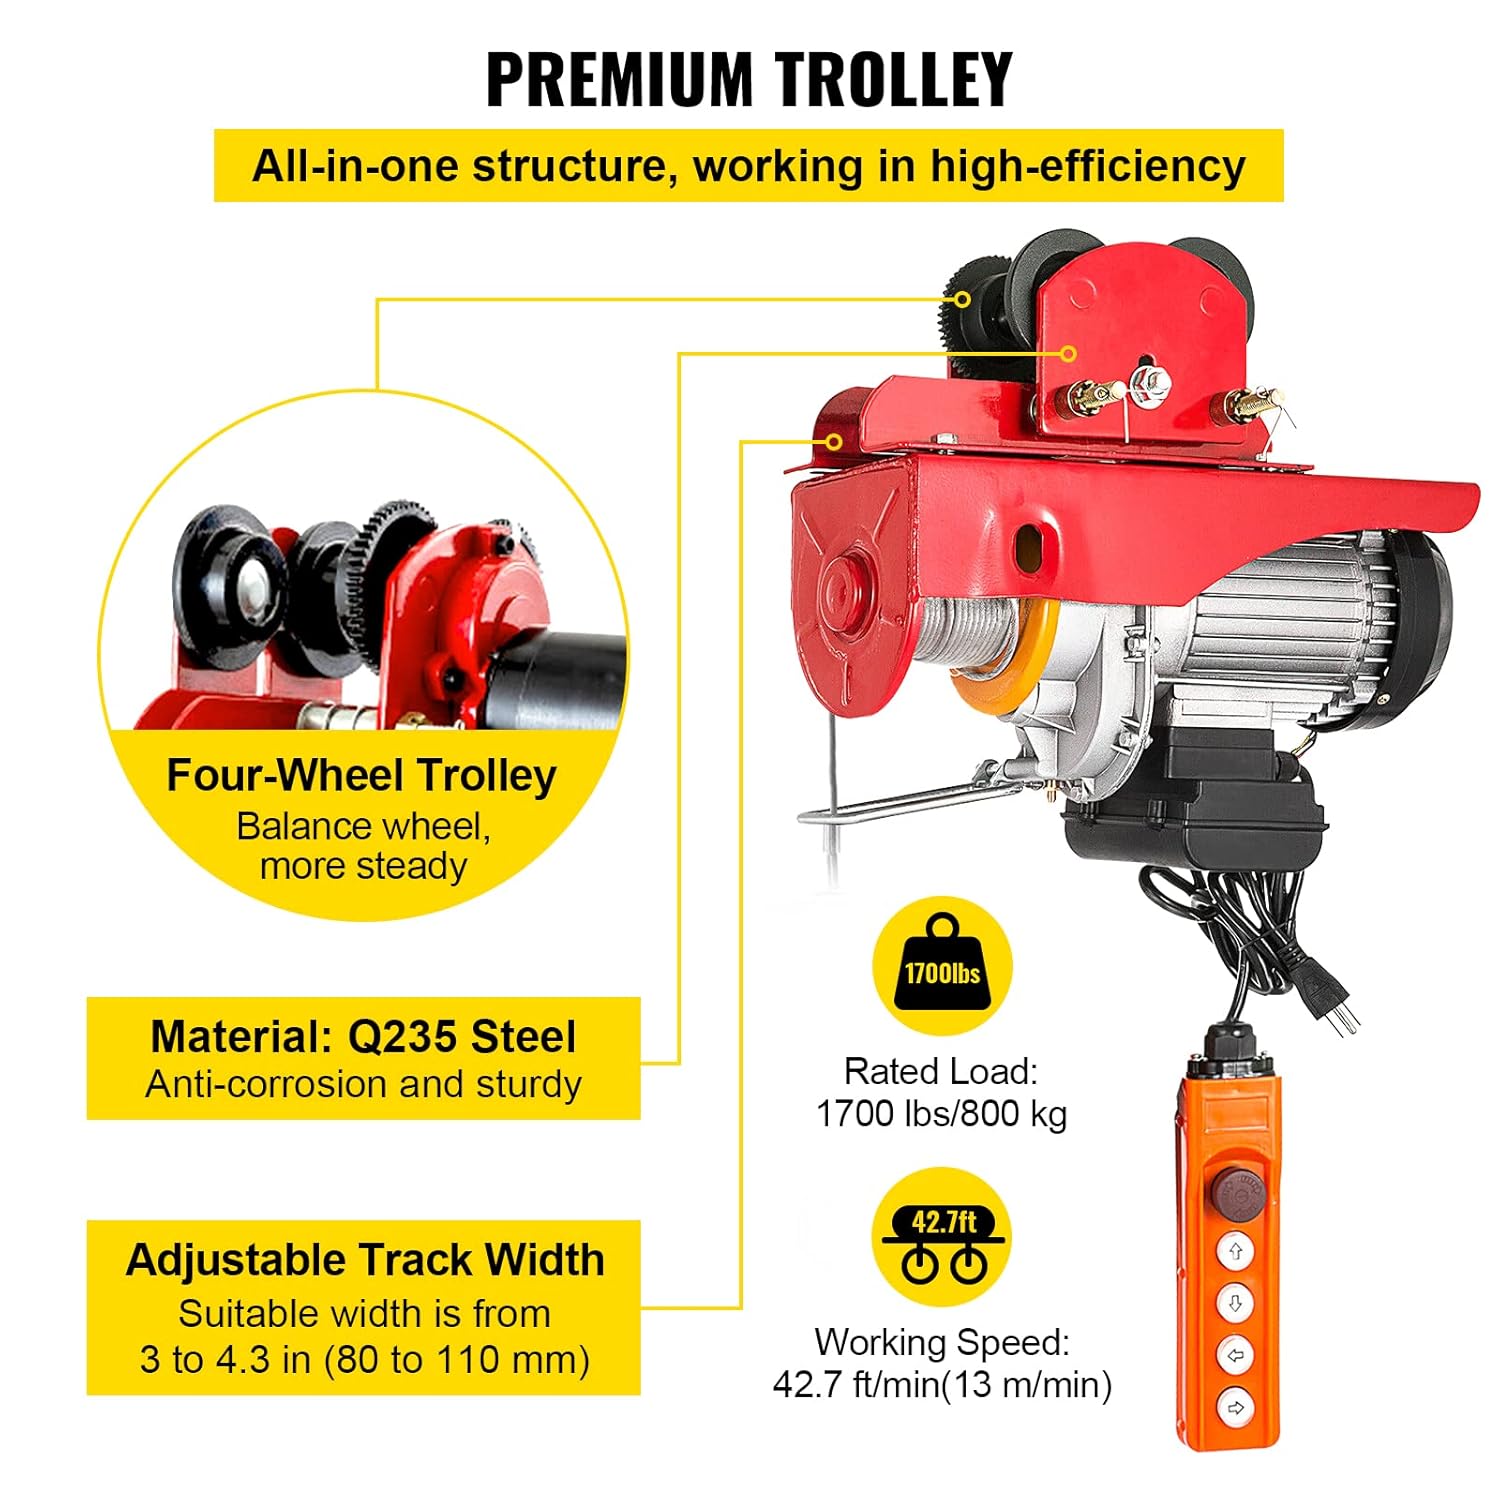
Figure 4: Premium Trolley details, highlighting adjustable track width and Q235 steel construction.
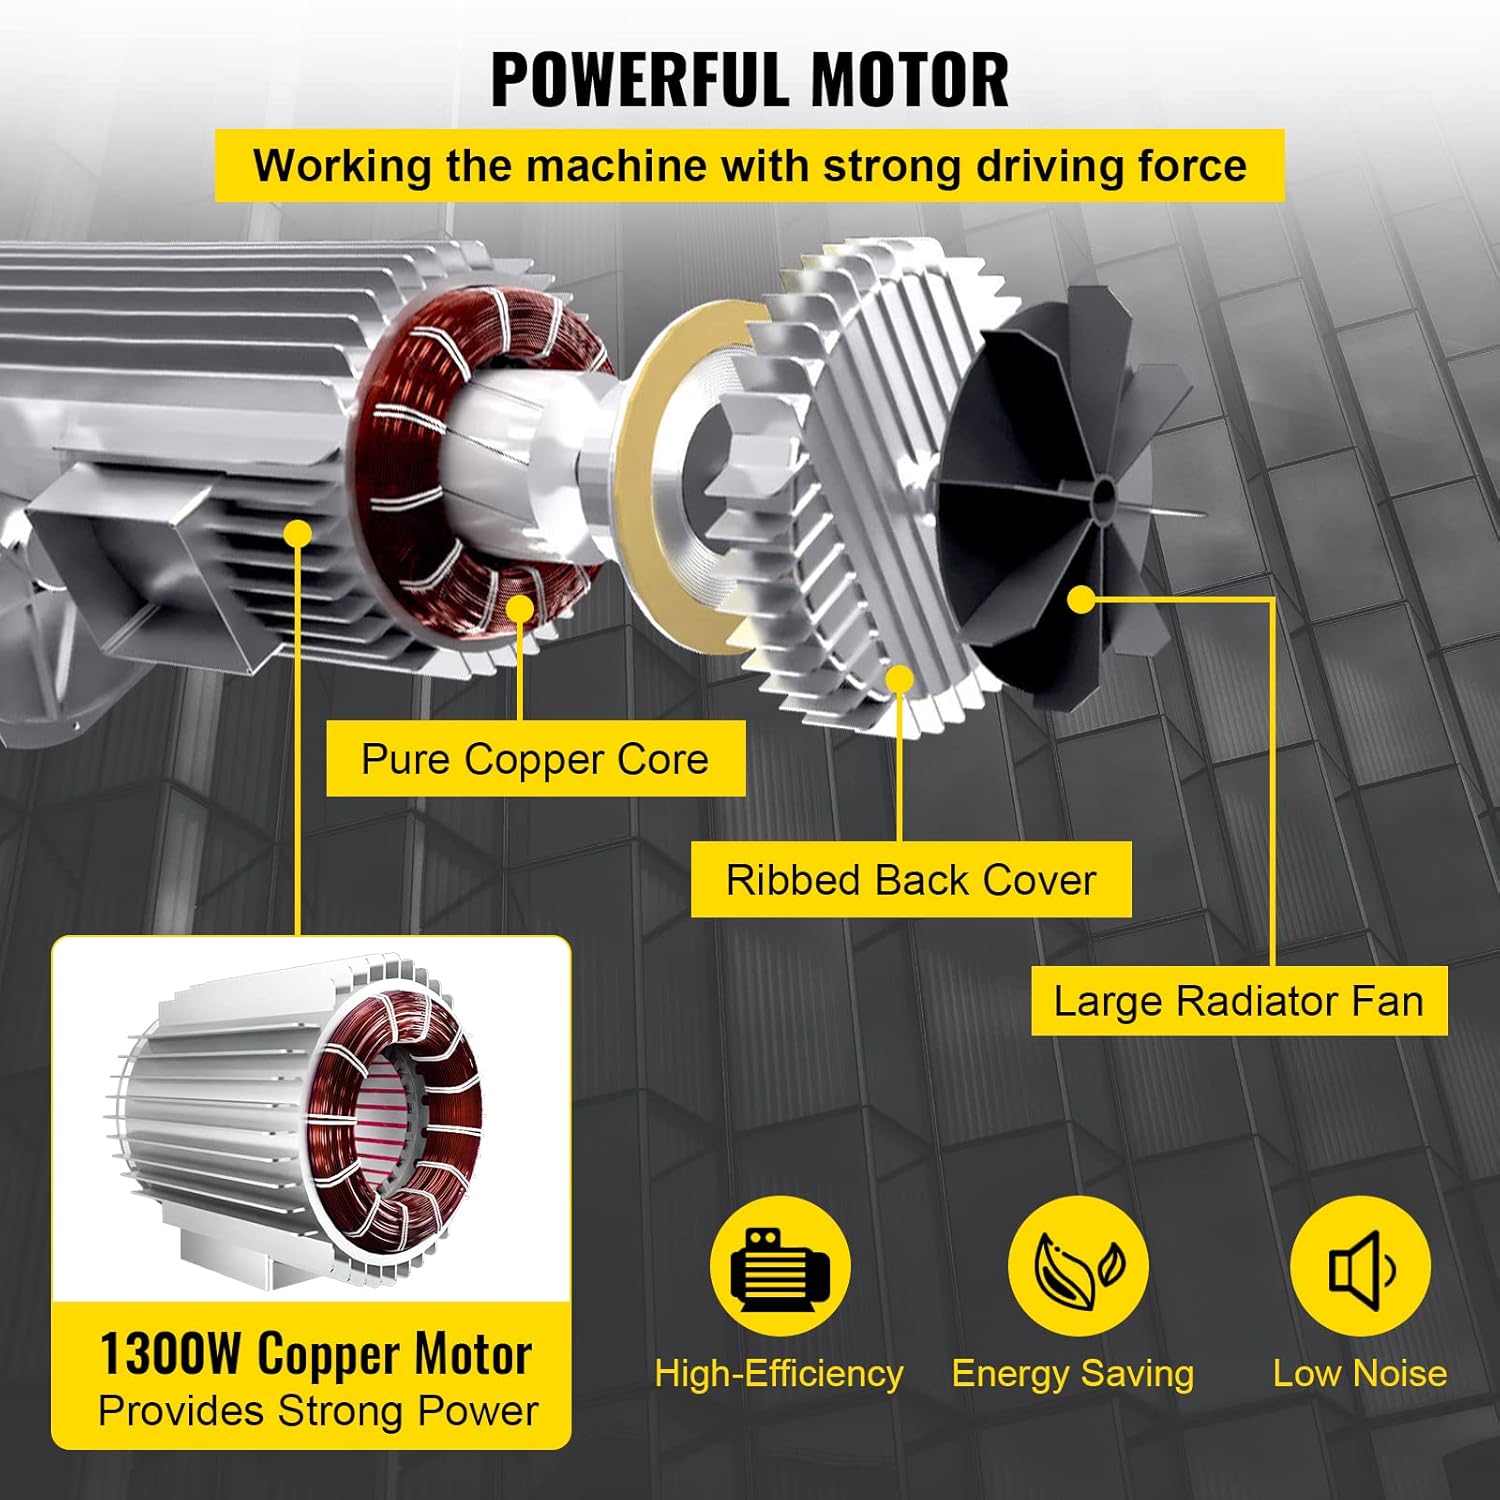
Figure 5: Powerful 1300W copper motor with efficient cooling system.
4. Setup and Installation
Proper installation is crucial for safe operation. Consult a qualified professional if you are unsure about any steps.
- Mounting Surface: Ensure the I-beam or mounting structure is capable of supporting the hoist's weight plus the maximum intended load. The trolley track width is adjustable from 3 to 4.3 inches (80-110 mm) to fit various I-beam sizes.
- Hoist Assembly: Attach the electric hoist unit securely to the premium trolley according to the provided hardware. Ensure all bolts are tightened to the manufacturer's specifications.
- Electrical Connection: Connect the hoist to a suitable power supply. Verify that the voltage and frequency match the hoist's requirements (refer to specifications). Ensure the power outlet is properly grounded.
- Wire Rope Configuration:
- Single-Line Operation: Attach the main hook directly to the wire rope.
- Double-Line Operation: Loop the wire rope through the pulley block of the secondary hook and attach it back to the hoist body. This configuration doubles the lifting capacity but halves the lifting speed and height.
- Test Run: Before lifting any loads, perform a test run with no load. Check for smooth operation, proper function of the limit switch, and responsiveness of the remote control.

Figure 6: Adjustable track width of the premium trolley for easy installation on various I-beams.
5. Operating Instructions
Follow these steps for safe and effective operation of your electric hoist.
- Pre-Operation Check: Before each use, inspect the hoist, wire rope, hooks, and trolley for any signs of wear, damage, or loose connections. Ensure the work area is clear of obstructions.
- Secure the Load: Attach the load securely to the appropriate hook (single or double line) and ensure the safety latch is closed. Distribute the load evenly to prevent swinging.
- Lifting: Use the 'Up' button on the remote control to slowly lift the load. Monitor the load's stability and the hoist's performance. Avoid sudden movements.
- Lowering: Use the 'Down' button to slowly lower the load. Guide the load if necessary, keeping hands clear.
- Horizontal Movement: Use the 'Left' and 'Right' buttons on the remote control to move the trolley and load horizontally along the I-beam.
- Emergency Stop: In any unsafe situation, immediately press the red emergency stop button on the remote control.
- Post-Operation: Once lifting is complete, lower the hook to a safe position, disconnect power if necessary, and store the remote control safely.

Figure 7: Single-line and double-line lifting configurations and capacities.

Figure 8: Remote control for hoist and trolley operation.
6. Maintenance
Regular maintenance ensures the longevity and safe operation of your hoist.
- Daily Inspection: Check the wire rope for fraying, kinks, or corrosion. Inspect hooks for deformation or cracks. Verify the functionality of the limit switch and emergency stop button.
- Lubrication: Periodically lubricate the wire rope and moving parts of the trolley as recommended by general hoist maintenance practices.
- Cleaning: Keep the hoist and trolley clean from dust, dirt, and debris. Ensure the motor's cooling fins are clear.
- Electrical Connections: Periodically check all electrical connections for tightness and signs of wear.
- Professional Servicing: For complex repairs or internal component checks, consult a qualified service technician.
7. Troubleshooting
This section addresses common issues you might encounter.
| Problem | Possible Cause | Solution |
|---|---|---|
| Hoist does not operate | No power supply; Emergency stop engaged; Overload protection activated; Loose electrical connection. | Check power connection; Release emergency stop; Reduce load; Check and tighten connections. |
| Motor overheats | Continuous operation; Overload; Blocked ventilation. | Allow motor to cool; Reduce load; Clear ventilation openings. |
| Wire rope damage | Wear and tear; Improper use; Lack of lubrication. | Replace wire rope; Ensure proper usage; Lubricate regularly. |
| Trolley does not move smoothly | Track obstruction; Wheels dirty or damaged; Track width incorrect. | Clear track; Clean/replace wheels; Adjust track width (3-4.3 inches). |
8. Specifications
| Feature | Specification |
|---|---|
| Model Number | PA800 |
| Manufacturer | VEVOR |
| Single-Line Loading Capacity | 880 lbs (400 kg) |
| Double-Line Loading Capacity | 1700 lbs (800 kg) |
| Single-Line Lifting Height | 39.4 ft (12 m) |
| Double-Line Lifting Height | 19.7 ft (6 m) |
| Single-Line Lifting Speed | 40 ft/min (12 m/min) |
| Double-Line Lifting Speed | 20 ft/min (6 m/min) |
| Motor Power | 1300 W |
| Wire Rope Diameter | 0.2 inches (5.1 mm) |
| Wire Rope Length | 40 ft (12 m) |
| Control Cord Length | 4.6 ft (1.4 m) |
| Trolley Track Width (Adjustable) | 3 - 4.3 inches (80 - 110 mm) |
| Product Dimensions (L x W x H) | 15.8 x 6 x 13.8 inches (40 x 15 x 35 cm) |
| Net Weight | 75 lbs (34 kg) |

Figure 9: Key dimensions of the VEVOR Electric Hoist.
9. Warranty and Support
For warranty information, technical support, or spare parts inquiries, please contact VEVOR customer service through their official website or your point of purchase. Keep your purchase receipt and model number (PA800) handy for faster service.
For more information, visit the official VEVOR store: VEVOR Store