
Introduction
This manual provides essential information for the installation, maintenance, and care of your Adviace grill replacement parts. These parts are designed to restore the functionality and extend the lifespan of your compatible Char-Broil 6-burner gas grill. Please read these instructions thoroughly before proceeding with installation or maintenance.
Compatibility
These replacement parts are compatible with the following Char-Broil 6-burner gas grill models:
- 463230515
- 463230514
- 463239915
- 463230513
- 463230512
- 463230511
- 463234513
- 463230510
- 463235513
- 463230710
- 463234512
- 463235214
- 463226514
- 463234511

Product Components
Your Adviace grill replacement kit includes the following components:
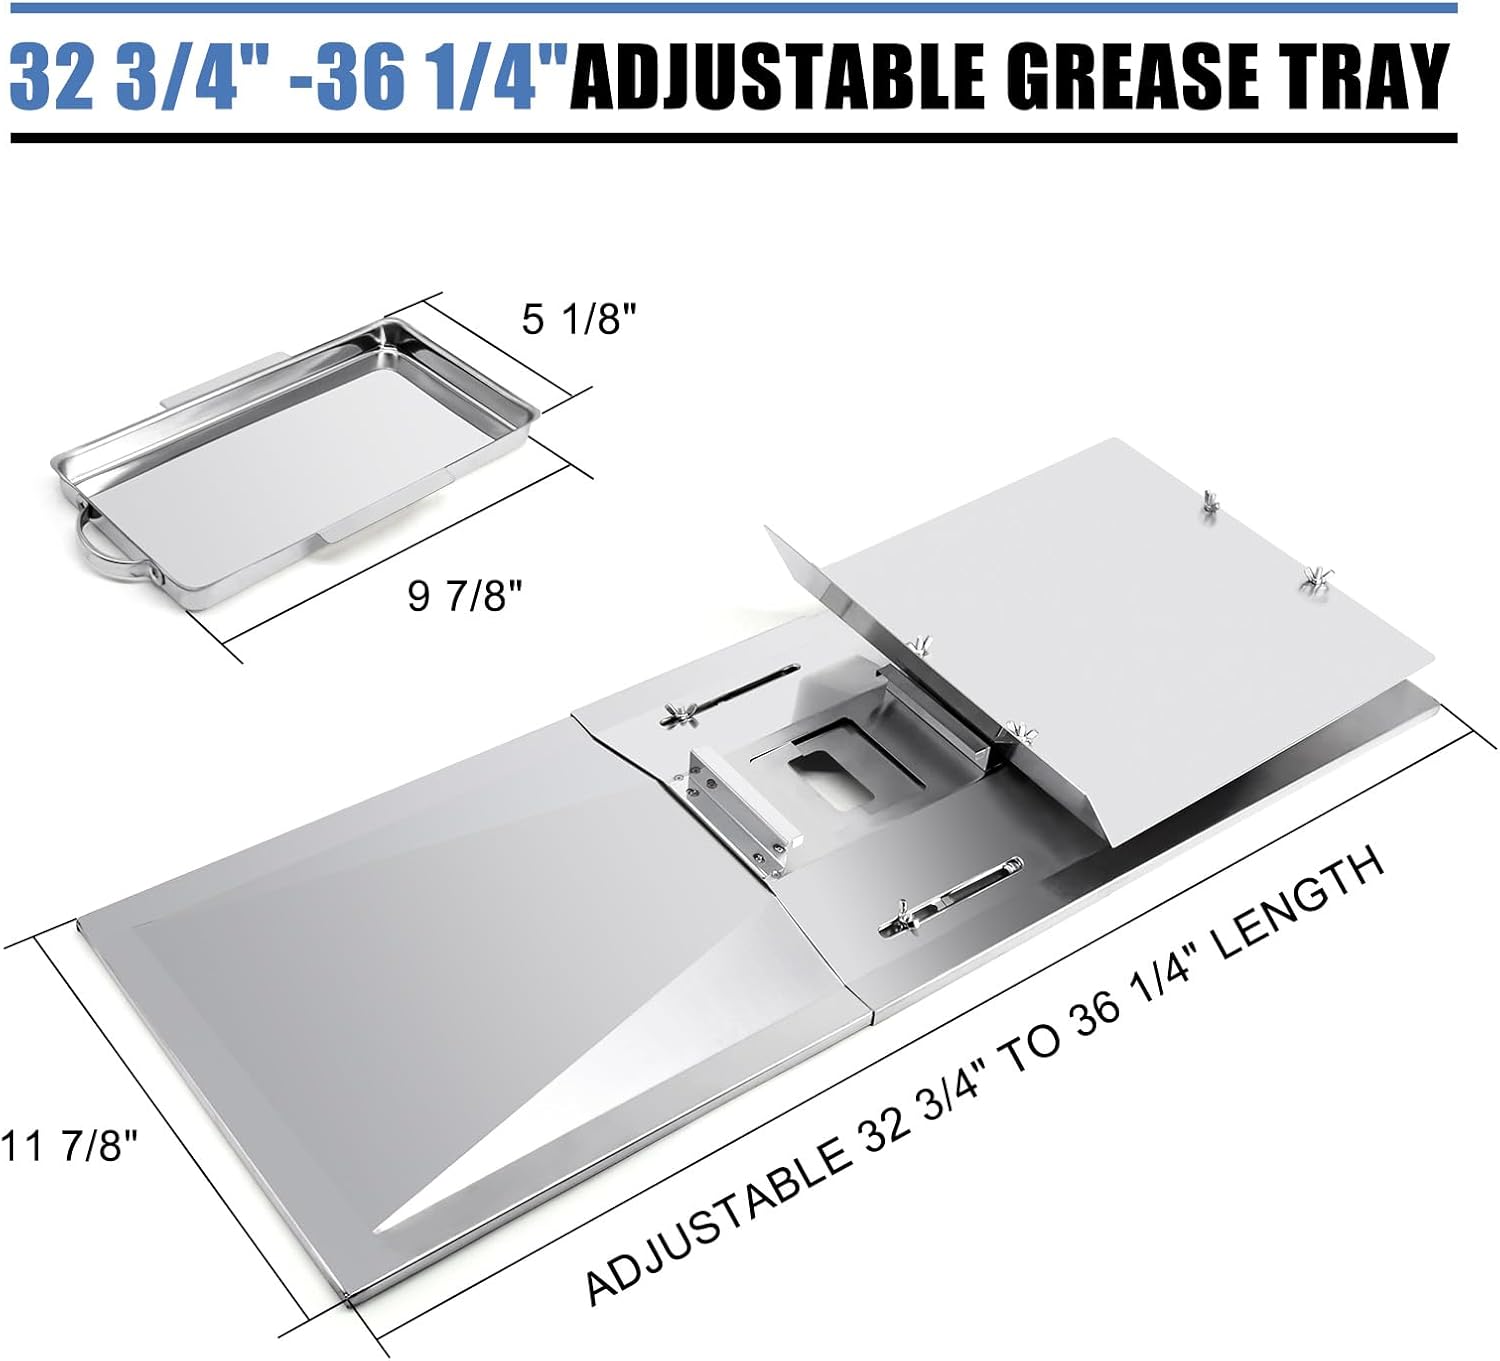
- 1x Grease Tray Assembly
- 4x Grill Grates
- 5x Heat Tents (Replacement Heat Plates)
- 5x Main Burners
- 4x Carry Over Tubes
- 5x Grill Igniters

Setup and Installation
Before beginning installation, ensure your grill is completely cool and disconnected from its gas supply. It is recommended to wear protective gloves during the process.
- Remove Old Components: Carefully remove the existing grease tray, grill grates, heat tents, burners, carry over tubes, and igniters from your grill. Dispose of old parts responsibly.
- Clean Grill Interior: Thoroughly clean the interior of your grill, removing any grease, debris, or rust buildup. This ensures optimal performance and longevity of the new parts.
- Install New Burners: Place the new main burners into their designated positions. Ensure they are securely seated and aligned with the gas valves.
- Connect Carry Over Tubes: Install the carry over tubes, connecting the burners to ensure even flame distribution across the cooking surface.
- Install Igniters: Attach the new grill igniters, ensuring proper connection to the ignition system. Test the igniters before proceeding.
- Place Heat Tents: Position the heat tents (flavorizer bars) over the burners. These protect the burners and help distribute heat.
- Insert Grill Grates: Carefully place the new grill grates onto their supports. Ensure they are stable and level.
- Install Grease Tray: Slide the adjustable grease tray into its slot beneath the burners. Adjust its length to fit snugly.
- Final Check: Reconnect the gas supply and perform a leak test according to your grill's manufacturer instructions. Light the grill to ensure all burners ignite properly and produce an even flame.

Operating Your Grill After Part Replacement
After installing the replacement parts, operate your grill as you normally would. The new components are designed to restore efficient and even heating. Always ensure proper ventilation and follow all safety guidelines provided by your grill's manufacturer.

Maintenance
Regular maintenance of your grill replacement parts will ensure their longevity and optimal performance.
- Grease Tray: Regularly clean the grease tray to prevent buildup and potential flare-ups. The stainless steel material is designed for easy cleaning and resistance to rust and corrosion.
- Grill Grates: Clean cast iron grates after each use with a grill brush. For deeper cleaning, remove and wash with warm, soapy water. Cast iron grates retain heat effectively for professional searing.
- Heat Tents: Periodically inspect and clean heat tents. The porcelain steel construction with an enamel coating is designed to be anti-rust, non-peeling, and easy to clean.
- Burners and Carry Over Tubes: Ensure burner ports are clear of debris. Use a wire brush if necessary.


Troubleshooting
If you encounter issues after installing your replacement parts, consider the following:
- Burners Not Lighting: Check igniter connections and ensure gas flow. Verify that burner ports are not clogged.
- Uneven Heating: Ensure burners are correctly seated and carry over tubes are properly aligned. Clean any debris from burner ports.
- Gas Leaks: Immediately turn off the gas supply. Perform a soap and water leak test on all gas connections. If a leak is detected, tighten connections or replace faulty parts. Do not operate the grill if a gas leak is suspected.
Specifications
| Component | Material | Dimensions |
|---|---|---|
| Grease Tray | Stainless Steel | Adjustable 32 3/4" to 36 1/4" L x 11 7/8" W |
| Grill Grates (each) | Cast Iron | 16 7/8" L x 9 1/4" W (Total: 16 7/8" L x 37" W) |
| Main Burners | Stainless Steel | 14 3/8" L x 1" Diameter |
| Heat Tents | Porcelain Steel | 14 5/8" L x 4 1/4" W |
| Carry Over Tubes | Stainless Steel | Adjustable 5" - 9.5" L |
Warranty and Support
For warranty information or technical support regarding your Adviace grill replacement parts, please refer to the contact information provided with your purchase or visit the Adviace brand store online. Keep your purchase receipt for warranty claims.