Introduction
Thank you for choosing the Pornitor 14-inch FHD 1080P Triple Portable Monitor Extender. This device is designed to enhance your productivity by providing additional screen real estate for your laptop, transforming it into a multi-screen workstation. Please read this manual carefully to ensure proper installation, operation, and maintenance of your new monitor extender.
What's in the Box
- Laptop Screen Extender x1
- Carry Bag x1
- Adapter x1
- USB-C to USB-C Cable x2
- User Manual x1
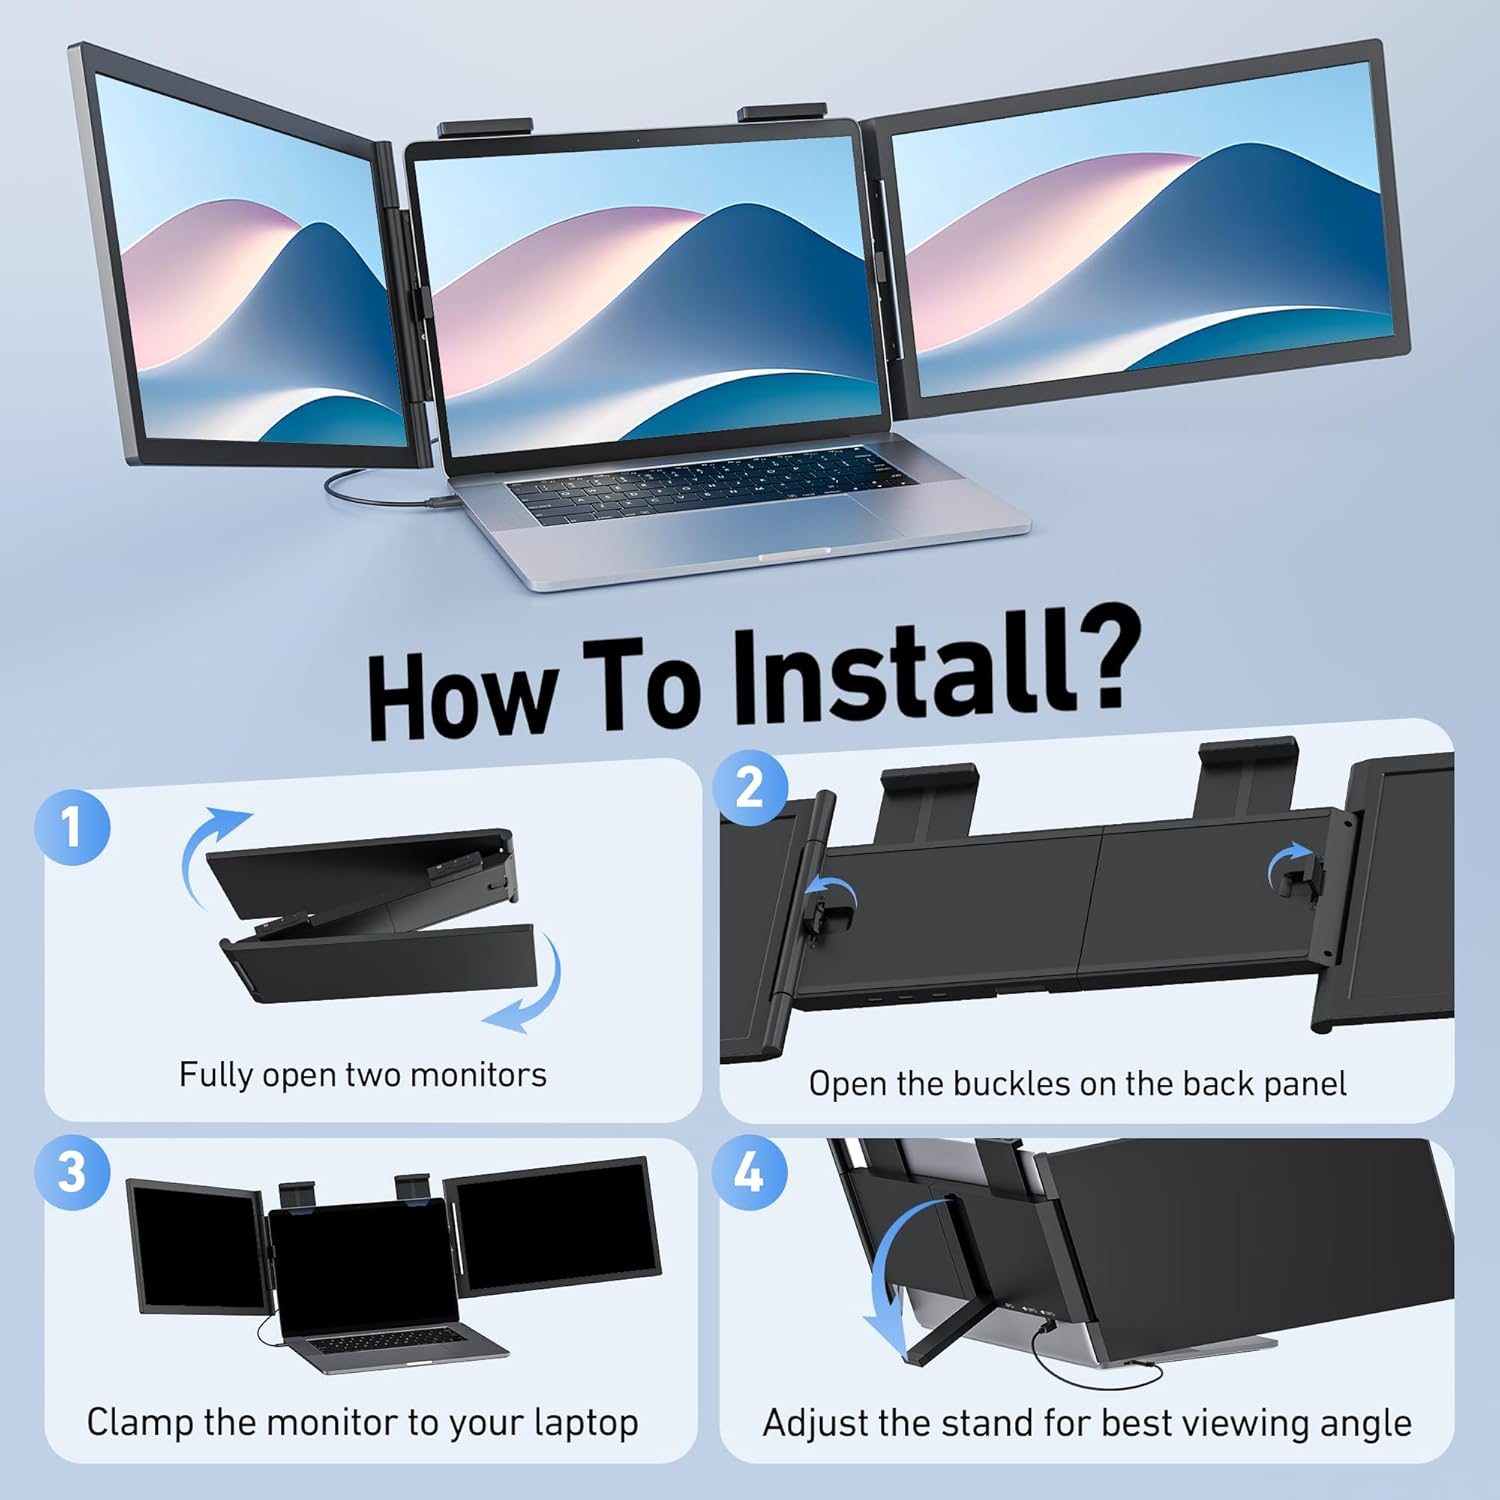
Image: All components included in the package: the screen extender, carry bag, power adapter, two USB-C to USB-C cables, and the user manual.
Product Features
- 300% Efficiency Boost: Transform your workflow with 14" FHD triple laptop monitor extender that eliminates constant tab-switching.
- Premium Displays: Features 1080P IPS panels, 300nit brightness, and 72% NTSC for sharp, accurate colors. Anti-glare matte finish reduces eye strain.
- 1-Cable Plug & Play (Windows): For Windows laptops, delivers 2 full HD displays through one USB-C connection without drivers.
- Wide Compatibility: Compatible with 14"-16.5" laptops (width 12.1"-14.3"). Supports Windows, Mac, ChromeOS, Linux, Android, Switch, Dex.
- Triple Display Modes: Instantly switch between extended desktop (3-screen workspace), mirror mode (presentations), or portrait orientation (coding/reading).
- Adjustable Stand: 250° adjustable stand offers flexible positioning for ergonomic comfort.

Image: Illustration of the different display modes available with the monitor extender, including extended, mirrored, presentation, second screen, and portrait modes.
Setup Instructions
1. Unpacking and Initial Preparation
Carefully remove the monitor extender and all accessories from the packaging. Ensure all components listed in the "What's in the Box" section are present.
Video: A demonstration of unpacking and initial setup of the triple screen laptop monitor extender.
2. Attaching to Your Laptop
- Fully open the two external monitors.
- Open the buckles on the back panel of the extender.
- Carefully clamp the monitor extender to the top of your laptop screen. Ensure the clips are securely fastened without obstructing the laptop's camera or screen.
- Adjust the integrated stand on the back of the extender for optimal viewing angle and stability. The stand can be adjusted up to 180° for optimal support at around 110°.

Image: Visual instructions for installing the screen extender onto a laptop, detailing the process from unfolding to securing the device.
3. Connecting Cables
The monitor extender requires a full-featured USB-C port on your laptop for video and power transmission. If your laptop's USB-C port does not support video output (DP Alt Mode) or power delivery (if outputs < 5V/3A), you may need to use additional cables or a power adapter.
- For Windows Laptops: Connect one USB-C to USB-C cable from your laptop's full-featured USB-C port to one of the USB-C input ports on the extender. This typically provides both video and power for both screens. If power is insufficient, connect the provided adapter.
- For MacBook Users (M1/M2/M3/M4 base models): A single USB-C cable connection will only mirror one screen. For mirroring and extended display modes on Pro/Max chip MacBooks, a dual USB-C cable connection is required. Connect two USB-C to USB-C cables from your MacBook's video output ports to the extender.

Image: Illustration demonstrating the single USB-C cable connection method for Windows laptops, highlighting the need for a full-function USB-C port.

Image: Visual guide for connecting the monitor extender to macOS laptops, showing the dual USB-C cable requirement for extended display modes.
4. Adjusting for Laptop Size
The extender is compatible with 14"-16.5" laptops. For smaller laptops (13.3"-15.6"), use the provided silicone pads to ensure a secure fit and prevent damage. For 14"-16.5" laptops, the silicone pads may not be necessary.

Image: Step-by-step instructions for installing the clip extender pads, designed to provide a snug fit for laptops between 13.3 and 13.9 inches.

Image: Visual comparison illustrating the use of silicone pads for smaller laptops (13.3-15.6 inches) versus no pads for larger laptops (14-16.5 inches) to ensure proper fit.
Operating Instructions
1. Power On/Off and Display Modes
Once connected, the screens should automatically power on. If not, press and hold the power button on the top of each screen to turn them on or off. You can switch between various display modes through your laptop's display settings:
- Extended Desktop: Creates a three-screen workspace, allowing you to drag windows across all displays.
- Mirror Mode: Duplicates your main laptop screen onto the external monitors, ideal for presentations.
- Portrait Orientation: Rotate the screens for vertical viewing, useful for coding or reading long documents.

Image: A laptop setup demonstrating the 'Extend Mode' where each of the three screens displays different content, enhancing multitasking.
2. Screen Rotation and Adjustment
The external screens can be rotated up to 250° to share content during meetings or for ergonomic positioning. The adjustable stand provides additional stability and angle flexibility.

Image: Visual representation of the monitor extender's rotational flexibility (250 degrees) and the adjustable stand (180 degrees) for various viewing angles.
3. Individual Brightness Control
Each screen has dedicated buttons for individual brightness control, allowing you to customize the display settings to your preference.

Image: An illustration demonstrating the independent brightness adjustment feature for each of the three screens on the extender.
Maintenance
- Cleaning: Use a soft, lint-free cloth to clean the screens. For stubborn smudges, lightly dampen the cloth with water or a screen-safe cleaning solution. Avoid harsh chemicals.
- Storage: When not in use, fold the screens inward and store the extender in its provided carry bag to protect it from dust and scratches.
- Handling: Always handle the extender with care. Avoid dropping it or applying excessive force to the screens or hinges.
Troubleshooting
- Screens Not Turning On:
- Ensure the USB-C cable is securely connected to a full-featured USB-C port on your laptop.
- Verify that your laptop's USB-C port supports DP Alt Mode (video output) and sufficient power delivery.
- If your laptop's USB-C port does not provide enough power (outputs < 5V/3A), connect the provided power adapter to the extender.
- For MacBooks, especially Pro/Max chip models, ensure two USB-C cables are used for extended display.
- Display Issues (Flickering, No Signal):
- Check all cable connections for looseness.
- Restart your laptop and the monitor extender.
- Update your laptop's graphics drivers.
- Adjust display settings on your laptop (e.g., resolution, refresh rate).
- Incorrect Display Mode (Mirror instead of Extend):
- Access your operating system's display settings (e.g., Windows Display Settings, macOS System Settings > Displays) and configure the monitors to "Extend these displays" or "Use as separate displays."
- Physical Stability Issues:
- Ensure the extender's clips are firmly attached to your laptop screen.
- Properly deploy and adjust the integrated kickstand to support the weight of the screens and prevent your laptop screen from tilting backward.
Video: A detailed review and setup guide for the monitor extender, specifically addressing compatibility and setup nuances for both Mac and Windows operating systems.
Specifications
| Product Dimensions | 1.2 x 13.4 x 7.9 inches |
| Item Weight | 5.41 pounds |
| Manufacturer | Pornitor |
| Item Model Number | Z140 |
| Screen Size | 14 Inches |
| Resolution | 1920 x 1080 Pixels (FHD 1080p) |
| Aspect Ratio | 16:9 |
| Image Brightness | 300 Candela |
| Screen Surface Description | Matte |
| Total USB Ports | 3 |

Image: Detailed specifications of the display quality, including resolution, brightness, color gamut, contrast ratio, aspect ratio, and refresh rate.
Warranty and Support
For warranty information, technical support, or any inquiries regarding your Pornitor Laptop Screen Extender, please refer to the contact information provided with your purchase documentation or visit the official Pornitor website. Keep your proof of purchase for warranty claims.