1. Introduction
Thank you for choosing the Wevoor 4K 64MP Digital Camera, Model A59. This compact and versatile camera is designed to capture high-quality photos and videos with ease. This manual provides detailed instructions on how to set up, operate, and maintain your camera to ensure optimal performance.
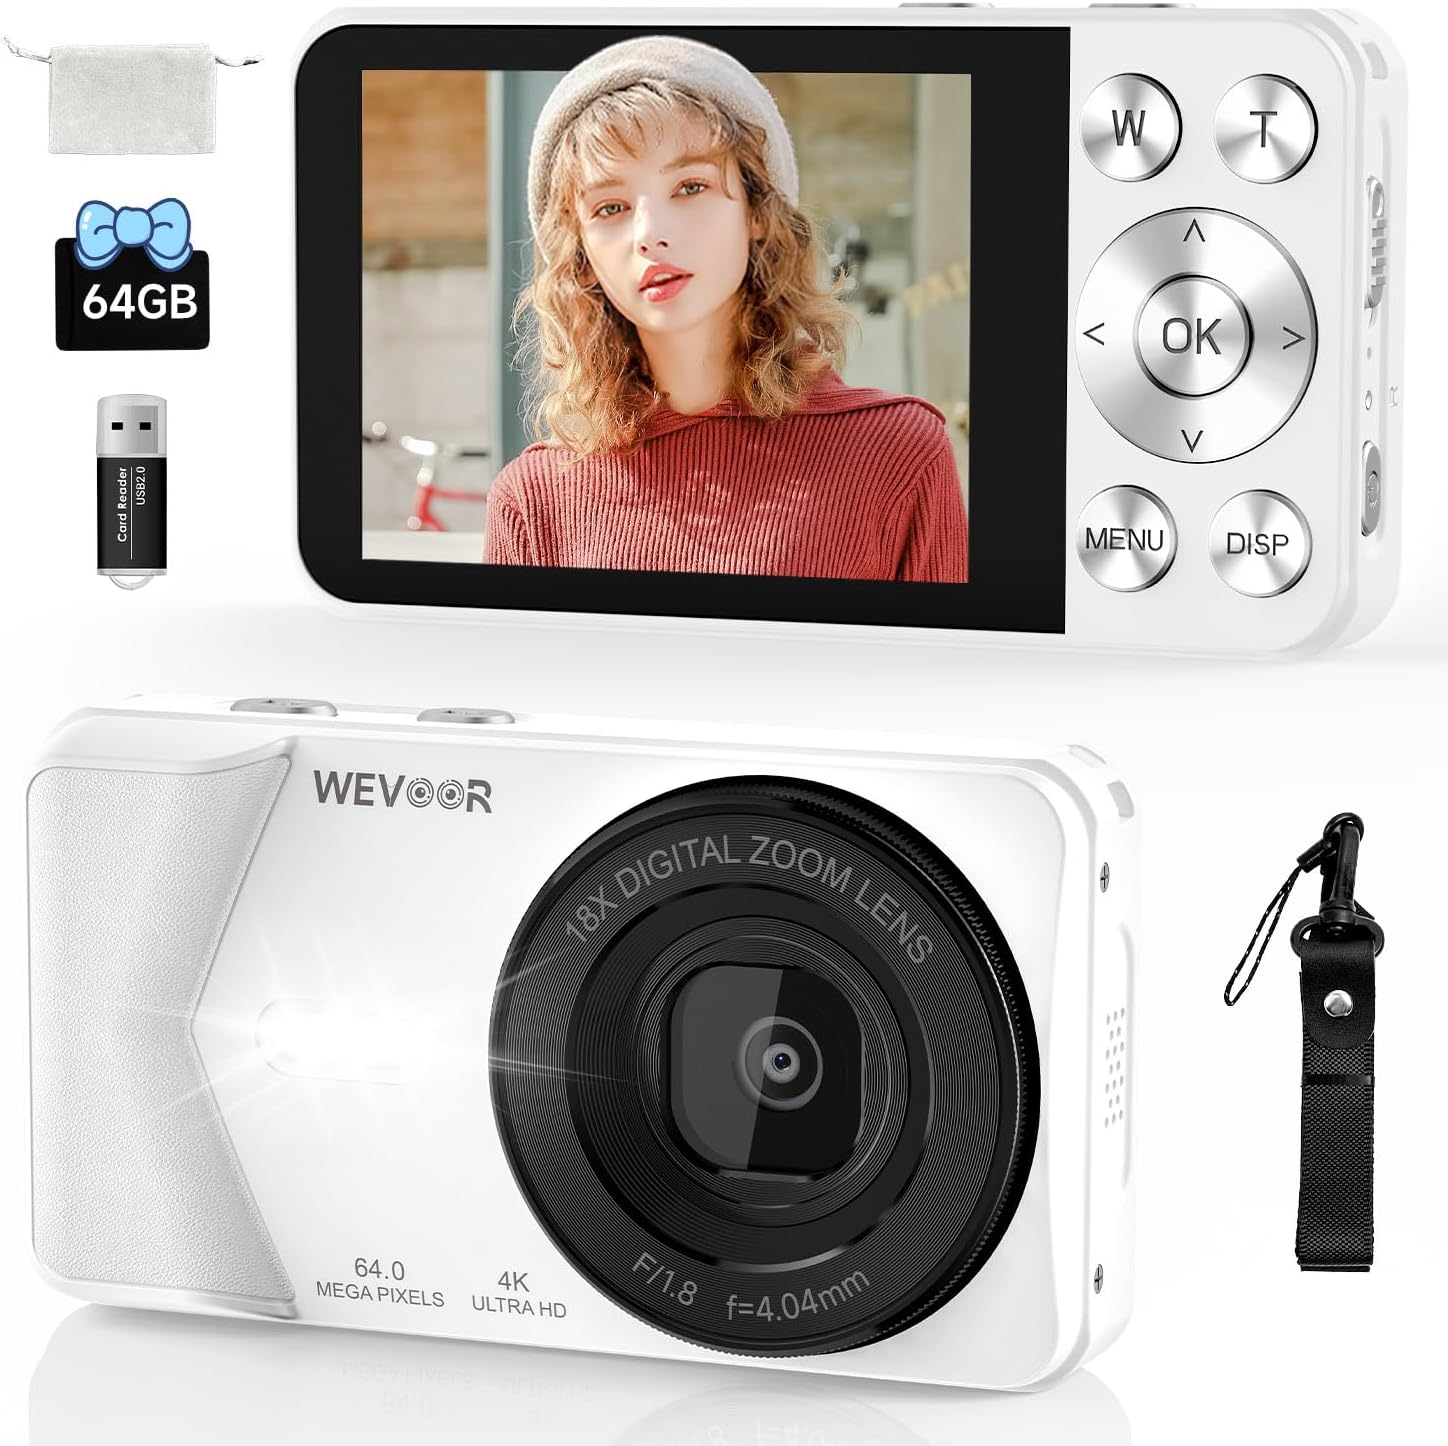
Figure 1.1: The Wevoor 4K 64MP Digital Camera in white, showcasing its front lens, rear LCD screen with control buttons, and included accessories such as a 64GB SD card, USB adapter, and wrist strap.
2. What's in the Box
Please check the package contents upon unboxing to ensure all items are present:
- Wevoor 4K 64MP Digital Camera (Model A59)
- 64GB SD Card (pre-installed)
- USB-C Cable
- USB-C to C Cable
- Neck Strap
- Protective Case
- Card Reader
- User Manual (this document)

Figure 2.1: A visual representation of all items included in the Wevoor 4K 64MP Digital Camera package.
3. Camera Overview
Familiarize yourself with the camera's components and controls:

Key Components:
- Lens: Captures images and videos.
- Flash: Provides illumination in low-light conditions.
- LCD Screen: Displays live view, menus, and playback.
- Control Buttons: Navigate menus, adjust settings, and operate camera functions (W/T for zoom, OK, MENU, DISP).
- Mode Button: Switches between photo and video modes, and accesses playback.
- ON/OFF Button: Powers the camera on or off.
- Take Photos Button: Captures still images.
- Record Videos Button: Starts and stops video recording.
- Reset Key: Used to reset the camera if it becomes unresponsive.
- USB-C Port: For charging and data transfer.
- SD Card Slot: Houses the memory card.
Figure 3.1: This detailed diagram labels the various buttons and parts of the camera, including the Mode Button, ON/OFF switch, Reset Key, Take Photos button, Record Videos button, W/T (zoom) buttons, OK button, MENU, DISP, Fill Light, Image Resolution, Metering Mode, ISO, Exposure, Visual Styles, and TF Card slot.
4. Initial Setup
4.1. Charging the Battery
- Connect the camera to a power source using the provided USB-C cable.
- The charging indicator light will illuminate.
- A full charge typically takes approximately 2 hours. The indicator light will change or turn off once charging is complete.
4.2. Inserting the SD Card
The camera comes with a 64GB SD card pre-installed. If you need to remove or re-insert it:
- Ensure the camera is powered off.
- Locate the SD card slot (refer to Figure 3.1).
- Gently push the SD card into the slot until it clicks into place. To remove, push it in again until it springs out.
5. Operating the Camera
5.1. Power On/Off
- To power on, press and hold the ON/OFF button.
- To power off, press and hold the ON/OFF button again.
5.2. Taking Photos
- Ensure the camera is in photo mode (use the Mode button to switch).
- Frame your shot using the LCD screen.
- Press the Take Photos button to capture the image.

Figure 5.1: This image illustrates the clarity of 4K video and 64MP photos, comparing different resolution settings for still images (30MP, 48MP, 64MP) and highlighting the difference between 1080p and 4K video.
5.3. Recording Videos
- Ensure the camera is in video mode.
- Press the Record Videos button to start recording.
- Press the Record Videos button again to stop recording.
5.4. Autofocus Function
The camera features an intelligent autofocus system to ensure your subjects are sharp.

Figure 5.2: This diagram visually explains the camera's autofocus capability, showing how the lens system adjusts to bring a subject into sharp focus.
5.5. Zoom Function
Use the W (Wide) and T (Telephoto) buttons to adjust the 18x digital zoom.
- Press T to zoom in on your subject.
- Press W to zoom out.

Figure 5.3: This image demonstrates the camera's 18x digital zoom by showing a subject at various zoom levels.
5.6. Creative Filters and Beauty Mode
Enhance your photos with 20 built-in creative filters and a beauty mode. Access these options through the camera's menu.
Figure 5.4: This image displays examples of the 20 creative filters, showcasing different color tones and effects.
5.7. Self-Timer and Continuous Shooting
Utilize the self-timer for delayed shots or continuous shooting for action sequences.

Figure 5.5: This image illustrates various shooting modes including self-timer options (3s, 5s, 10s, 20s) and continuous shooting for action sequences.
5.8. Using the Flash
The built-in flash provides additional light in dark environments. It can be set to automatic or forced on/off via the camera menu.
Figure 5.6: This image demonstrates the effect of the built-in flash in low-light conditions.
6. Data Transfer
Transfer photos and videos to your computer or mobile device using the provided USB-C cable.
- Connect the camera to your computer or mobile device using the USB-C cable.
- The camera will appear as a removable drive.
- Drag and drop files to transfer them.

Figure 6.1: This image demonstrates how to transfer photos and videos from the camera to a computer or mobile phone using the included USB-C cable, highlighting the camera's USB-C port.
7. Maintenance
- Cleaning the Lens: Use a soft, lint-free cloth specifically designed for camera lenses. Avoid harsh chemicals.
- Cleaning the Screen: Wipe the LCD screen gently with a microfiber cloth.
- Storage: When not in use, store the camera in its protective case in a cool, dry place away from direct sunlight and extreme temperatures.
- Battery Care: Avoid fully discharging the battery frequently. Charge it regularly, even if not in use for extended periods.
8. Troubleshooting
| Problem | Possible Cause | Solution |
|---|---|---|
| Camera does not power on. | Battery is depleted or not inserted correctly. | Charge the battery fully. Ensure the battery is correctly inserted. |
| Cannot take photos/record videos. | SD card is full, not inserted, or corrupted. | Check SD card capacity. Re-insert the SD card. Format the SD card (this will erase all data). |
| Images are blurry. | Autofocus issue, camera shake, or dirty lens. | Ensure autofocus is engaged. Hold the camera steady. Clean the lens. |
| Camera is unresponsive. | Software glitch. | Press the Reset Key with a thin object (e.g., paperclip). |
9. Specifications

Figure 9.1: This image highlights the compact size and lightweight design of the camera, providing dimensions and showing its portability.
| Feature | Detail |
|---|---|
| Model Name | A59 |
| Brand | Wevoor |
| Photo Sensor Technology | CMOS |
| Effective Still Resolution | 64 MP |
| Maximum Webcam Image Resolution | 64 MP |
| Digital Zoom | 18x |
| Screen Size | 2.8 Inches |
| Display Type | LCD |
| Connectivity Technology | USB (Type-C) |
| Battery Capacity | 2000 mAh |
| Item Weight | 0.28 Kilograms (approx. 0.62 lbs) |
| Material | Zinc Alloy Metal |
| Special Features | Autofocus, 20 Filters, Beauty Mode, Self Timer, Continuous Shooting, Built-in Flash, Time-lapse, Webcam Function |
10. Warranty and Support
Your Wevoor 4K 64MP Digital Camera comes with a 2-year warranty from the date of purchase, covering manufacturing defects.
For technical assistance, troubleshooting, or warranty claims, please contact our 24/7 customer support. Refer to the contact information provided on the product packaging or the official Wevoor website.