1. Introduction
The EnhanBili HD-VP210H is a versatile three-in-one video processor designed for LED screen applications. It integrates traditional video processing capabilities with a 2-way Gigabit network port output and U disk playback functions. This device simplifies on-site environment construction and enhances product reliability. It supports 5 channels of synchronous signal input and 1 channel of USB input, making it suitable for various settings such as hotels, shopping malls, conference rooms, exhibitions, and studios that require synchronous playback. Additionally, the HD-VP210H supports point-to-point input/output, ensuring a clearer picture on the LED display.
2. Safety Information
Please read and understand all safety instructions before operating this device. Failure to follow these instructions may result in electric shock, fire, or damage to the product.
- Power Supply: Use only the specified AC 110~240V 50/60Hz power supply. Ensure the power cable is securely connected and not damaged.
- Ventilation: Do not block ventilation openings. Ensure adequate airflow around the device to prevent overheating.
- Environment: Operate the device within the specified temperature range of -20℃ to 60℃. Avoid exposure to moisture, rain, or extreme temperatures.
- Handling: Handle the device with care. Avoid dropping or subjecting it to strong impacts.
- Servicing: Do not attempt to open or service the device yourself. Refer all servicing to qualified personnel.
- Cleaning: Disconnect power before cleaning. Use a dry, soft cloth. Do not use liquid or aerosol cleaners.
3. Package Contents
Verify that all items are present in the package:
- EnhanBili HD-VP210H Video Processor
- Power Cable
- User Manual
- Wi-Fi Antenna
4. Product Overview
4.1 Front Panel
The front panel of the HD-VP210H features controls for power, display, and input selection, along with a rotary knob for menu navigation.
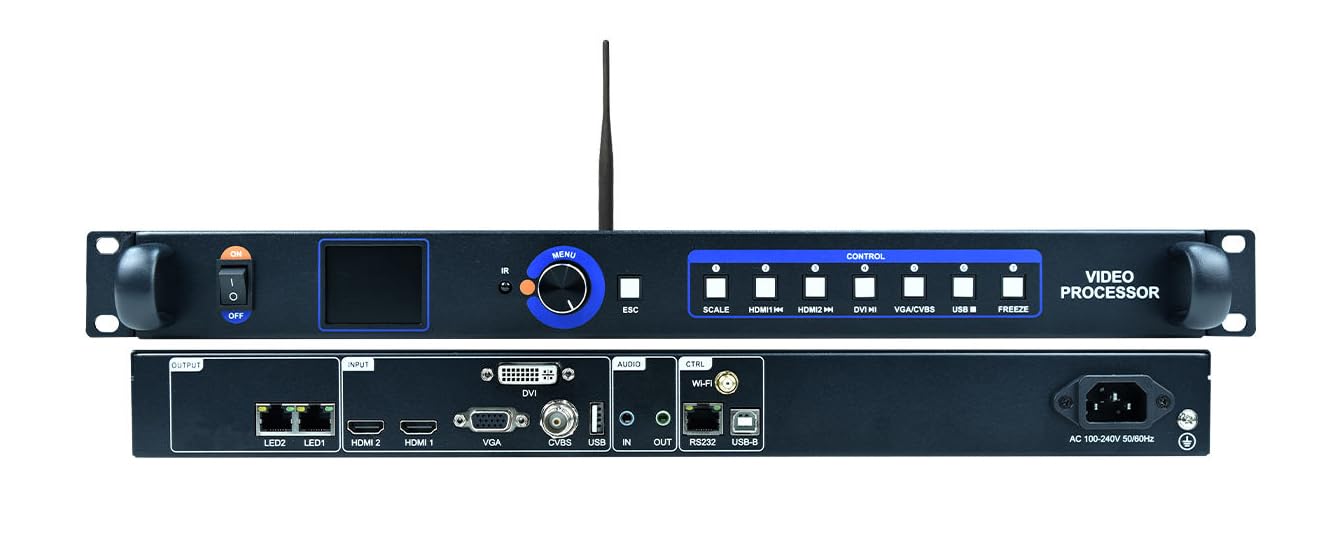
Image 1: Front view of the EnhanBili HD-VP210H Video Processor. This image displays the front of the unit, showing the power switch on the left, a small display screen, a rotary knob for menu control, and several input selection buttons labeled 'SCALE', 'HDMI IN', 'VGA IN', 'DVI IN', 'CVBS IN', and 'PREVIEW'. The unit is black with blue accents on the buttons and knob.
4.2 Rear Panel
The rear panel provides all necessary input and output ports for connecting to various video sources and LED displays, as well as network and audio connections.

Image 2: Rear view of the EnhanBili HD-VP210H Video Processor. This image shows the back of the unit with various ports. From left to right, there are two LAN ports (LINK1, LINK2), USB, HDMI 1, HDMI 2, DVI, VGA, CVBS, Audio In (3.5mm), Audio Out (3.5mm), Wi-Fi antenna connector, another LAN port (CTRL), and the AC power input (AC 110V~240V).
4.3 Dimensions
Understanding the physical dimensions is crucial for installation and integration into existing setups.

Image 3: Dimensional drawing of the EnhanBili HD-VP210H Video Processor. This technical drawing provides measurements in millimeters, showing the width as 482mm, depth as 248mm, and height as 32mm. It also indicates mounting points and overall form factor.
5. Setup
Follow these steps to set up your HD-VP210H video processor:
5.1 Connecting Devices
The HD-VP210H supports multiple input sources and outputs to an LED screen. Refer to the connection diagram for proper wiring.

Image 4: Connection diagram for the EnhanBili HD-VP210H Video Processor. This diagram illustrates how to connect various input sources (PC, TV-BOX, U-disk, Laptop) via HDMI, DVI, VGA, CVBS, and USB to the processor. It also shows the output to an LED screen, audio output to an audio amplifier and speakers, and the Wi-Fi antenna interface. The power connection (AC 110V~240V) and a USB-B debugging interface are also depicted.
- Connect Input Sources: Connect your video sources (e.g., PC, TV-BOX, Laptop) to the corresponding input ports (HDMI, DVI, VGA, CVBS) on the rear panel of the HD-VP210H.
- Connect USB Device: For U disk playback, insert your USB drive into the designated USB port.
- Connect to LED Screen: Use the Gigabit network ports (LINK1, LINK2) to connect the processor to your LED display.
- Audio Connections: If audio is required, connect audio input sources to the Audio In port and connect the Audio Out port to an amplifier or speakers.
- Wi-Fi Antenna: Attach the provided Wi-Fi antenna to the Wi-Fi antenna interface for wireless control.
- Power Connection: Connect the power cable to the AC 110~240V power input on the rear panel and then to a suitable power outlet.
5.2 Powering On
After all connections are secure, press the power switch on the front panel to turn on the device. The front display will illuminate, indicating the device is operational.
6. Operating Instructions
6.1 Input Selection
To switch between different video input sources:
- Press the corresponding input button on the front panel (e.g., HDMI IN, DVI IN, VGA IN, CVBS IN) to select your desired source.
- The selected input will be displayed on the front panel screen.
6.2 Menu Navigation and Settings
The rotary knob and the display screen on the front panel are used to navigate the device's settings menu.
- Rotate the knob to scroll through menu options.
- Press the knob to select an option or confirm a setting.
- Common settings include resolution adjustment, picture scaling (using the SCALE button), and advanced display parameters.
6.3 USB Playback
The HD-VP210H supports direct playback from a USB disk.
- Insert a USB disk containing compatible media files into the USB port.
- Navigate to the USB playback section in the menu using the rotary knob.
- Select the desired file for playback.
6.4 Network Control
The device can be controlled via a network connection (LAN or Wi-Fi).
- Connect the device to your network via the CTRL LAN port or Wi-Fi.
- Refer to the separate software manual for instructions on using the control software to manage the video processor remotely.
7. Maintenance
Proper maintenance ensures the longevity and optimal performance of your HD-VP210H video processor.
- Cleaning: Regularly clean the exterior of the device with a soft, dry cloth. Do not use abrasive cleaners or solvents. Ensure the device is powered off and unplugged before cleaning.
- Ventilation: Keep the ventilation openings clear of dust and debris to prevent overheating.
- Storage: When not in use for extended periods, store the device in a cool, dry place away from direct sunlight and extreme temperatures.
8. Troubleshooting
If you encounter issues with your HD-VP210H, refer to the following common problems and solutions:
| Problem | Possible Cause | Solution |
|---|---|---|
| No power | Power cable disconnected; Power outlet faulty; Device power switch off | Check power cable connection; Try a different power outlet; Ensure power switch is ON |
| No signal on LED screen | Incorrect input selected; Input cable loose/damaged; LED screen not configured correctly; Processor output settings incorrect | Select correct input source; Check all input/output cables; Verify LED screen configuration; Adjust processor output resolution/scaling |
| Image distortion or flickering | Cable quality issues; Resolution mismatch; Interference | Use high-quality cables; Ensure input/output resolutions match; Check for nearby electronic interference |
| USB playback not working | USB disk not formatted correctly; Incompatible file format; USB disk faulty | Ensure USB disk is FAT32/NTFS; Check supported file formats; Try a different USB disk |
| Network control issues | Network cable disconnected; Incorrect IP settings; Wi-Fi signal weak | Check LAN cable; Verify IP address settings; Ensure Wi-Fi antenna is connected and signal is strong |
9. Specifications
Key technical specifications for the EnhanBili HD-VP210H Video Processor:
- Model Number: HD-VP210H
- Power Supply: AC 110~240V 50/60Hz
- Overall Consumption: 14W
- Operating Temperature: -20℃ to 60℃
- Net Weight: 2.6 Kg
- Gross Weight: 2.7 Kg
- Item Dimensions (L x W x H): 19.09 x 9.45 x 1.77 inches (482 x 248 x 32 mm)
- Compatible Devices: Laptop, PC, TV-BOX, U-disk
- Connector Types: HDMI, DVI, VGA, CVBS, USB, LAN, Audio (3.5mm)
10. Warranty & Support
This product does not come with a manufacturer's warranty as per available information. For technical support or inquiries, please contact your retailer or the EnhanBili customer service department. Please have your product model number (HD-VP210H) ready when contacting support.