1. Introduction
This manual provides detailed instructions for setting up, operating, and maintaining your QISHENKOLA X10 Pro Retro Game Stick. Please read this manual thoroughly before use to ensure proper functionality and to maximize your gaming experience.
2. Product Overview
2.1 Package Contents
Verify that all items listed below are included in your package:
- 1 x Game Stick
- 2 x Wireless Controllers
- 1 x HD Cable
- 1 x USB Cable
- 1 x Power Cable
- 1 x Receiver
- 1 x User Manual (this document)

Figure 2.1: Package Contents
2.2 Game Stick and Controllers
The QISHENKOLA X10 Pro Game Stick is a compact device designed for retro gaming. It connects directly to your TV or monitor via an HD cable. The package includes two 2.4GHz wireless controllers for an untethered gaming experience.

Figure 2.2: QISHENKOLA X10 Pro System Overview

Figure 2.3: Wireless Controller Layout
3. Setup Instructions
Follow these steps to connect your QISHENKOLA X10 Pro Retro Game Stick to your display:
- Connect the Receiver: Insert the 2.4G wireless receiver into the USB port on the game stick.
- Connect to Display: Plug one end of the HD cable into the game stick and the other end into an available HD input port on your TV or monitor.
- Connect Power: Connect the power cable to the game stick and then to a 5V/2A power adapter (not included, typically a mobile phone charging plug) and plug it into a wall outlet.
- Power On: Turn on your TV or monitor and select the correct HD input source. The game stick will power on automatically.
- Controller Pairing: The wireless controllers will automatically pair with the game stick within seconds. Ensure batteries are inserted into the controllers.
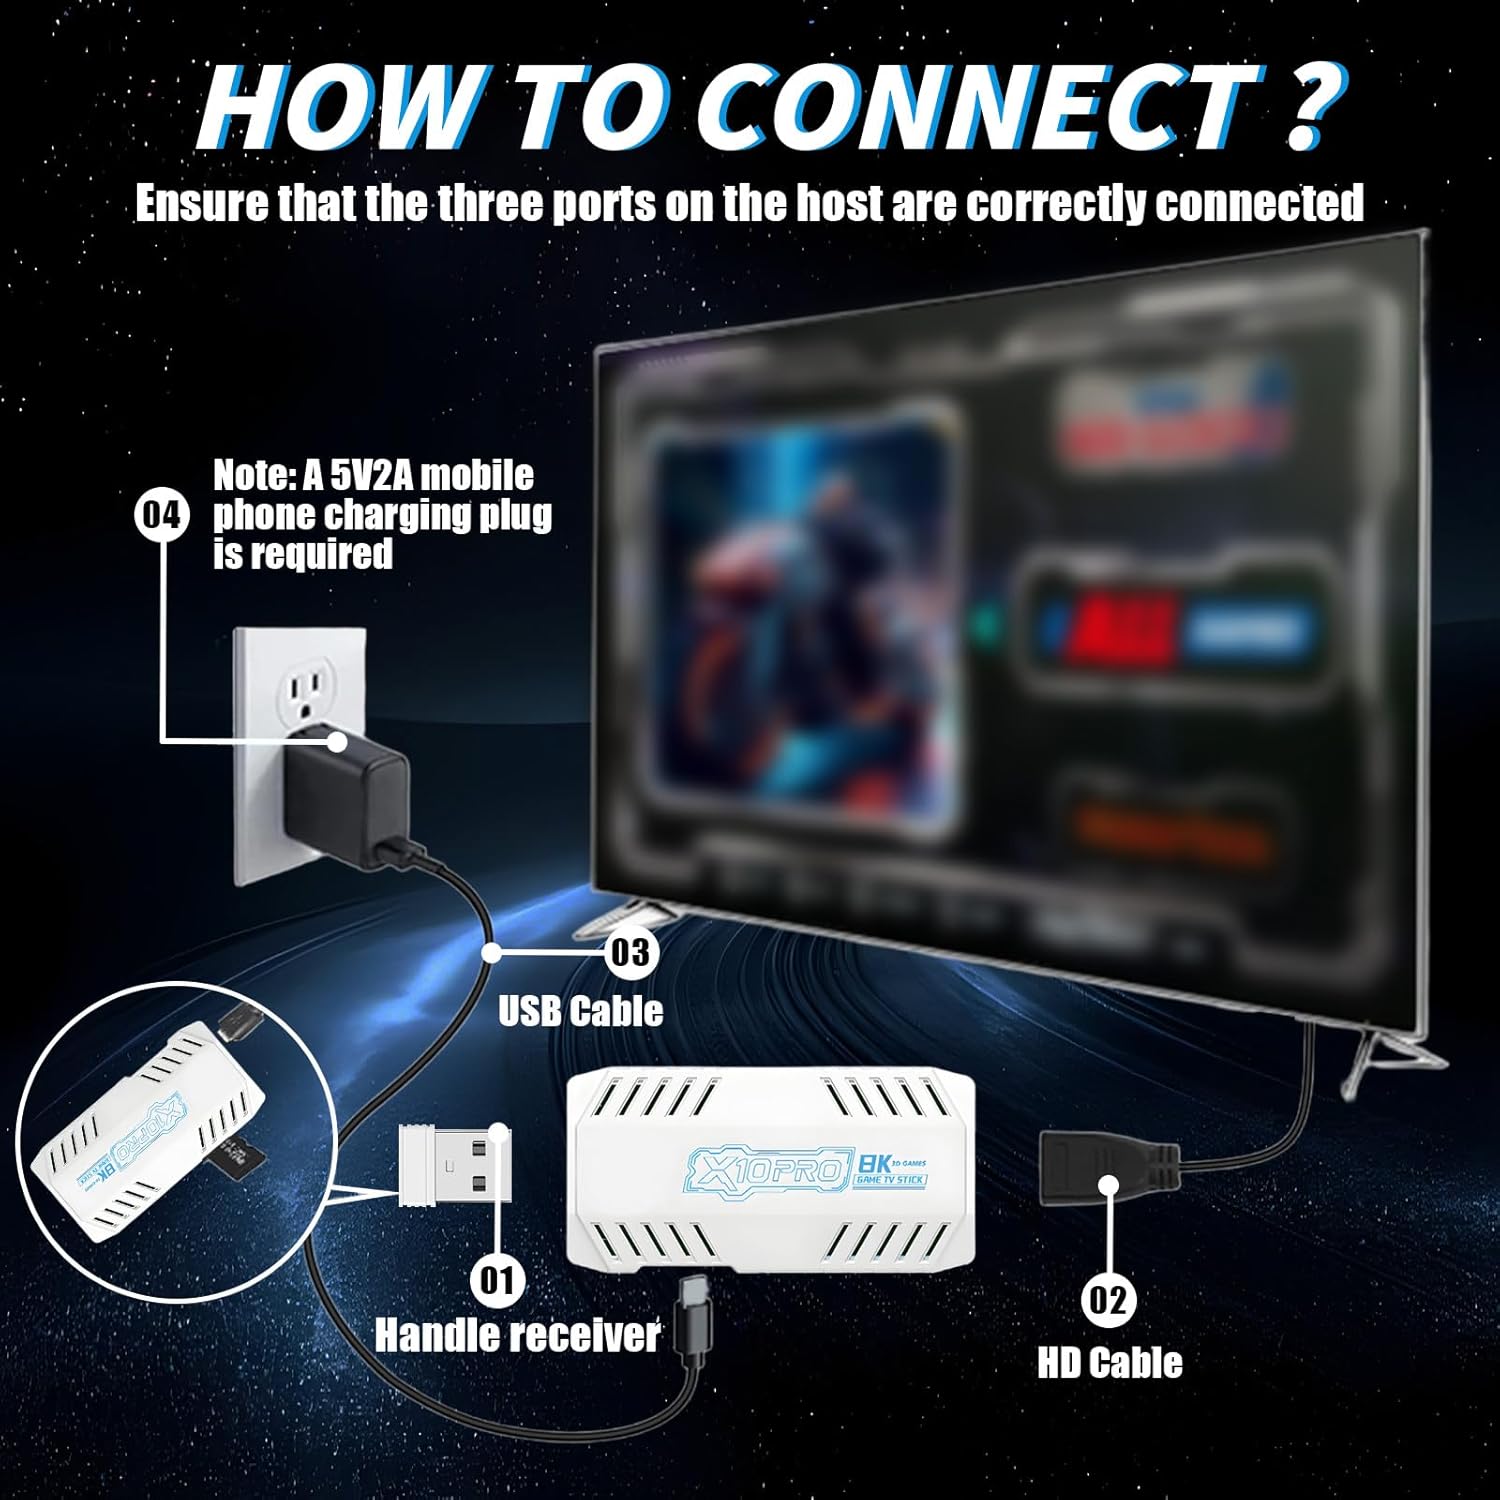
Figure 3.1: Connection Diagram
4. Operating Instructions
4.1 Navigating the Menu
Once powered on, the main menu will appear on your screen. Use the directional pad (D-pad) on your wireless controller to navigate through game categories and options. Press the 'A' button (or equivalent action button) to select an item and the 'B' button (or equivalent back button) to return to the previous screen.
4.2 Selecting and Starting Games
Browse the extensive library of pre-loaded games. Select a game using the 'A' button. The game will load automatically. To exit a game and return to the main menu, press the 'MODE' button on the controller.
4.3 Saving and Loading Game Progress
Specific instructions for saving and loading game progress may vary by emulator. Generally, you can access in-game menus by pressing a combination of buttons (e.g., 'SELECT' + 'START') to save your progress or load a previous save state.
4.4 Adding or Removing Games
The game stick comes with a 128GB TF card pre-loaded with games. It supports memory expansion up to 512GB. For advanced users who wish to add or remove games, this typically involves connecting the TF card to a computer and managing game ROMs within the appropriate emulator folders. Please exercise caution when modifying the contents of the TF card to avoid data corruption.
5. Specifications
The QISHENKOLA X10 Pro Retro Game Stick features the following technical specifications:
| Component | Specification |
|---|---|
| CPU | Quad-core ARM Cortex-A55 2.0GHz |
| GPU | Mali-G31 MP2 GPU, 650MHz |
| Output Resolution | 4K HD, 1080P/720P |
| Power Supply | DC 5V/2A |
| Chipset | S905X3 |
| Memory (RAM) | LPDDR3 2GB |
| Storage | 128GB TF card (expandable up to 512GB) |
| Material | Plastic |
| Product Dimensions | 6.5 x 4.72 x 4.49 inches |

Figure 5.1: S905X3 Chip Overview
6. Troubleshooting
If you encounter issues with your QISHENKOLA X10 Pro, refer to the following common problems and solutions:
- No Display on TV:
- Ensure the HD cable is securely connected to both the game stick and the TV.
- Verify that your TV is set to the correct HD input source.
- Check if the power cable is properly connected and the game stick is receiving power.
- Controllers Not Responding:
- Ensure the 2.4G wireless receiver is firmly plugged into the game stick's USB port.
- Check if the controllers have fresh batteries and are powered on.
- Move closer to the game stick to ensure a strong wireless connection.
- Game Lag or Freezing:
- Ensure the game stick has adequate ventilation and is not overheating.
- Restart the game stick and try again.
- Avoid running multiple background processes if possible (though this is generally managed by the system).
- System Malfunction / Unable to Update:
- Important Note: This gaming console does not support users changing or updating the system by themselves. Attempting to do so may cause irreversible damage.
- If you encounter system-related problems, please contact customer support for assistance.
7. Maintenance
To ensure the longevity and optimal performance of your QISHENKOLA X10 Pro Retro Game Stick, follow these maintenance guidelines:
- Cleaning: Use a soft, dry cloth to clean the game stick and controllers. Do not use liquid cleaners or abrasive materials.
- Storage: Store the device in a cool, dry place away from direct sunlight and extreme temperatures.
- Handling: Handle the game stick and controllers with care. Avoid dropping them or exposing them to excessive force.
- Power Supply: Always use a DC 5V/2A power adapter. Using an incorrect power supply may damage the device.
8. Warranty and Support
For any issues not covered in this manual or for warranty inquiries, please contact QISHENKOLA customer support. Refer to the contact information provided with your purchase or visit the official QISHENKOLA website for support details.
Note: Unauthorized modification or attempted system updates by the user are not supported and may void your warranty.


