OWERSLYN Mini ATSC Tuner Box
OWERSLYN 1080P Mini ATSC Tuner Box User Manual
Model: Mini ATSC Tuner Box
1. Introduction
This manual provides detailed instructions for the installation, operation, and maintenance of your OWERSLYN 1080P Mini ATSC Tuner Box. Please read this manual thoroughly before using the device to ensure proper functionality and to prevent damage.
The OWERSLYN Mini Digital Converter Box is designed to receive ATSC broadcast signals from an antenna and output them to a television, projector, or monitor. It supports 1080P HD resolution and includes features such as TV program recording, playback, and a USB media player.
2. Package Contents
Verify that all items listed below are included in your package:
- 1 x OWERSLYN Mini ATSC Tuner Box (Digital TV Stick)
- 1 x 2-in-1 Remote Control
- 1 x HDMI Cable
- 1 x AV Cable (3RCA)
- 1 x USB to DC Cable
- 1 x IR Receiver with Display
- 1 x User Manual

3. Product Overview
Familiarize yourself with the device's components and their functions.
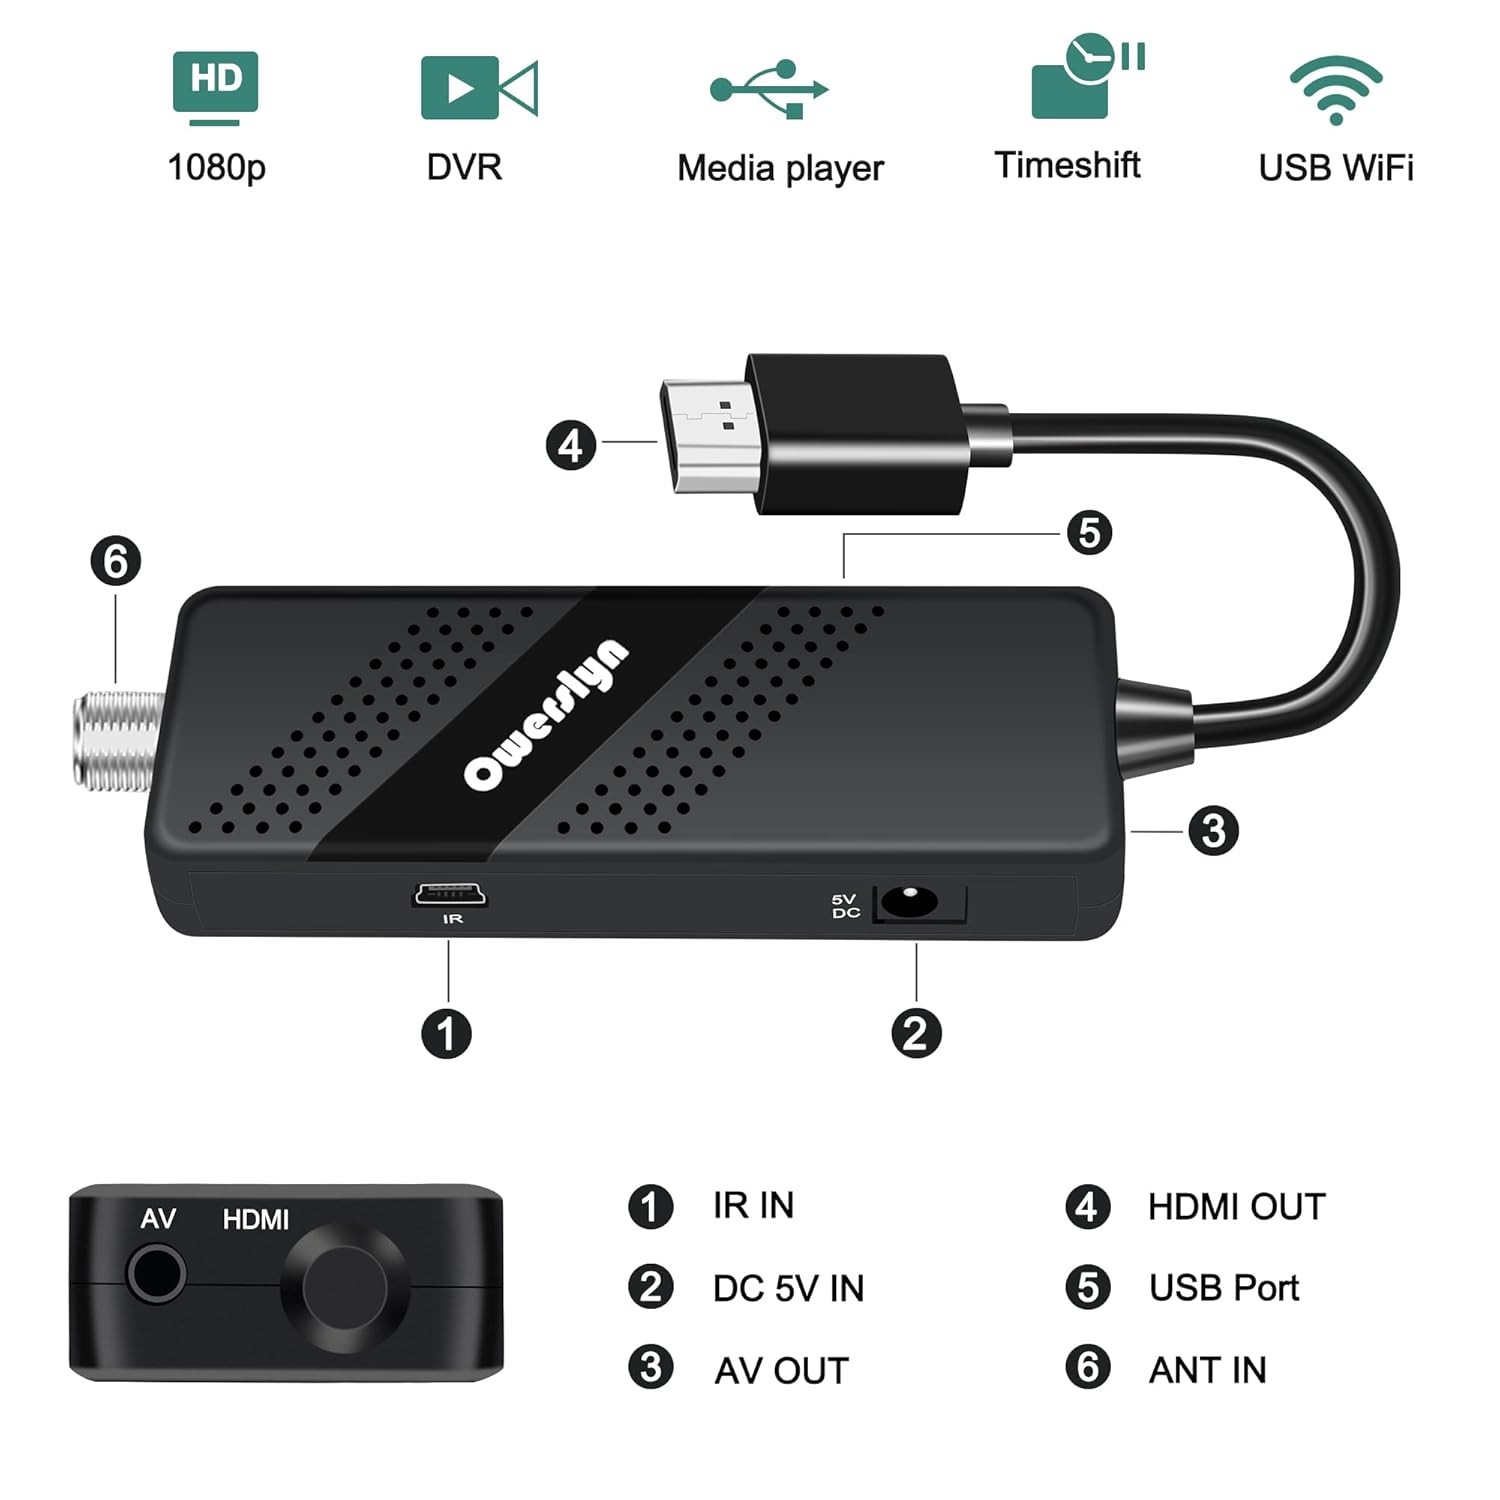
- IR IN: Connects to the external IR receiver for remote control signals.
- DC 5V IN: Power input port. Connect the USB to DC cable here.
- AV OUT: Analog video and audio output (RCA).
- HDMI OUT: High-Definition Multimedia Interface output for digital video and audio.
- USB Port: For connecting USB storage devices for media playback and DVR recording.
- ANT IN: Connects to your external antenna for receiving ATSC signals.

4. Setup Instructions
Follow these steps to connect your OWERSLYN Mini ATSC Tuner Box to your television or display.
4.1 Connecting to a TV/Display
- Connect the Antenna: Connect your digital antenna to the ANT IN port on the tuner box.
- Connect the IR Receiver: Plug the IR Receiver with Display into the IR IN port on the side of the tuner box. Position the IR receiver where it has a clear line of sight to your remote control.
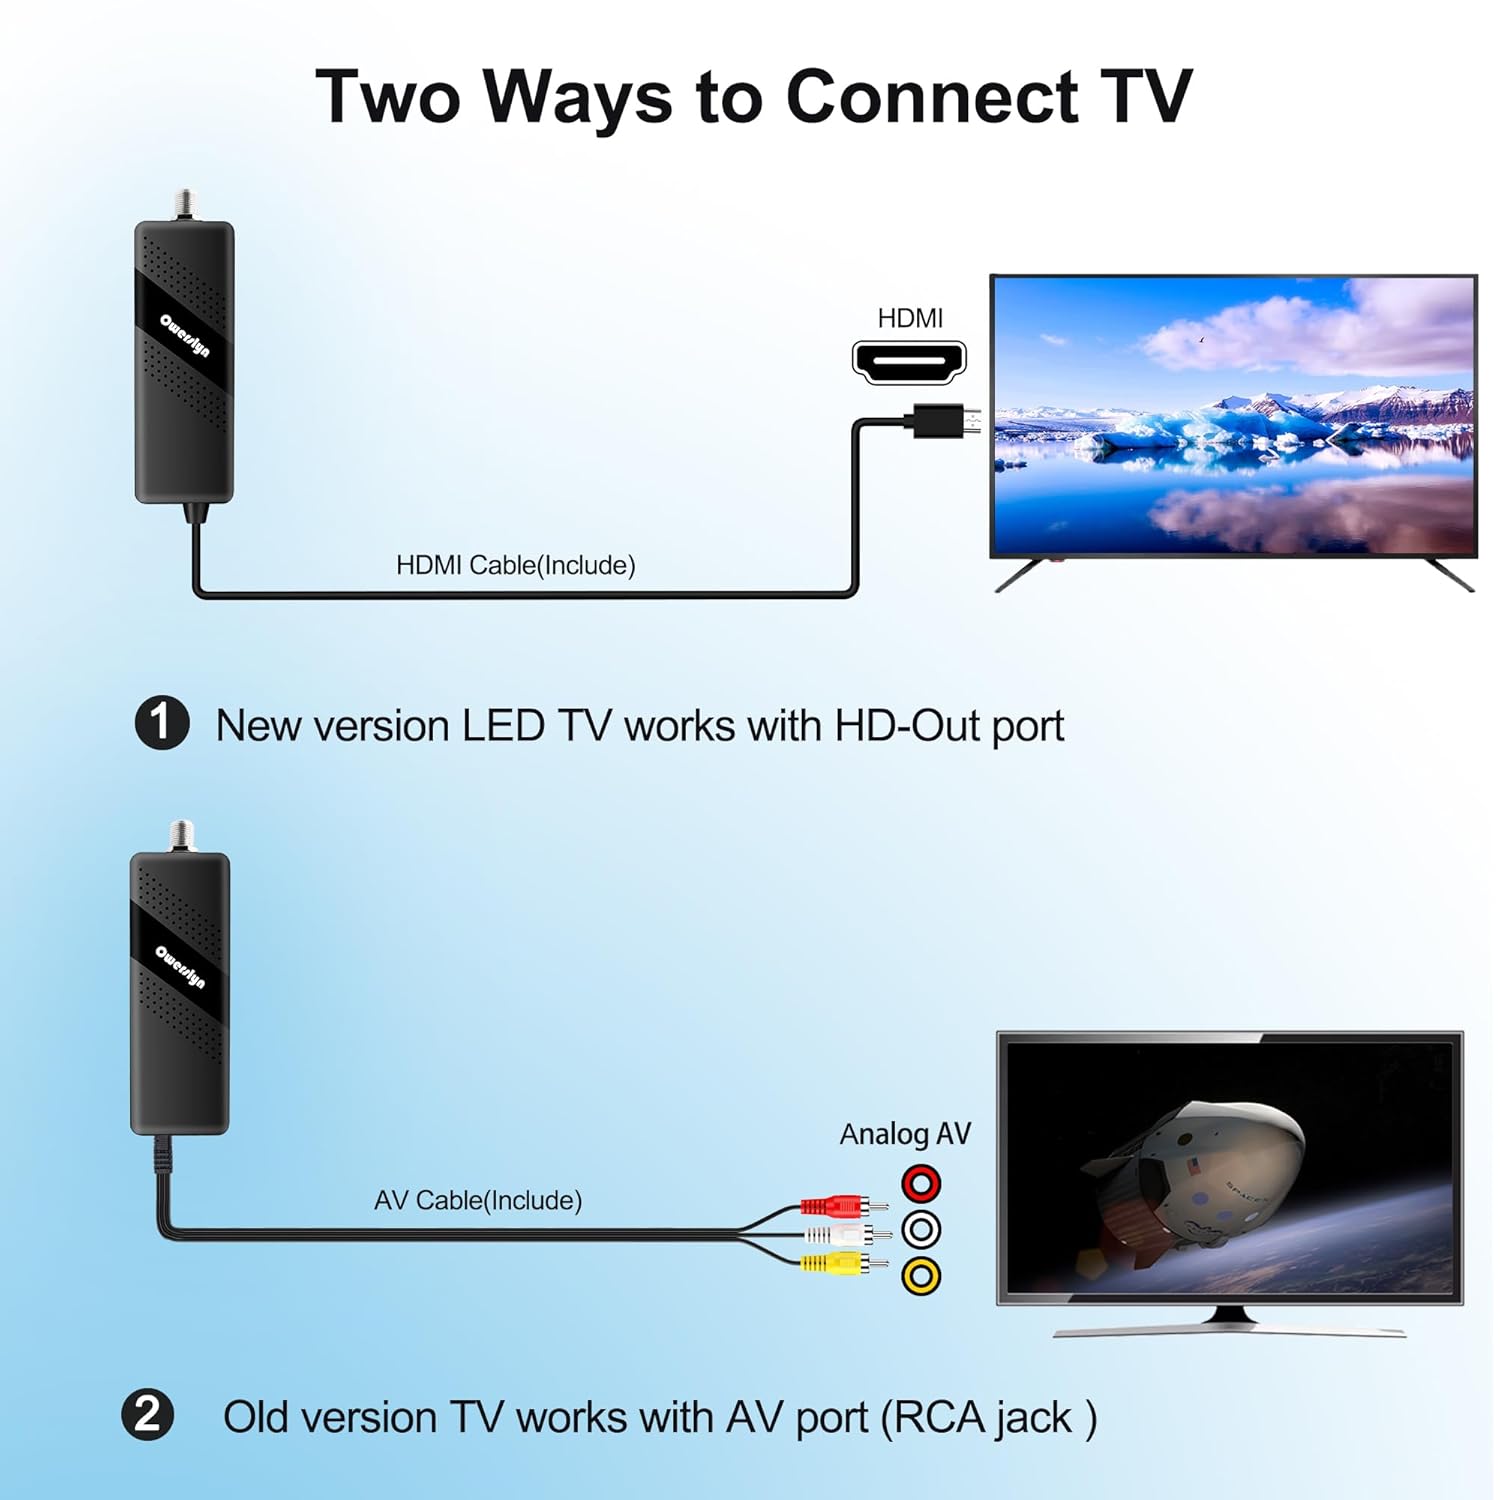
- Connect to TV (HDMI):
- For modern TVs with an HDMI port, connect one end of the included HDMI cable to the HDMI OUT port on the tuner box and the other end to an available HDMI input on your TV.
- Note: This device is not compatible with TVs that only have an RF input.
- Connect to TV (AV/RCA):
- For older TVs with AV (RCA) inputs, connect the included 3RCA AV cable to the AV OUT port on the tuner box. Match the yellow, white, and red connectors to the corresponding input ports on your TV.
- Power Connection: Connect the USB to DC cable to the DC 5V IN port on the tuner box. Plug the USB end into a 5V USB power source (e.g., a USB port on your TV or a 5V USB wall adapter).

4.2 Initial Setup and Channel Scan
- Power On: Turn on your TV and the OWERSLYN Mini ATSC Tuner Box.
- Select Input: Use your TV's remote control to select the correct input source (HDMI or AV) that the tuner box is connected to.
- Initial Setup Screen: The first time you power on the device, an initial setup screen will appear. Follow the on-screen prompts to select your preferred language, time zone, and country.
- Automatic Channel Search: Select the "Auto Scan" or "Channel Search" option. The tuner box will scan for available ATSC broadcast channels. This process may take a few minutes.
- Completion: Once the scan is complete, the device will display the first available channel.
5. Operating Instructions
5.1 Remote Control Functions
The included 2-in-1 remote control operates both the tuner box and can be programmed for basic TV functions.

- Power: Turns the tuner box on/off.
- TV Control Section: Buttons for TV power, volume, and input source (can be programmed).
- CH+/CH-: Changes channels.
- VOL+/VOL-: Adjusts volume.
- OK: Confirms selections in menus.
- MENU: Accesses the main menu.
- EXIT: Exits current menu or function.
- EPG: Displays the Electronic Program Guide.
- PVR/REC: Initiates recording (requires USB storage).
- USB: Accesses the USB media player.
- Number Buttons (0-9): Direct channel input.
Remote Learning Function: The remote can learn basic functions (Power, Volume, Input) from your TV's original remote. Refer to the remote control's specific instructions for programming details.
5.2 Live TV Viewing
After the channel scan, you can navigate channels using the CH+/CH- buttons or by entering the channel number directly. The EPG button provides program information.
5.3 DVR Recording and Playback
The tuner box supports real-time DVR recording and scheduled recording to a USB storage device (not included).
- Connect USB Storage: Insert a USB flash drive or external hard drive (up to 4TB, externally powered recommended for HDDs) into the USB port on the tuner box. The device supports NTFS and FAT32 file systems.
- Instant Recording: While watching a program, press the REC button on the remote to start recording immediately. Press REC again to stop.
- Scheduled Recording: Access the EPG or the main menu to set up scheduled recordings. You can specify the channel, start time, and duration.
- Playback: To watch recorded programs, press the USB button on the remote, navigate to the "PVR" or "Recordings" section, and select the desired file.

Note: Recording functionality is for broadcast programs only and is incompatible with streaming services.
5.4 USB Media Player
The tuner box can play various media files from a connected USB storage device.
- Connect USB Storage: Insert your USB flash drive or external hard drive into the USB port.
- Access Media Player: Press the USB button on the remote control.
- Browse Files: Navigate through the folders to find your video, music, or photo files.
- Playback: Select a file to begin playback. The device supports common formats like MP3 and JPEG.
6. Maintenance
- Cleaning: Use a soft, dry cloth to clean the device. Do not use liquid cleaners or abrasive materials.
- Ventilation: Ensure the device has adequate ventilation. Do not block the ventilation holes.
- Power: Disconnect the power adapter if the device will not be used for an extended period.
- Environment: Avoid exposing the device to extreme temperatures, humidity, or direct sunlight.
7. Troubleshooting
| Problem | Possible Cause | Solution |
|---|---|---|
| No picture/No signal |
|
|
| Remote control not working |
|
|
| Cannot record to USB |
|
|
| Poor picture quality |
|
|
8. Specifications
| Feature | Detail |
|---|---|
| Model | Mini ATSC Tuner Box |
| Brand | OWERSLYN |
| Video Resolution | Up to 1080P HD |
| Video Output | HDMI, 3RCA (AV), Component |
| Tuner Type | ATSC |
| USB Support | Media Playback, DVR Recording (USB 2.0) |
| USB File Systems | NTFS, FAT32 |
| Power Supply | DC 5V (via USB) |
| Dimensions | 7.28 x 4.13 x 1.73 inches (Package) |
| Weight | 8.15 ounces (Package) |
9. Warranty and Support
The OWERSLYN Mini ATSC Tuner Box comes with a 1-year warranty from the date of purchase. Additionally, a 30-day money-back guarantee is offered.
For technical support, warranty claims, or any questions regarding your product, please contact OWERSLYN customer service. Contact information can typically be found on the product packaging or the official OWERSLYN website.
We are committed to providing reliable, quality products and support. If you encounter any issues, please do not hesitate to contact us for assistance.
Ask a question about this manual
Ask about setup, troubleshooting, compatibility, parts, safety, or missing instructions. Manuals+ will review the question and use this page’s manual context to help answer it.