1. Introduction
Thank you for choosing the OQTIQ QI2 15W Magnetic Wireless Car Charger Mount. This manual provides detailed instructions for the proper installation, operation, and maintenance of your new car charger. Please read this manual thoroughly before use to ensure optimal performance and safety.
2. Package Contents
Verify that all items listed below are included in your package:
- 1 x Magnetic Wireless Car Charger
- 1 x Suction Cup Base
- 1 x Air Vent Clip
- 1 x PD 30W Car Charger Adapter
- 1 x 3M Sticky Dashboard Disc
- 1 x Anti-UV Film for Windshield
- 1 x USB-C Cable
- 1 x Metal Ring
- 1 x User Manual (this document)

Figure 1: Package Contents
3. Product Features
- QI2 15W Fast Wireless Charging: Supports fast 15W wireless charging, compatible with iOS 17.2 and above for iPhone 12-17 series. Ensures efficient power delivery and reduced charging time.
- Built-in Cooling Fan: An intelligent cooling fan actively dissipates heat during fast charging, maintaining consistent performance and preventing phone overheating.
- Super Strong Magnetic Hold: Features 17 powerful N54 magnets, precisely aligned with iPhone MagSafe technology, for a secure and stable device attachment even on bumpy roads.
- Dual Mounting Options: Includes both a suction cup base for dashboard/windshield and an air vent clip for versatile placement. A 3M sticky dashboard disc and anti-UV films are also provided for enhanced stability.
- Fully Adjustable Viewing Angles: The arm extends from 4.6” to 6.29” and features a 360° rotatable ball head for optimal positioning and comfortable viewing.

Figure 2: QI2 15W Fast Charging

Figure 3: Heat Dissipation Technology with Built-in Cooling Fan

Figure 4: Super Strong N54 Magnetic Hold

Figure 5: Dual Mounting Options (Windshield, Dashboard, Air Vent)
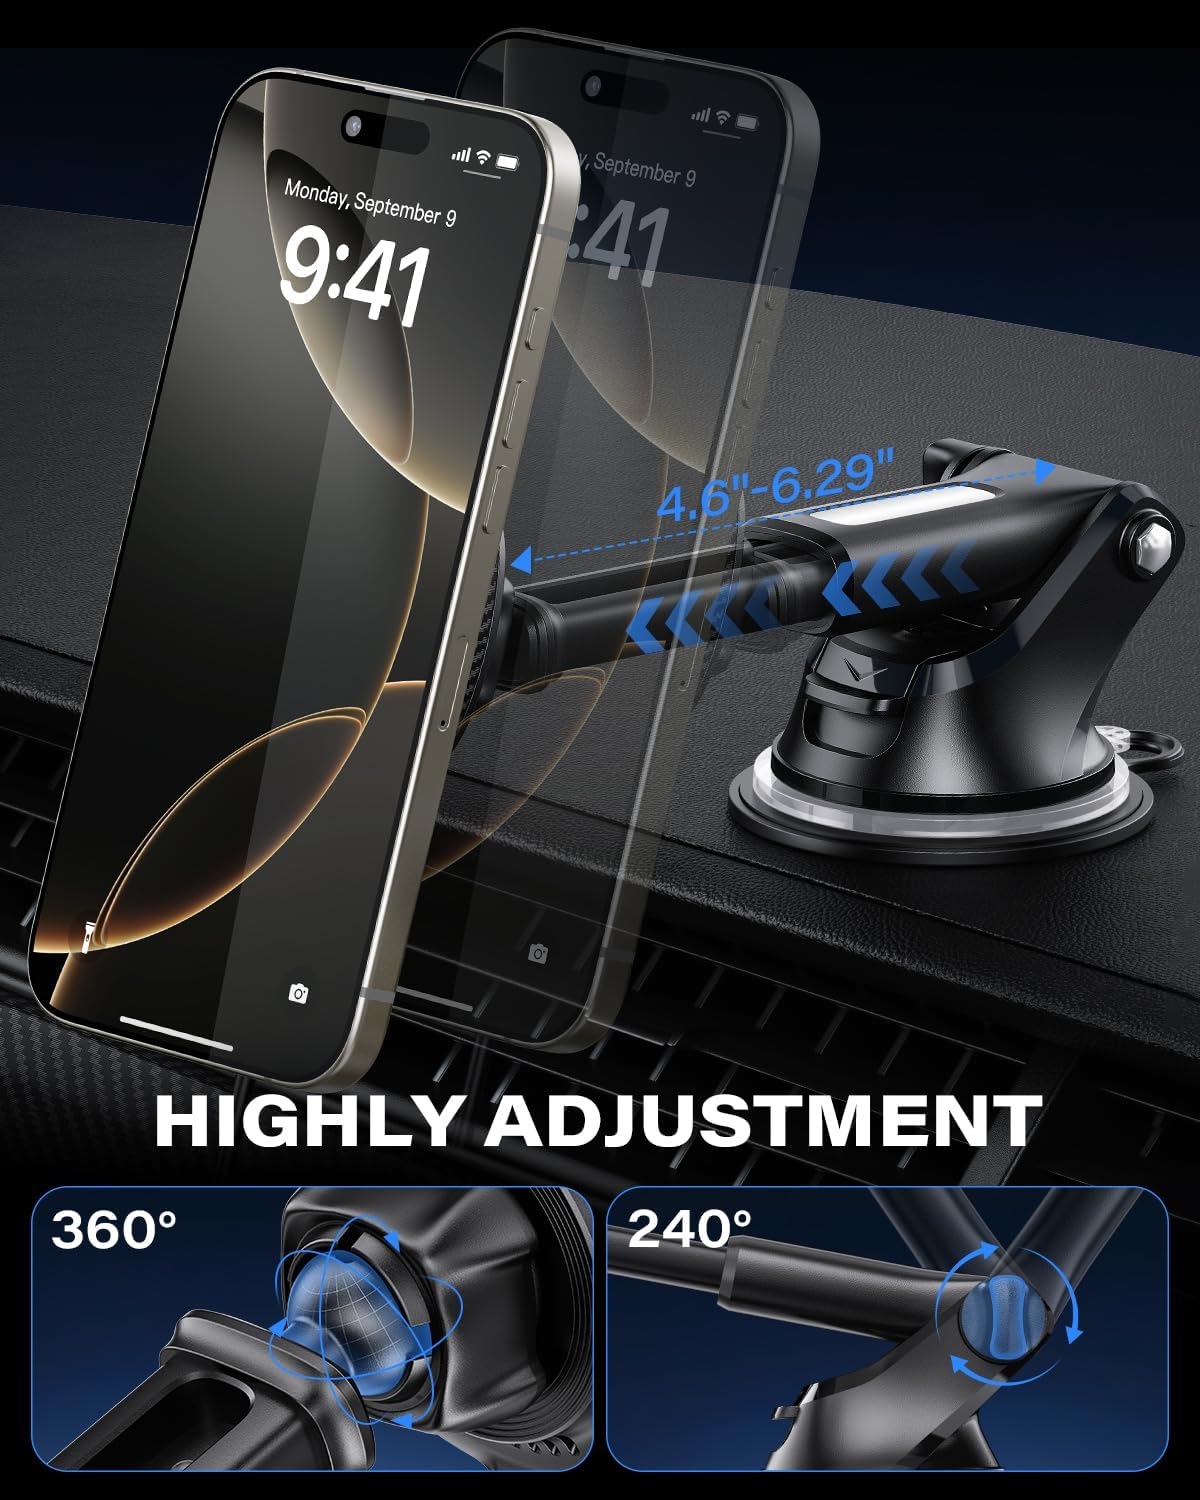
Figure 6: Highly Adjustable Mount
4. Setup & Installation
Follow these steps to install your OQTIQ Magnetic Wireless Car Charger Mount:
4.1. Choosing a Mounting Location
The charger offers two primary mounting options: the air vent or the dashboard/windshield. Consider your vehicle's layout and personal preference for optimal viewing and accessibility.
4.2. Air Vent Installation
- Unscrew the nut on the air vent clip to loosen it.
- Insert the ball joint of the magnetic charging pad into the nut, then tighten the nut to secure the charging pad to the clip.
- Locate a suitable air vent in your vehicle. Ensure the vent blades are sturdy enough to support the weight of the charger and your phone.
- Gently push the air vent clip onto one of the vent blades until it is firmly seated.
- Tighten the screw on the air vent clip to secure it in place.
- Adjust the angle of the magnetic charging pad for optimal viewing.
4.3. Suction Cup Installation (Dashboard/Windshield)
- Clean the desired mounting surface (dashboard or windshield) thoroughly with an alcohol wipe and let it dry completely.
- If mounting on the dashboard, apply the 3M sticky dashboard disc to the cleaned surface first. Remove the protective film from the disc and press it firmly for 30 seconds. Allow 24 hours for the adhesive to cure before attaching the suction cup.
- Unscrew the nut on the suction cup base to loosen it.
- Insert the ball joint of the magnetic charging pad into the nut, then tighten the nut to secure the charging pad to the base.
- Remove the protective film from the suction cup.
- Press the suction cup firmly onto the prepared surface (dashboard disc or windshield).
- Flip the locking lever on the suction cup base down to create a strong vacuum seal.
- Adjust the arm and the magnetic charging pad to your preferred viewing angle.
Note: For windshield mounting, consider using the anti-UV film provided to protect your windshield from potential adhesive residue over time.

Figure 7: Charger Installed on Dashboard
Video 1: Installation demonstration of the OQTIQ Magnetic Wireless Car Charger Mount, showing how to attach it to an air vent and connect a phone for charging.
5. Operating Instructions
5.1. Connecting to Power
- Connect the provided USB-C cable to the charging port on the magnetic charging pad.
- Insert the other end of the USB-C cable into the PD 30W Car Charger Adapter.
- Plug the PD 30W Car Charger Adapter into your vehicle's 12V power outlet (cigarette lighter socket).
- The charger is now powered and ready for use.
5.2. Charging Your Device
- Ensure your smartphone is compatible with MagSafe or has a MagSafe-compatible case.
- Align your smartphone with the magnetic charging pad. The magnets will automatically snap your phone into place.
- Once properly aligned, your phone will begin to charge wirelessly. A charging indicator may appear on your phone's screen.
5.3. Adjusting Viewing Angle
The mount features a 360° rotatable ball head and an extendable arm. Loosen the adjustment knob (if present on your specific mount type) to reposition your phone, then tighten it to secure the desired angle.
6. Compatibility
This OQTIQ Magnetic Wireless Car Charger Mount is designed for optimal performance with:
- iPhone 12 series or later (including iPhone 17/16/15/14/13/12 series).
- Official MagSafe cases.
- MagSafe-compatible magnetic cases.
Not Compatible With:
- iPhone 11 series or earlier.
- Non-MagSafe cases.
- Metal cases or cases with built-in grips, stands, or wallets that interfere with magnetic attachment or wireless charging.

Figure 8: Phone & Case Compatibility Guide
7. Maintenance
To ensure the longevity and optimal performance of your OQTIQ car charger, follow these maintenance guidelines:
- Cleaning: Use a soft, dry cloth to wipe down the charger and mount regularly. Avoid using harsh chemicals or abrasive cleaners, as these can damage the surfaces.
- Magnetic Surface: Keep the magnetic charging surface clean and free of debris to ensure a strong and consistent connection with your phone.
- Suction Cup: If the suction cup loses its grip, rinse it with warm water and let it air dry. This can help restore its adhesive properties.
- Cable Care: Avoid bending or crimping the USB-C cable excessively to prevent internal damage.
- Storage: When not in use for extended periods, store the charger in a cool, dry place away from direct sunlight and extreme temperatures.
8. Troubleshooting
If you encounter issues with your OQTIQ Magnetic Wireless Car Charger Mount, refer to the following common problems and solutions:
| Problem | Possible Cause | Solution |
|---|---|---|
| Phone not charging wirelessly. | Incorrect phone alignment, non-compatible phone/case, power not connected, foreign objects between phone and charger. | Ensure phone is centered on the magnetic pad. Verify phone/case compatibility. Check if the PD 30W adapter is securely plugged into the 12V outlet and the USB-C cable is connected. Remove any metal objects or thick cases. |
| Slow charging speed. | Using a non-PD 30W adapter, phone running power-intensive apps, high ambient temperature. | Use the included PD 30W adapter. Close unnecessary background apps. The built-in cooling fan helps, but extreme heat can still affect charging. |
| Phone not holding securely. | Non-MagSafe phone/case, dirty magnetic surface, mount not properly secured. | Ensure your phone or case is MagSafe compatible. Clean the magnetic surface of the charger and your phone/case. Re-secure the suction cup or air vent clip. |
| Suction cup losing grip. | Dirty surface, air trapped, surface not smooth. | Clean the dashboard/windshield surface and the suction cup. Ensure the locking lever is fully engaged. Use the 3M dashboard disc for textured surfaces. |
9. Specifications
| Feature | Detail |
|---|---|
| Brand | OQTIQ |
| Model Number | WH05-S02-AV2S+ |
| Wireless Charging Output | 15W (QI2 Certified) |
| Input Voltage | 5 Volts |
| Output Voltage | 5 Volts (DC) |
| Amperage | 3 Amps |
| Connectivity Technology | USB Type C |
| Compatible Devices | Smartphones (iPhone 12-17 series) |
| Special Features | Cooling Fan, Fast Charging, MagSafe Compatible |
| Mounting Type | Flex mount (Suction Cup & Air Vent) |
| Material | Acrylonitrile Butadiene Styrene |
| Included Components | 1.2m USB-C Cable, PD 30W Adaptor |
10. Warranty & Support
The OQTIQ Magnetic Wireless Car Charger Mount comes with a 12-month warranty from the date of purchase. This warranty covers manufacturing defects and malfunctions under normal use.
For warranty claims, technical support, or any inquiries, please contact OQTIQ customer service through the retailer where the product was purchased or visit the official OQTIQ website for contact information.
Please retain your proof of purchase for warranty validation.