1. Introduction
Thank you for choosing the HOSTACK 71-inch Tall Pantry Cabinet. This manual provides detailed instructions for the safe assembly, operation, and maintenance of your new storage cabinet. Please read this manual thoroughly before beginning assembly and retain it for future reference.
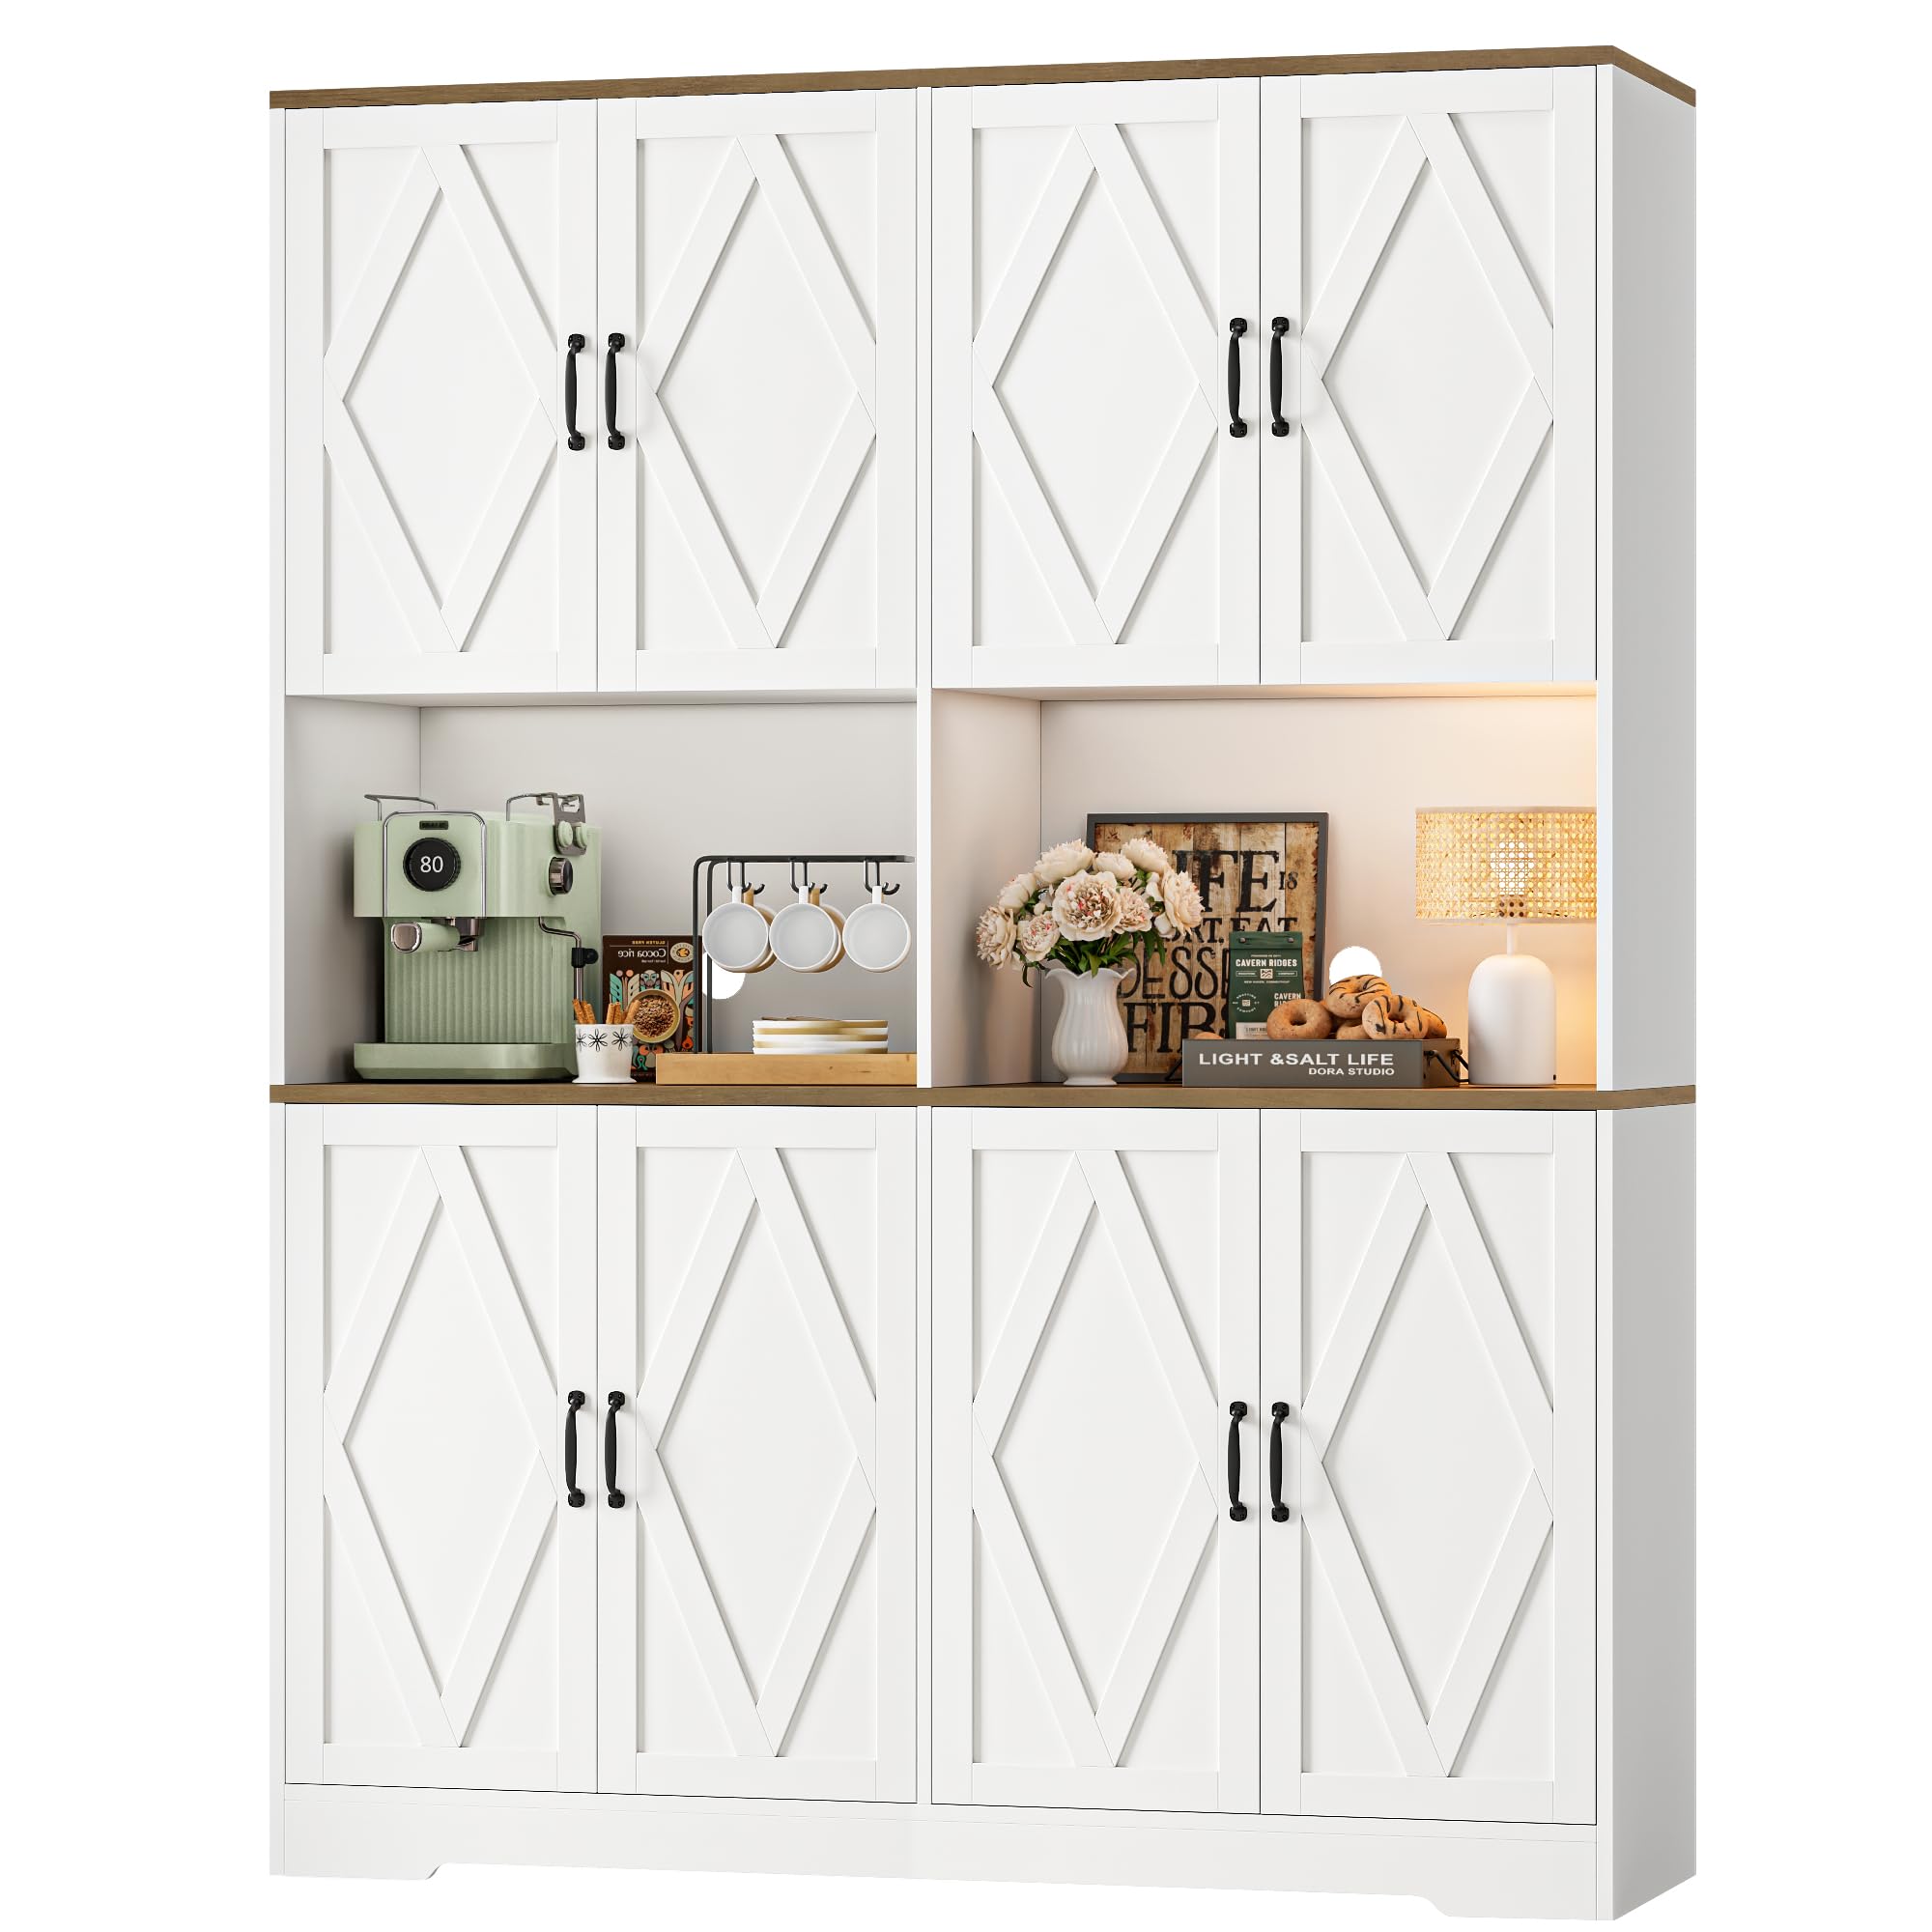
Image 1.1: The HOSTACK 71-inch Tall Pantry Cabinet, showcasing its design and functionality in a home environment.
2. Safety Information
To ensure safe use of this product, please observe the following precautions:
- Always assemble the cabinet on a soft, clean surface to prevent scratches.
- Ensure all parts are securely fastened before use.
- This cabinet must be anchored to a wall using the provided anti-tipping device to prevent accidental tipping, especially in households with children or pets.
- Do not overload shelves. Distribute weight evenly.
- Keep small parts and packaging materials away from children.
3. Package Contents
Your HOSTACK Pantry Cabinet will be delivered in two separate packages. Please ensure both packages have arrived before beginning assembly. Carefully unpack all components and verify against the parts list provided in your assembly guide. If any parts are missing or damaged, please contact customer support.

Image 3.1: The pantry cabinet is packaged in two boxes, which may arrive separately. A height reference is provided.
4. Assembly Instructions
Assembly of the HOSTACK Pantry Cabinet requires attention to detail. Each step includes clear instructions, part numbers, and illustrations for easy understanding. Due to the product's size and weight, we strongly recommend that two adults work together during the setup process.
- Step 1: Unpack and Identify Parts. Lay out all components on a soft, clean surface. Refer to the included parts list to ensure all pieces are present.
- Step 2: Assemble Base Structure. Follow the illustrated guide to connect the base panels and side frames.
- Step 3: Install Shelves and Dividers. Securely attach all internal shelves and dividers as indicated in the manual.
- Step 4: Attach Back Panels. Fasten the back panels to the assembled frame.
- Step 5: Mount Doors. Attach the doors using the provided buffer hinges. Adjust hinges for proper alignment.
- Step 6: Install Handles. Secure the handles to the doors.
- Step 7: Secure Anti-Tipping Device. Attach the anti-tipping device to the top rear of the cabinet and secure it to a wall stud. This step is crucial for safety.

Image 4.1: A visual representation of the recommended two-person assembly process for the cabinet.
5. Key Features
- Ample Storage: Features 8 fully enclosed storage compartments with doors, providing organized space for various kitchen or dining essentials.
- Dual Countertops: Includes 2 separate countertops designed to accommodate appliances such as microwaves and coffee makers without interference.

Image 5.1: The interior layout of the cabinet, illustrating the 8 storage compartments and two independent countertops.
- Cable Management: Equipped with cable management holes on the back panel of the countertop sections to keep appliance cords tidy and out of sight.

Image 5.2: Detail of the warm natural wood texture on the countertop and the integrated cable management holes.
- Soft-Close Hinges: All doors are fitted with buffer hinges that allow for slow and smooth closing, preventing slamming and reducing wear.
Video 5.1: Demonstration of the soft-close hinges on the cabinet doors, showing smooth and quiet operation.
- Durable Construction: Constructed from high-quality engineered wood with a sturdy base and an anti-tipping device for enhanced stability and longevity.
- Farmhouse Design: Features intricate diamond patterns on the doors, adding a distinctive farmhouse aesthetic.

Image 5.3: A detailed view of the diamond pattern design on the cabinet doors.
6. Usage and Placement
This versatile pantry cabinet is suitable for various rooms and purposes:
- Kitchen: Ideal for storing ingredients, small appliances, and cookware. The countertops provide convenient space for food preparation or appliance use.
- Dining Room: Can serve as a buffet station, displaying dinnerware, glassware, or acting as a coffee bar.
- Living Room: Use for organizing snacks, entertainment essentials, or decorative items.

Image 6.1: The cabinet's versatility is demonstrated across various home settings, including kitchen, dining room, living room, and study.
7. Maintenance
To maintain the appearance and longevity of your HOSTACK Pantry Cabinet:
- Wipe surfaces with a soft, damp cloth. Avoid abrasive cleaners.
- Promptly clean up spills to prevent damage to the engineered wood.
- Avoid placing hot items directly on the surface; use coasters or protective pads.
- Periodically check all fasteners and tighten if necessary.
- Keep the cabinet away from direct sunlight and excessive moisture.
8. Troubleshooting
| Problem | Possible Cause | Solution |
|---|---|---|
| Missing or Damaged Parts | Shipping damage or packaging error. | Contact customer support with the part number/letter from the instruction manual. |
| Cabinet is Unstable/Wobbly | Fasteners not fully tightened; uneven floor; anti-tipping device not installed. | Ensure all screws are tight. Adjust leveling feet if applicable. Install the anti-tipping device securely to a wall stud. |
| Doors do not align properly | Hinges not adjusted correctly. | Adjust the screws on the hinges to align the doors. Refer to the assembly guide for hinge adjustment details. |
| Only one package received | Product ships in two separate packages. | Wait for the second package to arrive. Do not begin assembly until both packages are received. |
9. Product Specifications
| Attribute | Detail |
|---|---|
| Brand | HOSTACK |
| Model Number | B0FHHRFQ3X |
| Overall Dimensions (D x W x H) | 15.8" x 55" x 71" |
| Material | Engineered Wood, Metal |
| Color | White |
| Number of Doors | 8 |
| Number of Shelves | 8 |
| Mounting Type | Freestanding (with anti-tipping device) |
| Assembly Required | Yes (Two adults recommended) |
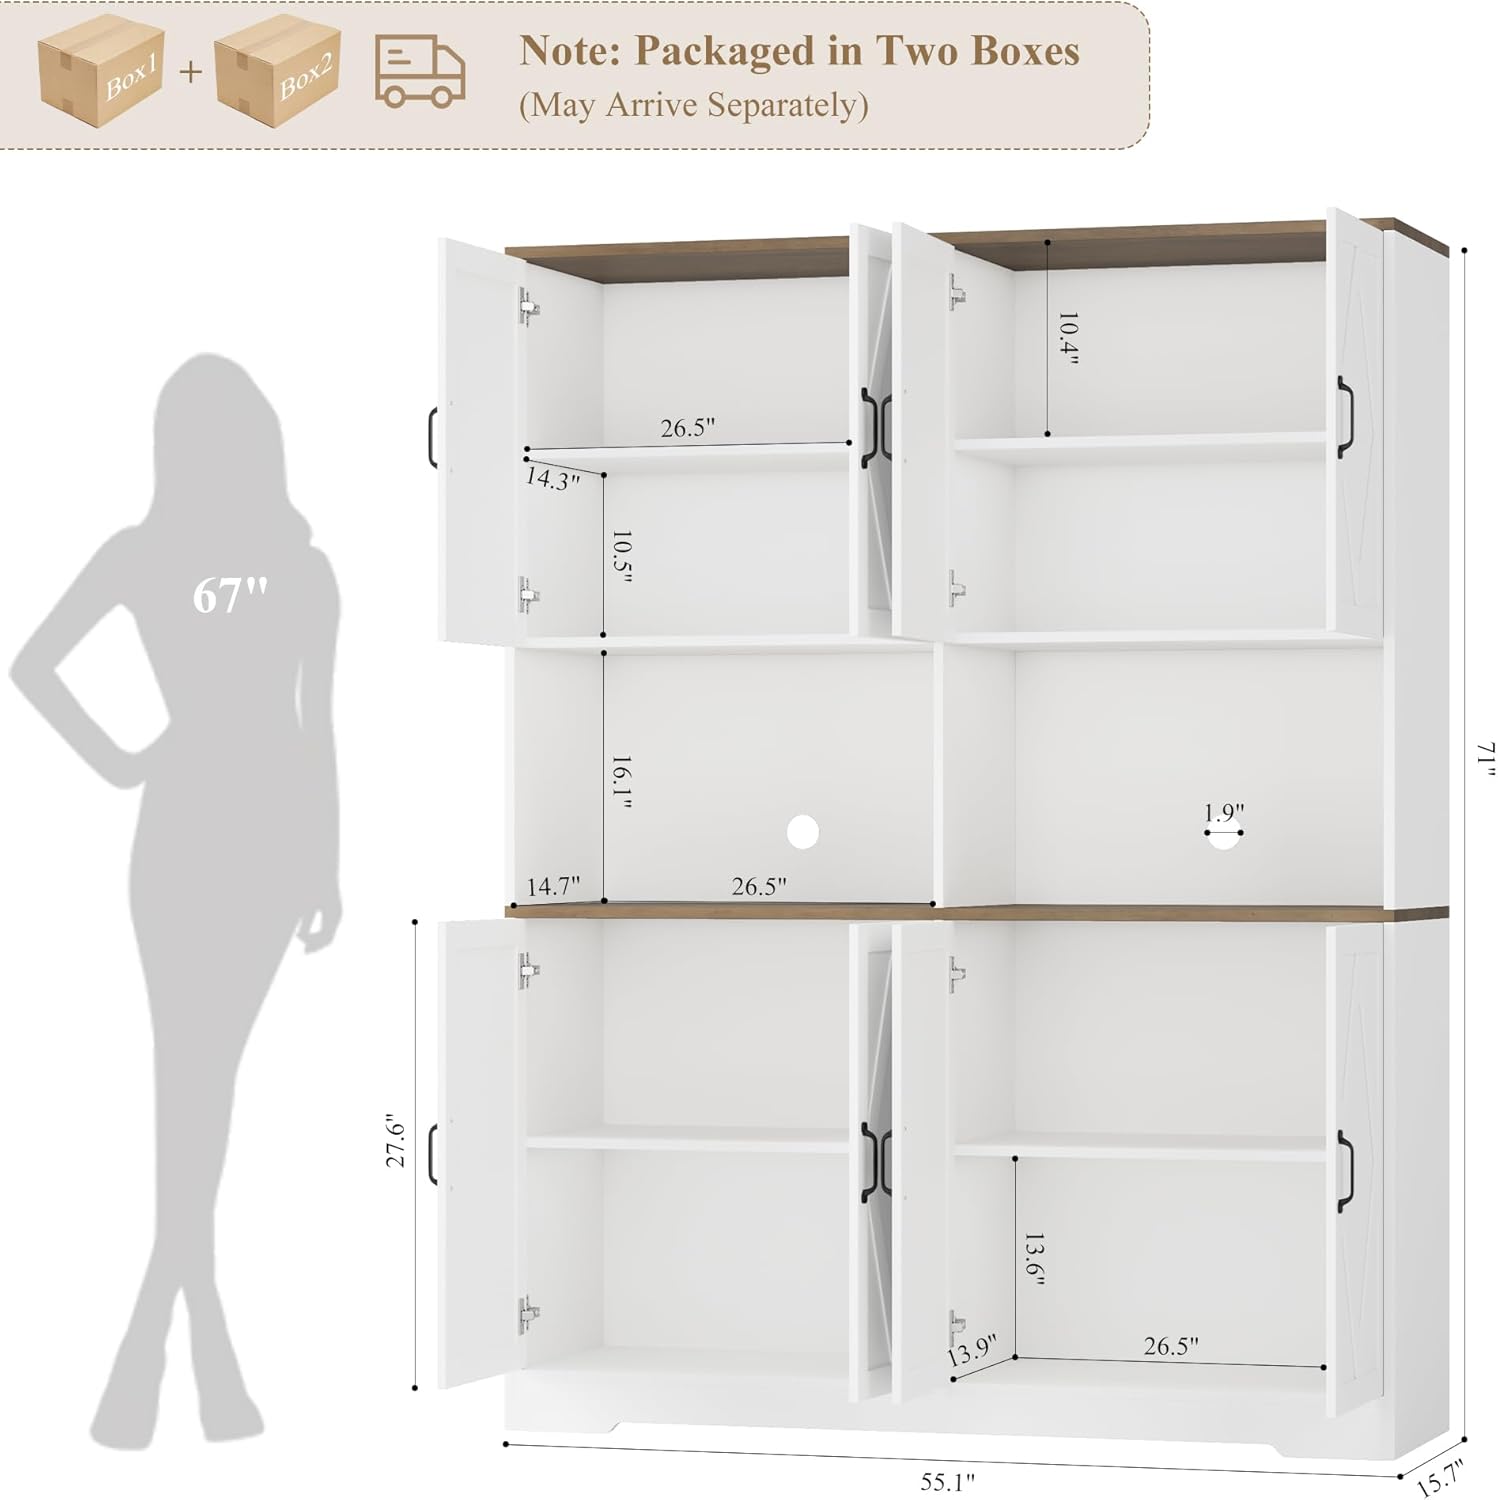
Image 9.1: Detailed dimensions of the HOSTACK Pantry Cabinet, illustrating the measurements of each section.
10. Warranty and Customer Support
HOSTACK products are designed for quality and durability. For information regarding warranty coverage, please refer to the product's purchase documentation or contact our customer support team. If you have any questions, require assistance with assembly, or need to report missing/damaged parts, please contact us via the "Contact Seller" option on Amazon. Our support team is available to assist you.
Contact Information: Please use the "Contact Seller" feature on the Amazon product page for direct assistance.