1. Introduction and Key Features
This manual provides essential information for the safe operation, maintenance, and troubleshooting of your ADISTAR Spacewalk M7 Electric Bike. Please read it thoroughly before your first ride and keep it for future reference.
Key Features:
- Powerful Motor: 750W peak motor with 60Nm torque for tackling inclines up to 30°.
- Extended Range Battery: 48V 15Ah removable battery providing up to 55 miles per charge.
- All-Terrain Capability: 20×4.0" fat tires for enhanced grip and stability on various surfaces.
- Full Suspension System: Dual suspension for a comfortable ride over varied terrain.
- Compact and Portable: Weighs 38kg, designed for easier transport and storage.
- Integrated LED Display: Provides real-time information on battery level, speed, and mileage.
- Multiple Riding Modes: Features Pure Electric, Pedal Assist, and Manual Cycling modes.
- Shimano 7-Speed Gear System: For adaptable riding in different environments.
- Mechanical Disc Brakes: Ensures reliable stopping power.
- Rear Rack: Supports up to 55 lbs for carrying gear.
2. Safety Information
Your safety is paramount. Always adhere to local traffic laws and regulations. Failure to follow these guidelines may result in serious injury or property damage.
- Helmet Use: Always wear an approved bicycle helmet that fits properly.
- Pre-Ride Check: Before each ride, inspect brakes, tire pressure, battery charge, and ensure all quick releases and fasteners are secure.
- Visibility: Use the integrated headlight and ensure you are visible to others, especially during low-light conditions. Consider wearing reflective clothing.
- Weather Conditions: Exercise caution when riding in wet conditions, snow, or on slippery surfaces. Braking distance increases significantly.
- Passenger Limit: This e-bike is designed for a single rider. Do not carry passengers.
- Weight Limit: Do not exceed the maximum load capacity of 120 kg (264 lbs).
- Charging Safety: Only use the provided charger. Charge the battery in a well-ventilated area away from flammable materials. Do not leave charging unattended for extended periods.
- Children: This e-bike is suitable for riders 5'5'' and above. Ensure younger riders are supervised and understand safe operation.
- Alcohol/Drugs: Never operate the e-bike under the influence of alcohol or drugs.
3. Components Overview
Familiarize yourself with the main components of your ADISTAR Spacewalk M7 Electric Bike.

Overall view of the ADISTAR Spacewalk M7 Electric Bike, showcasing its robust design and fat tires.

Illustration of the bike's full suspension system, including front forks and rear shock absorbers, designed for a comfortable ride.

Visual representation of the three riding modes: Pure Electric, Pedal Assist, and Manual Cycling.

Close-up of the 48V 15Ah lithium-ion battery, highlighting its removable design, BMS safety certification, and key locking security.

Detailed view of the 750W/48V motor and drivetrain, showing its internal components and highlighting max speed, max torque, and Shimano 7-speed.

Image demonstrating the rear rack's capacity, capable of holding up to 55 pounds, shown with a pet carrier.
Close-up of the handlebar, showing the LCD display, light switch, horn, left/right turn signal, front brake, rear brake, motor gear switching, pedal riding gear switching, and throttle.

Illustration showing how to unlock and remove the battery from the bike frame using a key.

Close-up of the battery's charging port and integrated battery level display.
4. Setup and Assembly
Your ADISTAR Spacewalk M7 Electric Bike comes partially assembled. Follow these steps to complete the setup.
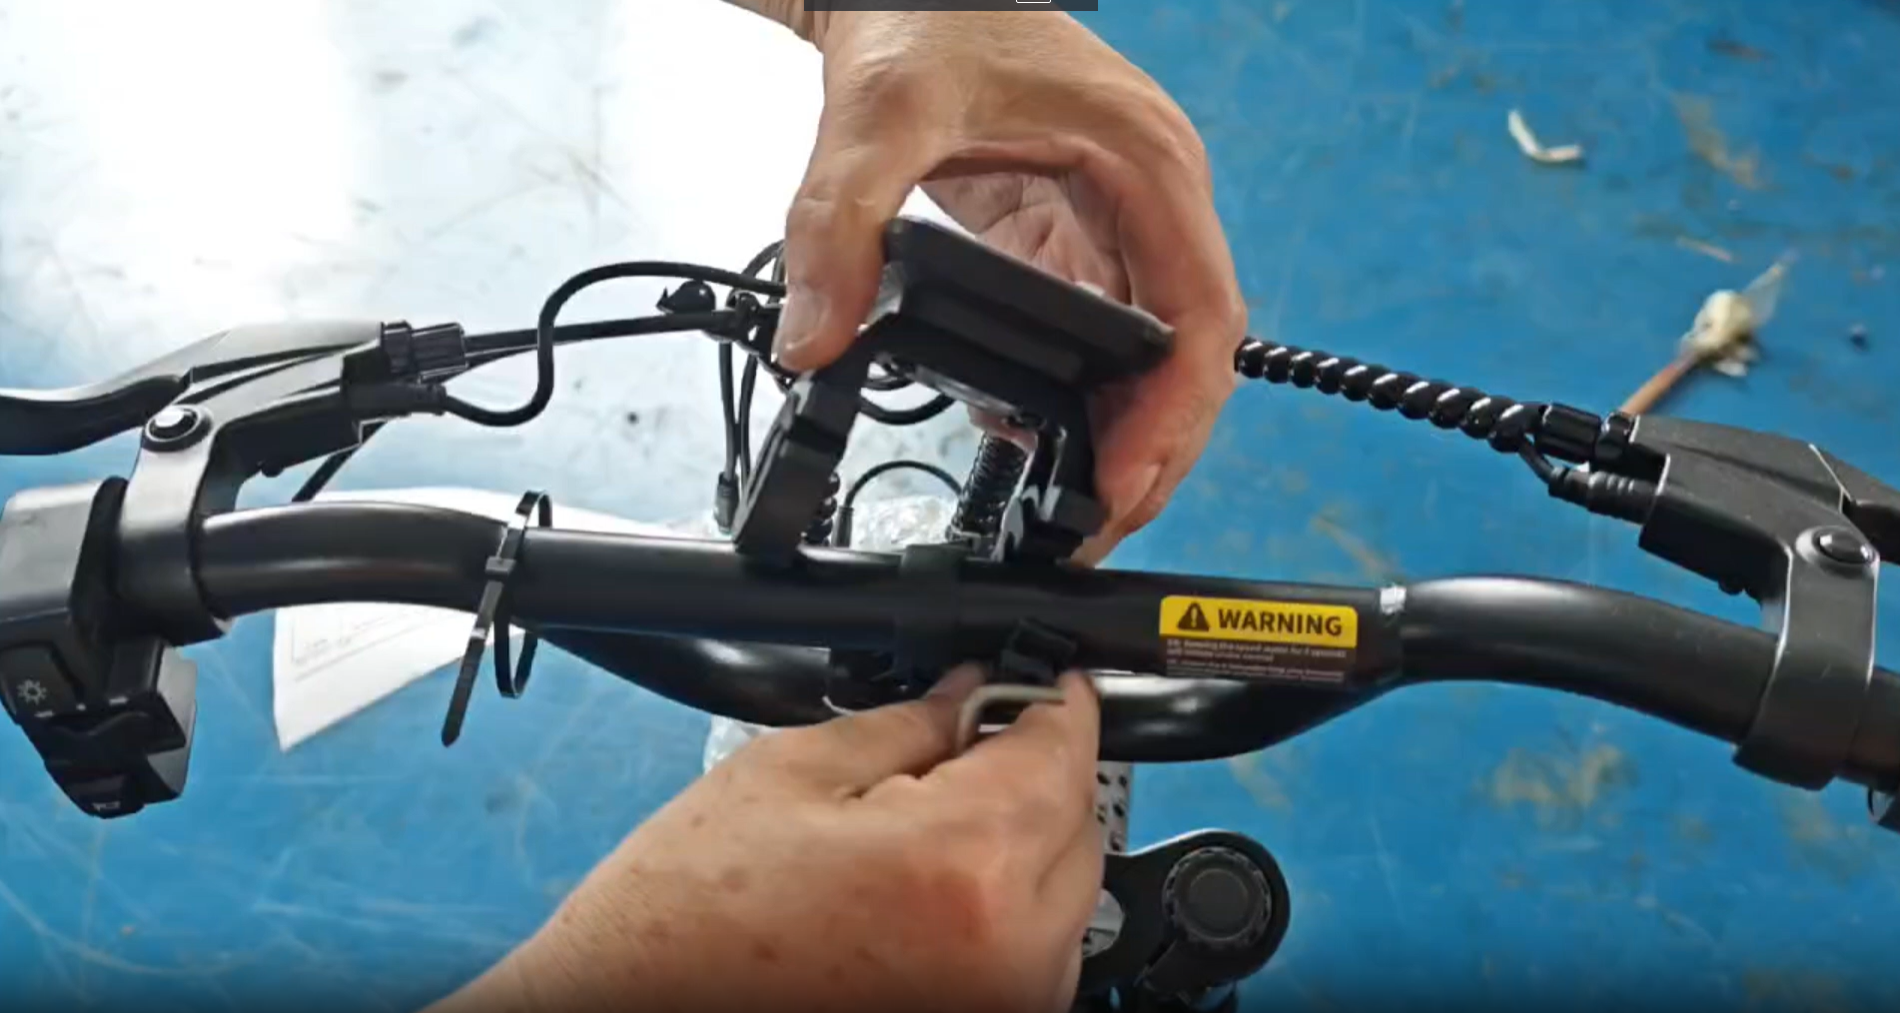
4.1 Handlebar and Display Installation
The display and instrument switch need to be securely attached to the handlebar.
- Snap the instrument bracket onto the bicycle handlebars and tighten the screws.
- Screw the instrument switch onto the bicycle handlebar as well.
- Connect the corresponding cables from the display and switch to the main wiring harness. Ensure the arrows on the connectors align before pushing them firmly together.
Video: How to install the display. This video demonstrates the process of attaching the display and instrument switch to the handlebar and connecting the necessary cables.
4.2 Remaining Assembly Steps
- Install the front wheel and secure it with the quick release mechanism.
- Attach the pedals, ensuring they are screwed into the correct sides (L for left, R for right).
- Adjust the seat height for comfortable riding posture.
- Inflate tires to the recommended pressure (check sidewall of tires for specific PSI).
- Perform a final check of all bolts and connections to ensure they are tight and secure.
5. Operating Instructions
5.1 Powering On/Off
To power on the bike, ensure the battery is securely installed and turned on (if it has a separate power switch). Then, long press the power button on the instrument switch located on the handlebar. To power off, long press the same button.
5.2 Riding Modes
Your ADISTAR Spacewalk M7 offers three distinct riding modes:
- Pure Electric Riding: Twist the throttle to engage the motor and propel the bike without pedaling.
- Pedal Assist Riding: Begin pedaling, and the motor will provide assistance, making pedaling easier. The level of assistance can often be adjusted via the display controls.
- Manual Cycling: With the power off or no throttle/pedal assist engaged, ride the bike like a traditional bicycle using pedal power only.
Visual guide to the three riding modes: Pure Electric, Pedal Assist, and Manual Cycling.
5.3 LED Display Functions
The integrated LED display provides crucial information during your ride:
- Battery Level: Indicates the remaining charge of your battery.
- Speed: Shows your current riding speed.
- Mileage: Displays the distance traveled.
- Assist Level: Allows you to select different levels of pedal assistance.
Close-up of the LED display, showing various indicators such as battery level, speed, and assist level.
6. Maintenance
Regular maintenance ensures the longevity and safe operation of your e-bike.
- Cleaning: Clean your bike regularly with a damp cloth. Avoid high-pressure washing directly on electrical components.
- Tires: Check tire pressure before each ride. Maintain recommended PSI for optimal performance and safety.
- Brakes: Regularly inspect brake pads for wear and ensure brake levers provide firm and responsive stopping power. Adjust or replace as needed.
- Chain: Keep the chain clean and lubricated to prevent rust and ensure smooth gear changes.
- Fasteners: Periodically check all bolts, nuts, and quick releases for tightness.
- Battery Care:
- Charge the battery fully after each ride, especially if it will be stored for an extended period.
- Store the battery in a cool, dry place, away from direct sunlight and extreme temperatures.
- If storing for a long time, charge the battery to 50-70% every 2-3 months.
- Professional Service: For complex repairs or electrical issues, consult a qualified bicycle mechanic or the manufacturer.
7. Troubleshooting
This section addresses common issues you might encounter and their potential solutions.
| Problem | Possible Cause | Solution |
|---|---|---|
| Bike does not power on. | Battery not charged, battery not properly seated, power switch off, loose electrical connection. | Charge battery, ensure battery is fully inserted, check battery power switch, inspect connections. |
| Motor not assisting. | Low battery, assist level set to zero, brake lever engaged, motor connection loose. | Charge battery, increase assist level on display, release brake levers, check motor cable connection. |
| Brakes feel weak. | Worn brake pads, loose brake cable, air in hydraulic system (if applicable). | Inspect and replace brake pads, adjust brake cable tension, consult a professional for hydraulic brake issues. |
| Unusual noises during riding. | Loose components, dry chain, rubbing brakes, worn bearings. | Check all fasteners, lubricate chain, adjust brake calipers, inspect bearings. |
8. Specifications
Detailed technical specifications for the ADISTAR Spacewalk M7 Electric Bike.

Diagram illustrating the key dimensions of the ADISTAR Spacewalk M7 Electric Bike, including length, handlebar height, wheelbase, and seat height.
| Feature | Detail |
|---|---|
| Bike Type | Commuting Bike, Cross Country Bike |
| Age Range (Description) | Adult |
| Brand | ADISTAR |
| Number of Speeds | 7 |
| Color | 20''×4.0 black |
| Wheel Size | 20 Inches |
| Frame Material | Carbon Steel |
| Suspension Type | Dual (Full Suspension) |
| Special Feature | Adjustable Handlebars, Digital Display, Dual Disc Brake, Dual Suspension, Headlight |
| Included Components | Battery, Charger, Mudguard, Tool Kit, User Manual |
| Size | 20 inch |
| Brake Style | Disc |
| Wheel Width | 4 Inches |
| Specific Uses For Product | Dirt Biking, Gravel, Road, Snow, Trail |
| Item Weight | 68 Pounds (approx. 30.8 kg) |
| Theme | Sport |
| Style | Classic |
| Model Name | M7 |
| Power Source | Electric motor |
| Wattage | 750 watts |
| Wheel Material | Aluminum |
| Year | 2025 |
| Lithium Battery Energy Content | 720 Watt Hours |
| Seat Material Type | Polyurethane (PU) |
| Warranty Type | Limited |
| Maximum Weight Recommendation | 120 Kilograms (264 lbs) |
| Assembly Required | Yes |
| Bicycle Gear Shifter Type | Twist Grip |
| Number of Handles | 2 |
| Skill Level | Beginner |
| Fender Material | Plastic |
| Derailleur Configuration | Rear |
| Manufacturer | Shenzhen Gistar Limited |
| Item Package Dimensions L x W x H | 49.21 x 29.13 x 11.81 inches |
| Package Weight | 39 Kilograms |
| Item Dimensions LxWxH | 63.78 x 10.24 x 43.31 inches |
| Warranty Description | 1-year |
| Grip Type | Ergonomic |
9. Warranty and Support
Your ADISTAR Spacewalk M7 Electric Bike comes with a 1-year comprehensive warranty covering manufacturing defects. Please retain your proof of purchase for warranty claims.
For technical assistance, troubleshooting beyond this manual, or warranty inquiries, please contact ADISTAR customer support through the retailer where you purchased the product or visit the official ADISTAR website for contact information.
ADISTAR Ebike Customer Support: Contact Seller on Amazon


