
1. Introduction
This manual provides detailed instructions for the installation, operation, maintenance, and troubleshooting of your IMAYCC 100cc 2-Stroke Bicycle Engine Kit. This kit is designed to convert standard 26-28 inch bicycles into motorized bikes, offering enhanced speed and range for various outdoor activities and commuting.
The installation process requires basic tools and mechanical aptitude. It is recommended to allocate approximately 2-4 hours for installation and fine-tuning. Reviewing these instructions thoroughly and consulting online resources, such as YouTube tutorials for "IMAYCC Bicycle Engine Kit," can significantly streamline the process and help prevent common installation challenges.
2. Package Contents
Before beginning installation, verify that all components listed below are present in your kit. Refer to the image below for a visual representation of the included parts.
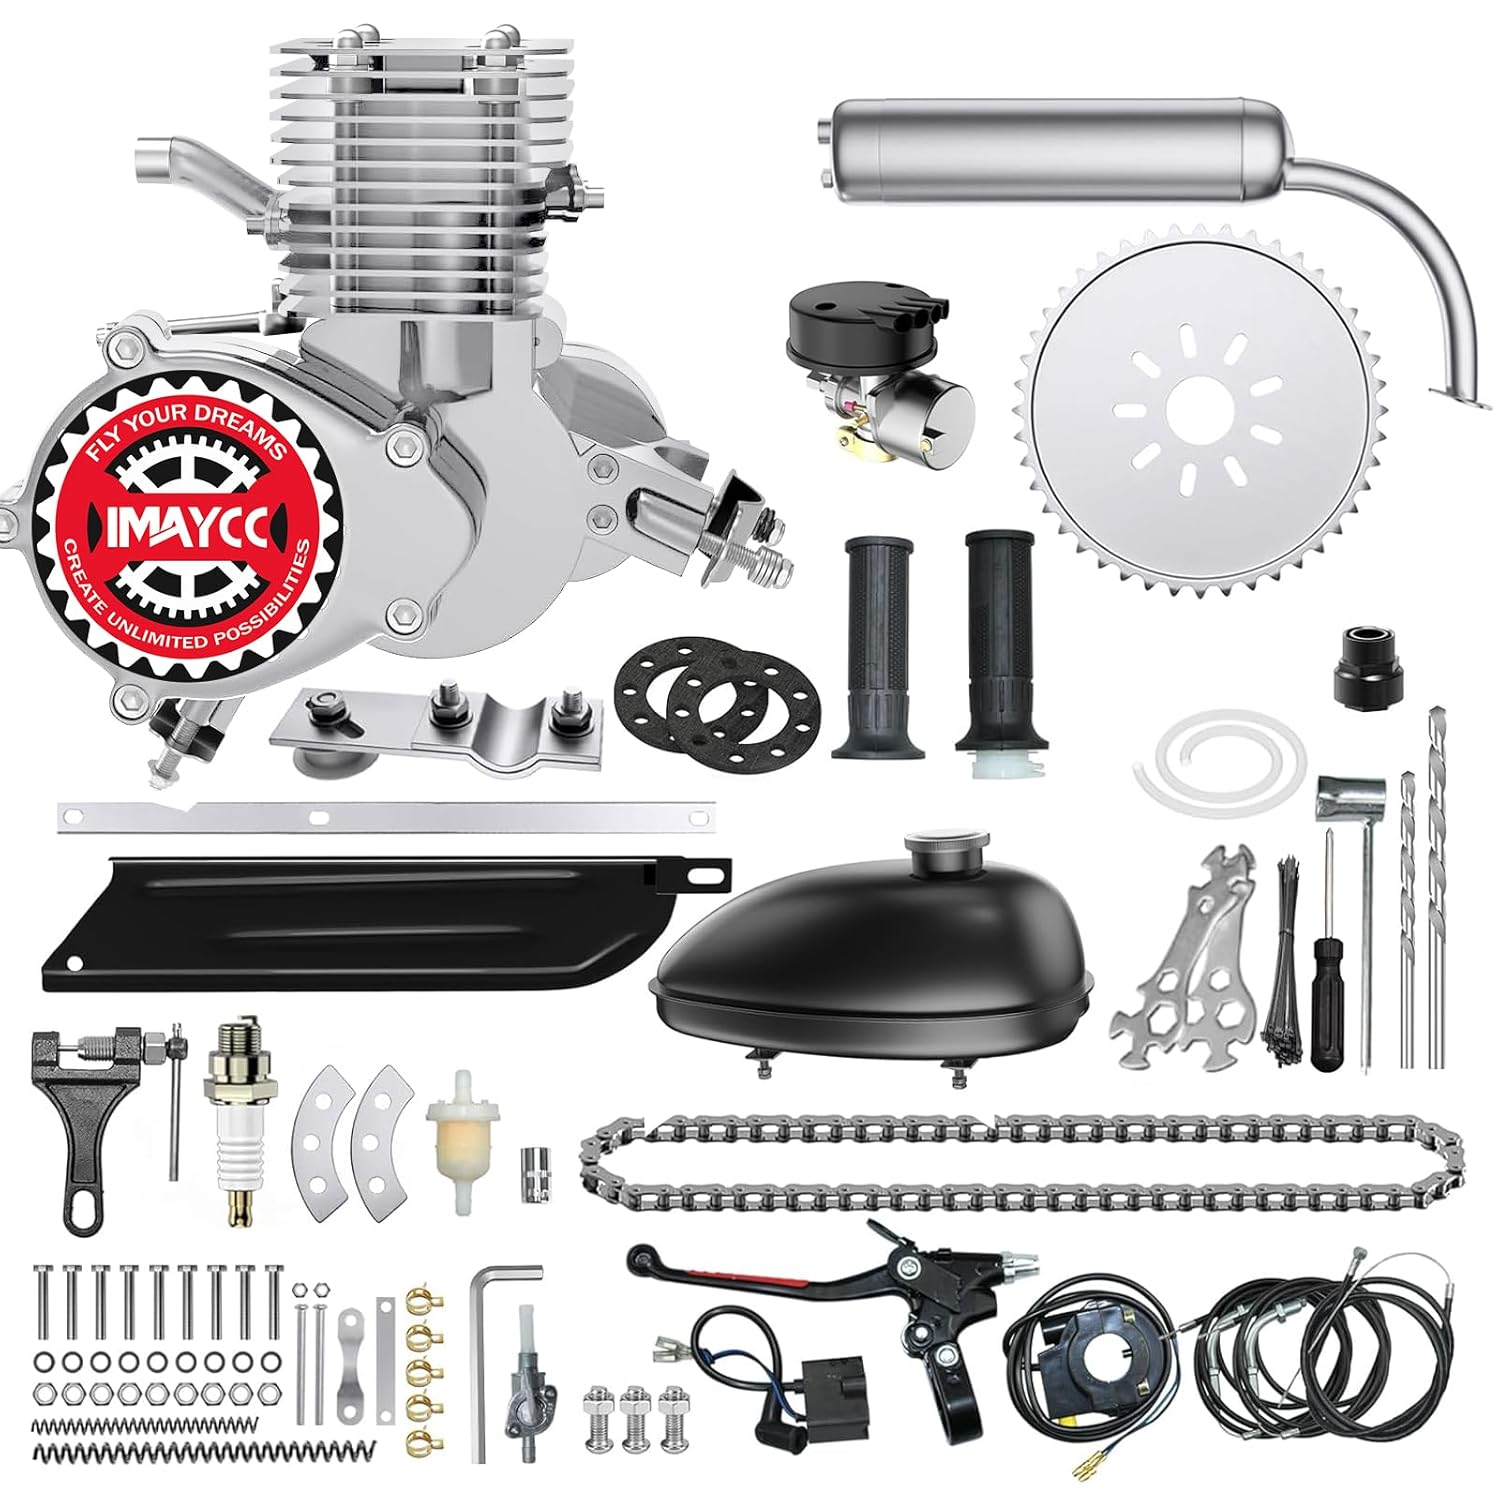
Image 2.1: Overview of all components included in the IMAYCC 100cc Bicycle Engine Kit.

Image 2.2: Detailed diagram illustrating each component and its name within the package.
3. Setup and Installation
3.1 Bike Compatibility
This engine kit is designed to fit most common 26-28 inch wheel bicycles that feature a V-frame design. This includes mountain bikes, cruiser bikes, and road bikes. A critical requirement for proper fitment is ensuring at least 10 inches of clearance between your bike's bottom bracket and the top bar.

Image 3.1: Diagram illustrating the required clearance and V-frame design for bike compatibility.

Image 3.2: Example of the IMAYCC 100cc Bicycle Engine Kit installed on a compatible bicycle.
3.2 Key Components
- Engine: Single-cylinder, air-cooled, 2-stroke engine with CDI ignition.
- Sprocket: Rugged 44-tooth drive sprocket for efficient power transfer.
- Chain: 110 knots chain teeth, designed for strength and durability.
- Fuel Tank: 3L black teardrop fuel tank.
- Muffler: Chrome-plated for exhaust management.

Image 3.3: 44-Tooth Chrome Drive Sprocket.

Image 3.4: Chrome-Plated Muffler.

Image 3.5: 415 Bike Engine Drive Chain.

Image 3.6: 3L Black Teardrop Fuel Tank.
3.3 Fuel Tank Installation
Proper fuel tank installation is crucial for safety and performance. Follow the steps outlined in the diagram below.

Image 3.7: Diagram detailing the fuel tank installation procedure, including fuel line and valve orientation.
3.4 Wiring Connections
Connect the electrical components as shown in the wiring diagram. Ensure all connections are secure.

Image 3.8: Wiring diagram for the IMAYCC Bicycle Engine Kit, showing connections for the engine, spark plug, CDI ignition, and throttle handle.
- Point 1: Blue wire and blue wire connection.
- Point 2: Black wire and black wire connection.
- Point 3: White wire does not need to be connected; it should be wrapped with electrical tape for insulation.
4. Operating Instructions
4.1 Fuel Mixture
For optimal performance and engine longevity, use 90# fuel mixed with 2-stroke engine oil. The mixing ratio is critical:
- Initial Break-in Period (first 500km): 16:1 (fuel to oil ratio).
- After Break-in Period: 20:1 (fuel to oil ratio).
Always mix the fuel and oil thoroughly before adding it to the fuel tank. Ensure the fuel valve is closed when parking the bicycle to prevent leaks.
4.2 Engine Start and Operation
The engine features CDI ignition and a foot pedal start mechanism. Once installed and fueled, engage the clutch and pedal the bicycle to gain momentum, then release the clutch to start the engine. Familiarize yourself with the throttle control for speed regulation.
4.3 Performance Guidelines
When driving on a smooth road, maintain a speed of 35-40 km/h. The maximum speed limit for this engine is 50 km/h. The typical fuel consumption is approximately 2.5 liters per 100 km.

Image 4.1: Engine dimensions and key performance specifications.

Image 4.2: Various bicycle types suitable for the IMAYCC 100cc engine kit, including mountain, road, cruiser, and beach bikes.
5. Maintenance
Regular maintenance is essential for the longevity and reliable operation of your engine kit.
5.1 Routine Checks
- Fasteners: Periodically check all nuts and bolts for tightness. Vibrations can cause components to loosen. Applying thread-locking compound (Loctite) to critical fasteners can help prevent loosening.
- Chain Tension: The drive chain tensioner may require periodic adjustment, especially during the initial break-in period as the chain stretches. Ensure proper chain tension to prevent derailment or damage.
- Spark Plug: Inspect and replace the spark plug as needed. A new spark plug may be required after the break-in period or if starting issues occur.
- Fuel System: Regularly check fuel lines and connections for leaks. Ensure the fuel filter is clean.
- Wiring: Inspect wiring for any signs of wear, melting, or damage, particularly near hot components like the muffler. Reroute or insulate wires if they are in contact with hot surfaces.
5.2 Fuel Mixture Adherence
Strictly follow the recommended fuel-to-oil mixing ratios (16:1 for break-in, 20:1 thereafter) to ensure proper engine lubrication and prevent premature wear.
6. Troubleshooting
This section addresses common issues you might encounter with your engine kit.
6.1 Engine Not Starting or Running Poorly
- Fuel Supply: Check if the fuel tank has sufficient fuel and the fuel valve is open. Ensure the fuel line is not kinked and the fuel filter is clean.
- Spark Plug: Inspect the spark plug for fouling or damage. Clean or replace if necessary.
- Magneto Waterlogging: In wet weather, the magneto can become waterlogged, preventing the engine from starting. Consider sealing the magneto cover to prevent water ingress.
- Carburetor: Ensure the carburetor is clean and properly adjusted.
6.2 Loose or Damaged Components
- Exhaust System: If the exhaust becomes loose or falls off, check the mounting bolts and threads. Re-secure with thread-locking compound if possible.
- Chain Tensioner: A loose chain tensioner can cause the chain to interfere with the rear spokes. Ensure it is securely fastened and adjusted correctly.
- General Hardware: If you experience issues with bolts stripping or loosening frequently, consider replacing them with higher-quality hardware from a local store.
6.3 Electrical Issues
- Melting Wires: If wires are running too close to the muffler or other hot engine parts, they can melt. Reroute wires away from heat sources or use heat-resistant insulation.
- CDI Ignition: Ensure all CDI ignition connections are secure and free from corrosion.
7. Specifications
| Feature | Specification |
|---|---|
| Engine Type | Single-cylinder, Air-cooled, 2-Stroke |
| Displacement | 100cc |
| Power/Speed | 2kW / 6500rpm |
| Ignition System | CDI Ignition |
| Starting Method | Foot Pedal Start |
| Drive Sprocket | 44-Tooth |
| Drive Chain | 415 Heavy Duty Chain, 110 Knots |
| Fuel Tank Capacity | 3 Liters (0.79 Gallons) |
| Recommended Fuel | 90# Gasoline |
| Fuel Mixing Ratio (Break-in) | 16:1 (Fuel:Oil) for first 500km |
| Fuel Mixing Ratio (Normal) | 20:1 (Fuel:Oil) after 500km |
| Fuel Consumption | 2.5L per 100km |
| Maximum Speed | 50 km/h |
| Compatible Bike Wheel Size | 26-28 inches (V-frame design) |
| Product Dimensions | 17.6 x 17.6 x 8.2 inches |
| Item Weight | 26.4 Pounds |
8. Warranty and Support
8.1 Warranty Information
IMAYCC provides a one-year warranty for quality-related issues with products purchased. This includes long-term guidance and free replacement of new products if a quality problem arises.
8.2 Customer Support
For any product support inquiries or assistance, please utilize the 'Contact Seller' option available in your Amazon order details. The IMAYCC team is committed to providing comprehensive support to ensure customer satisfaction.