Inefala B0FHH5SYDS
Inefala Android 15 Car Radio User Manual
Model: B0FHH5SYDS
For Dodge Grand Caravan (2011-2020), Chrysler Grand Voyager (2011-2015), Chrysler Town & Country (2011-2016)
1. Product Overview
This manual provides detailed instructions for the Inefala 9-inch HD Touchscreen Android 15 Car Radio. It covers essential information for installation, operation, and maintenance to ensure optimal performance and user experience.
Key Features:
- 9-inch HD Touchscreen (1280*720 resolution) with 15 customizable themes.
- Wireless Apple Carplay and Android Auto support for seamless smartphone integration.
- Mirror Link functionality for displaying phone content.
- Integrated WiFi and GPS navigation for online and offline mapping.
- Advanced EQ settings for audio customization.
- Bluetooth for hands-free calling and audio streaming.
- FM/RDS radio with station storage.
- Steering Wheel Control (SWC) compatibility for safer operation.
- Includes a backup camera and external microphone.
2. Package Contents
Verify all components are present before beginning installation:
- 1 x Inefala Android Car Stereo
- 1 x Power Cable
- 1 x GPS Antenna
- 1 x Radio Antenna
- 1 x Rear Camera Input Cable
- 1 x RCA Cable
- 2 x USB Cable
- 2 x Mounting Bracket
- 4 x Screws
- 1 x User Manual (this document)
- 1 x External Microphone
- 1 x Backup Camera
- 1 x Canbus (if applicable for your vehicle model)
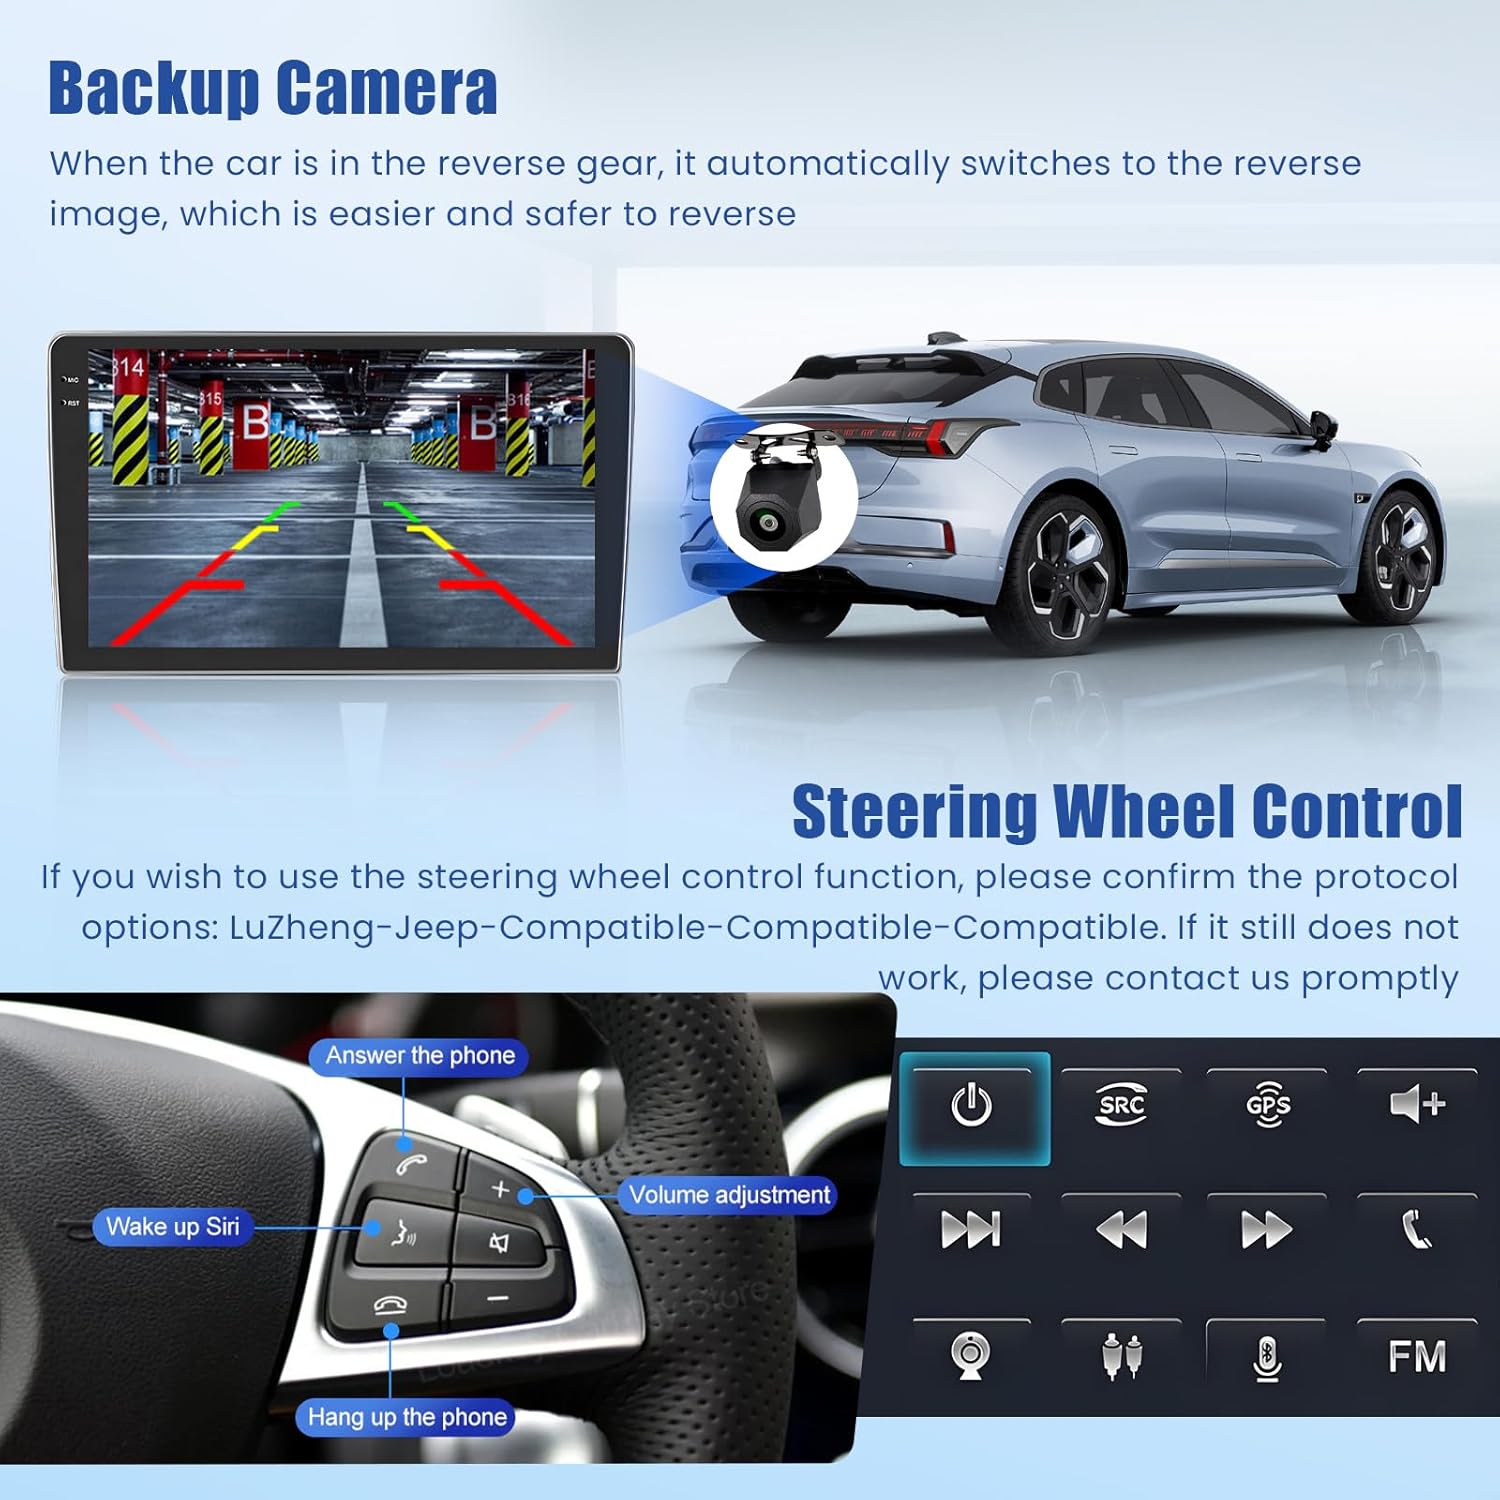
Figure 2.1: Illustration of all included components in the Inefala car stereo package.
3. Compatibility Check
This product is designed for specific vehicle models. Please confirm your vehicle's center console and power cord port match the compatible models before installation.
- Dodge Grand Caravan: 2011-2020
- Chrysler Grand Voyager: 2011-2015
- Chrysler Town & Country: 2011-2016

Figure 3.1: Visual guide for compatible and incompatible car console models. Ensure your vehicle matches "Model A" for proper fitment.
4. Installation Guide
Professional installation is recommended. Ensure the vehicle's power is disconnected before starting. Refer to your vehicle's specific disassembly instructions for removing the old stereo unit.
4.1. Wiring Connections
Connect the provided wiring harnesses to the corresponding ports on the car stereo and your vehicle's wiring. Pay close attention to the power, speaker, and accessory connections.

Figure 4.1: Rear panel of the Inefala car stereo with labeled ports for power, RCA, USB, camera input, and GPS antenna.
4.2. Backup Camera Installation
The included backup camera requires specific wiring for proper function. Connect the camera's video output to the "Rear Camera Input" on the stereo. The camera's power wire (red) should connect to the vehicle's reverse light power, and the ground wire (black) to a chassis ground point. Ensure the reverse trigger wire from the stereo's harness is connected to the vehicle's reverse light signal.
Video 4.1: This video demonstrates the connection process for the included backup camera to the car stereo unit. It shows how to connect the video cable, power, and ground wires, and how to connect the reverse trigger wire to enable automatic camera display when reversing.

Figure 4.2: Detailed wiring diagram for the backup camera, illustrating connections to the car stereo's video input and the vehicle's reverse light circuit.
5. Operating Instructions
5.1. Initial Setup and Language Settings
Upon first power-on, the system may prompt for initial setup. To adjust the language:
- Go to Settings.
- Select More Settings.
- Choose Language & Input.
- Select Language Settings and then Add a language to select your preferred language.
5.2. Time Settings
To set the correct time:
- Go to Settings.
- Select More Settings.
- Choose Date and Time.
- Enable "The use of GPS to provide time" for automatic synchronization.
5.3. Wi-Fi Connection
Connect to a Wi-Fi network to access online features like YouTube, Google Maps, and app downloads.
- Go to Settings.
- Select Wi-Fi.
- Toggle Use Wi-Fi to ON.
- Select your desired Wi-Fi network from the list and enter the password if prompted.
- For subsequent uses, you can simply swipe down from the top of the screen and tap the Wi-Fi icon to connect.

Figure 5.1: The car stereo supports both online and offline GPS navigation, and can connect to Wi-Fi for internet access.
5.4. Screen Brightness Adjustment
Adjust display brightness for optimal viewing in various lighting conditions.
- Go to Settings.
- Select Display.
- Adjust the Day and Night brightness sliders as needed.
- You can also swipe down from the top of the screen to access quick brightness adjustments.
5.5. Touch Calibration (Five-Point Calibration)
If touch response is inaccurate, perform a touch calibration.
- Go to Settings.
- Select Factory Setup.
- Enter the password: 1234.
- Select Touch Calibration.
- Follow the on-screen prompts to tap the indicated points. For five-point calibration, place all five fingers on the screen simultaneously to activate.
5.6. Touch Button Learning
This feature allows you to customize the function of the physical touch buttons on the unit.
- Go to Settings.
- Select Factory Setup.
- Enter the password: 1234.
- Select Touch Button Learning.
- Follow the on-screen instructions to assign functions to each button.
5.7. Key Learning (Physical Buttons)
This feature allows you to customize the function of the physical buttons on the unit's bezel.
- Go to Settings.
- Select Factory Setup.
- Enter the password: 1234.
- Select Knob Panel Button Learning (or similar, based on UI).
- Follow the on-screen instructions to assign functions to each button.
5.8. Backcar Source Settings
Configure the input source for the backup camera.
- Go to Settings.
- Select Factory Setup.
- Enter the password: 1234.
- Select Backcar Source Settings.
- Choose the appropriate video format (e.g., AHD 720P 25fps, CVBS-N) that matches your backup camera.
5.9. CAN Settings
If your vehicle uses a CANbus system for steering wheel controls or other integrations, configure it here.
- Go to Settings.
- Select Factory Setup.
- Enter the password: 1234.
- Select Can Settings.
- Choose your vehicle's brand and model from the list. If your vehicle is not listed, select "No Can".
5.10. Split Screen Settings
Enable or disable the split-screen function to run two applications simultaneously.
- Go to Settings.
- Select Factory Setup.
- Enter the password: 1234.
- Toggle Split screen function ON/OFF.
- Once enabled, you can swipe down from the status bar to access split-screen options.

Figure 5.2: The split-screen feature allows simultaneous use of two applications, such as navigation and music playback.
5.11. Speed Unit Switch
Change the speed unit displayed on the main screen.
- Tap the speed unit display on the main screen to switch between kilometers per hour (km/h) and miles per hour (mph).
5.12. Clear Memory
To optimize system performance, clear cached memory.
- Swipe down from the top of the screen and tap the "Clean up" or "Clear memory" option.
5.13. Steering Wheel Control Learning
Program your vehicle's steering wheel controls to operate the car stereo.
- Go to SteeringWheelKey app.
- Clear any existing settings if necessary.
- Select a function on the screen (e.g., "Volume+").
- Press and hold the corresponding button on your steering wheel until the system confirms learning.
- Repeat for all desired functions.
Figure 5.3: Steering wheel control interface, allowing users to map vehicle buttons to stereo functions for convenience and safety.
5.14. UI Theme Selection
Customize the visual appearance of the user interface.
- Open the ThemeSelect app.
- Browse through the available themes.
- Select a theme and tap APPLY to change the interface.
5.15. Radio Settings (FM/RDS)
Access and manage radio stations.
- Open the Radio app.
- Use the arrow buttons to tune frequencies or tap directly on the frequency display.
- Use the search icon to scan for available stations.
- The RDS (Radio Data System) feature provides additional information like station name and traffic announcements where available.
Figure 5.4: The car stereo features Bluetooth 5.0 for stable connections, FM/RDS radio, and customizable EQ settings.
5.16. EQ Settings
Customize the audio output with the built-in equalizer.
- Open the Sound Settings app.
- Adjust the frequency bands using the sliders or select from preset modes (e.g., Standard, Rock, Pop, Live, Dance, Classical, Soft, Jazz).
- Use the "Sound Field" option to adjust the audio focus within the vehicle cabin.
5.17. Bluetooth Connection
Connect your smartphone via Bluetooth for hands-free calling and audio streaming.
- Open the BT Call app.
- Ensure Bluetooth is enabled on your smartphone.
- On your phone, search for available Bluetooth devices and select "BLINK_UNW2652" (or similar name displayed on the stereo).
- Confirm the pairing request on both devices.
- Once connected, you can make calls, access contacts, and stream music.
5.18. Wireless Carplay Connection (for iOS)
Connect your iPhone wirelessly for Carplay functionality.
- Open the S-Play app on the car stereo.
- Ensure Bluetooth is enabled on your iPhone.
- Connect your iPhone's Bluetooth to the car stereo (device name: BLINK_UNW2652).
- Follow any on-screen prompts on your iPhone to allow Carplay connection.
- Once connected, the Carplay interface will appear on the stereo screen.
Video 5.1: This video demonstrates the steps to connect your iPhone to the car stereo for Wireless Carplay functionality, including Bluetooth pairing and Carplay activation.

Figure 5.5: The car stereo supports wireless Carplay and Android Auto, allowing seamless integration of smartphone features.
5.19. Wireless Android Auto Connection (for Android)
Connect your Android phone wirelessly for Android Auto functionality.
- Open the S-Play app on the car stereo.
- Ensure Bluetooth is enabled on your Android phone.
- Connect your Android phone's Bluetooth to the car stereo (device name: BLINK_UNW2652).
- Follow any on-screen prompts on your Android phone to allow Android Auto connection.
- Once connected, the Android Auto interface will appear on the stereo screen.
5.20. Mirror Link (Jlink) Connection
Mirror your smartphone screen to the car stereo display.
- Open the Jlink app on the car stereo.
- Connect the car stereo to your mobile phone's hotspot via Wi-Fi.
- For first-time connection, you may need to download the Jlink app on your mobile phone by scanning the QR code provided in the Jlink app on the stereo.
- Once connected to the hotspot, open the Jlink app on your mobile phone and initiate screen casting.
Figure 5.6: Mirror Link functionality allows displaying your smartphone's screen directly on the car stereo.
Video 5.2: This video provides a general function operation demonstration, including aspects of UI navigation, app usage, and potentially mirror link features.
6. Troubleshooting
If you encounter issues, refer to the following common solutions:
- Unit not powering on: Check all power connections (B+, ACC, GND). Ensure the vehicle's fuse for the stereo is intact.
- No sound: Verify speaker wiring connections. Check EQ settings to ensure no channels are muted or set to extreme low volume.
- Touchscreen unresponsive or inaccurate: Perform the "Touch Calibration" as described in Section 5.5.
- Radio changing screens randomly: This could indicate a software glitch or an issue with the CANbus connection. Try performing a factory reset (consult support for specific steps if not in manual) or ensure CAN settings are correct (Section 5.9).
- Navigation issues (e.g., night mode not working): Ensure GPS antenna is properly installed and has a clear view of the sky. Check time settings (Section 5.2) and map application settings for day/night mode preferences. Update map data if possible.
- Bluetooth/Carplay/Android Auto connection issues: Ensure Bluetooth is enabled on both devices. Forget previous pairings on both the stereo and your phone, then re-pair. Ensure the S-Play app is running. Check for any conflicting Wi-Fi connections if using wireless Carplay/Android Auto.
- Steering wheel controls not working: Verify CANbus settings (Section 5.9) and perform "Steering Wheel Control Learning" (Section 5.13). Ensure the correct protocol is selected.
- Backup camera not displaying: Check the camera's video input connection and ensure the reverse trigger wire is correctly connected and receiving power when the vehicle is in reverse. Verify "Backcar Source Settings" (Section 5.8).
For persistent issues, please contact customer support.
7. Specifications
| Feature | Detail |
|---|---|
| Brand | Inefala |
| Model Number | B0FHH5SYDS |
| Screen Size | 9 Inches |
| Screen Resolution | 1280*720 HD |
| Operating System | Android 15 |
| Memory Storage Capacity | 64 GB |
| Connectivity Technology | Bluetooth, USB, Wi-Fi |
| Special Features | EQ, Bluetooth, FM/RDS, SWC & Backup Camera, Touchscreen, WiFi & GPS Navigation, Wireless IOS Carplay Android Auto & Mirror Link |
| Compatible Vehicle Types | Dodge Grand Caravan 2011-2020, Chrysler Grand Voyager 2011-2015, Chrysler Town & Country 2011-2016 |
| Item Dimensions (L x W x H) | 9.65"L x 5.52"W x 2.36"H |
8. Warranty and Support
Inefala provides comprehensive support for its products.
- Warranty: 24 months quality assurance from the date of purchase.
- Returns: 30 days free return policy.
- Customer Support: Online consultation support available, with responses typically within 24 hours.
For any quality issues or questions, please contact Inefala-US directly. Your concerns will be addressed promptly.
Contact Email: inefalatech@163.com

Figure 8.1: Information on how to contact customer support and details regarding warranty and return policies.
Related Documents - B0FHH5SYDS
 |
Inefala 1DIN CarPlay Manual: Single-Din Car Player User Guide Comprehensive user manual for the Inefala 1DIN CarPlay car stereo. Learn about installation, features like Apple CarPlay, Android Auto, MirrorLink, Bluetooth, USB playback, radio functions, and troubleshooting. |
 |
F133 7-Inch Smart Player User Manual - Inefala User manual for the Inefala F133 7-Inch Smart Player, a multifunctional portable car media player featuring Apple CarPlay, Android Auto, screen mirroring, Bluetooth connectivity, FM transmission, and media playback from TF/USB. Includes setup instructions, interface details, and troubleshooting. |
 |
Inefala Single DIN Car Stereo User Manual and Specifications Comprehensive user manual for the Inefala Single DIN Car Stereo, detailing function introduction, disassembly, accessories, and power supply pin definitions. Features include a 7-inch flip-out retractable touchscreen, Bluetooth, USB/Type-C, and backup camera support. |
 |
Modifying a 2010-2015 Toyota Prius Android Audio Head Unit with Factory Features A guide detailing the process of replacing a JBL audio system in a 2010-2015 Toyota Prius with an Android audio head unit, integrating factory features like the antenna, GPS, backup camera, and microphone. |
 |
Inefala In-Vehicle Media Player Data Handling and User Rights This document outlines the data handling policies for the Inefala in-vehicle media player, detailing data generation, collection, processing, storage, security, and user rights in compliance with EU regulations like the EU Data Act. |