1. Introduction
Welcome to the user manual for your new Tattoo Gizmo Stencil Wireless Printer MHT-500. This portable thermal transfer printer is designed to create high-resolution tattoo stencils with ease and precision. Featuring a built-in display screen, Bluetooth, and USB connectivity, it offers compatibility with Android, iOS, and Windows devices, making it a versatile tool for tattoo artists. Its lightweight design and ink-free thermal technology ensure a clean, efficient, and professional stencil printing experience.

The Tattoo Gizmo MHT-500 printer in operation, producing a high-resolution tattoo stencil. A smartphone connected wirelessly displays the design being printed, highlighting the device's seamless connectivity.
2. Safety Information
- Do not disassemble or modify the printer. This may cause damage or injury and will void the warranty.
- Keep the printer away from water, moisture, and direct sunlight.
- Use only the specified power adapter and USB cable provided with the printer.
- Ensure proper ventilation around the printer during operation.
- Keep out of reach of children.
- Avoid touching the thermal print head immediately after printing, as it may be hot.
3. Product Overview
3.1 Package Contents
Upon unboxing your Tattoo Gizmo MHT-500 printer, please verify that all the following items are included:
- Tattoo Gizmo MHT-500 Stencil Wireless Printer
- USB-C to USB-A Charging/Data Cable
- User Manual
- Sample Thermal Stencil Paper
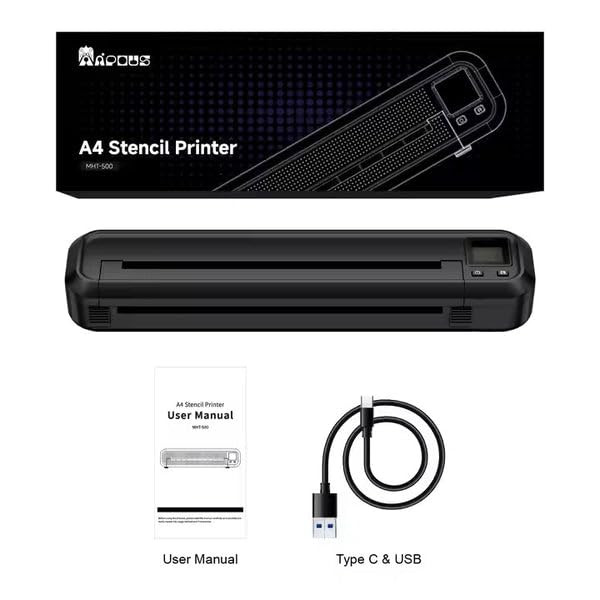
The standard contents included with your Tattoo Gizmo MHT-500 printer: the MHT-500 thermal printer unit, a comprehensive user manual, and a USB-C to USB-A charging and data cable.
3.2 Printer Components
Familiarize yourself with the main components of your MHT-500 printer:
- Paper Feed Slot: Where stencil paper is inserted for printing.
- Control Panel: Includes power button, paper feed button, and indicator lights.
- Display Screen: Shows printer status, connectivity, and allows previewing designs.
- USB-C Port: For charging and wired connection to a computer.
- Power Indicator: Shows battery status and charging.
- Bluetooth Indicator: Shows Bluetooth connection status.
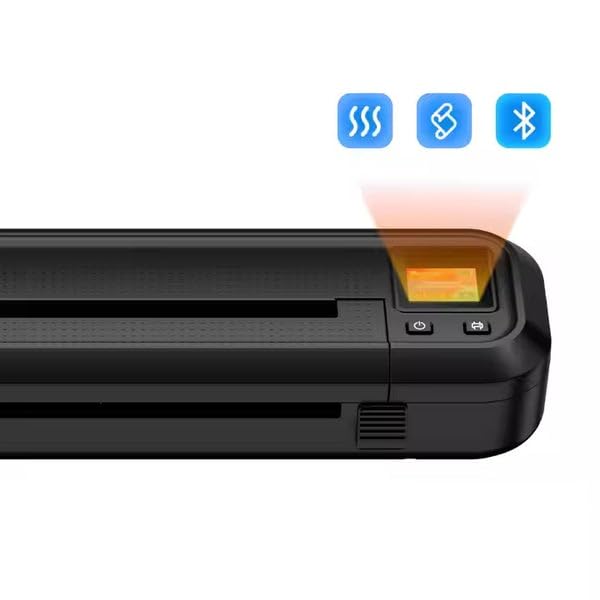
A detailed view of the printer's control panel, featuring the power button, paper feed button, and a small display screen. Indicators for Bluetooth and signal strength are visible, demonstrating the printer's connectivity options.
4. Setup
4.1 Charging the Printer
Before first use, fully charge the printer. Connect the provided USB-C cable to the printer's USB-C port and the other end to a compatible USB power adapter (not included) or a computer's USB port. The power indicator light will show charging status and turn solid when fully charged. The printer features a built-in 2500mAh Lithium Ion rechargeable battery.
4.2 Initial Setup and Connectivity
The MHT-500 printer supports both Bluetooth and USB connections.
- Power On: Press and hold the power button on the control panel until the display screen illuminates.
- Bluetooth Connection (Recommended):
- Ensure Bluetooth is enabled on your smartphone, tablet, or computer.
- Open the dedicated Tattoo Gizmo printing application (available for Android and iOS) or your preferred printing software on Windows/Mac OS.
- Search for available devices and select "MHT-500" or "Tattoo Printer MHT-500" from the list.
- Confirm the pairing on both devices if prompted. The Bluetooth indicator on the printer will become solid when connected.
- USB Connection:
- Connect the printer to your computer using the provided USB-C cable.
- The printer should be recognized as a standard printing device. Install any necessary drivers if prompted by your operating system.

The Tattoo Gizmo MHT-500 printer demonstrates broad compatibility, connecting seamlessly with iOS, Android, Windows, and Mac OS devices for flexible use.
5. Operating Instructions
5.1 Preparing Stencil Paper
The MHT-500 uses thermal transfer paper, typically consisting of multiple layers. Proper preparation ensures a clear stencil.
- Remove Protective Paper: Carefully separate and remove the thin, translucent protective sheet from the top layer of the stencil paper.
- Tear Off Yellow Backing Paper: Detach the yellow backing paper, leaving the carbon sheet and the transfer sheet.
- Insert Paper: With the printer powered on, gently insert the prepared stencil paper into the paper feed slot. Ensure the paper is aligned straight to prevent skewed prints. The printer will automatically pull the paper into position.
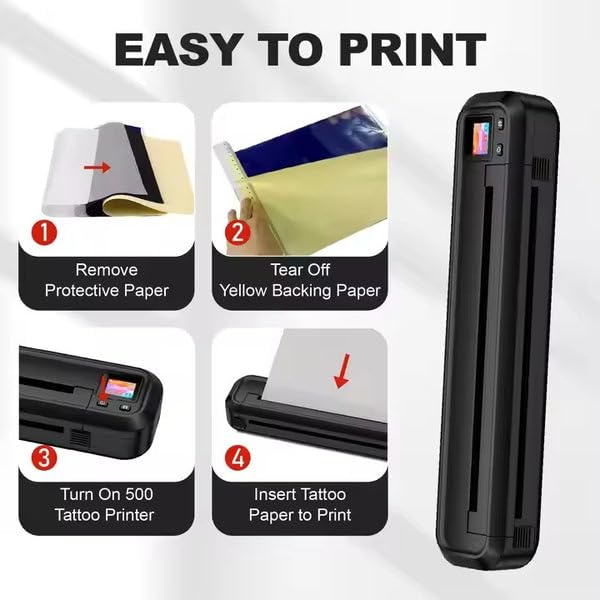
This visual guide illustrates the simple steps for preparing and loading stencil paper into the MHT-500 printer for optimal printing results.
Tip for Clearer Templates: For optimal results, ensure the carbon paper is on top when inserting. If your paper has a transfer paper layer, remove it first before inserting the carbon paper side up.
5.2 Printing a Stencil
Once the printer is connected and paper is loaded, you can proceed with printing:
- Prepare Your Design: Open your tattoo design on your connected device (smartphone, tablet, or computer).
- Open Printing Application: Launch the Tattoo Gizmo app or your preferred printing software.
- Select Printer: Ensure the MHT-500 is selected as the active printer.
- Adjust Settings: Use the app/software to adjust print settings such as print density, mirror image (essential for tattoo stencils), and size. The built-in display screen on the printer allows for quick preview and adjustment of designs before printing.
- Print: Initiate the print command from your device. The printer will feed the paper and create the stencil.
- Retrieve Stencil: Once printing is complete, gently remove the printed stencil from the output slot.
The MHT-500 produces sharp, clean, and detailed tattoo stencils, ensuring professional-quality transfers every time.
5.3 Transferring the Stencil
After printing, the stencil is ready for transfer to the skin:
- Crop to Fit: Carefully cut out the printed tattoo pattern from the stencil paper, ensuring it fits the desired area on the skin.
- Prepare Skin: Cleanse and prepare the skin area where the tattoo will be applied. Apply a thin, even layer of stencil transfer solution or ointment.
- Paste Stencil: Firmly press the stencil onto the prepared skin, ensuring full contact. Hold in place for a few seconds.
- Remove Stencil: Gently peel off the stencil paper, leaving the clear tattoo outline on the skin.
- Allow to Dry: Let the transferred stencil dry completely before beginning the tattooing process.
Any unwanted stencil marks can typically be wiped away with alcohol.
6. Maintenance
6.1 Cleaning the Printer
- Exterior: Wipe the exterior of the printer with a soft, dry, lint-free cloth. Do not use abrasive cleaners or solvents.
- Print Head: If print quality degrades, the thermal print head may need cleaning. Refer to the specific cleaning instructions in the full user manual or contact support. Generally, a cotton swab lightly dampened with isopropyl alcohol can be used to gently wipe the print head when the printer is off and cool.
- Paper Path: Periodically check the paper path for any paper dust or debris and remove it carefully.
6.2 Storage
- Store the printer in a cool, dry place, away from direct sunlight and extreme temperatures.
- If storing for an extended period, ensure the battery is partially charged (around 50%) to maintain battery health.
- Keep the printer covered to prevent dust accumulation.

The MHT-500 printer's compact size and lightweight design make it highly portable, easily fitting into a bag for convenient transport and storage.
7. Troubleshooting
If you encounter issues with your Tattoo Gizmo MHT-500 printer, please refer to the following common problems and their solutions:
| Problem | Possible Cause | Solution |
|---|---|---|
| Printer not turning on | Low battery; Power button not pressed correctly | Charge the printer fully; Press and hold the power button for a few seconds. |
| Cannot connect via Bluetooth | Bluetooth off on device; Printer not in pairing mode; Interference | Ensure Bluetooth is on; Restart printer and device; Move closer to printer; Check for other Bluetooth devices. |
| Poor print quality / Faded prints | Low battery; Incorrect paper insertion; Dirty print head; Low print density setting | Charge printer; Re-insert paper correctly; Clean print head; Increase print density in app/software. |
| Paper jam | Paper inserted incorrectly; Damaged paper | Turn off printer, gently pull out jammed paper; Ensure paper is straight and undamaged before inserting. |
| Printer not recognized by computer (USB) | Driver issue; Faulty USB cable/port | Try a different USB port/cable; Reinstall printer drivers; Restart computer. |
8. Specifications
| Feature | Detail |
|---|---|
| Model | MHT-500 |
| Printing Technology | Thermal Transfer |
| Connectivity | Bluetooth, USB |
| Compatible Operating Systems | Android, iOS, Windows, Mac OS |
| Maximum Media Size | A4 (8.3 x 11.7 Inches) |
| Printer Output | Monochrome |
| Print Resolution | 203 DPI |
| Max Print Speed | 10 ppm (Monochrome) |
| Battery Type | Rechargeable Lithium Ion |
| Battery Capacity | 2500 mAh |
| Product Dimensions (L x W x H) | 26.7D x 9.5W x 5.1H Centimeters |
| Item Weight | 750 Grams (0.75 kg) |
| Color | Black |
9. Warranty and Support
The Tattoo Gizmo Stencil Wireless Printer MHT-500 comes with a standard manufacturer's warranty. Please refer to the warranty card included in your package for specific terms and conditions, including warranty period and coverage details.
For technical support, troubleshooting assistance, or warranty claims, please contact Tattoo Gizmo customer service.
Tattoo Gizmo Customer Support:
Please visit the official Tattoo Gizmo website or refer to the contact information provided on your product packaging or warranty card for the most up-to-date support channels.
You can also visit the Tattoo Gizmo Store on Amazon for more product information and support resources.


