1. Introduction
The Preciva LF326 Digital Caliper is a professional-grade measuring instrument designed for precise measurements in various applications, including professional, mechanical, electrical, and DIY tasks. This manual provides detailed instructions on how to set up, operate, maintain, and troubleshoot your digital caliper to ensure accurate and reliable performance.
2. Product Overview
2.1. Key Features
- High Precision Measurement: Offers a measuring range of 0-150 mm (0-6 inches) with a resolution of 0.01 mm (0.0005 inches) and an accuracy of ±0.01 mm.
- Large LCD Display: Features a large, backlit digital screen for clear and immediate readings, even in low-light conditions.
- USB Type-C Rechargeable: Equipped with a Type-C rechargeable battery, providing 3 to 6 months of daily use on a single 50-minute charge.
- IP54 Protection: Constructed from high-quality hardened stainless steel, making it resistant to dust, rust, and water splashes from all directions.
- Versatile Measurement Modes: Capable of measuring inner diameter, outer diameter, depth, and step measurements.
- User-Friendly Functions: Includes mm/inch conversion, zero-setting at any point, and a locking screw for stable measurements.
2.2. Product Components
Refer to the diagram below for an overview of the digital caliper's main components.

Image: Detailed view of the Preciva Digital Caliper showing its components, including inner diameter claw, charging port, LCD display, unit conversion key, power switch, fastening screws, caliper body, roller, zero key, outer measuring jaws, and depth measuring rod.
- Inner Diameter Claw: Used for measuring internal dimensions.
- Charging Port: USB Type-C port for recharging the internal battery.
- LCD Display: Digital screen showing measurement readings, units, and battery status.
- Unit Conversion Key: Button to switch between millimeters (mm) and inches (in).
- Power Switch: Button to turn the caliper ON/OFF.
- Fastening Screws: Secures the display unit to the main body.
- Caliper Body: The main frame of the measuring tool.
- Roller: Thumb roller for fine adjustment of the measuring jaws.
- Zero Key: Button to reset the display to zero at any position.
- Outer Measuring Jaws: Used for measuring external dimensions.
- Depth Measuring Rod: Extends from the end of the caliper for depth measurements.
3. Setup
3.1. Unpacking and Inspection
Carefully unpack the Preciva Digital Caliper and all accessories. Verify that all items listed below are present and undamaged:
- Preciva Digital Caliper (x1)
- USB Type-C Charging Cable (x1)
- Hard Protective Case (x1)
- User Manual (x1)
If any items are missing or damaged, please contact customer support.
3.2. Initial Charging
Before first use, it is recommended to fully charge the digital caliper. Connect the provided USB Type-C charging cable to the caliper's charging port and to a standard USB power adapter (5V/3A or lower, not included).

Image: The digital caliper being charged via a USB Type-C cable connected to a laptop. The image highlights the charging port and the battery indicator on the LCD screen.
A full charge typically takes approximately 50 minutes and provides 3 to 6 months of usage. The LCD display will show a charging indicator.
4. Operating Instructions
4.1. Power On/Off
Press the ON/OFF button to turn the caliper on. The LCD display will illuminate. To turn off the caliper, press and hold the ON/OFF button, or it will automatically power off after 5 minutes of inactivity.
4.2. Zero Setting
Before taking a measurement, ensure the jaws are fully closed and clean. Press the ZERO button to set the display to zero. This allows for relative measurements from any point.
4.3. Unit Conversion (mm/inch)
Press the in/mm button to switch between millimeter (mm) and inch (in) units. The selected unit will be displayed on the LCD screen.
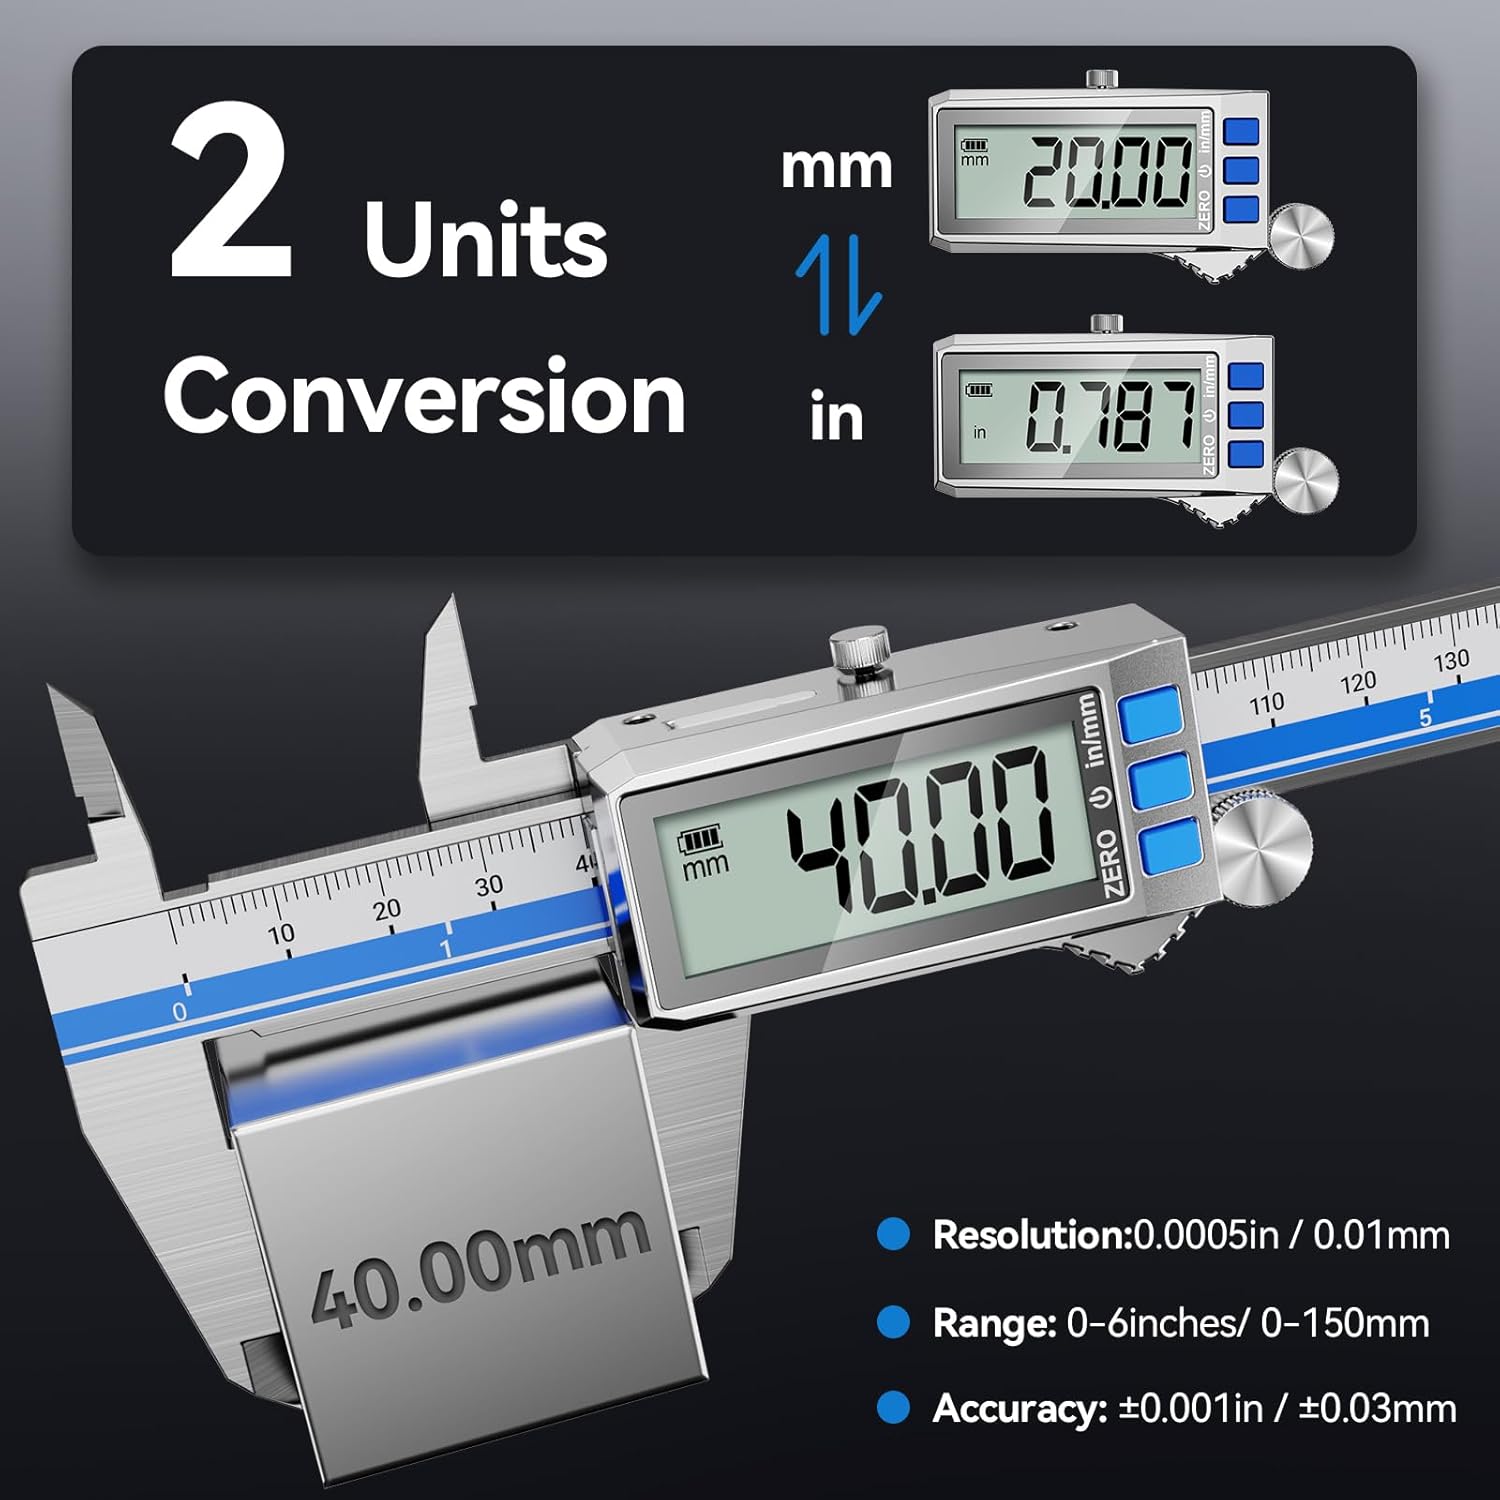
Image: The digital caliper's LCD display showing measurements in both millimeters (mm) and inches (in), illustrating the unit conversion feature. The image also highlights the resolution, range, and accuracy.
4.4. Taking Measurements
The Preciva Digital Caliper can perform four types of measurements:

Image: A composite image demonstrating the four primary measurement types: inside measurement using the inner jaws, outside measurement using the outer jaws, depth measurement using the depth rod, and step measurement using the step face.
- Outside Measurement: Use the large outer jaws to measure external dimensions of objects.
- Inside Measurement: Use the small inner jaws to measure internal dimensions, such as bore diameters.
- Depth Measurement: Extend the depth measuring rod into a hole or recess to measure its depth.
- Step Measurement: Use the step face at the end of the fixed jaw to measure the height difference between two surfaces.
For stable readings, use the thumb roller for fine adjustments and the locking screw to secure the jaws in place after taking a measurement.
5. Maintenance
5.1. Cleaning
Regularly clean the measuring surfaces and the main body of the caliper with a clean, dry, lint-free cloth. Avoid using solvents or abrasive cleaners, as they may damage the display or the caliper's finish. Ensure no dust or debris accumulates in the sliding mechanism.
5.2. Storage
When not in use, store the digital caliper in its hard protective case to prevent damage from impacts, dust, and moisture. Store in a dry environment at room temperature.
5.3. Battery Care
Recharge the caliper when the battery indicator on the LCD display shows low power. Avoid completely draining the battery for extended periods to prolong its lifespan. Use only the provided USB Type-C cable or a compatible cable for charging.
5.4. Protection Features

Image: The digital caliper showcasing its "Triple Protection" features: IP54 Waterproof, Anti-Rust, and Stainless Steel construction. It also illustrates the slidable mechanism and the lockable screw for securing measurements.
The caliper is designed with IP54 protection, making it resistant to dust and water splashes. Its stainless steel construction provides anti-rust properties. However, it is not fully submersible and should not be exposed to excessive moisture or corrosive substances.
6. Troubleshooting
| Problem | Possible Cause | Solution |
|---|---|---|
| Display does not turn on. | Low battery or completely discharged. | Charge the caliper using the USB Type-C cable. |
| Inaccurate readings. | Jaws are not clean or fully closed before zeroing. Debris on measuring surfaces. | Clean the measuring jaws and surfaces. Close jaws completely and press the ZERO button. |
| Display shows "E" or error message. | Measurement range exceeded or internal error. | Ensure measurement is within the 0-150mm range. Turn the caliper off and on again. If the problem persists, contact customer support. |
| Difficulty sliding jaws. | Dust or debris in the sliding mechanism. | Clean the sliding rail thoroughly. Avoid applying excessive force. |
7. Specifications
| Feature | Specification |
|---|---|
| Model Number | LF326 |
| Measuring Range | 0 - 150 mm (0 - 6 inches) |
| Resolution | 0.01 mm (0.0005 inches) |
| Accuracy | ±0.01 mm |
| Material | Hardened Stainless Steel |
| Display | Large Backlit LCD |
| Power Source | Rechargeable Lithium Battery (USB Type-C) |
| Charging Time | Approx. 50 minutes |
| Battery Life | 3 - 6 months (typical daily use) |
| Ingress Protection (IP) Rating | IP54 (Dust and splash resistant) |
| Auto Power-Off | After 5 minutes of inactivity |
| Product Dimensions | 24L x 8W cm (approx. 20 x 9 x 0.1 cm) |
| Product Weight | 300 grams |
8. Warranty and Support
Preciva products are manufactured to high-quality standards. For warranty information or technical support, please refer to the contact details provided with your purchase documentation or visit the official Preciva website.
Please retain your proof of purchase for warranty claims.


