HOSTACK Wide Kitchen Pantry
HOSTACK 71" Tall Pantry Cabinet with Charging Station Instruction Manual
Model: Wide Kitchen Pantry
Introduction
This manual provides detailed instructions for the assembly, operation, and maintenance of your HOSTACK 71" Tall Pantry Cabinet with Charging Station. Please read this manual thoroughly before assembly and use to ensure proper function and safety. Keep this manual for future reference.
Important Safety Information
- Anti-Tipping Device: To prevent tipping, ensure the anti-tipping device is properly installed. This is crucial for stability and safety, especially in households with children or pets.
- Assembly: Two adults are recommended for assembly due to the large size and weight of the cabinet.
- Weight Limit: Do not exceed the maximum weight limit of 275 pounds for the entire unit. Distribute weight evenly across shelves and drawers.
- Electrical Safety: When using the built-in charging station, ensure all connected appliances and devices are within the specified voltage and amperage limits (120V/12A for AC outlets, 5V/2A for USB ports). Always use the on-off switch to power down the charging station when not in use or during maintenance.
- Placement: Place the cabinet on a flat, stable surface. Avoid placing it in areas with excessive moisture or direct sunlight.
Package Contents
Your HOSTACK Pantry Cabinet package includes the following items:
- 1x Farmhouse Pantry (main cabinet components)
- 1x Accessories Bag (containing hardware, screws, etc.)
- 1x Instructions Manual (this document)
Note: The product may be shipped in two separate boxes. Please ensure all components are present before beginning assembly.
Setup and Assembly
Assembly of the HOSTACK Pantry Cabinet requires attention to detail. Follow the included step-by-step instructions carefully. It is recommended that two adults perform the assembly due to the size and weight of the components.
- Unpack Components: Carefully unpack all parts and hardware. Verify against the parts list in the included instruction booklet.
- Prepare Workspace: Clear a spacious area for assembly to prevent damage to the product or your flooring.
- Follow Step-by-Step Instructions: Refer to the detailed assembly guide provided in your package for specific steps on constructing the base, drawers, countertop, and upper cabinets.
- Install Anti-Tipping Device: Once assembled, securely attach the anti-tipping device to the wall as per the instructions to prevent accidental tipping.

Figure 1: Fully assembled HOSTACK Pantry Cabinet.
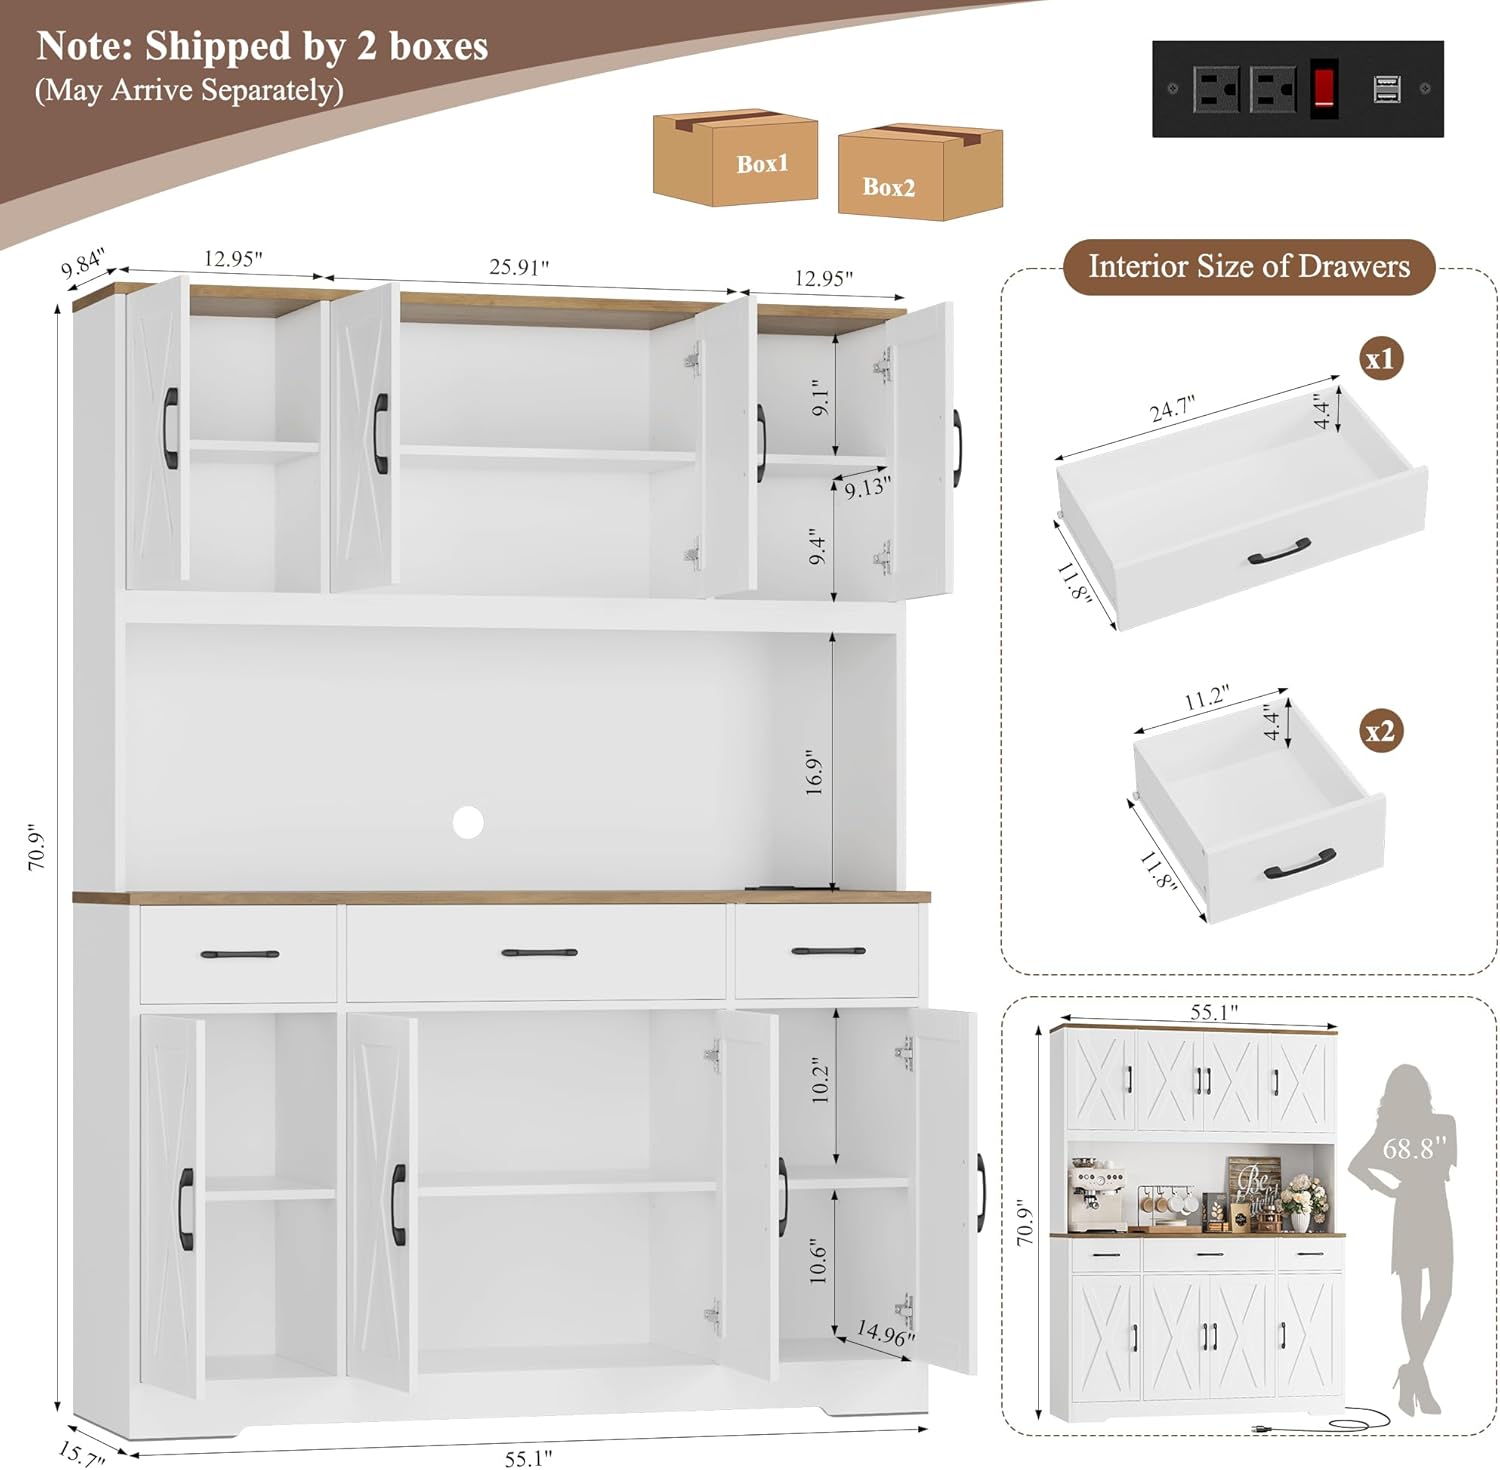
Figure 2: Dimensions and shipping information for the pantry cabinet.
Video 1: Overview of the HOSTACK 71" Tall Kitchen Pantry Storage Cabinet with Charging Station, demonstrating its features and potential uses.
Operating Features
Storage Compartments
The cabinet features 6 generous cabinets with adjustable shelves and 3 deep drawers, providing ample storage for various items.
- Adjustable Shelves: The shelves within the upper and lower cabinets can be adjusted to different heights to accommodate items of varying sizes. Simply remove the shelf pins, reposition the shelf to the desired height, and reinsert the pins securely.
- Drawers: Three easy-glide drawers are located below the countertop, ideal for organizing smaller kitchen tools, utensils, or pantry staples.

Figure 3: Overview of the spacious storage with adjustable shelves and drawers.

Figure 4: Detailed view of the three deep storage drawers.
Built-in Charging Station
The cabinet includes a built-in charging station on the 55" wide countertop, designed for convenience and safety.
- Power Outlets: Equipped with 2 AC outlets (120V/12A) and 2 USB ports (5V/2A) for powering small appliances like coffee makers, toasters, or charging mobile devices.
- On-Off Switch: A dedicated switch allows you to easily power the charging station on or off, enhancing safety and energy efficiency.
- Cable Management Hole: A discreet hole is provided for routing cables, keeping the countertop tidy and organized.

Figure 5: The built-in charging station with AC outlets and USB ports.
Maintenance
- Cleaning: Wipe surfaces with a soft, damp cloth. Avoid harsh chemicals or abrasive cleaners that may damage the finish.
- Hardware: Periodically check all screws and fasteners to ensure they are tight. Re-tighten as necessary.
- Door Hinges: If doors become misaligned or do not close properly, refer to the troubleshooting section for adjustment instructions.
Troubleshooting
Door Alignment Issues
If your cabinet doors are not aligning correctly, have gaps, or overlap, you can adjust the hinges. The hinges have multiple adjustment screws to fine-tune the door position.
- Vertical Adjustment (Screws A & B): To adjust the door vertically (up or down), loosen screws A and B on the hinge. Adjust the door to the desired height, then re-tighten screws A and B.
- Horizontal Adjustment (Screw C): To adjust the door horizontally (left or right), turn screw C on the hinge. Turning clockwise moves the door in one direction, counter-clockwise in the other.
- Depth Adjustment (Screw D): To adjust the gap between the door and the cabinet frame (flushness), loosen screw D, push the door in or pull it out as needed, then re-tighten screw D.
Video 2: Detailed guide on how to adjust cabinet door hinges to correct alignment, gaps, or flushness issues.
Specifications
| Feature | Detail |
|---|---|
| Brand | HOSTACK |
| Model Name | 55" Wide Kitchen Hutch Cabinet |
| Color | White |
| Product Dimensions | 15.7"D x 55.12"W x 71"H |
| Item Weight | 157.6 pounds (71.65 Kilograms) |
| Material | Engineered Wood |
| Mounting Type | Freestanding |
| Number of Shelves | 7 |
| Number of Drawers | 3 |
| Weight Limit | 275 Pounds |
| Special Features | 55" Wide Kitchen Hutch, Adjustable Shelf, with Charging Station, with Large Countertop, with Storage Drawers |
| Charging Station | 2 AC Outlets (120V/12A), 2 USB Ports (5V/2A), On-Off Switch |
| Assembly Required | Yes |
Ask a question about this manual
Ask about setup, troubleshooting, compatibility, parts, safety, or missing instructions. Manuals+ will review the question and use this page’s manual context to help answer it.