1. Introduction
This manual provides essential instructions for the safe operation, setup, and maintenance of your FLYWING BELL-412 470-Class RC Military Helicopter. Please read this manual thoroughly before operating the helicopter to ensure proper function and to prevent damage or injury.
The BELL-412 is a high-performance 470-class RC helicopter featuring advanced GPS positioning, auto-return functions, and multiple flight modes suitable for both beginners and advanced enthusiasts. Its realistic military scale design and flybarless (FBL) rotor system offer precise control and an immersive flight experience.
2. Safety Information
Operating an RC helicopter requires caution and responsibility. Failure to operate this product safely can result in injury or property damage. Always adhere to the following safety guidelines:
- Age Recommendation: This product is recommended for users aged 16 and above.
- Flight Environment: Operate in open, clear areas away from people, animals, buildings, and power lines. Avoid flying near airports or restricted airspace.
- Weather Conditions: Do not fly in strong winds, rain, snow, or other adverse weather conditions.
- Pre-Flight Check: Always perform a thorough pre-flight check, including battery levels, propeller security, and control surface functionality.
- Battery Safety: Use only the specified battery and charger. Follow all battery charging and handling instructions to prevent fire or explosion.
- Propeller Hazard: Keep hands, face, and loose clothing away from rotating propellers. The propellers can cause severe injury.
- Supervision: Beginners should always operate under the supervision of an experienced RC pilot.
- Respect Local Regulations: Be aware of and comply with all local laws and regulations regarding RC aircraft operation.
3. Package Contents
Verify that all items listed below are included in your package. If any items are missing or damaged, please contact customer support.
- RC Helicopter Body (assembled)
- Hand-made Painted Integrated Case
- Battery
- Electronic Display Charger
- Transmitter
- Multi-tool Set
- USB Charging Cable
- Instruction Manual (this document)
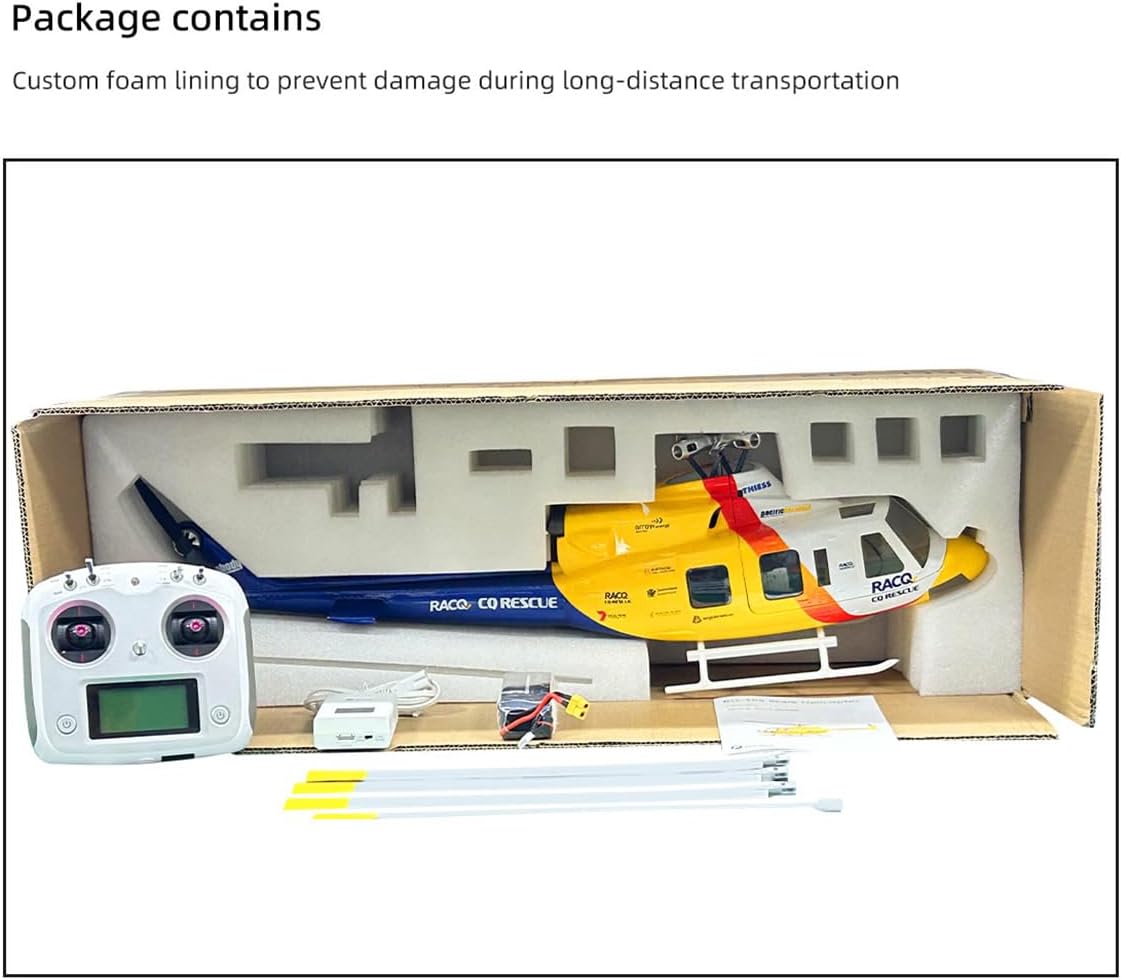
Image 3.1: Contents of the FLYWING BELL-412 RTF package.
The image displays the complete package contents, including the assembled BELL-412 helicopter, the remote control transmitter, a battery, an electronic charger, a multi-tool, and a USB charging cable, all securely nestled within custom foam packaging inside a cardboard box.
4. Specifications
| Feature | Detail |
|---|---|
| Model | BELL-412 (UIL17JSU1GP3208ZPGH6Q4) |
| Body Length (excluding propellers) | 750mm |
| Body Height | 170mm |
| Body Width | 240mm |
| Weight (excluding battery) | 1000g |
| Main Rotor Diameter (wingspan) | 810mm |
| Main Rotor Length (single) | 360mm |
| Tail Rotor Diameter (wingspan) | 125mm |
| Tail Drive Motor | 2008 brushless motor |
| Main Motor | 3508 brushless motor |
| ESC | 60A dual brushless speed regulator |
| Flight Controller | H1 Flight Controller |
| Satellite Positioning Module | GPS/GLONASS with omnidirectional positioning |
| Hovering Accuracy (Horizontal) | ±1.5m (with GPS) |
| Hovering Accuracy (Vertical) | ±0.5m (with GPS) |
| Recommended Age | 16 years and up |
5. Setup Guide
5.1. Battery Charging
Before first use, fully charge the helicopter battery using the provided electronic display charger. Ensure the charger is connected to a suitable power source and the battery is correctly attached. Monitor the charging process and disconnect once fully charged.
5.2. Transmitter Preparation
Install the required batteries into the transmitter (refer to the transmitter's specific manual for battery type and installation). Power on the transmitter and ensure it is linked to the helicopter. The RTF (Ready-To-Fly) version typically comes pre-bound, but refer to the transmitter manual for binding procedures if necessary.
5.3. Pre-Flight Inspection
Before every flight, perform the following checks:
- Ensure all main and tail rotor blades are securely attached and free from damage.
- Check that the helicopter's battery is fully charged and securely installed.
- Verify the transmitter battery level is sufficient.
- Confirm all control surfaces move freely and correctly in response to transmitter inputs.
- Inspect the helicopter for any visible damage or loose components.

Image 5.1: Fully assembled FLYWING BELL-412 helicopter.
This image presents the complete FLYWING BELL-412 RC Military Helicopter, highlighting its detailed fuselage, main rotor, tail rotor, and landing skids. This view is typical of the helicopter after initial setup and pre-flight checks.
6. Operating Instructions
6.1. Flight Modes
The BELL-412 features multiple flight modes to accommodate various skill levels and flight preferences:
- GPS Self-Stabilization Mode: Ideal for beginners, this mode utilizes GPS and the H1 flight controller for stable hovering and easy control. It maintains position and altitude automatically.
- 3D Manual Mode: For advanced pilots, this mode allows for aggressive maneuvers, flips, rolls, and other aerobatic stunts. Stability assistance is minimal.
- One-Key Inverted Flight: A specialized mode for performing inverted flight with a single command.
- Semi-Automatic Assisted Flight: Includes functions like circular flight and 8-shaped route flight, where the helicopter follows a pre-programmed path while allowing rudder control.

Image 6.1: Automatic Route Modes (Circular and Figure-8).
This image visually explains the semi-automatic assisted flight modes, specifically the "O Fly" (circular) and "8 Fly" (figure-eight) routes. The helicopter follows these horizontal flight paths automatically, with the user retaining rudder control for directional adjustments.
6.2. GPS Positioning and Auto-Return Functions
The integrated GPS/GLONASS module provides precise positioning and enables several safety features:
- One-Key Return: Pressing the return button on the transmitter will command the helicopter to automatically return to its takeoff point and land.
- Low Battery Return: If the helicopter's battery voltage drops below a pre-set threshold, it will automatically initiate a return-to-home sequence to prevent a crash.
- Out of Control Return: In case of signal loss between the transmitter and helicopter, the helicopter will automatically return to its takeoff point.
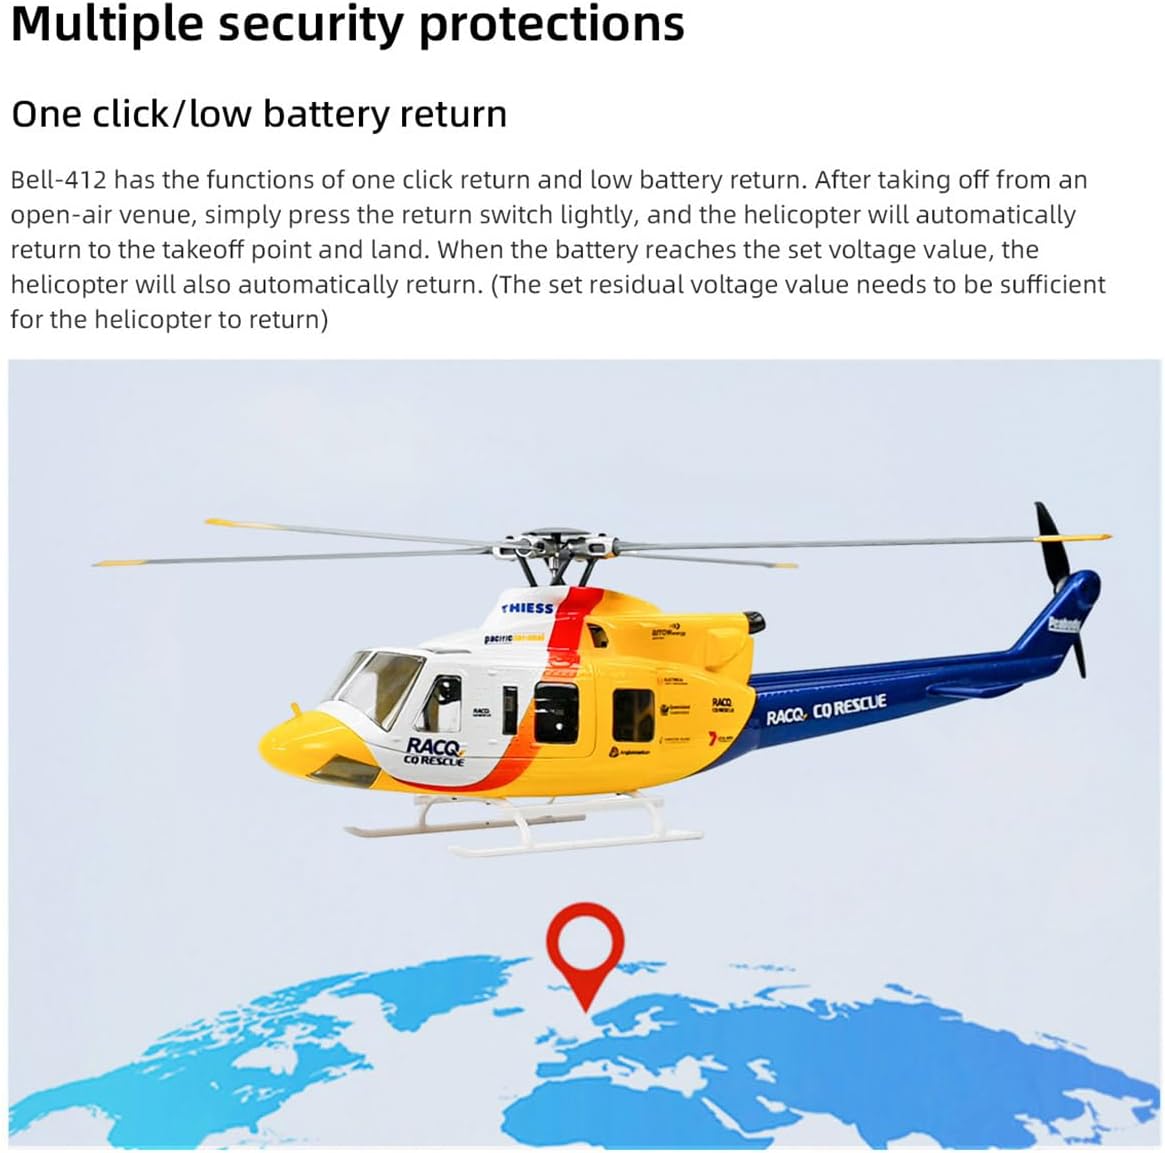
Image 6.2: Multiple Security Protections (GPS Return).
This image depicts the BELL-412 helicopter with a location pin on a global map, symbolizing its GPS positioning and auto-return functions. It visually represents the helicopter's ability to return to its takeoff point due to a single command, low battery, or signal loss.
7. Maintenance
7.1. General Care
- Keep the helicopter clean and free from dust and debris. Use a soft, dry cloth for cleaning.
- Store the helicopter and its components in a cool, dry place, away from direct sunlight and extreme temperatures.
- Regularly inspect all screws and fasteners to ensure they are tight.
- Check for any signs of wear or damage on the fuselage, landing gear, and electronic components.
7.2. Propeller and Rotor Head Maintenance
The BELL-412 features a new 4-blade rotor head and quick-release propellers for easy maintenance.
- Inspection: Before each flight, inspect the main and tail rotor blades for cracks, chips, or deformation. Damaged blades must be replaced immediately.
- Replacement: The quick-detachable propeller system allows for rapid blade replacement. Simply unclip or unscrew the damaged blade and replace it with a new one. Ensure the new blade is securely fastened.
- Belt Replacement: The torsion-spring belt pulley system facilitates belt replacement in under a minute. Refer to the detailed assembly diagram for specific steps if belt replacement is required.
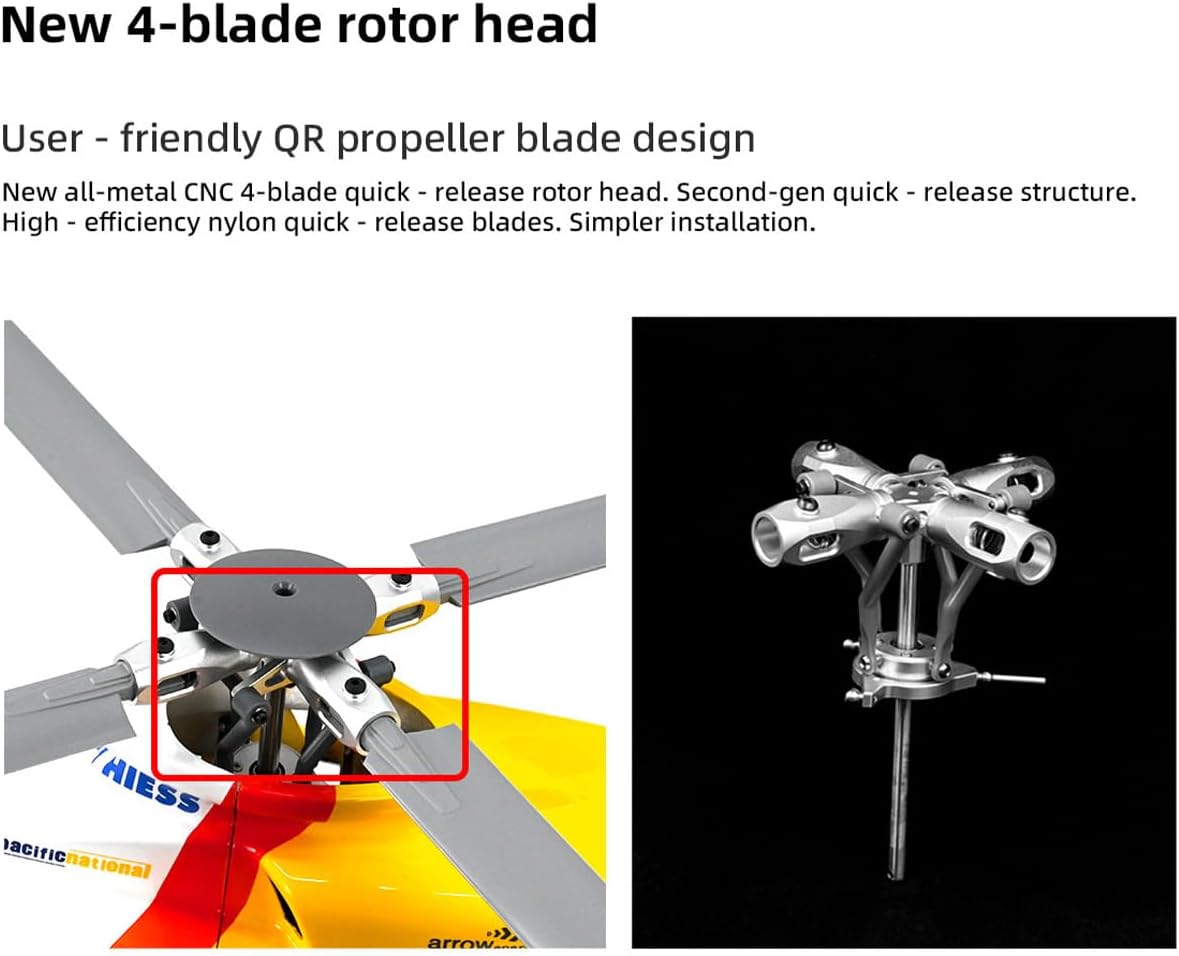
Image 7.1: New 4-Blade Rotor Head and Quick-Release Propeller Design.
This image provides a detailed view of the helicopter's advanced 4-blade rotor head. The left side shows the rotor head with blades attached, highlighting the quick-release mechanism. The right side displays the all-metal CNC rotor head assembly separately, emphasizing its robust construction and user-friendly design for simpler installation and maintenance.
8. Troubleshooting
| Problem | Possible Cause | Solution |
|---|---|---|
| Helicopter does not power on. | Battery not connected or discharged; power switch off. | Ensure battery is fully charged and properly connected. Turn on the helicopter's power switch. |
| No response from controls. | Transmitter not powered on; helicopter and transmitter not bound; low transmitter battery. | Power on transmitter. Re-bind helicopter and transmitter (refer to transmitter manual). Replace or charge transmitter batteries. |
| Helicopter drifts during hover. | Insufficient GPS signal; calibration needed; trim settings incorrect. | Ensure flight in an open area with clear sky for GPS lock. Perform flight controller calibration. Adjust trim settings on the transmitter. |
| Auto-return function not working. | No GPS lock at takeoff; insufficient battery voltage for return. | Ensure GPS signal is strong before takeoff. Maintain sufficient battery charge for return flight. |
| Unusual noise or vibration. | Damaged or unbalanced propellers; loose components; motor issue. | Inspect and replace damaged propellers. Check all screws and connections. If problem persists, contact support. |
9. Warranty and Support
9.1. Warranty Information
This product comes with a standard manufacturer's warranty against defects in materials and workmanship. The warranty period typically covers a specific duration from the date of purchase. Please retain your proof of purchase for warranty claims. For detailed warranty terms and conditions, refer to the documentation provided with your product or contact GoAssemb customer service.
Extended protection plans may be available for purchase separately. These plans offer additional coverage beyond the standard manufacturer's warranty.
9.2. Customer Support
For technical assistance, troubleshooting, or spare parts, please contact GoAssemb customer support. When contacting support, please have your product model number (BELL-412 / UIL17JSU1GP3208ZPGH6Q4) and purchase information ready.
Visit the official GoAssemb store for more information and contact options: GoAssemb Store


