1. Introduction
This manual provides essential information for the safe and efficient operation, installation, and maintenance of your TOPWISH 12-Inch Gas Cooktop, Model AGSK-003-4. Please read all instructions carefully before using the appliance and retain this manual for future reference.

Image 1.1: The TOPWISH 12-Inch Gas Cooktop, Model AGSK-003-4.
2. Safety Information
Your safety and the safety of others are paramount. This cooktop is designed with safety features, but proper installation and use are crucial to prevent accidents.
- Gas Supply: Ensure the cooktop is connected to the correct gas supply (LPG or Natural Gas) and that all connections are secure and leak-free.
- Ventilation: Always use the cooktop in a well-ventilated area. Adequate airflow is necessary for proper combustion and to prevent the buildup of harmful gases.
- Flame Failure Detection (FFD): The advanced FFD system automatically shuts off the gas supply if no flame is detected, enhancing safety during operation.
- Children and Pets: Keep children and pets away from the cooktop during operation and while it is cooling down.
- Hot Surfaces: Cooktop surfaces and grates remain hot after use. Allow them to cool completely before cleaning or touching.
- Electrical Connection: The automatic electric pulse ignition requires a 110-120V AC power supply. Ensure the power outlet is properly grounded.

Image 2.1: Illustration of the Thermocouple Safety Protection, which automatically cuts off gas if the flame extinguishes.
3. Product Overview and Features
The TOPWISH 12-Inch Gas Cooktop is a compact and efficient cooking solution designed for various environments, including kitchens, RVs, and outdoor spaces.
Key Features:
- Powerful Burners: Equipped with two high-performance burners: one 12,000 BTU Triple Ring burner for high-heat cooking and one 6,000 BTU Semi-rapid burner for delicate tasks.
- Premium Construction: Crafted from food-grade 304 stainless steel for durability, rust resistance, and easy cleaning. Features heavy-duty cast iron grates.
- NG/LPG Compatibility: Designed for flexibility, supporting both natural gas and propane setups. Includes a natural gas regulator and LPG nozzles for conversion.
- Automatic Electric Pulse Ignition: Powered by 110-120V AC for reliable ignition.
- Thermocouple Protection: An advanced Flame Failure Detection (FFD) system automatically shuts off the gas supply if the flame is extinguished.
- Compact Design: Ideal for small spaces with dimensions of 12.2" W x 20.08" L x 1.18" H.

Image 3.1: Burner power distribution, showing a 12,000 BTU burner and a 6,000 BTU burner.

Image 3.2: Detailed view of cooktop features including powerful burners, easy-clean surface, cast iron grates, and heat-resistant knobs.
4. Setup and Installation
Proper installation is critical for the safe and efficient operation of your cooktop. It is recommended that installation be performed by a qualified professional.
Installation Requirements:
- Cut-out Dimensions: The required cut-out size for built-in installation is 10.63" W x 18.9" L.
- Gas Type: Ensure the cooktop is configured for your gas type (LPG or NG). LPG nozzles are included for conversion.
- Electrical Supply: A 110-120V AC power outlet is required for the electric ignition.
Installation Steps (General Guidance):
- Prepare the countertop opening according to the specified cut-out dimensions.
- Apply the sealing tape around the edge of the cooktop opening to create a seal.
- Carefully lower the cooktop into the prepared opening.
- Secure the cooktop using the provided brackets and fixing screws from underneath the countertop.
- Connect the gas supply line to the cooktop, ensuring the pressure regulator is installed correctly for your gas type. Perform a leak test.
- Plug the cooktop's power cord into a grounded 110-120V AC outlet.
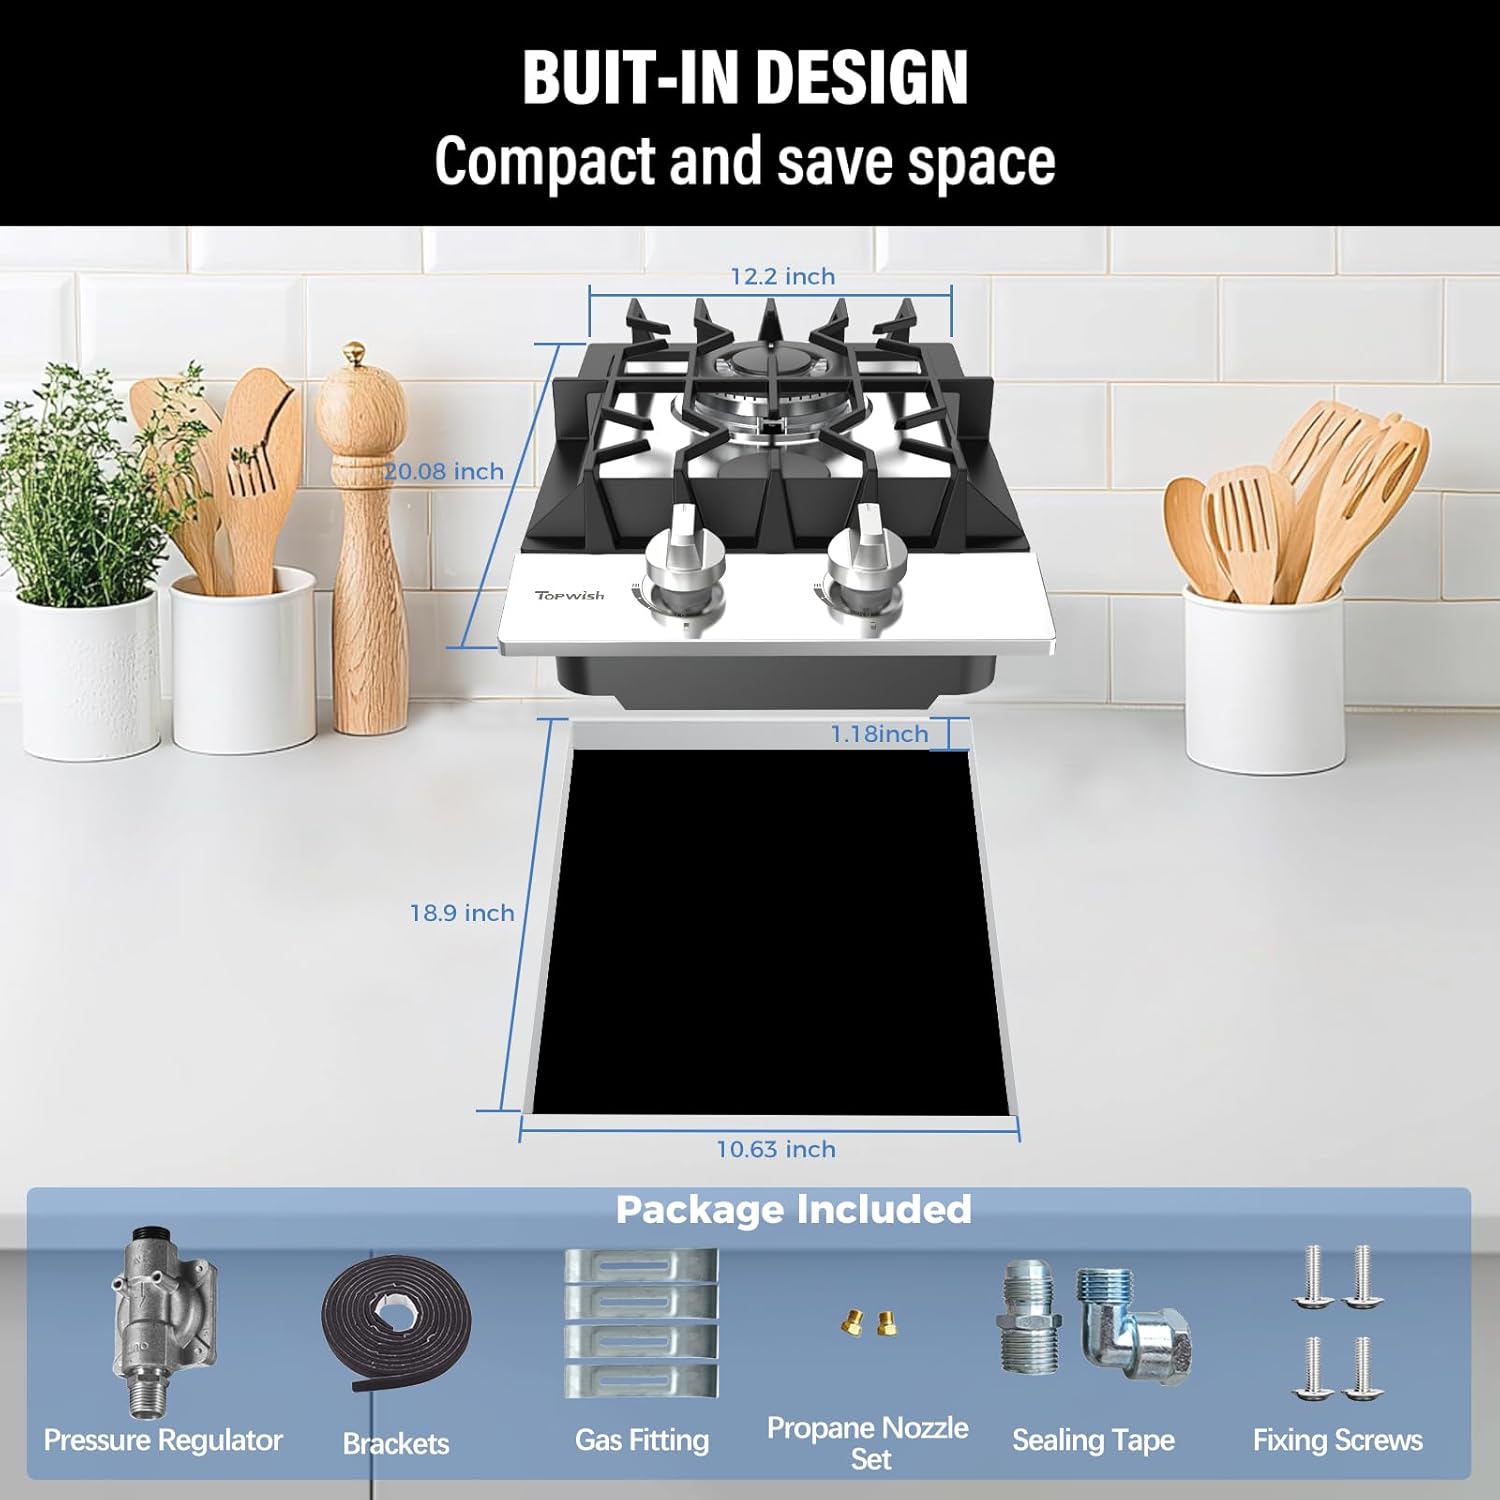
Image 4.1: Cooktop dimensions and required cut-out size for built-in installation. Also shows included accessories like pressure regulator, brackets, gas fitting, propane nozzle set, sealing tape, and fixing screws.

Image 4.2: Applying sealing tape during installation.

Image 4.3: Securing the cooktop with mounting brackets.

Image 4.4: Connecting the gas pressure regulator.

Image 4.5: Plugging in the cooktop for electric ignition.
5. Operating Instructions
Follow these steps to safely operate your TOPWISH gas cooktop.
Igniting a Burner:
- Ensure the cooktop is connected to the gas supply and electrical power.
- Push down the control knob for the desired burner.
- While holding the knob down, rotate it counter-clockwise to the 'High' or 'Ignite' position. You will hear a clicking sound as the igniter sparks.
- Once the flame ignites, continue to hold the knob down for a few seconds to allow the thermocouple to heat up and activate the safety valve.
- Release the knob. If the flame goes out, repeat steps 2-4.
- Adjust the flame to your desired cooking intensity by rotating the knob between 'High' and 'Low' settings.
Turning Off a Burner:
Rotate the control knob clockwise until it clicks into the 'Off' position.

Image 5.1: Adjusting the flame using the control knob.
Video 5.1: This video demonstrates the features and operation of the TOPWISH Gas Cooktop, including burner ignition and flame adjustment. It highlights the precise knob control and the cooktop's overall design.
6. Maintenance and Cleaning
Regular cleaning and maintenance will ensure the longevity and optimal performance of your cooktop.
Cleaning Instructions:
- Always ensure the cooktop is cool and disconnected from the power supply before cleaning.
- Stainless Steel Surface: Wipe with a soft cloth and mild detergent. For stubborn stains, use a stainless steel cleaner. Avoid abrasive cleaners or scouring pads that can scratch the surface.
- Cast Iron Grates: Remove the grates and wash them with warm, soapy water. For baked-on food, soak them before scrubbing. Ensure they are completely dry before placing them back on the cooktop.
- Burner Caps and Heads: Remove these components and clean them with warm, soapy water. Ensure the burner ports are not clogged. Dry thoroughly before reassembling.
- Control Knobs: Pull off the knobs and wash them with warm, soapy water. Dry completely before reattaching.

Image 6.1: Disassembled cooktop components for thorough cleaning.
7. Troubleshooting
If you encounter issues with your cooktop, refer to the following common problems and solutions. For complex issues, contact customer service.
- Burner does not ignite:
- Check if the cooktop is plugged into a working electrical outlet.
- Ensure the gas supply valve is open.
- Verify that the burner cap and head are correctly seated.
- Clean any debris from the igniter and burner ports.
- Flame is weak or uneven:
- Check for blockages in the burner ports.
- Ensure the gas pressure is adequate.
- Confirm the correct gas type (LPG/NG) is being used and the corresponding nozzles are installed.
- Gas smell:
- Immediately turn off all burners and the main gas supply.
- Open windows and doors for ventilation.
- Do not operate any electrical switches or appliances.
- Contact your gas supplier or a qualified technician immediately.
8. Specifications
| Specification | Detail |
|---|---|
| Brand Name | TOPWISH |
| Model Number | AGSK-003-4 |
| Item Weight | 19.06 pounds |
| Product Dimensions | 20.08 x 12.2 x 1.18 inches (D x W x H) |
| Installation Type | Drop-In |
| Special Features | Thermocouple Protection |
| Burner Type | Gas |
| Heating Elements | 2 |
| Color | Silver |
| Voltage | 120 Volts |
| Fuel Type | Propane (LPG/NG Convertible) |
| Material Type | 304 Stainless Steel |
9. What's in the Box
The following components are included with your TOPWISH 12-Inch Gas Cooktop:
- Main Cooktop Body
- Pressure Regulator
- Mounting Brackets (4)
- Gas Fitting
- Propane Nozzle Set
- Sealing Tape
- Fixing Screws
Image 9.1: All included components for the TOPWISH 12-Inch Gas Cooktop.
10. Warranty and Support
For any questions, installation assistance, or operational concerns, please contact TOPWISH customer service. Refer to your purchase documentation for specific warranty details.
Customer Service: Please refer to the contact information provided with your product packaging or on the official TOPWISH website.


