1. Product Overview
The VEVOR Solar Fence Charger (Model P17) is a robust and efficient electric fence energizer designed to protect livestock, poultry, and gardens from intruding animals. This weather-resistant unit utilizes solar power for continuous operation, offering a powerful shock effect and extended battery life for reliable performance in various outdoor conditions.

Figure 1.1: VEVOR Solar Fence Charger and included accessories, including alligator clips and power adapter.
2. Safety Instructions
Please read and understand all safety instructions before installing and operating the VEVOR Solar Fence Charger. Failure to follow these instructions may result in electric shock, injury, or damage to the equipment.
- Warning: Electric fences can deliver a painful but non-lethal shock. Keep children and pets away from the fence unless supervised.
- Do not connect the energizer to more than one fence system.
- Ensure proper grounding. A well-grounded system is crucial for effective operation and safety.
- Avoid touching the fence wires with bare hands or wet clothing.
- Disconnect the energizer from the fence and power source before performing any maintenance or repairs.
- Do not install the energizer near flammable materials or in explosive atmospheres.
- Regularly inspect the fence system for damaged wires, insulators, or other components.
- Place warning signs on the electric fence at appropriate intervals, especially near public access points.

Figure 2.1: An electric fence with a "DANGER! Electric fence" warning sign, demonstrating the need for clear warnings.
3. Product Features
The VEVOR Solar Fence Charger is equipped with several key features designed for optimal performance and user convenience:
- Powerful Shock Effect: Delivers up to 8kV voltage and 0.3J shock energy. Features an automatic pulse with a discharge interval of 1 second during the day and 1.5 seconds at night, effectively deterring animals without causing harm.
- Exceptional Durability: IP65 waterproof rating ensures reliable performance in all weather conditions, including rain and snow. Operates efficiently in temperatures ranging from -20°C to +50°C (-4°F to +122°F). UV-resistant solar panels prevent sun damage.
- Green Solar Power: Integrated 10W high-efficiency monocrystalline silicon solar panel charges the unit during the day, eliminating the need for external power sources and reducing electricity costs.
- Long Battery Life: Built-in 10,400mAh lithium battery provides up to 7 days of power, ensuring stable operation even during cloudy or sunless conditions.
- Flexible & Easy Installation: Designed for straightforward setup with clear instructions. The solar panel orientation can be adjusted for optimal charging.

Figure 3.1: Visual representation of the charger's powerful electric output, including 8kV pulse amplitude and 0.3J output energy.

Figure 3.2: The charger's robust design, featuring IP65 waterproofing and a wide operating temperature range for reliable protection.

Figure 3.3: The solar-powered and environment-friendly charging mechanism, highlighting the 10W monocrystalline silicon solar panel.

Figure 3.4: Comparison illustrating the advantages of the VEVOR's built-in 10400mAh lithium battery over traditional lead-acid batteries, including longer lifespan and better performance in rainy weather.
4. Setup and Installation
Follow these steps for proper setup and installation of your VEVOR Solar Fence Charger:
- Mount the Charger: Securely mount the charger on a suitable post (e.g., Y/T post) in a location that receives ample direct sunlight throughout the day for optimal solar charging.
- Connect the Lead Wire: Connect the lead wire from the charger to the electric fence line. Ensure a secure connection.
- Attach Grounding Clip: Attach the black alligator clip to your grounding rod.
- Bury Grounding Rod: Bury the grounding rod at least 31.5-39.37 inches (80-100 cm) deep into moist ground for optimal conductivity.
- Connect Fence Clip: Connect the red alligator clip to the electric fence wire.
Note: The solar panel orientation can be adjusted to maximize sunlight exposure. Ensure all connections are tight and free from corrosion.

Figure 4.1: Step-by-step visual guide for easy installation, from mounting to connecting the grounding rod and fence.
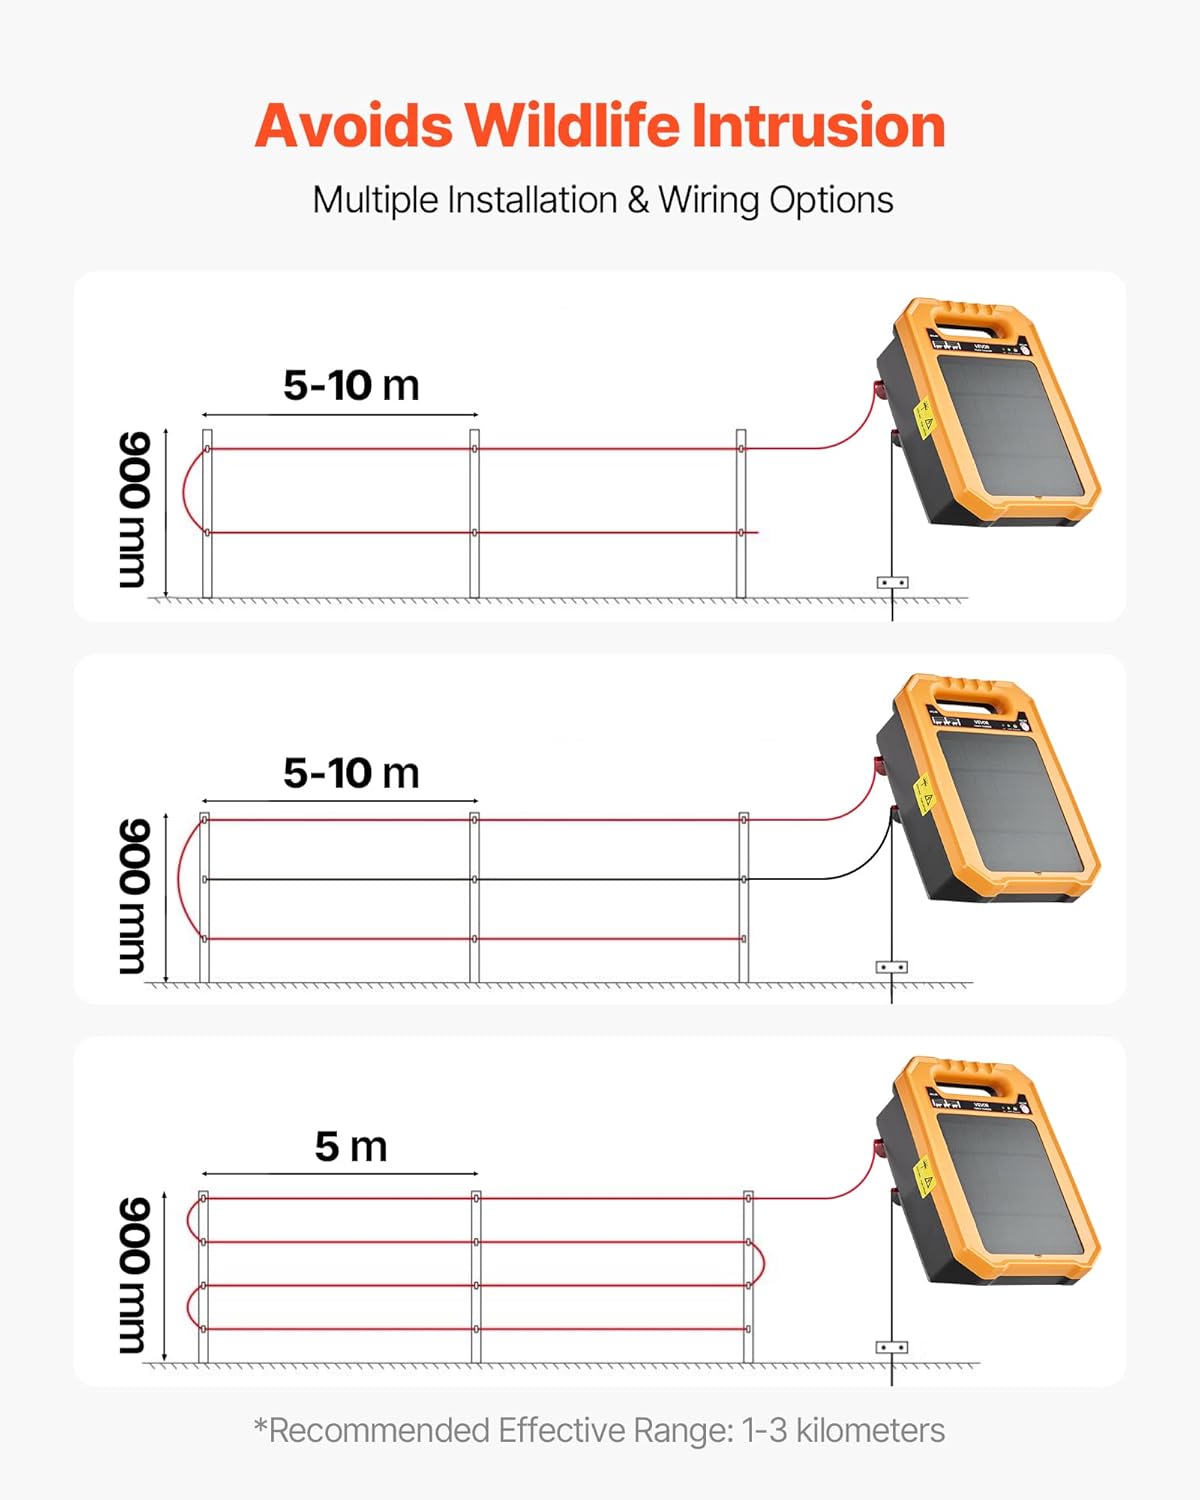
Figure 4.2: Various wiring configurations for the electric fence, demonstrating flexibility in setup for different applications.
5. Operation
Once installed and connected, the VEVOR Solar Fence Charger operates automatically:
- Automatic Charging: The integrated solar panel charges the internal 10,400mAh lithium battery during daylight hours.
- Automatic Pulsing: The energizer automatically delivers electric pulses to the fence line. The discharge interval is 1 second during the day and 1.5 seconds at night.
- Power Indicator: Check the indicator lights on the unit to confirm operation and battery status.
- Battery Backup: The built-in battery ensures continuous operation for up to 7 days even without direct sunlight, making it reliable during cloudy weather or at night.

Figure 5.1: Illustration of the dual power supply system, showing how the unit is powered by solar energy during the day and by its internal lithium battery at night or during low-light conditions.
6. Maintenance
Regular maintenance ensures the longevity and optimal performance of your solar fence charger:
- Clean Solar Panel: Periodically clean the solar panel surface with a soft, damp cloth to remove dust, dirt, or debris that may hinder charging efficiency.
- Check Connections: Regularly inspect all wire connections (fence, ground, and charger terminals) to ensure they are secure and free from corrosion. Loose connections can reduce effectiveness.
- Inspect Fence Line: Check the entire fence line for any broken wires, damaged insulators, or vegetation touching the wires, which can cause shorts and reduce shock intensity.
- Grounding Rod: Ensure the grounding rod remains in moist soil. If the soil is dry, consider watering the area around the rod to improve conductivity.
- Battery Health: While the battery is designed for long life, monitor its performance. If the unit struggles to hold a charge even with ample sunlight, the battery may need attention.
7. Troubleshooting
If you encounter issues with your VEVOR Solar Fence Charger, refer to the following common problems and solutions:
| Problem | Possible Cause | Solution |
|---|---|---|
| No shock or weak shock from fence. |
|
|
| Charger not holding charge. |
|
|
| Indicator lights not working. |
|
|
8. Technical Specifications
| Parameter | Value |
|---|---|
| Model Number | P17 |
| Output Voltage | Up to 8 kV |
| Output Energy | 0.3 J |
| Pulse Width | <1 ms |
| Discharge Interval (Day) | 1 second per pulse |
| Discharge Interval (Night) | 1.5 seconds per pulse |
| Solar Panel Power | 10 W |
| Battery Type | Built-in Lithium Battery |
| Battery Capacity | 10,400 mAh |
| Battery Life (Runtime) | Up to 7 days (without sunlight) |
| Waterproof Rating | IP65 |
| Operating Temperature | -20°C to +50°C (-4°F to +122°F) |
| Product Dimensions (L x W x H) | 11.02 x 7.87 x 9.84 inches (280 x 200 x 250 mm) |
| Product Net Weight | 3.57 lbs (1.62 kg) |
| Main Material | ABS |
| Recommended Effective Range | 1-3 kilometers |

Figure 8.1: Detailed dimensions and a summary of key technical specifications for the VEVOR Solar Fence Charger.
9. Warranty and Support
VEVOR products are designed for durability and performance. For warranty information, technical support, or service inquiries, please contact VEVOR customer service through their official website or the retailer where the product was purchased.
Please have your model number (P17) and purchase details ready when contacting support.
Visit the official VEVOR Store for more information: VEVOR Official Store