1. Introduction
This manual provides detailed instructions for the NEPIVEL H17 12000mAh Emergency Radio. This multi-functional device is designed to provide essential communication, lighting, and power in emergency situations and outdoor activities. It features AM/FM/NOAA weather radio reception, multiple charging options, a powerful flashlight, a reading lamp, an SOS alarm, a compass, and a power bank function for charging external devices.
The NEPIVEL H17 is an indispensable tool for emergency preparedness, camping, hiking, and daily use, ensuring you stay informed and connected.

Image 1.1: The NEPIVEL H17 Emergency Radio is suitable for various emergency situations, including snowstorms, earthquakes, floods, thunderstorms, tornadoes, and power outages.
2. Product Overview
Familiarize yourself with the components and controls of your NEPIVEL H17 Emergency Radio.

Image 2.1: Detailed diagram illustrating the various parts and controls of the NEPIVEL H17 Emergency Radio.
- USB-A Output Port: For charging external devices.
- Flashlight Switch Button: Activates the front flashlight.
- Reading Light Switch Button: Activates the top reading lamp.
- SOS Alarm Switch Button: Activates the emergency alarm and flashing light.
- Power Switch: Turns the radio on/off.
- Headphone Jack: For private listening with 3.5mm headphones (not included).
- Type-C Charging Port: For charging the radio via USB-C cable.
- Radio Antenna: Extendable antenna for improved radio reception.
- Compass: Integrated compass for navigation.
- Hand Crank: For manual power generation.
- Remaining Battery Indicator Light: Displays current battery level (25%, 50%, 75%, 100%).
- Solar Panels: Two integrated solar panels for solar charging.
- Charging Indicator: Light indicating when the radio is charging.
- Flashlight: Front-facing LED light.
- AM/FM/NOAA Switch Button: Toggles between radio bands.
- Switching Channel Button: Adjusts radio frequency.
- Volume Adjustment Button: Controls audio volume.
3. Setup
- Initial Charge: Before first use, fully charge the radio using the Type-C cable. Connect the cable to the Type-C charging port on the radio and a standard USB power adapter (not included). The charging indicator will illuminate.
- Antenna: For optimal radio reception, extend the telescopic antenna fully.
- Handle: Attach the handle if it is not already installed, ensuring it is securely fastened for carrying.
4. Operating Instructions
4.1. Charging the Radio
The NEPIVEL H17 offers three methods to charge its internal 12000mAh battery:
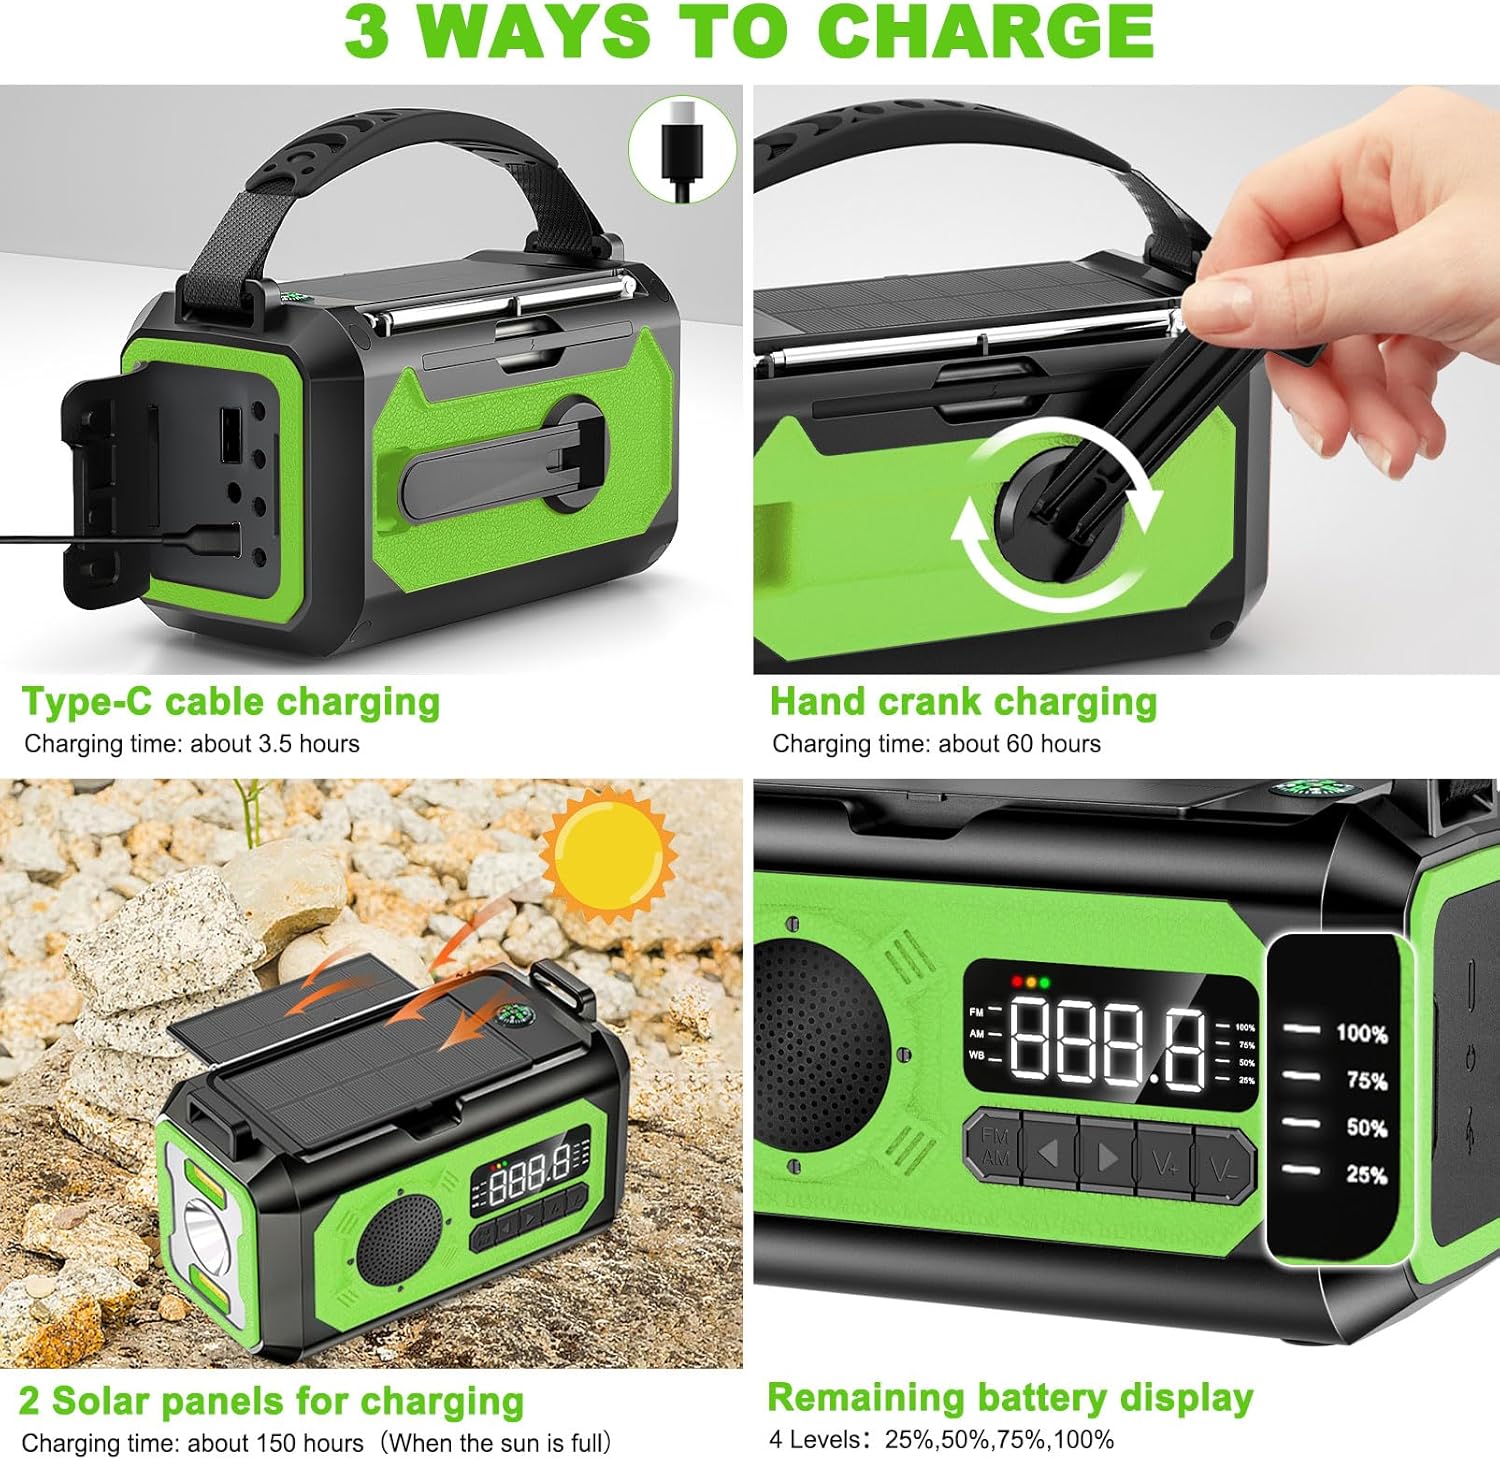
Image 4.1: Visual guide to the three charging methods: Type-C cable, hand crank, and solar panels.
- Type-C Charging: Connect the provided Type-C cable to the radio's Type-C port and a USB power source. This is the fastest charging method, taking approximately 3.5 hours for a full charge.
- Hand Crank Charging: Rotate the hand crank clockwise or counter-clockwise at a steady pace. Cranking for approximately 1 minute can provide enough power for a few minutes of radio use or a short burst of light. A full charge via hand crank takes about 60 hours.
- Solar Charging: Place the radio with its solar panels facing direct sunlight. The solar panels will convert sunlight into energy to charge the internal battery. This method is ideal for maintaining charge or for emergency power in sunny conditions. A full charge via solar panels takes approximately 150 hours.
The remaining battery display lights (25%, 50%, 75%, 100%) indicate the current charge level.
4.2. Radio Operation (AM/FM/NOAA)
- Power On/Off: Press the Power Switch to turn the radio on or off.
- Select Band: Press the AM/FM/NOAA Switch Button to cycle through AM, FM, and NOAA weather bands.
- Tune Frequency: Use the Switching Channel Buttons (up/down arrows) to manually tune to desired frequencies.
- Automatic Search: The radio features an automatic search function. To activate, press and hold the Switching Channel Button. The radio will scan for available frequencies and automatically tune to the strongest signal. It can store searched frequencies, allowing you to skip signals with no broadcast.
- Volume Control: Adjust the Volume Adjustment Button to increase or decrease the audio level.
- Headphone Use: For private listening, plug 3.5mm headphones (not included) into the Headphone Jack.
4.3. Light Functions
- Flashlight: Press the Flashlight Switch Button to turn the front flashlight on or off. The flashlight illuminates up to 20 meters.
- Reading Lamp: Press the Reading Light Switch Button to activate the top LED reading lamp. This is useful for illuminating a small area, such as for reading in low-light conditions.
4.4. SOS Alarm
- Activate SOS: Press the SOS Alarm Switch Button to activate a loud siren and a flashing light. This function is designed to attract attention in emergency situations.
- Deactivate SOS: Press the SOS Alarm Switch Button again to turn off the alarm.
4.5. Power Bank Function
The radio's 12000mAh battery can be used to charge external USB-powered devices, such as smartphones or small tablets.
- Charging External Devices: Connect your device's USB charging cable to the USB-A Output Port on the radio. The radio will begin charging your device.
4.6. Compass
The integrated compass provides basic directional guidance. Ensure the radio is held level and away from strong magnetic fields for accurate readings.
5. Maintenance
- Cleaning: Wipe the radio with a soft, dry cloth. Do not use abrasive cleaners or solvents.
- Storage: Store the radio in a cool, dry place away from direct sunlight and extreme temperatures. For long-term storage, ensure the battery is charged to at least 50% and recharge it every 3-6 months to maintain battery health.
- Water Resistance: The radio is designed for outdoor use but is not fully waterproof. Avoid submerging it in water or exposing it to heavy rain.
6. Troubleshooting
- Radio Not Turning On/No Power:
- Check the battery level indicator. If low, charge the radio using Type-C, hand crank, or solar power.
- Ensure the Power Switch is in the 'On' position.
- Poor Radio Reception:
- Fully extend the telescopic antenna.
- Adjust the radio's position or location to find a stronger signal.
- Use the automatic search function to find the strongest available stations.
- External Device Not Charging:
- Ensure the radio's battery has sufficient charge.
- Verify that the USB cable is securely connected to both the radio's USB-A output port and your device.
- Some devices may require more power than the radio can provide.
- Self-Protection Function Triggered (Radio Not Working After Impact):
- The radio has a self-protection design that may activate if it experiences a strong impact, causing buttons to malfunction or the radio to stop working. This is to ensure the internal structure remains stable and safe.
- If the radio can still charge your cell phone but other functions are not working, refer to the manufacturer's support resources or contact customer service for specific instructions on how to reset or address this issue.
- Compass Inaccurate:
- Ensure the radio is held level.
- Move away from electronic devices, metal objects, or strong magnetic fields that can interfere with the compass reading.
7. Specifications
| Feature | Specification |
|---|---|
| Model Number | H17 |
| Battery Capacity | 12000mAh |
| Product Dimensions | 5.94 x 3.15 x 3.38 inches (15.09 x 8.00 x 8.59 cm) |
| Item Weight | 1.63 pounds (0.74 kg) |
| Power Source | Rechargeable Battery, Solar Powered, Hand Cranked |
| Connectivity Technology | Wireless |
| Voltage | 5 Volts (AC) |
| Included Components | Emergency Radio, Handle, Owners Manual, Type-C Cable |
8. Warranty and Support
- Warranty: The NEPIVEL H17 Emergency Radio comes with a 6-month warranty from the date of purchase. This warranty covers manufacturing defects.
- Support: In case of product defects or issues, please contact NEPIVEL customer service. Provide your purchase details and a description of the problem for assistance. The manufacturer aims to provide a satisfactory after-sales service, including exchanges or refunds within 24 hours for defective products.
- Note: Headphones and a USB power adapter/charger are not included and must be purchased separately.
9. Safety Information
- Do not expose the radio to extreme temperatures, direct flame, or prolonged direct sunlight (beyond charging needs).
- Avoid dropping or subjecting the radio to severe impacts.
- Keep out of reach of children.
- Do not attempt to disassemble or modify the radio. This will void the warranty and may cause damage or injury.
- Use only the provided Type-C cable or a certified equivalent for charging.
- Dispose of the product and its battery responsibly according to local regulations.