1. Introduction
Thank you for choosing the OYLUS 2-inch Clear Ice Ball Maker. This manual provides essential information for the safe and efficient operation of your new appliance. Please read these instructions thoroughly before use and retain them for future reference.

Image 1.1: OYLUS 2-inch Clear Ice Ball Maker in operation.
2. Important Safety Information
To reduce the risk of fire, electric shock, or injury, always follow basic safety precautions when using this appliance.
- Read all instructions before operating the appliance.
- Do not touch the evaporator or ice balls when the machine is operating to avoid frostbite.
- Do not immerse the appliance, power cord, or plug in water or other liquids.
- Ensure the appliance is placed on a stable, level surface with adequate ventilation.
- Keep the appliance away from heat sources and direct sunlight.
- Unplug the appliance before cleaning or when not in use for extended periods.
- This appliance is for household use only.
3. Package Contents
Please check that all items are present and in good condition:
- OYLUS 2-inch Clear Ice Ball Maker Unit
- Ice Scoop
- Water Inlet Hose (for water line connection)
- User Manual
4. Setup
4.1 Unpacking and Placement
- Remove all packaging materials and inspect the appliance for any damage.
- Place the ice maker on a firm, level surface. Ensure there is at least 5 inches (12.7 cm) of space around the unit for proper ventilation. Avoid placing it near heat sources.
- Allow the unit to stand upright for at least 2 hours before plugging it in, especially if it was transported horizontally. This allows refrigerants to settle.
4.2 Initial Cleaning
Before first use, clean the interior of the ice maker:
- Open the door and remove the ice basket.
- Clean the interior with a soft cloth and warm water with a mild detergent. Rinse thoroughly.
- Wipe dry with a clean cloth.
- Run the self-cleaning cycle (refer to Section 5.4) with warm water multiple times before making ice for consumption.
4.3 Water Filling Options
Your OYLUS ice maker offers two convenient ways to supply water:

Image 4.1: Dual water filling options.
4.3.1 Manual Water Fill
For manual filling, simply pour potable water into the water reservoir located at the top of the unit. The maximum capacity is approximately 0.4 gallons. Do not overfill.
4.3.2 Water Line Connection (Automatic Fill)
For continuous ice production without manual refilling, connect the ice maker to a potable water line:
- Locate the water inlet port at the back of the unit.
- Connect one end of the provided water inlet hose to the ice maker's inlet port.
- Connect the other end of the hose to a cold water supply line. Ensure all connections are secure to prevent leaks.
- Open the water supply valve. The machine will automatically draw water as needed.
5. Operating Instructions
5.1 Control Panel Overview
The ice maker features an intuitive LCD touch control panel for easy operation.

Image 5.1: LCD Touch Control Panel.
- Start/Stop Button: Powers the unit on or off and initiates/stops ice production.
- Ice Making Indicator: Illuminates when ice is being produced.
- Ice Harvesting Indicator: Illuminates when ice is being released into the basket.
- Ice Full Indicator: Illuminates when the ice basket is full. The machine will pause production.
- Water Shortage Indicator: Illuminates when the water reservoir is low. The machine will pause production until water is added.
- Cleaning/Mute Button: Initiates the self-cleaning cycle or mutes alert sounds.
5.2 Making Ice Balls
- Ensure the water reservoir is filled (manual or water line).
- Plug the appliance into a grounded electrical outlet.
- Press the Start/Stop button on the control panel. The Ice Making indicator will illuminate.
- The machine will begin the ice-making process. Approximately 4 clear ice spheres will be produced in about 35 minutes.
- Once ice is ready, the Ice Harvesting indicator will illuminate, and the ice balls will drop into the insulated storage basket.
- When the ice basket is full, the Ice Full indicator will light up, and the machine will automatically pause. Remove ice to resume production.
For optimal ice quality, use filtered or purified water with a TDS value below 200. The first few batches of ice may not be perfectly clear; this is normal. Discard these initial batches.

Image 5.2: Clear ice spheres in beverages.
5.3 Built-in Cold Storage
The ice maker features an insulated storage basket to keep finished ice balls chilled. While it significantly reduces melting, it is not a freezer. For longer-term storage, transfer ice balls to a conventional freezer.
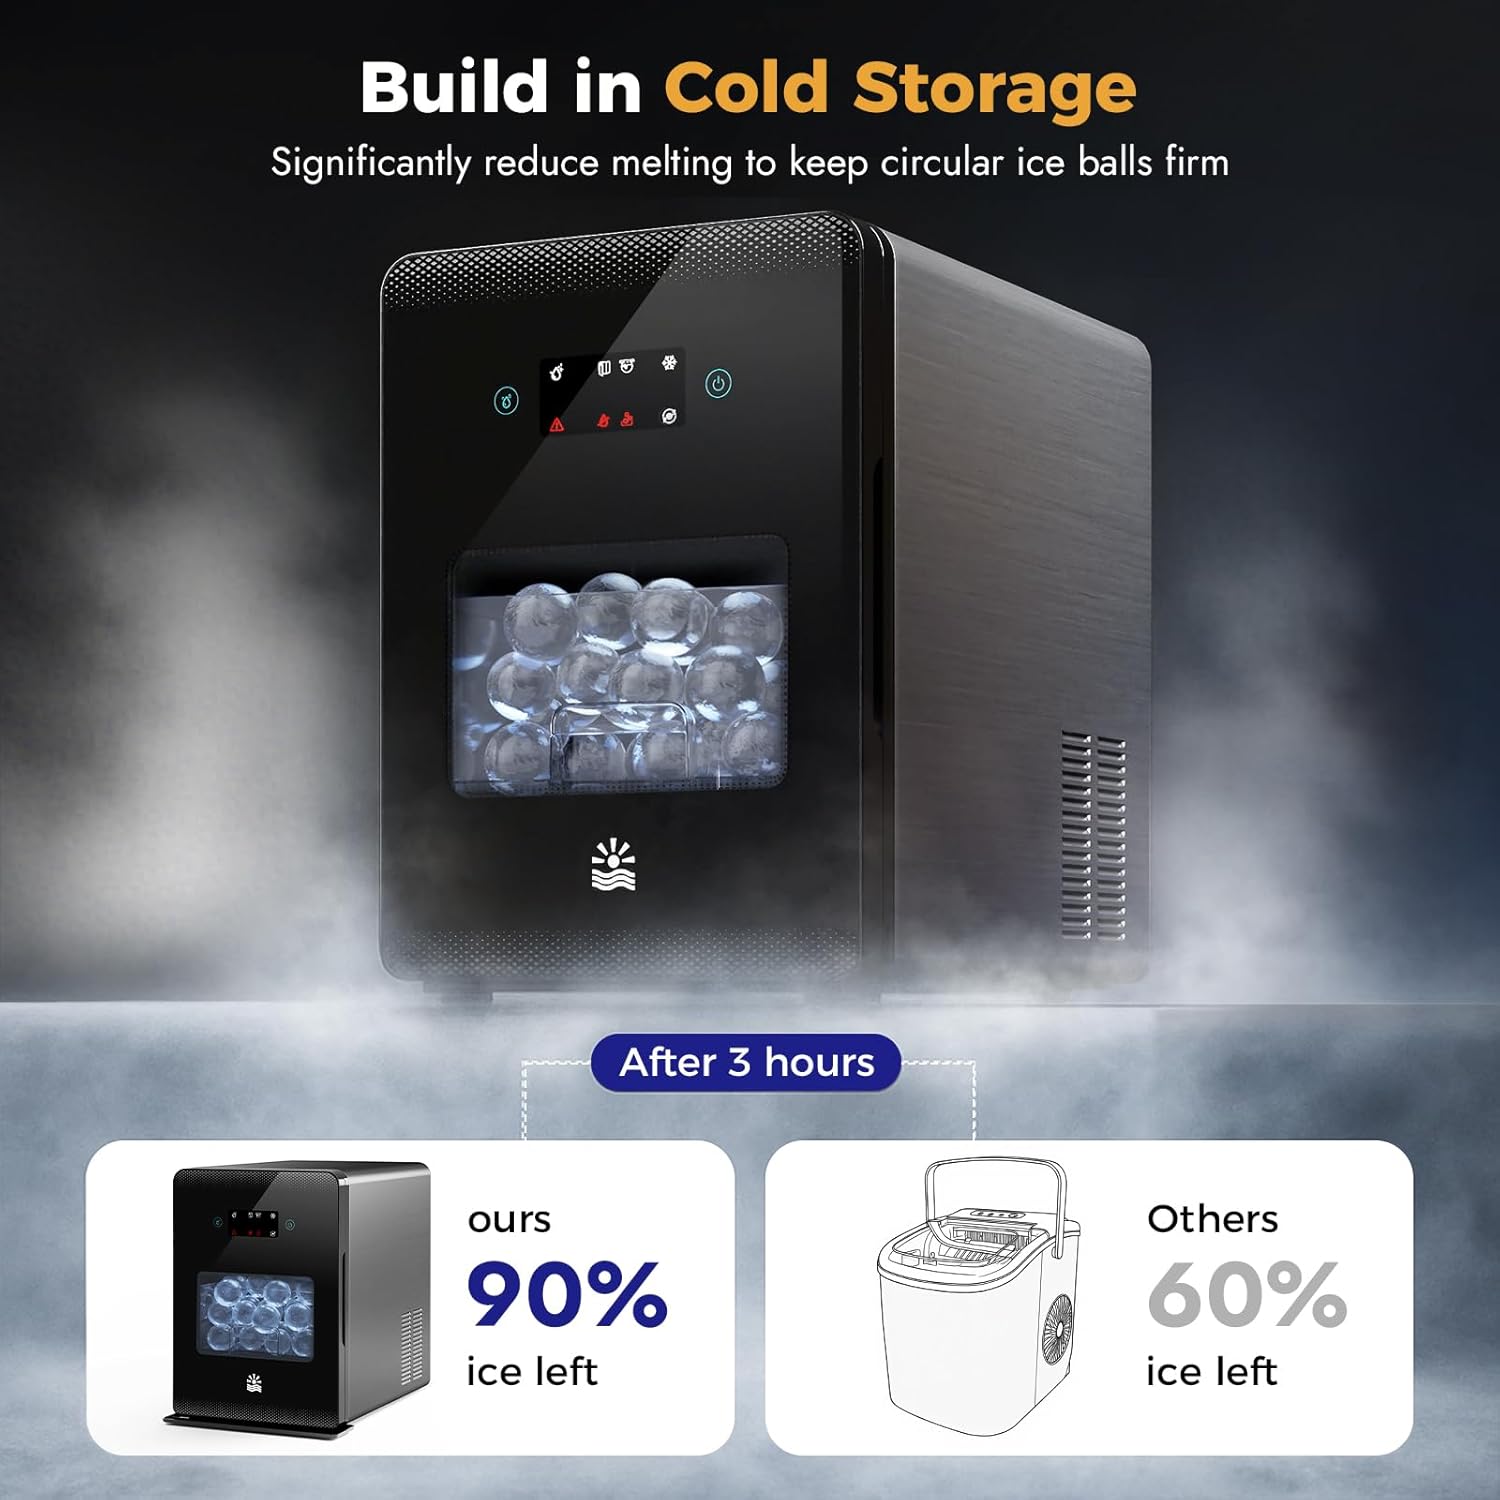
Image 5.3: Built-in cold storage efficiency.
5.4 Self-Cleaning Function
The self-cleaning function helps maintain hygiene and extends the life of your machine.

Image 5.4: Self-cleaning system in action.
- Ensure the water reservoir is filled with clean water.
- Press the Cleaning/Mute button. The machine will initiate a cleaning cycle, circulating water through its internal components.
- The cycle typically takes several minutes. Once complete, the machine will drain the water.
- It is recommended to run this cycle regularly, especially after extended periods of use or before storing the unit.
6. Maintenance
6.1 Regular Cleaning
- Always unplug the ice maker before cleaning.
- Clean the exterior with a soft, damp cloth. Do not use abrasive cleaners or solvents.
- Periodically clean the interior, water reservoir, and ice basket with warm water and a mild detergent. Rinse thoroughly to remove any soap residue.
- Ensure all parts are completely dry before reassembling and operating.
6.2 Draining the Water
If storing the unit or performing deep cleaning, drain any remaining water from the reservoir. Locate the drain plug (usually at the bottom or back of the unit) and remove it to allow water to flow out. Replace the plug securely after draining.
6.3 Air Filter Cleaning
The ice maker has an air filter to ensure efficient operation. Periodically clean the air filter (location may vary, typically on the side or back) by gently brushing off dust or rinsing with water. Ensure it is dry before reattaching.
7. Troubleshooting
Before contacting customer support, please refer to the following common issues and solutions:
| Problem | Possible Cause | Solution |
|---|---|---|
| Ice maker not producing ice. | No water in reservoir; Water line not connected or valve closed; Unit not plugged in; Ambient temperature too high. | Fill water reservoir or check water line connection; Ensure unit is plugged in; Operate in a cooler environment. |
| Ice balls are cloudy or not clear. | High mineral content in water; First few batches after setup. | Use filtered or purified water (TDS < 200); Discard initial batches. |
| "Ice Full" indicator is on, but basket is not full. | Ice sensor obstructed or dirty. | Clean the ice sensor located near the ice basket. |
| "Water Shortage" indicator is on, but reservoir has water. | Water level sensor dirty or obstructed. | Clean the water level sensor in the reservoir. |
| Unit is noisy during operation. | Normal compressor/fan operation; Unit not level; Obstruction in fan. | Ensure unit is on a level surface; Check for obstructions around fan vents. Note: Some operational noise is normal (approx. 40dB). |
| Ice balls melting quickly in storage basket. | Storage basket is insulated, not refrigerated like a freezer. | Transfer ice balls to a conventional freezer for long-term storage. |
8. Specifications
| Feature | Detail |
|---|---|
| Model Number | ZB-001H (A-Upgrade 1) |
| Brand | OYLUS |
| Product Dimensions (D x W x H) | 18" x 17.3" x 12.5" |
| Water Tank Capacity | 0.4 Gallons |
| Wattage | 5 Watts |
| Ice Ball Size | 2 inches |
| Ice Production Rate | 4 spheres in approx. 35 minutes; Up to 144 spheres per day |
| Noise Level | Approx. 40dB |
| First Available | July 10, 2025 |
9. Warranty and Support
9.1 Limited Warranty
This OYLUS ice maker comes with a 1-Year Quality Protection from the date of purchase. This warranty covers manufacturing defects in materials and workmanship under normal use. It does not cover damage resulting from misuse, accident, alteration, neglect, unauthorized repair, or commercial use.
9.2 Customer Support
For technical assistance, warranty claims, or general inquiries, please contact OYLUS customer support. Our team is available to provide professional after-sales support and a rapid response system.
- Website: Visit the OYLUS Store on Amazon
- Email: Refer to your purchase documentation for direct contact information.


