Introduction
This user manual provides comprehensive instructions for the operation and maintenance of your ciciglow Digital Camera. Designed for ease of use, this compact camera features 66MP photo resolution, 2.5K video recording, a 2.4-inch 180° flip screen, 16X digital zoom, and a built-in LED fill light, making it ideal for various photography and videography needs.
Please read this manual thoroughly before using the camera to ensure proper operation and to maximize its capabilities.
Package Contents
Verify that all items listed below are included in your package:
- 1 x ciciglow Digital Camera
- 1 x User Manual
- 1 x Charging Cable (USB-A to USB-C)
- 1 x Card Reader

Figure 1: Included accessories with the ciciglow Digital Camera. This image displays the camera, a white USB charging cable, and a small black USB card reader, all neatly arranged.
Camera Components
Familiarize yourself with the various parts of your ciciglow Digital Camera:

Figure 2: Front view of the camera with the 2.4-inch flip screen extended. Key features visible include the lens, LED fill light, and the screen with control buttons.
- Lens: The primary optical component for capturing images and videos.
- LED Fill Light: Provides additional illumination for photos and videos in low-light conditions.
- 2.4-inch 180° Flip Screen: A rotatable display for framing shots, especially useful for selfies and vlogging.
- Control Buttons: Navigation and function buttons located next to the screen.
- Microphone: Captures audio during video recording.
- Speaker: For audio playback.
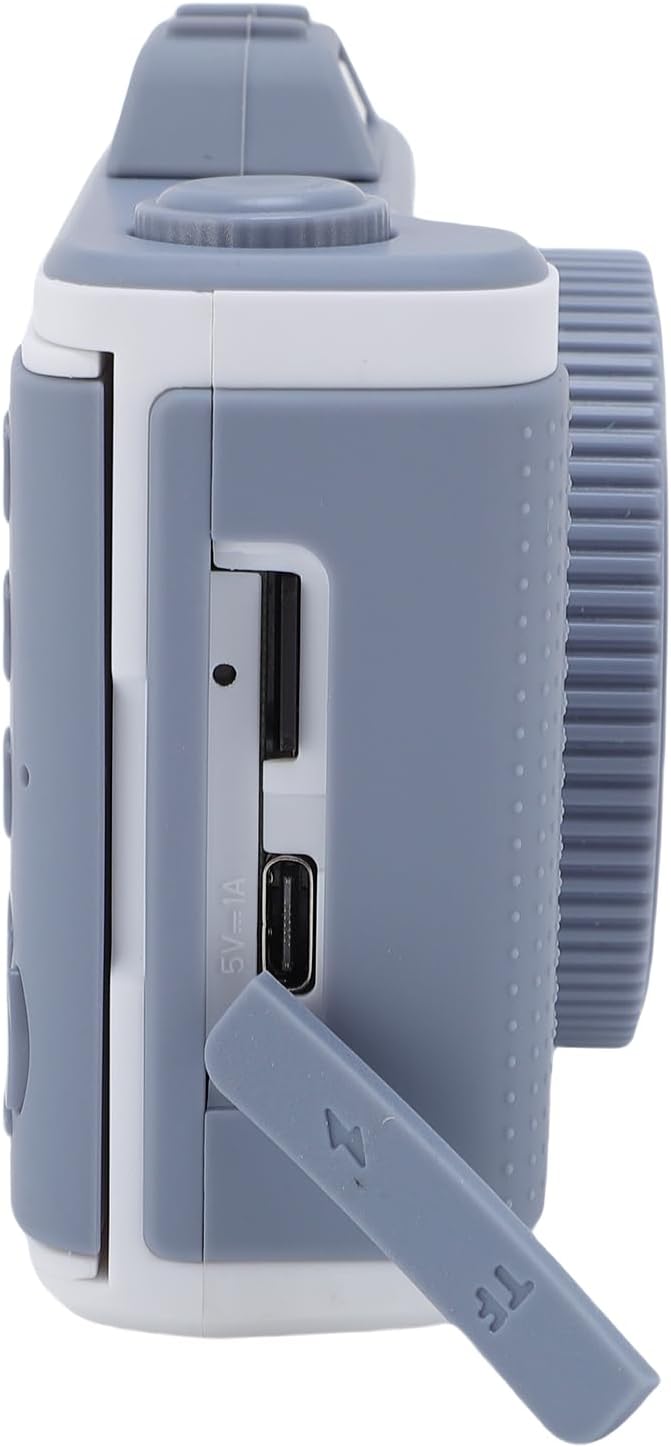
Figure 3: Side view of the camera, highlighting the USB charging port and the TF (memory card) slot, protected by a cover.
- USB Port (5V-1A): For charging the camera and connecting to a computer.
- TF Card Slot: Insert your memory card here (supports up to 32GB, Class 10 recommended).
Setup
1. Charging the Battery
The camera has a built-in Lithium Polymer battery. Before first use, fully charge the camera.
- Connect the smaller end of the provided USB charging cable to the camera's USB port (refer to Figure 3).
- Connect the larger end of the USB cable to a USB power adapter (not included) or a computer's USB port.
- The charging indicator light will illuminate during charging and turn off when fully charged.
2. Inserting a Memory Card
A memory card (not included) is required to save photos and videos.
- Locate the TF card slot on the side of the camera (refer to Figure 3).
- Gently open the protective cover.
- Insert a Class 10 or higher TF (microSD) card, up to 32GB, with the metal contacts facing the front of the camera, until it clicks into place.
- Close the protective cover securely.
Note: Ensure the camera is powered off before inserting or removing the memory card to prevent data loss or damage.
Operating Instructions
1. Power On/Off
- To Power On: Press and hold the Power button (usually located on the top or side) for a few seconds until the screen illuminates.
- To Power Off: Press and hold the Power button again until the screen turns off.
2. Basic Photo Capture
- Turn on the camera.
- Ensure the camera is in photo mode (indicated by an icon on the screen, typically a camera symbol). If not, use the Mode button to switch.
- Frame your shot using the 2.4-inch flip screen.
- Press the Shutter button (usually on top) to take a photo.
3. Video Recording (2.5K)
- Turn on the camera.
- Switch to video recording mode (indicated by a video camera icon).
- Press the Shutter button once to start recording. A recording indicator (e.g., red dot or timer) will appear on the screen.
- Press the Shutter button again to stop recording.

Figure 4: The camera's screen showing the interface during HD video recording, with a timestamp and recording indicator.
4. Using the 180° Flip Screen
The flip screen allows for versatile shooting angles, especially for selfies and vlogging.
- Gently pull the screen outwards from the camera body.
- Rotate the screen up to 180 degrees to face forward for self-portraits or vlogging.
- Adjust the angle as needed for optimal viewing.

Figure 5: Visual representation of the 180° flip screen design, demonstrating its rotation for selfie mode.
5. Utilizing the Built-in LED Fill Light
The LED fill light enhances brightness in dimly lit environments.
- Locate the LED light button or setting in the camera menu.
- Activate the LED fill light for still photos or continuous illumination during video recording.

Figure 6: Demonstration of the built-in LED fill light's effect, showing a brighter image "after use" compared to "before use" in low light.
6. Using 16X Digital Zoom
The 16X digital zoom allows you to magnify your subject.
- While in photo or video mode, use the zoom controls (often marked with 'W' for Wide and 'T' for Telephoto, or up/down arrows) to adjust the zoom level.
- Zoom in to capture distant details or zoom out for a wider field of view.

Figure 7: Visual explanation of the 16X digital zoom, illustrating how it can capture both wide scenes and magnified distant subjects.
7. Playback and File Transfer
- Playback: Enter playback mode (usually a dedicated button or menu option) to view your captured photos and videos. Use navigation buttons to browse.
- File Transfer: Connect the camera to a computer using the provided USB cable. The camera should appear as a removable disk. Alternatively, remove the memory card and use the included card reader to transfer files to your computer.
Maintenance
1. Cleaning the Camera
- Use a soft, lint-free cloth to clean the camera body.
- For the lens and screen, use a specialized lens cleaning cloth and solution. Avoid abrasive materials.
- Do not use strong detergents or solvents.
2. Battery Care
- Avoid exposing the camera to extreme temperatures.
- Charge the battery regularly, even if the camera is not in frequent use, to maintain battery health.
3. Storage
- Store the camera in a cool, dry place away from direct sunlight and high humidity.
- If storing for an extended period, ensure the battery is partially charged (around 50%) and remove the memory card.
Troubleshooting
If you encounter issues with your camera, refer to the following common problems and solutions:
| Problem | Possible Cause | Solution |
|---|---|---|
| Camera does not power on. | Battery is depleted or not charged. | Charge the camera battery fully. |
| Cannot take photos/videos. | No memory card inserted or card is full/corrupted. | Insert a compatible memory card. Delete unnecessary files or format the card (this will erase all data). |
| Images are blurry. | Lens is dirty; insufficient light; camera shake. | Clean the lens. Use the LED fill light in low light. Hold the camera steady. |
| Screen is blank or frozen. | Temporary software glitch. | Power off the camera and restart it. If unresponsive, allow battery to drain completely and then recharge. |
Specifications
| Feature | Detail |
|---|---|
| Brand | ciciglow |
| Model Number | ciciglowzaye0hc9o2-11 |
| Max Resolution | 66MP (Still Image) |
| Video Resolution | 2.5K (Maximum) |
| Digital Zoom | 16X |
| LCD Screen | 2.4 inches, 180° Flip |
| Fill Light | Built-in LED |
| Memory Card Support | Up to 32GB (Class 10 TF Card) |
| Battery Type | 600mAh, 602050, 3.7V, 2.22Wh Lithium Polymer (Built-in) |
Warranty and Support
Warranty Information
This ciciglow Digital Camera is covered by a manufacturer's warranty for 90 days from the date of purchase. This warranty covers defects in materials and workmanship under normal use. It does not cover damage caused by misuse, accidents, unauthorized modifications, or natural disasters.
Customer Support
For technical assistance, troubleshooting, or warranty claims, please contact ciciglow customer support. Refer to the product packaging or the official ciciglow website for the most current contact information.
You can also visit the official ciciglow store on Amazon for more product information and support resources: ciciglow Amazon Store.