MAHVEC B0FH4Z4VPY
MAHVEC 4G+128G Car Radio Stereo Instruction Manual
Model: B0FH4Z4VPY for Chrysler 300 2005-2010
1. Introduction
This manual provides detailed instructions for the installation, operation, and maintenance of your MAHVEC 4G+128G Car Radio Stereo. Please read this manual thoroughly before installation and use to ensure proper function and safety.
2. Applicable Models
This car stereo is compatible with Chrysler 300 and 300C models from 2005 to 2010.
Notice:
- Wiring with an amplifier: Connect the AMP CONT wire on the power cable to the AMP CONT on the RCA cable.
- Before purchasing, please verify your car's model year and dashboard shape. If uncertain, send a dashboard photo to MAHVEC for a compatibility check.

Image: Dashboard compatibility check. The image displays two dashboard configurations, one labeled 'Fit' and the other 'Not Fit', highlighting the importance of verifying dashboard shape before installation.
3. What's in the Box
- Car Stereo for Chrysler 300
- Backup Camera
- Microphone

Image: Packing List & Product Size. This image shows the car stereo unit, various cables (power, USB, RCA, GPS antenna, rear camera input), a user manual, installation tools, and a backup camera.
4. Key Features
- Upgraded In-Cell Screen: 1280×720P HD In-Cell full touch screen, thinner, lighter, with over 95% light transmittance and 20-30% faster touch response.
- 4GB RAM + 128GB ROM: Upgraded Android OS for smooth, reliable performance.
- Wireless CarPlay & Android Auto: Seamless smartphone integration for calls, music, navigation, and messaging.
- Online + Offline GPS & WiFi: Built-in GPS chip for offline navigation and WiFi connectivity for online map updates and entertainment.
- More Functions: Multi EQ settings, built-in FM/RDS radio, steering wheel controls, AHD backup camera (170° wide-angle, IP69 waterproof, night vision), Bluetooth 5.0 for stable connectivity and precise positioning.

Image: Incell Screen features. This graphic illustrates the benefits of the In-Cell screen, including 68% light transmittance, precise touch response, ultra-slim and lightweight design, and a crystal-clear display.
5. Setup & Installation
5.1. Disconnecting the Car Battery
- Locate the car battery in the trunk, typically by the rear tire well.
- Lift the carpet flap to access the battery.
- Using a 10mm socket, loosen the bolt holding the positive terminal to the connector.
- Remove the positive terminal connector. Wiggle it free if necessary.
- Place the disconnected terminal to the side, ensuring it does not touch any metal parts to prevent short circuits.
Video: Center console disassembly wiring video. This video demonstrates the process of disconnecting the car battery and removing the positive terminal.
5.2. Removing the Old Head Unit
- Use a pry tool (plastic is recommended to avoid damage) to carefully remove the trim around the head unit in the center console. Start from the bottom corners and work your way up.
- Once the trim is loose, gently pull it back. Most components in the center console are attached to this trim.
- Disconnect the plugs from the climate control unit (bottom), the clock (top), and the traction control/hazard light section (under the clock). There are typically three plugs at the bottom and two at the top.
- After disconnecting all plugs, the trim panel can be fully removed.
- Locate the four Phillips head screws holding the old radio (head unit) in place, one at each corner. Remove these screws.
- Carefully pull the radio out at an angle to access the plugs at the back. There is usually one large central plug. Disconnect it.
Video: Center console disassembly wiring video. This video demonstrates the removal of the center console trim and the old head unit.
5.3. Transferring Components to the New Bezel
The new head unit comes with a new bezel. You will need to transfer the climate control unit, air vents, clock, and hazard/traction control buttons from your old trim to the new bezel.
- Climate Control Unit: This unit is typically held by four hex-head screws, one at each corner. Unscrew them to remove the unit.
- Air Vents: The vents are held by several clips (approximately four on each side). Gently push back the clips while pulling the vent out.
- Clock: The clock is secured by two screws (the same type as the climate control screws). Unscrew them and carefully remove the clock.
- Hazard/Traction Control Button: This button is also held by screws. Remove them to detach the button.
- Once all components are removed from the old trim, install them into the corresponding slots on the new bezel. Installation is the reverse of removal.
5.4. Wiring Connections
Refer to the wiring diagram provided with your product for specific connections. The main connections include:
- 4G Antenna: Connect the 4G antenna to its designated port on the back of the car radio.
- GPS Antenna: Connect the GPS antenna to its port.
- Factory Radio Antenna: Connect your car's factory radio antenna to the ANT port.
- Rear Camera Signal Cable: Connect the rear camera signal cable to the 10-pin reversing video input port.
- USB Cables: Connect the 4-pin and 6-pin USB cables to their respective ports.
- Radio Power Cable: Connect the main power cable to the 16-pin port.
- Canbus Cable: Connect the 8-pin Canbus cable.
- Audio Output Ports (RCA): Connect male AUX cables to the audio output ports from the 20-pin RCA cable. This is necessary if your car has a factory amplifier.
- External Microphone: Connect the external microphone to the 3.5mm port on the RCA cables.

Image: Reversing Camera Wiring. This diagram illustrates how to connect the reversing camera, including the reverse trigger cable, video signal cable, and power connections.
Video: Jufodrca Radio Wiring Video. This video provides a detailed guide on connecting the various wiring harnesses to the car stereo.
6. Operating Instructions
6.1. Wireless CarPlay & Android Auto Connection
To connect your smartphone wirelessly, ensure Bluetooth is enabled on your phone and the car stereo. Pair your phone with the car stereo via Bluetooth. Once paired, open the Zlink app on the car stereo to initiate CarPlay or Android Auto.
Video: Car Radio Stereo Carplay Connect Instructions. This video demonstrates the steps to connect your smartphone for Wireless CarPlay and Android Auto.

Image: Wireless Carplay & Android Auto. This image displays the seamless integration of smartphone apps like navigation, music, and messaging on the car stereo screen.
6.2. iPhone Wireless Connection (Mirroring)
For iPhone mirroring, first set up a Personal Hotspot on your iPhone and connect the car stereo to this hotspot. Then, on your iPhone, select Screen Mirroring and choose the car stereo device (e.g., 'ZJ-airplay').
Video: Car Radio Stereo Carplay Connect Instructions (iPhone Wireless Connection segment). This video demonstrates the steps for iPhone wireless mirroring.
6.3. Android Wireless Mirroring
For Android mirroring, connect your phone to the car stereo via Bluetooth. Turn on Personal Hotspot on your Android phone and connect the car stereo to it. Open the mirroring app on your phone (e.g., 'Link Innovation') and click 'Start Mirroring'.
Video: Car Radio Stereo Carplay Connect Instructions (Android Wireless Mirroring segment). This video demonstrates the steps for Android wireless mirroring.
6.4. Bluetooth 5.0
The Bluetooth 5.0 and upgraded chip enable faster pairing, stable connectivity, and precise positioning. Ideal for hands-free calls and music streaming.

Image: Bluetooth Functionality. This image illustrates the Bluetooth interface for hands-free calling and music playback.
6.5. GPS Navigation (Online/Offline)
The Android radio has a built-in GPS chip that supports offline GPS navigation. WiFi connectivity allows for online map updates or downloading online navigation software.

Image: GPS Navigation & WiFi. This image highlights the online and offline map functionalities, along with the ability to download other entertainment applications via WiFi.
6.6. FM/RDS Radio
The unit includes a built-in FM/RDS radio. You can select stations and enjoy clear audio with RDS information.

Image: FM/RDS Radio & EQ Adjustment. This image shows the radio interface with station presets and an equalizer adjustment screen.
6.7. Steering Wheel Controls (SWC)
The car stereo works with steering wheel controls for screen-free use. You can configure the buttons to control various functions like volume, track skipping, and calls.

Image: Steering Wheel Control. This image displays the interface for setting up and customizing steering wheel controls.
6.8. EQ Settings
Utilize the multi EQ settings with presets and adjustable volume, fader, balance, treble, and bass to customize your audio experience.
Image: FM/RDS Radio & EQ Adjustment. This image shows the equalizer adjustment screen with various frequency bands and sound field options.
6.9. AHD Backup Camera
The system comes with an AHD backup camera featuring a 170° wide-angle view, IP69 waterproof rating, and night vision capabilities for enhanced safety.
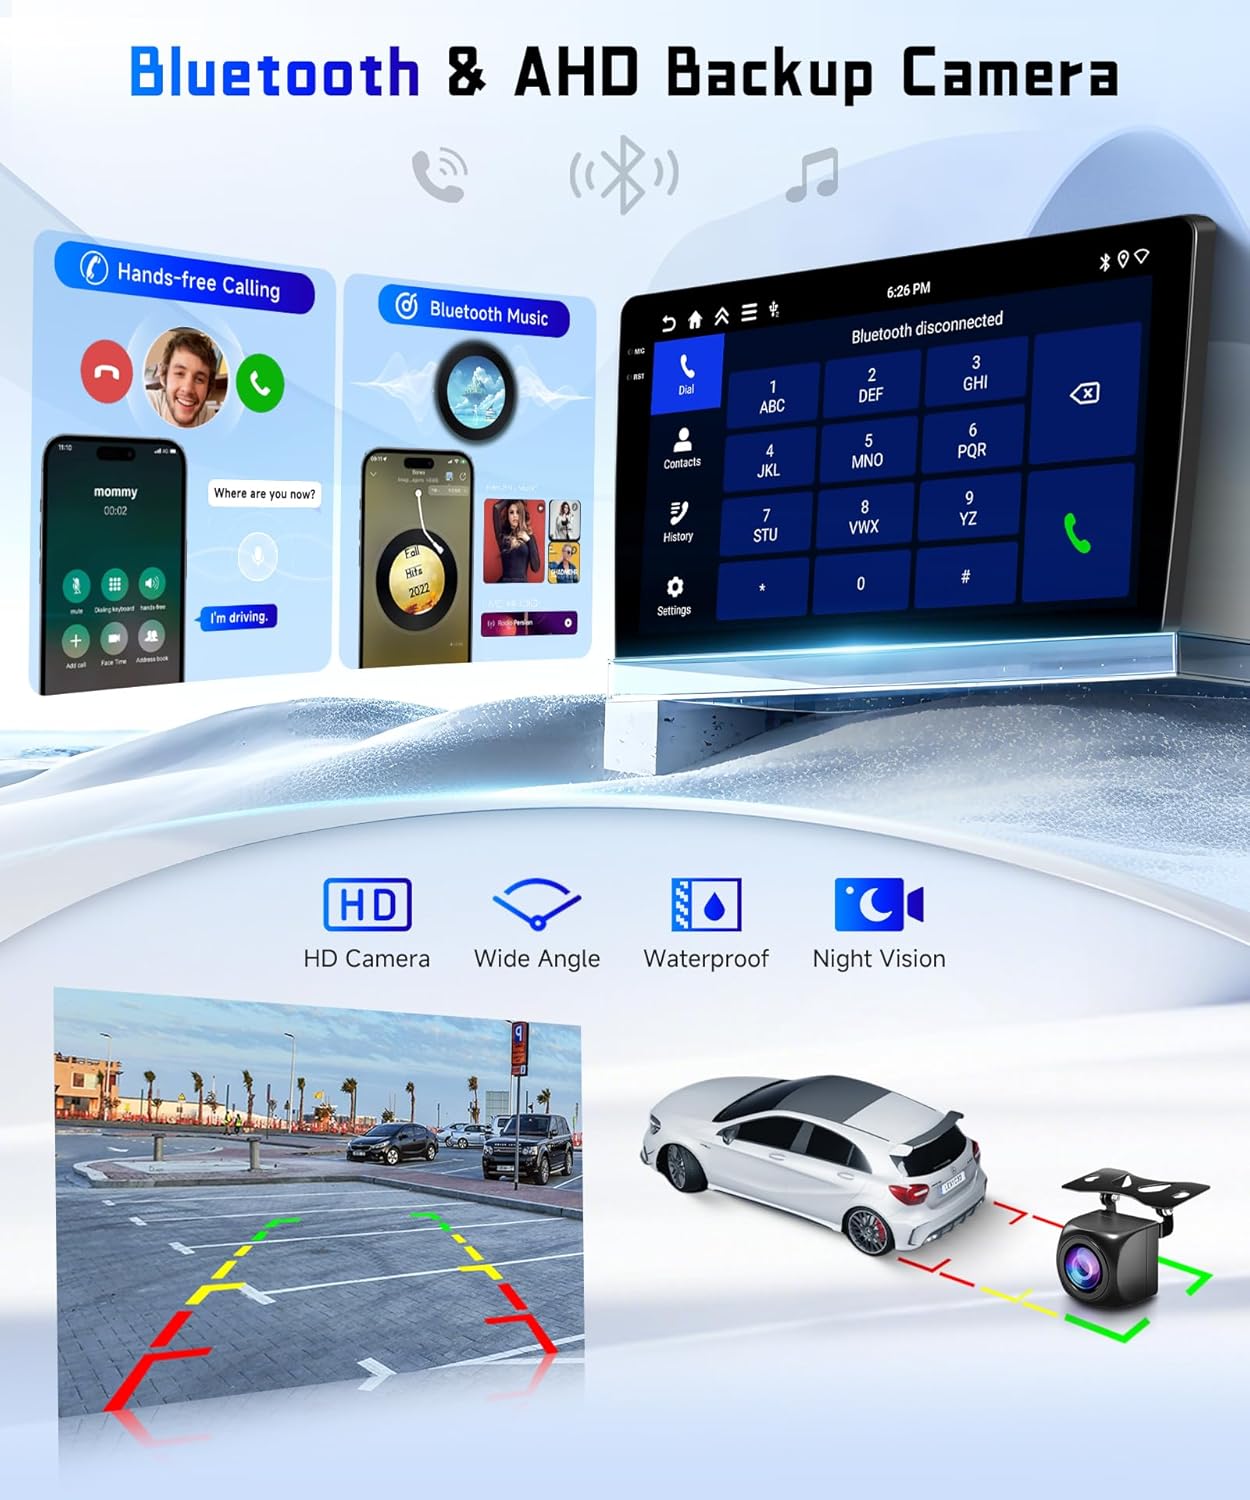
Image: Bluetooth & AHD Backup Camera. This image illustrates the features of the AHD backup camera, including HD quality, wide-angle view, waterproofing, and night vision, along with a sample view on the car stereo screen.
6.10. 5G WiFi
Enjoy fast and stable internet connectivity with 5G WiFi support for online streaming, app updates, and browsing.
Image: GPS Navigation & WiFi. This image highlights the online and offline map functionalities, along with the ability to download other entertainment applications via WiFi.
7. Maintenance
To ensure the longevity and optimal performance of your car stereo, follow these maintenance guidelines:
- Screen Cleaning: Use a soft, lint-free cloth dampened with a screen cleaner (or water) to gently wipe the screen. Avoid harsh chemicals.
- Software Updates: Periodically check for and install software updates to ensure the system runs smoothly and has the latest features.
- Cable Connections: Ensure all cables are securely connected. Loose connections can lead to intermittent issues.
- Ventilation: Ensure the unit's ventilation areas are not blocked to prevent overheating.
8. Troubleshooting
If you encounter any issues, refer to the following common troubleshooting steps:
- No Power: Check all power cable connections and ensure the car battery is properly connected. Verify fuses.
- No Sound: Check speaker connections, audio output cables, and EQ settings. Ensure volume is not muted.
- Touch Screen Unresponsive: Try restarting the unit. If the issue persists, check for software updates.
- CarPlay/Android Auto Connection Issues: Ensure Bluetooth is on and paired. Check WiFi connection for wireless mirroring. Try reconnecting the device.
- GPS Signal Loss: Ensure the GPS antenna is properly installed and has a clear view of the sky.
For persistent issues, please contact MAHVEC customer support.
9. Specifications
- Item Weight: 3.5 pounds
- Package Dimensions: 7.87 x 5.91 x 3.5 inches
- Display Size: 9 Inches
- Operating System: Android 15
- Memory: 4GB RAM + 128GB ROM
- Connectivity Technology: Bluetooth 5.0, USB, Wi-Fi (5Ghz supported)
- Special Features: In-Cell Touch Screen, Wireless CarPlay/Android Auto, GPS, FM/RDS, Steering Wheel Control, AHD Backup Camera
- Map Type: Worldwide
- Mounting Type: Dashboard Mount
10. Warranty
This product comes with a 3-year warranty. For warranty claims or service, please retain your proof of purchase and contact MAHVEC customer support.
11. Support
For further assistance, technical support, or inquiries, please visit the MAHVEC Store on Amazon or refer to the contact information provided in your product packaging.
Ask a question about this manual
Ask about setup, troubleshooting, compatibility, parts, safety, or missing instructions. Manuals+ will review the question and use this page’s manual context to help answer it.