1. Introduction
This manual provides comprehensive instructions for the installation and use of the GeeekPi 10-inch 3U Rack Mount. This product is designed to seamlessly integrate 7-inch LCD screens into your DeskPi RackMate T0, T1, T2, T0 Plus, T1 Plus, or TL1 server cabinet setup. Please read these instructions carefully before proceeding with installation.
2. Product Features
- Compatibility: Specifically designed for DeskPi RackMate T1/T0/T2/T0 Plus/T1 Plus/TL1 server cabinets.
- Screen Support: Accommodates various 7-inch LCD screens, including official Raspberry Pi 7-inch screens.
- Rack Standard: Fits standard 10-inch 3U rack spaces.
- Material: Constructed from durable metal for robust support.
3. Product Dimensions
Refer to the diagram below for detailed product dimensions and hole spacing for different 7-inch screens.

Figure 3.1: Product Dimensions and Screen Mounting Hole Spacing
4. Package Contents
Verify that all items listed below are present in your package.

Figure 4.1: Included Components
- 1x GeeekPi 7-inch Monitor Mounting Panel for 10-inch Rack
- 4x M2.5*4 mm Flat Head Screws
- 4x M2.5*6 mm Flat Head Screws
- 4x #10-32 5/16 Screws
- 4x 5*10*1 Washers
5. Setup and Installation
This section details the installation process for integrating a 7-inch LCD screen into the rack mount and subsequently into a DeskPi RackMate cabinet.
5.1. Installation for 52Pi 7-inch 1024x600 IPS Capacitive Touch Screen

Figure 5.1: 52Pi 7-inch Screen Installation Steps
- Step 1: Carefully place the 52Pi 7-inch 1024x600 IPS capacitive touch screen into the designated opening on the mounting panel. Ensure proper alignment.
- Step 2: Secure the screen to the mounting panel using the provided M2.5*4 mm flat head screws. Tighten gently to avoid overtightening.
- Step 3: Connect the necessary cables (e.g., HDMI, USB for touch, power) to the screen and any associated single-board computer (SBC) or device.
- Step 4: Install the assembled screen and mounting panel into your DeskPi RackMate cabinet using the #10-32 5/16 screws and washers.
5.2. Installation for Official Raspberry Pi 7-inch Touch Screen
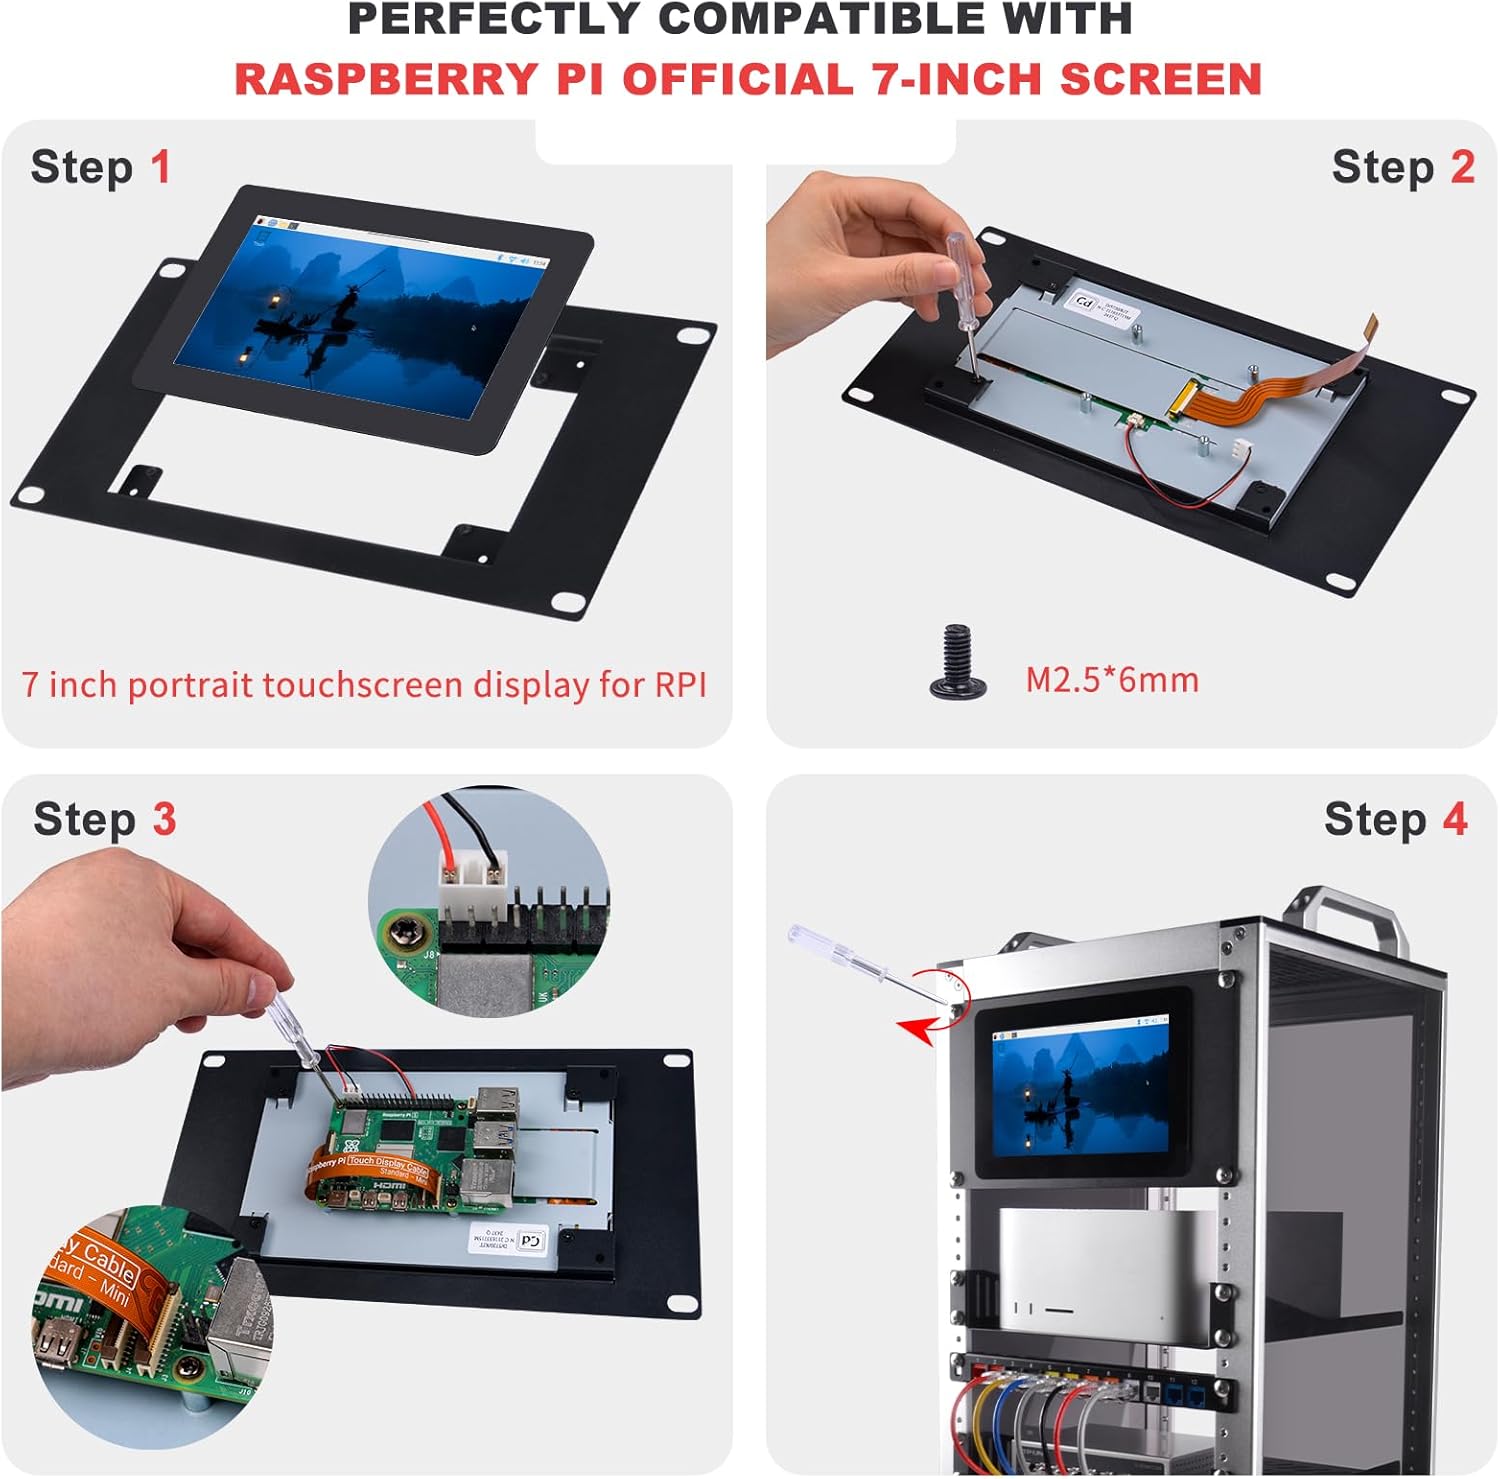
Figure 5.2: Official Raspberry Pi 7-inch Screen Installation Steps
- Step 1: Position the official Raspberry Pi 7-inch portrait touchscreen display into the mounting panel's opening, ensuring correct orientation.
- Step 2: Secure the screen to the mounting panel using the provided M2.5*6 mm flat head screws.
- Step 3: Connect the display's ribbon cable to your Raspberry Pi and attach any necessary power connections.
- Step 4: Mount the assembled screen and panel into your DeskPi RackMate cabinet using the #10-32 5/16 screws and washers.
5.3. Compatibility Overview
The rack mount is designed to be compatible with both 52Pi 7-inch screens and official Raspberry Pi 7-inch screens, allowing for flexible integration into your DeskPi RackMate system.

Figure 5.3: Compatibility with Various 7-inch Screens
6. Operating
Once installed, the GeeekPi 10-inch 3U Rack Mount functions as a stable and secure housing for your 7-inch LCD screen within your DeskPi RackMate. Ensure all mounting screws are tightened appropriately to prevent movement or vibration. The operation of the screen itself will depend on the specific 7-inch LCD model and its connection to your server components.
7. Maintenance
- Cleaning: Use a soft, dry cloth to wipe the rack mount. Avoid abrasive cleaners or solvents that could damage the finish.
- Periodic Inspection: Periodically check all screws and connections to ensure they remain secure. Tighten any loose fasteners as needed.
- Environment: Ensure the rack mount and screen are used in a clean, dry environment, free from excessive dust or moisture.
8. Troubleshooting
- Screen Does Not Fit: Verify that your 7-inch screen is compatible with the mounting holes. Refer to Figure 3.1 for hole spacing. Ensure you are using the correct screws (M2.5*4mm or M2.5*6mm) for your specific screen type.
- Mount Feels Loose: Ensure all #10-32 5/16 screws securing the mount to the DeskPi RackMate are fully tightened. Check that the washers are correctly placed.
- Difficulty Aligning: Double-check the orientation of the screen and the mounting panel before tightening screws. Slight adjustments may be needed during initial placement.
9. Specifications
| Feature | Specification |
|---|---|
| Brand | GeeekPi |
| Model Number | 3U |
| Material | Metal |
| Color | Black |
| Item Weight | 8.8 ounces (approx. 249 grams) |
| Package Dimensions | 10.47 x 5.67 x 1.73 inches |
| Compatible Devices | Server (DeskPi RackMate T0/T1/T2/T0 Plus/T1 Plus/TL1) |
| Screen Compatibility | 7-inch LCD screens (e.g., 52Pi, Official Raspberry Pi) |
10. Warranty and Support
For warranty information or technical support, please refer to the official GeeekPi website or contact your retailer. Keep your purchase receipt for warranty claims.