1. Introduction
Thank you for purchasing the Juson Audio JTA200 EL34 Tube Amplifier. This high-fidelity hybrid stereo amplifier combines the warmth of tube amplification with the efficiency of solid-state technology, delivering a rich and dynamic audio experience. This manual provides essential information for the safe and optimal use of your amplifier, including setup, operation, maintenance, and troubleshooting.
2. Important Safety Instructions
- Read all instructions carefully before operating the amplifier.
- Keep this manual for future reference.
- Do not expose this appliance to rain or moisture.
- Do not block any ventilation openings. Ensure adequate airflow around the unit.
- Do not install near any heat sources such as radiators, heat registers, stoves, or other apparatus that produce heat.
- Protect the power cord from being walked on or pinched.
- Only use attachments/accessories specified by the manufacturer.
- Unplug this apparatus during lightning storms or when unused for long periods.
- Refer all servicing to qualified service personnel. Servicing is required when the apparatus has been damaged in any way.
- High voltage is present inside. Do not open the casing.
3. Package Contents
Please check that all items are present in the package:
- Juson Audio JTA200 Amplifier
- User Manual (this document)
- Remote Control (batteries not included)
- Bluetooth Antenna
- Power Cable
4. Product Overview
4.1 Front Panel
The front panel provides access to essential controls and indicators.
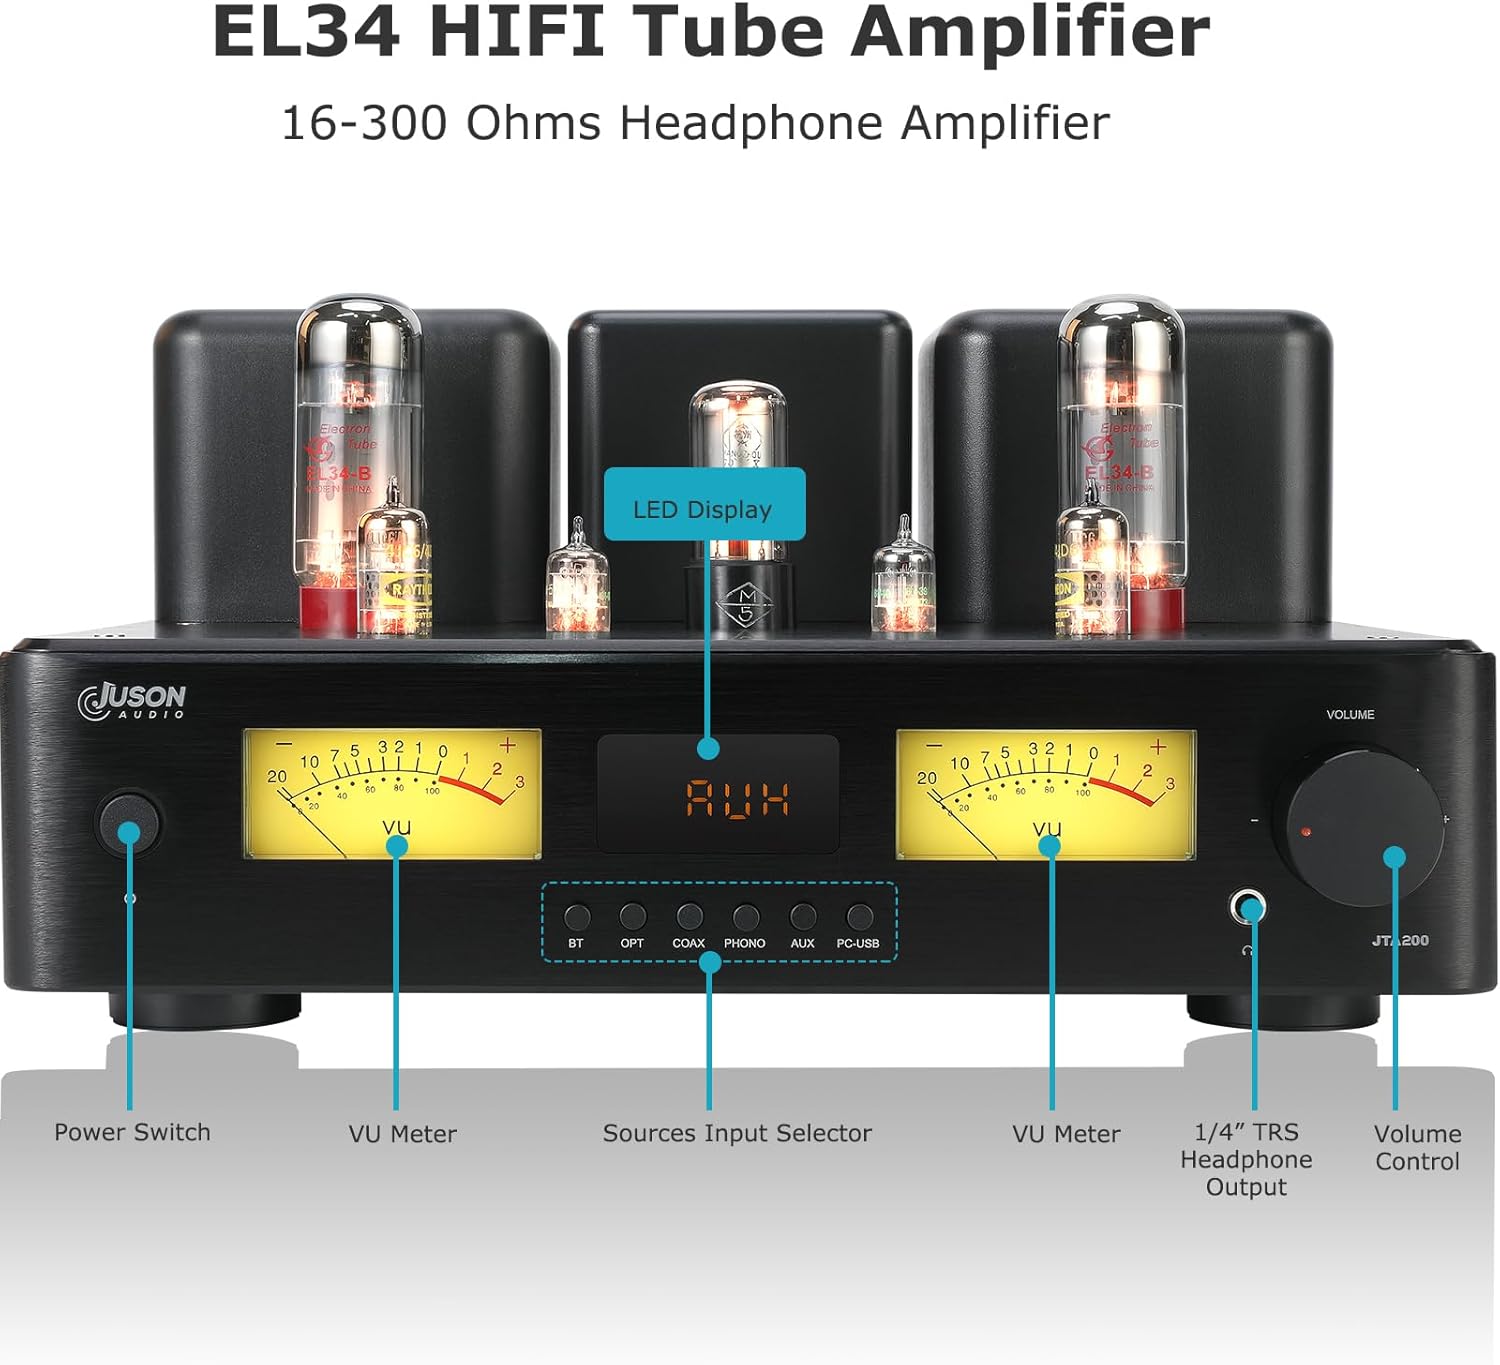
Figure 4.1: Front Panel Layout
- Power Switch: Turns the amplifier on or off.
- VU Meter: Displays the audio output level for each channel.
- LED Display: Shows the currently selected input source.
- Source Input Selector Buttons: Allows selection between BT (Bluetooth), OPT (Optical), COAX (Coaxial), PHONO, AUX, and PC-USB inputs.
- 1/4" TRS Headphone Output: Connects headphones.
- Volume Control: Adjusts the overall output volume.
4.2 Rear Panel
The rear panel houses all input and output connections.

Figure 4.2: Rear Panel Connections
- PC-USB Input: Connects to a computer for digital audio playback.
- SW. OUT (Subwoofer Output): Connects to an active subwoofer.
- BT ANTENNA: Connection point for the Bluetooth antenna.
- AUX RCA Input: Connects analog audio sources (e.g., CD player).
- PHONO RCA Input: Connects a turntable (with built-in pre-amp or external pre-amp). Includes a Ground Terminal.
- OPT (Optical) Input: Connects digital optical audio sources.
- COAX (Coaxial) Input: Connects digital coaxial audio sources.
- HEADPHONE H-GAIN-L Switch: Selects high or low gain for the headphone output.
- Passive Speakers Output: Connects passive stereo speakers (Left and Right channels).
- Noiseless Cooling Fan: Provides active cooling for internal components.
- AC115V or AC230V Voltage Selector Switch: Selects the appropriate input voltage (ensure this is set correctly before powering on).
- AC Power Input: Connects the power cable.
4.3 Internal Components (Tubes)
The JTA200 features a hybrid design utilizing specific vacuum tubes for optimal audio performance.


Figure 4.3: EL34, 4JC6, and 5726 Vacuum Tubes
The amplifier uses 2x EL34 tubes for power amplification, 2x 4JC6 preamp tubes for signal processing, and 2x 5726 rectifier tubes for power conversion. Additionally, it incorporates 4x 2SA1943 and 4x 2SC5200 Toshiba transistors for the solid-state section.
5. Setup
5.1 Unpacking and Placement
- Carefully remove the amplifier and all accessories from the packaging.
- Place the amplifier on a stable, level surface away from direct sunlight, heat sources, and moisture.
- Ensure there is adequate space around the unit for ventilation, especially around the tubes and cooling fan.
5.2 Tube Installation
The tubes may be pre-installed or require installation. If installation is required:
- Carefully remove the protective cage (if present) or any packing material around the tubes.
- Identify the correct sockets for each tube type (EL34, 4JC6, 5726). The sockets are typically labeled.
- Align the pins of each tube with the corresponding holes in the socket. Ensure the keyway on the tube base aligns with the notch on the socket.
- Gently push the tube straight down into the socket until it is firmly seated. Do not force it.
- The JTA200 also features a preamp tube switch, allowing for potential upgrades to ECC83/12AX7 tubes. Ensure this switch is set correctly for the installed preamp tubes.

Figure 5.1: Preamp Tube Switch
5.3 Connecting Audio Sources
Connect your audio sources to the appropriate inputs on the rear panel.

Figure 5.2: Rear Panel Input Connections
- AUX (RCA): For analog devices like CD players, tuners, or media players.
- PHONO (RCA): For turntables. If your turntable has a ground wire, connect it to the GND terminal.
- OPT (Optical): For digital audio sources like TVs, game consoles, or digital media players.
- COAX (Coaxial): For digital audio sources with a coaxial output.
- PC-USB: Connects to a computer via a USB-B cable for high-quality digital audio playback.
5.4 Connecting Speakers
Connect your passive stereo speakers to the speaker terminals on the rear panel. Ensure correct polarity (+ to + and – to –) for both left and right channels.
5.5 Connecting a Subwoofer
If you have an active subwoofer, connect its input to the SW. OUT (Subwoofer Output) on the rear panel using an RCA cable.
5.6 Bluetooth Antenna Installation
Screw the provided Bluetooth antenna into the BT ANTENNA connector on the rear panel. Ensure it is securely tightened for optimal signal reception.
5.7 Power Connection and Voltage Selection
- Before connecting the power cable, verify that the AC115V or AC230V Voltage Selector Switch on the rear panel is set to match your local mains voltage. Incorrect voltage selection can damage the unit.
- Connect the supplied power cable to the AC Power Input on the rear panel and then to a suitable wall outlet.
6. Operation
6.1 Powering On/Off
Press the Power Switch on the front panel to turn the amplifier on or off. Allow a few moments for the tubes to warm up after powering on.
6.2 Input Selection
Use the Source Input Selector Buttons on the front panel or the remote control to switch between the connected audio sources (BT, OPT, COAX, PHONO, AUX, PC-USB). The selected input will be displayed on the LED display.
6.3 Volume Adjustment
Rotate the Volume Control knob on the front panel or use the volume buttons on the remote control to adjust the output volume. Start with a low volume and gradually increase it to a comfortable listening level.
6.4 Headphone Output and Gain Switch
Connect your headphones to the 1/4" TRS Headphone Output on the front panel. The JTA200 supports headphones with impedance from 16 to 600 ohms.

Figure 6.1: Headphone Output and Gain Switch
Use the HEADPHONE H-GAIN-L Switch on the rear panel to select between high (H) and low (L) gain settings. Choose the appropriate gain based on your headphone's impedance and sensitivity to achieve optimal volume and sound quality without distortion.
6.5 Bluetooth Pairing
To connect a Bluetooth device:

Figure 6.2: Bluetooth Connectivity
- Select the BT input on the amplifier. The LED display will show 'BT'.
- On your Bluetooth device (e.g., smartphone, tablet), enable Bluetooth and search for available devices.
- Select 'JTA200' from the list of devices to pair.
- Once paired, you can stream audio wirelessly to the amplifier. The JTA200 supports aptX Adaptive, aptX HD, LDAC, and AAC codecs for high-quality streaming.
- Ensure your Bluetooth device's volume is set appropriately to avoid low output from the amplifier.
6.6 Remote Control Functions
The included remote control allows for convenient adjustment of volume and input selection from a distance. Insert two AAA batteries (not included) into the remote before use.
6.7 Understanding the LED Display and VU Meters
The LED Display indicates the currently active input source. The VU Meters provide a visual representation of the audio signal level for each channel, allowing you to monitor the output in real-time.
7. Maintenance
7.1 Cleaning
To clean the amplifier, disconnect it from the power outlet. Use a soft, dry cloth to wipe the exterior surfaces. Do not use liquid cleaners or abrasive materials, as they may damage the finish.
7.2 Tube Replacement
Vacuum tubes have a finite lifespan and may need replacement over time. If you notice a degradation in sound quality or a tube fails, contact qualified service personnel or refer to specific tube replacement guides. Always ensure the amplifier is powered off and unplugged, and the tubes have cooled down before attempting any tube handling.
7.3 Cooling Fan
The JTA200 is equipped with a noiseless cooling fan to maintain optimal operating temperatures. Ensure the fan's vents are not obstructed to allow for proper airflow.

Figure 7.1: Cooling Fan
8. Troubleshooting
If you experience issues with your JTA200 amplifier, please consult the following common problems and solutions:
| Problem | Possible Cause | Solution |
|---|---|---|
| No power | Power cable not connected; Power switch off; Incorrect voltage selection; Blown fuse | Check power cable connection; Turn power switch on; Verify voltage selector switch setting; Consult service personnel for fuse replacement. |
| No sound | Incorrect input selected; Volume too low; Speaker cables loose/incorrectly connected; Source device not playing/muted; Faulty tubes | Select correct input; Increase volume; Check speaker connections and polarity; Ensure source device is active; Consult service personnel for tube inspection. |
| Distorted sound | Volume too high; Source signal too strong; Faulty cables; Damaged speakers; Tube issues | Reduce volume; Check source output level; Replace cables; Test with different speakers; Consult service personnel. |
| Bluetooth not connecting | BT input not selected; Device not in pairing mode; Antenna loose; Interference | Select BT input; Put device in pairing mode; Re-attach BT antenna; Move device closer to amplifier; Restart both devices. |
| Humming/Buzzing noise | Ground loop; Interference from other electronics; Loose connections; Faulty tubes | Ensure proper grounding; Move amplifier away from other electronics; Check all cable connections; Consult service personnel. |
If the problem persists after trying these solutions, please contact Juson Audio customer support.
9. Specifications
| Feature | Specification |
|---|---|
| Model | JTA200 |
| Output Power | 150W RMS per channel (300W total) |
| Tube Complement | 2x EL34, 2x 4JC6, 2x 5726 |
| Transistors | 4x 2SA1943, 4x 2SC5200 (Toshiba) |
| Inputs | AUX (RCA), COAX, PHONO (RCA), OPT (Optical), PC-USB, Bluetooth 5.4 |
| Outputs | Passive Speakers, Headphone (1/4" TRS), Active Subwoofer (RCA) |
| Headphone Impedance | 16-600 ohms (with High/Low gain switch) |
| Bluetooth Version | 5.4 (QCC3095 chip) |
| Bluetooth Codecs | aptX Adaptive, aptX HD, LDAC, AAC |
| Product Dimensions | 14.88 x 14.88 x 8.15 inches |
| Item Weight | 31.9 pounds |
| Manufacturer | Shenzhen Juson Technology Co.,Limited |
| Date First Available | October 9, 2024 |
10. Warranty and Support
For warranty information and technical support, please refer to the warranty card included with your product or contact Juson Audio customer service directly. Keep your proof of purchase for any warranty claims.
Manufacturer: Shenzhen Juson Technology Co.,Limited
Contact Information: Please refer to the official Juson Audio website or your purchase documentation for the most current support contact details.