1. Introduction
This manual provides detailed instructions for the setup, operation, and maintenance of your WallarGe Large Digital Wall Clock, Model CL8003. This electric clock features a clear LED display, temperature, date, and day indicators, automatic Daylight Saving Time (DST) adjustment, and adjustable brightness levels. Please read this manual thoroughly before use to ensure proper functionality and longevity of your device.
Video 1: Overview of the WallarGe Large LED Digital Wall Clock. This video demonstrates the clock's various features and display options.
2. Package Contents
Please verify that all items are present in your package:
- WallarGe Large Digital Wall Clock (CL8003)
- Power Adapter
- 5ft Power Cord
- Mounting Accessories (screws, wall anchors)
- User Manual
- Memory Battery (pre-installed)

Image 1: Contents included with the WallarGe Large Digital Wall Clock.
3. Product Overview
Familiarize yourself with the main components and display elements of your clock.
3.1 Front Display

Image 2: Front display of the WallarGe digital clock, showing time, temperature, day, and date.
3.2 Rear Panel and Controls

Image 3: Rear view of the clock, indicating the location of control buttons, power input, wall mounting holes, the foldable stand, and the memory battery compartment.
- UP / 12/24HR Button: Adjusts values up during setting; toggles 12/24-hour format.
- TIME SET Button: Enters and confirms time/date setting mode.
- DOWN / °C/°F Button: Adjusts values down during setting; toggles temperature unit.
- ALARM SET / ON/OFF Button: Sets alarm; turns alarm on/off.
- DST ON/OFF Button: Activates or deactivates Daylight Saving Time.
- DIMMER Button: Adjusts display brightness.
- Power Port: Connects to the power adapter.
- Hanging Holes: For wall mounting.
- Foldable Stand: For tabletop placement.
- Memory Battery Compartment: Houses the backup battery.
4. Setup
4.1 Powering On
Connect the provided power adapter to the clock's power port and plug it into a standard electrical outlet. The clock is designed for continuous plug-in operation. A pre-installed memory battery preserves your settings during power outages, eliminating the need for frequent resets.

Image 4: Explanation of the clock's power source and memory battery function.
4.2 Initial Settings (Time, Date, Year, Alarm)
Follow these steps to set the clock's time, date, and year. The day of the week will automatically synchronize based on the set year and date.
- Press and hold the TIME SET button for 3 seconds to enter setting mode. The year display will flash.
- Use the UP / 12/24HR or DOWN / °C/°F buttons to adjust the year. Press TIME SET to confirm and move to the next setting.
- Repeat the process for setting the month, day, hour, and minute.
- To set the alarm, press and hold the ALARM SET / ON/OFF button. Use the UP or DOWN buttons to set the desired alarm time. Press ALARM SET to confirm.
Video 2: Detailed instructions on how to set up the WallarGe digital clock, including time, date, and alarm settings.
4.3 Daylight Saving Time (DST)
The clock features an automatic DST function. To enable or disable it:
- Press the DST ON/OFF button to toggle the automatic DST feature. When enabled, the clock will automatically adjust for spring forward and fall back.

Image 5: Visual representation of the automatic Daylight Saving Time adjustment.
5. Operating Instructions
5.1 Adjusting Brightness
The clock offers 5 levels of adjustable brightness to suit various environments and preferences.
- Press the DIMMER button repeatedly to cycle through the 5 brightness levels (20%, 40%, 60%, 80%, 100%).

Image 6: Demonstration of the 5-level adjustable brightness feature.
5.2 Switching Display Modes
Easily switch between 12/24-hour time format and Celsius/Fahrenheit temperature units.
- Press the UP / 12/24HR button to toggle between 12-hour and 24-hour time formats.
- Press the DOWN / °C/°F button to toggle between Celsius (°C) and Fahrenheit (°F) temperature units.
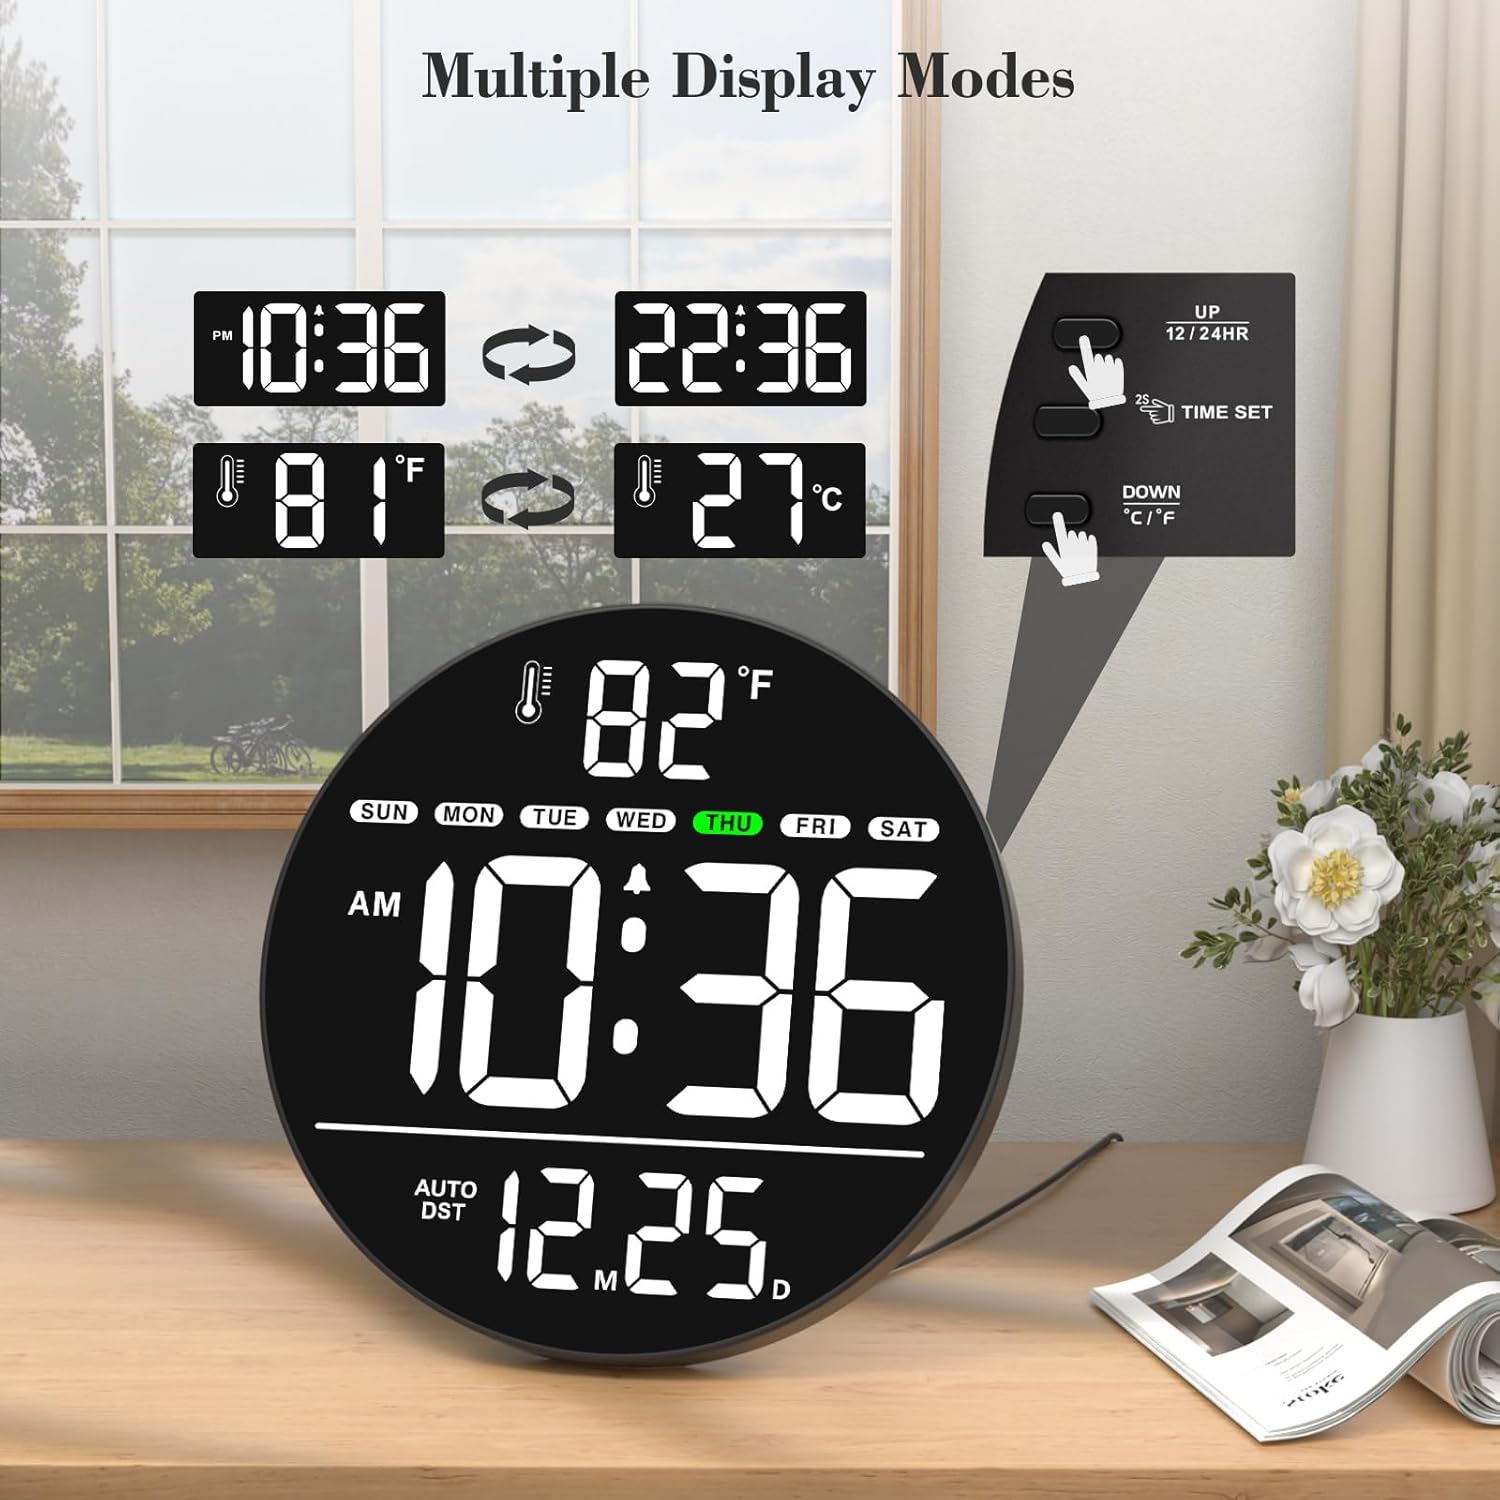
Image 7: Illustration of multiple display modes for time and temperature.
5.3 Placement Options
The clock can be either wall-mounted or placed on a tabletop using its integrated foldable stand.
- Wall Mount: Use the hanging holes on the rear panel and the provided mounting accessories to secure the clock to a wall.
- Tabletop: Extend the foldable stand on the rear panel to place the clock on any flat surface.
6. Maintenance
To ensure optimal performance and appearance of your WallarGe Digital Wall Clock, follow these maintenance guidelines:
- Cleaning: Gently wipe the display and casing with a soft, dry cloth. Avoid using abrasive cleaners, solvents, or chemical sprays, as these can damage the surface.
- Power Supply: Always use the original power adapter and cord provided with the clock. Ensure the power cord is not pinched or damaged.
- Memory Battery: The clock uses a memory battery to retain settings during power interruptions. If the clock consistently loses settings after a power outage, the memory battery may need replacement. Refer to the rear panel diagram for the battery compartment location.
- Environment: Place the clock in a dry environment, away from direct sunlight, extreme temperatures, and high humidity.
7. Troubleshooting
If you encounter any issues with your WallarGe Digital Wall Clock, please refer to the following common problems and solutions:
- No Display / Clock Not Turning On:
- Ensure the power adapter is securely plugged into both the clock and a working electrical outlet.
- Check if the power outlet is functional by plugging in another device.
- Incorrect Time/Date:
- Enter the setting mode by pressing and holding the TIME SET button and re-adjust the year, month, day, hour, and minute as described in Section 4.2.
- If the clock loses settings after a power outage, the memory battery may be depleted and require replacement.
- Day of the Week is Incorrect:
- The day of the week is automatically calculated based on the set year and date. Ensure the year, month, and day are set correctly.
- Temperature Display is Incorrect:
- Ensure the clock is placed in an area with stable ambient temperature, away from direct heat sources or drafts.
- Brightness Not Adjusting:
- Press the DIMMER button repeatedly to cycle through all 5 brightness levels. If it remains unresponsive, contact customer support.
- Alarm Not Sounding:
- Ensure the alarm time is set correctly and the alarm function is turned ON using the ALARM SET / ON/OFF button.
If these steps do not resolve the issue, please contact WallarGe customer support for further assistance.
8. Specifications
| Feature | Detail |
|---|---|
| Brand | WallarGe |
| Model Number | CL8003 |
| Display Type | Digital LED |
| Color | White (LED display color may vary by variant) |
| Special Features | Time, Alarm, Indoor Temperature, Date, Day of the Week, LED, Auto DST, 5-Level Dimmer |
| Product Dimensions | 0.7"W x 8"H |
| Power Source | Corded Electric (Adapter included) |
| Room Type | Classroom, Bedroom, Living Room, Office, Warehouse, Study Room, Dining Room |
| Mounting Type | Wall Mount, Tabletop |
| Frame Material | Plastic |
| Batteries Included | 1 Nonstandard Battery (for memory function) |
| Item Weight | 15.2 ounces |
| Manufacturer | ShenZhen litian technology Co.,Ltd |
9. Warranty and Support
WallarGe products are manufactured with quality and customer satisfaction in mind. For any product-related inquiries, technical support, or warranty claims, please contact our customer service team.
- Customer Support Email: WallarGe@outlook.com
- Warranty Information: Please retain your proof of purchase for any warranty claims. Specific warranty terms and conditions may apply and are subject to the retailer's policy at the time of purchase.