1. Introduction
Thank you for choosing the KKMOL Cordless Soldering Iron Kit. This manual provides essential information for the safe and effective use of your soldering iron. This device offers both cordless and wired operation, precise temperature control, and is designed for various electronic and DIY soldering tasks. Please read this manual thoroughly before initial use and retain it for future reference.
2. Safety Instructions
- Always work in a well-ventilated area to avoid inhaling soldering fumes.
- The soldering iron tip reaches high temperatures (up to 450°C). Avoid direct contact with skin or flammable materials.
- Use appropriate personal protective equipment, including safety glasses, to protect against splashes of molten solder.
- Ensure the soldering iron is placed on a heat-resistant stand when not in use.
- Do not use the soldering iron near explosive gases or flammable liquids.
- Keep the device out of reach of children.
- Disconnect the power source (USB-C cable) when cleaning or performing maintenance.
- This soldering iron is not designed for heavy-duty industrial applications. Using it for such tasks may lead to damage or malfunction.
3. Package Contents
Verify that all items listed below are present in your package:
- 1 x KKMOL Cordless Soldering Iron
- 3 x Soldering Tips (Rounded, Horseshoe, Knife)
- 1 x Solder Wire
- 1 x Solder Paste
- 1 x Cleaning Sponge
- 1 x USB Type-C Charging Cable
- 1 x Tool Box
- 1 x Instruction Manual (this document)
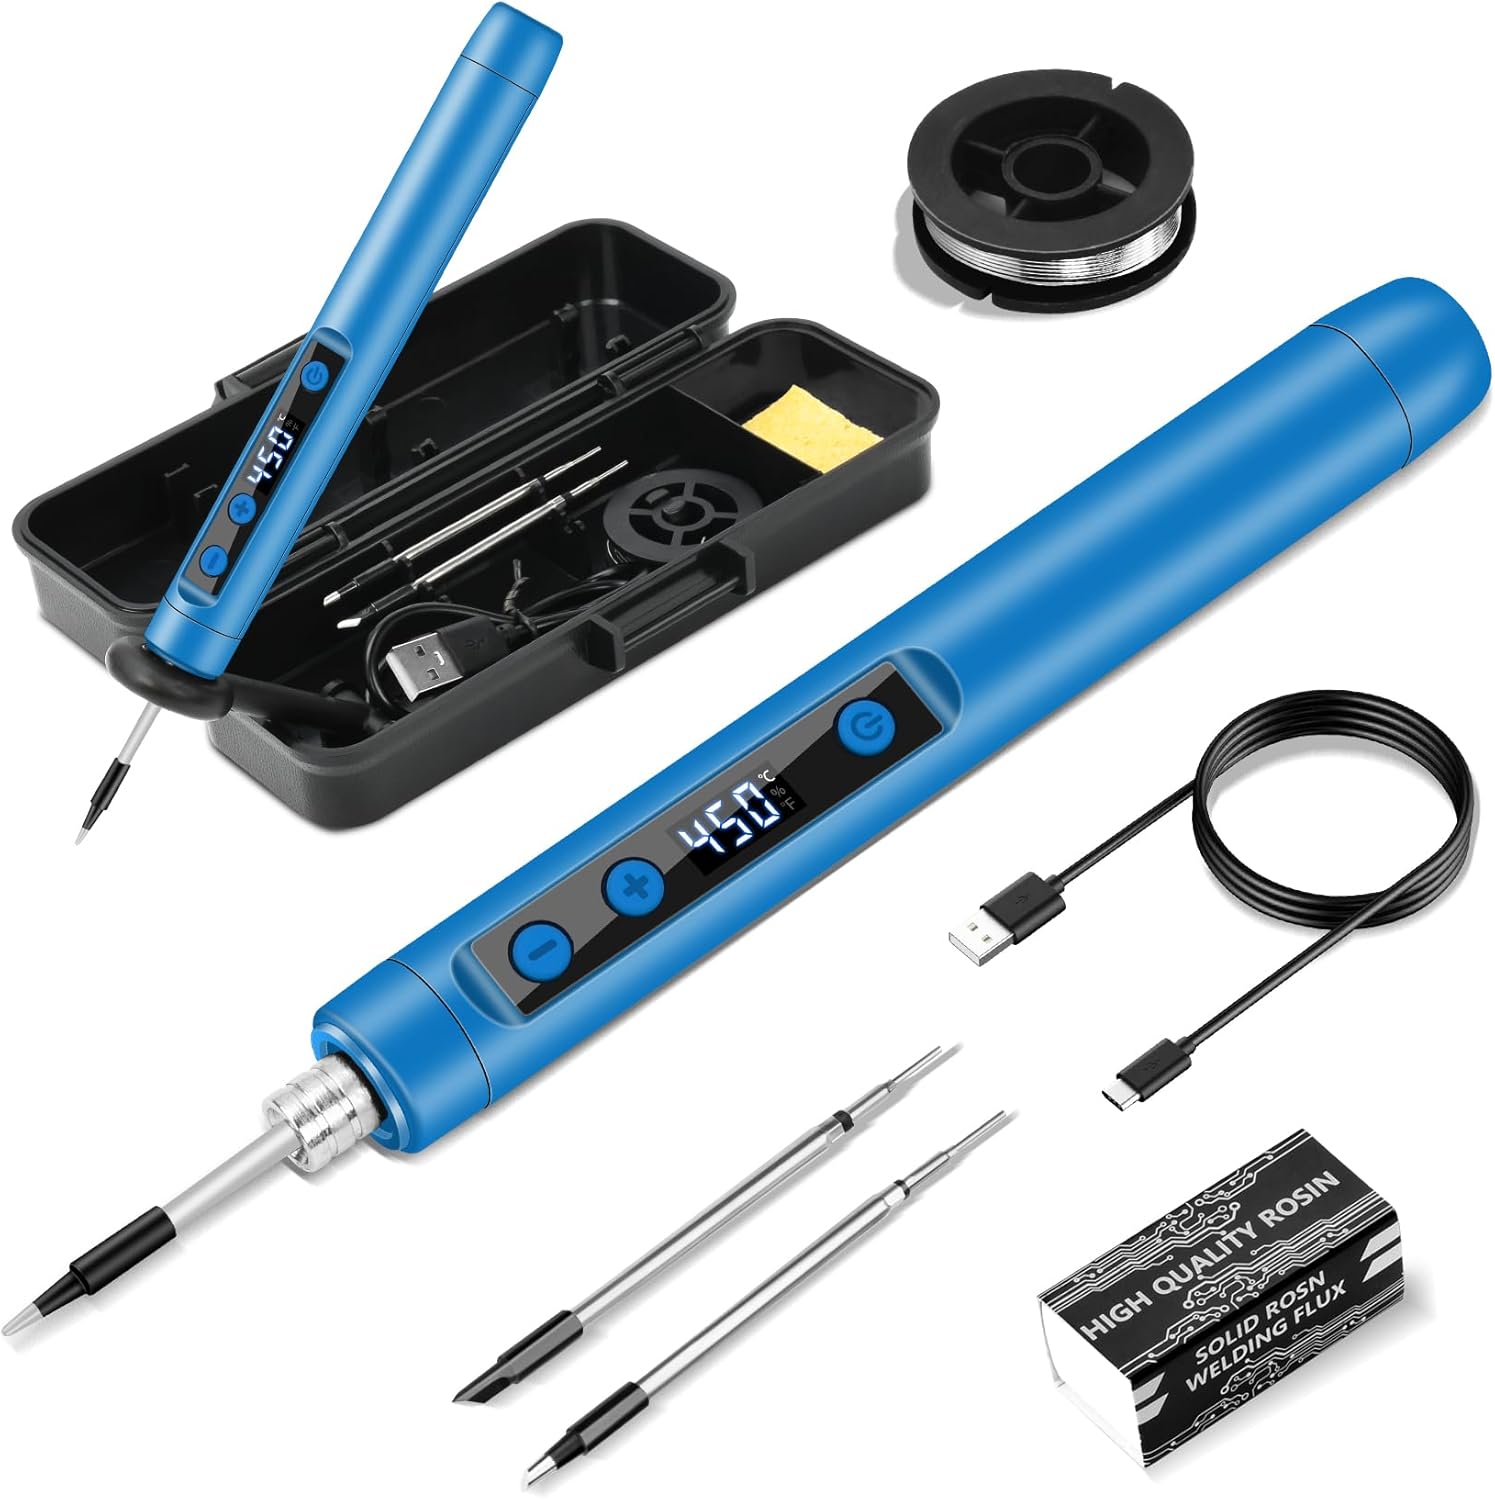
Figure 3.1: Complete KKMOL Cordless Soldering Iron Kit contents.
4. Product Overview
The KKMOL Cordless Soldering Iron features an ergonomic design with an integrated LCD for temperature display and control buttons for easy operation.

Figure 4.1: KKMOL Cordless Soldering Iron with LCD display.

Figure 4.2: LCD Temperature Display showing Celsius and Fahrenheit options.
5. Setup
5.1 Attaching Soldering Tips
- Ensure the soldering iron is off and cool.
- Carefully screw the desired soldering tip onto the heating element of the iron. Do not overtighten.
- To remove, unscrew the tip once the iron has cooled completely.

Figure 5.1: Illustration of tip insertion and removal.
5.2 Initial Charging
Before first use, fully charge the soldering iron. Connect the provided USB Type-C cable to the charging port on the iron and to a compatible USB power source (e.g., power bank, laptop, 5V1A-5V5A adapter). The LCD will indicate charging progress.

Figure 5.2: USB Type-C charging port and charging status display.
6. Operating Instructions
6.1 Power On/Off
- To Power On: Press and hold the power button for 3 seconds. The LCD will illuminate and display the current temperature.
- To Power Off: Press and hold the power button for 3 seconds again. The LCD will turn off.
6.2 Temperature Adjustment
- The temperature range is 180°C to 450°C.
- Press the '+' or '-' buttons to adjust the temperature in 5°C increments.
- Press and hold the '+' or '-' buttons for faster temperature changes.
- For most applications, a temperature of 380°C to 400°C is sufficient. Avoid prolonged use above 470°C to prevent premature wear of the soldering tip.
6.3 Celsius/Fahrenheit Switch
To switch between Celsius (°C) and Fahrenheit (°F) display, press the '+' and '-' buttons simultaneously.
6.4 Cordless and Wired Operation
- Cordless Mode: The internal 1100mAh battery provides approximately 30 minutes of operation on a full charge.
- Wired Mode: For extended use, connect the USB Type-C charging cable. The iron can be used while charging, providing continuous operation.

Figure 6.1: Basic operating instructions for the soldering iron.

Figure 6.2: Dual mode operation: Wireless and Wired.
7. Maintenance
7.1 Cleaning the Soldering Tip
Regularly clean the soldering tip to ensure optimal performance and extend its lifespan. Use the included cleaning sponge, dampened with water, to wipe off oxidation and excess solder from the hot tip. Do not use abrasive materials.
7.2 Tip Replacement
If a soldering tip becomes worn or damaged, replace it with a new one. Ensure the iron is cool before attempting to remove or attach tips.
7.3 Storage
After use, allow the soldering iron to cool completely. Store it in the provided tool box in a dry, safe place, away from moisture and extreme temperatures.
8. Troubleshooting
- Iron does not power on: Ensure the battery is charged. Connect the USB-C cable and try again. Verify the power button is pressed and held for 3 seconds.
- Iron does not heat up: Check if the iron is powered on and the temperature is set correctly. Ensure the soldering tip is properly attached. If operating in wired mode, verify the USB-C connection and power source.
- Temperature display is inaccurate: Ensure the tip is clean and properly seated. If the issue persists, contact customer support.
- Poor solder joint quality: Check the set temperature; it might be too low. Ensure the soldering tip is clean and properly tinned. Use fresh solder wire.
9. Specifications
| Feature | Specification |
|---|---|
| Brand | KKMOL |
| Model Number | IDCE0136-004 |
| Item Weight | 250 g |
| Package Dimensions | 19.8 x 7.8 x 5.2 cm |
| Power Source Type | Battery Powered (USB-C Rechargeable) |
| Wattage | 15 watts |
| Temperature Range | 180°C - 450°C |
| Included Components | Soldering Iron, 3 Soldering Tips, Solder Wire, Solder Paste, Cleaning Sponge, USB Type-C Charging Cable, Tool Box |
10. Warranty and Support
For warranty information or technical support, please refer to the contact details provided with your purchase or visit the official KKMOL website. Please have your model number (IDCE0136-004) available when contacting support.