1. Introduction
Thank you for choosing the magicplux Portable Countertop Dishwasher. This compact and efficient appliance is designed to provide convenient dishwashing for small kitchens, apartments, RVs, or offices. Featuring a color screen, multiple wash programs, and flexible water input options, this dishwasher ensures your dishes are thoroughly cleaned and dried. Please read this manual carefully before operation to ensure proper use, maintenance, and safety.
2. Safety Instructions
To reduce the risk of fire, electric shock, or injury, always follow these basic safety precautions:
- Read all instructions before using the dishwasher.
- Ensure the power supply matches the voltage specified on the rating label.
- Do not immerse the appliance, cord, or plug in water or other liquids.
- Keep children away from the dishwasher during operation and when the door is open.
- Use only detergents and rinse aids specifically designed for automatic dishwashers.
- Do not open the door during operation, as hot water may spray out.
- Always unplug the appliance before cleaning or performing maintenance.
- Do not operate the dishwasher if the power cord or plug is damaged.
3. Product Overview
3.1 Components
- Cutlery Basket
- Drain Hose
- Inlet Hose
- User Manual
- Water Filling Cup
3.2 Key Features
- Compact Design: Ideal for small spaces, offering 5 place settings capacity.
- Advanced Cleaning: Equipped with three 360° spray arms for thorough washing.
- User-Friendly Interface: Color touchscreen control panel for easy operation.
- Flexible Water Supply: Supports both 5L built-in water tank and direct faucet connection.
- Energy Efficient: 1-24 hour delay timer for off-peak washing, saving up to 30% energy.
- Enhanced Drying: Top vent design for improved thermal efficiency and fresh air circulation.
- Multiple Programs: 8 washing programs including Heavy, Normal, ECO, Speed, Rinse, Dry, Air Fresh, and Delay.

Front view of the magicplux Portable Countertop Dishwasher, showcasing its compact design and control panel.

An internal view of the dishwasher highlighting the triple spray arm system for 360-degree cleaning.
4. Setup
4.1 Unpacking
- Carefully remove the dishwasher from its packaging.
- Remove all packing materials, including internal and external protective films.
- Inspect the dishwasher for any damage during transit. Contact customer support if any damage is found.
- Place the dishwasher on a stable, level surface near a power outlet and a water source/drain.
4.2 Water Connection
The magicplux dishwasher offers two methods for water supply:
Tank Mode (No Plumbing Needed)
- Ensure the drain hose is properly installed and directed into a sink or bucket.
- Open the water inlet cap on the top of the dishwasher.
- Use the provided water filling cup to pour up to 5 liters of water into the tank.
- Close the water inlet cap securely.

A person refilling the magicplux dishwasher's built-in water tank from the front.
Faucet Mode (Direct Connection)
- Connect the inlet hose to the dishwasher's water inlet port and to a standard 20mm faucet adapter.
- Ensure all connections are tight to prevent leaks.
- Ensure the drain hose is properly installed and directed into a sink or bucket.
- Turn on the water supply to the faucet.

Diagram illustrating the two water input methods: direct tank filling and faucet connection.
5. Operating Instructions
5.1 Control Panel
The dishwasher features an intuitive color touchscreen control panel. Icons represent different wash programs and functions. Refer to the display for cycle status and remaining time.

Close-up of the dishwasher's color touchscreen control panel, showing various wash programs and features.
5.2 Loading Dishes
Proper loading ensures optimal cleaning performance. Scrape off large food particles before loading. Place larger items in the lower rack and smaller items, cups, and cutlery in the upper basket or cutlery holder. Ensure spray arms are not obstructed.
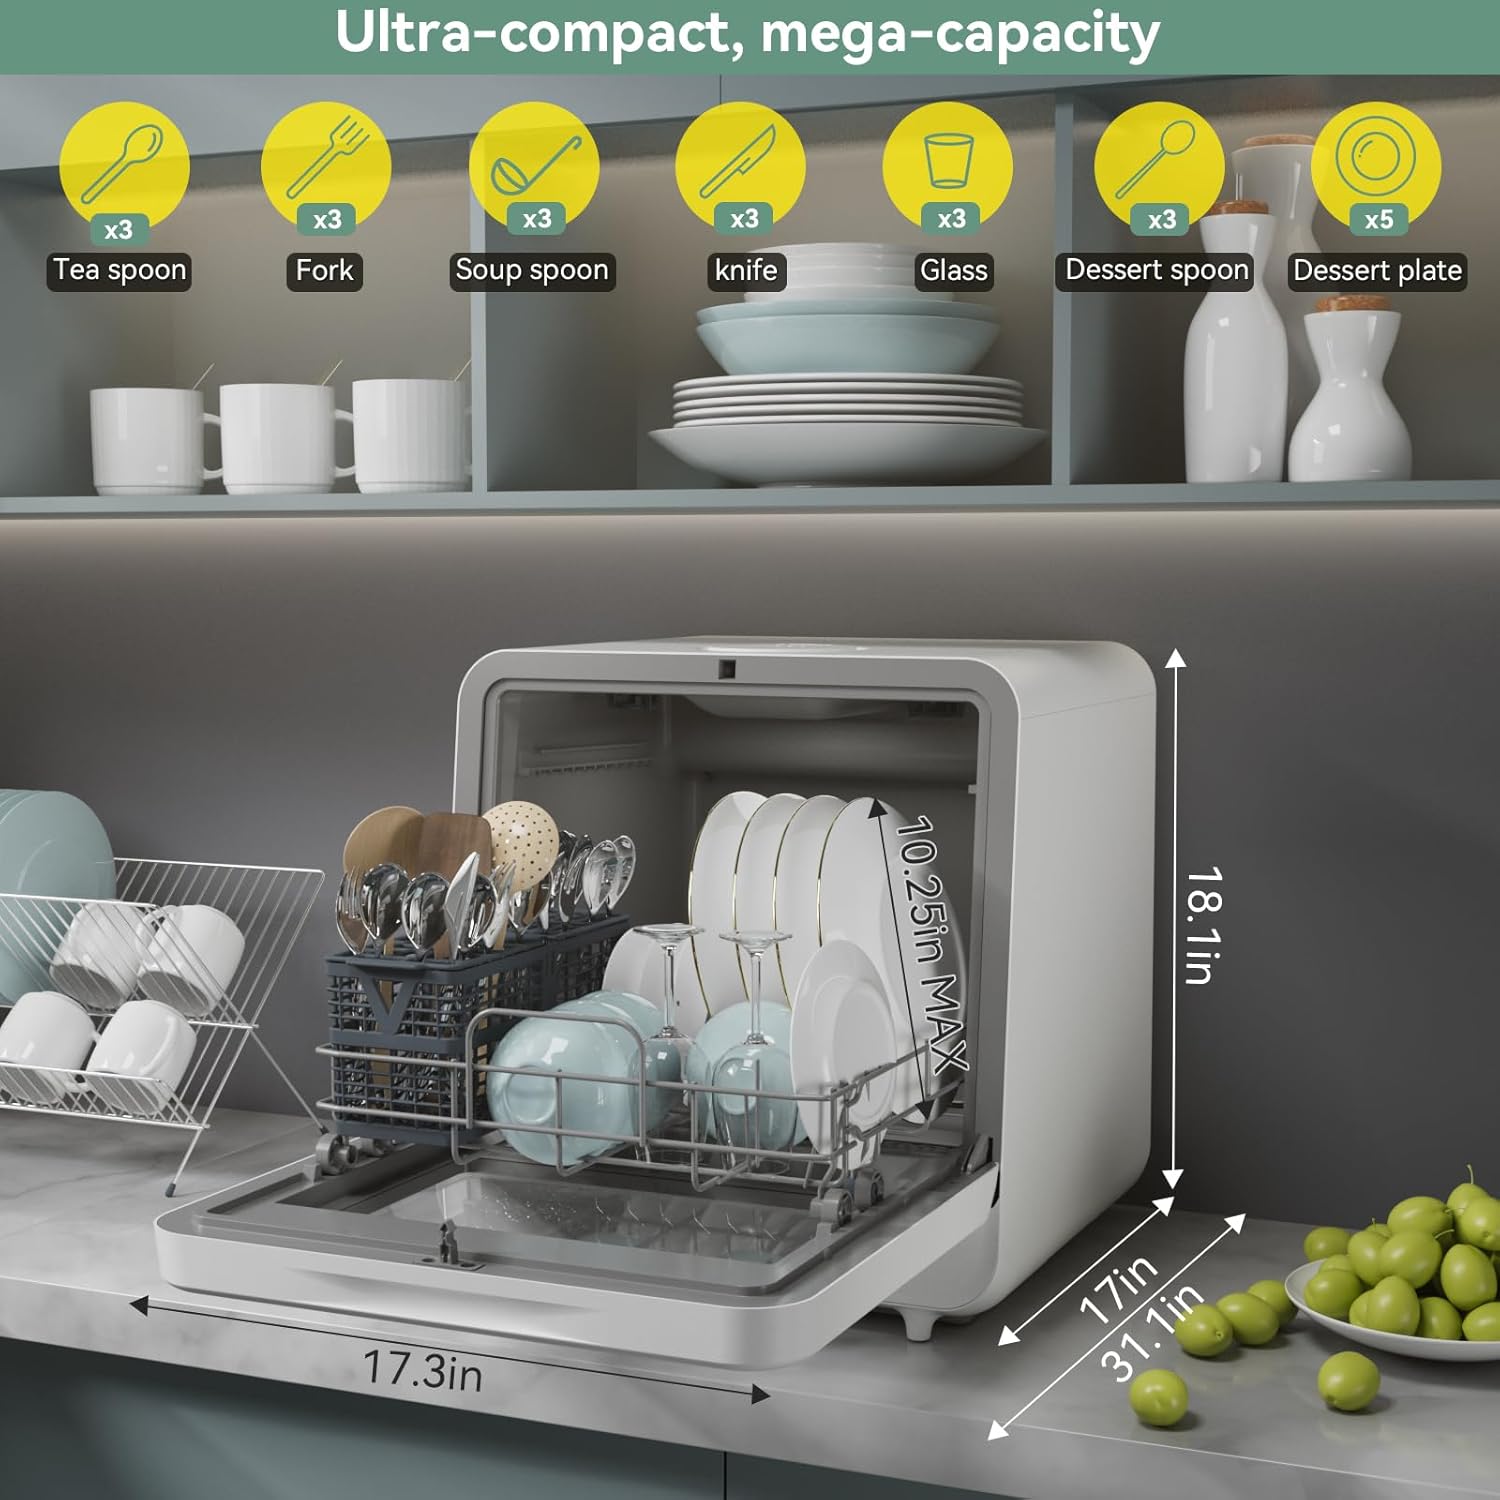
An image showing the internal capacity of the dishwasher with various dishes loaded, along with dimensions.
5.3 Adding Detergent
Open the detergent dispenser and add the appropriate amount of dishwasher detergent. This dishwasher is compatible with liquid, powder, or tablet detergents. Close the dispenser lid securely.
5.4 Selecting a Wash Program
Press the 'Program' button or touch the desired program icon on the screen to select from the available wash cycles:
| Program | Description |
|---|---|
| Heavy | For heavily soiled dishes and pots. |
| Normal | Standard program for daily soiled dishes. |
| ECO | Energy-saving program for normally soiled dishes. |
| Speed | Quick wash for lightly soiled dishes without drying. |
| Rinse | Pre-rinse cycle for dishes that will be washed later. |
| Dry | Additional drying cycle. |
| Air Fresh | Circulates fresh air to prevent odors during storage. |
| Delay | Sets a delayed start time for the wash cycle. |
5.5 Starting a Cycle
After selecting the program, press the 'Start/Pause' button to begin the wash cycle. The display will show the remaining time.
5.6 Delay Start Function
To use the delay start function, select your desired wash program, then press the 'Delay' button repeatedly to set the delay time (1-24 hours). Press 'Start/Pause' to confirm and begin the countdown. This allows you to run the dishwasher during off-peak electricity hours.

An image depicting the 1-24 hour delay timer feature, highlighting energy savings.
6. Maintenance
Regular maintenance ensures optimal performance and longevity of your dishwasher.
6.1 Cleaning the Interior
- Wipe the interior with a damp cloth after each use to remove any food residue.
- Periodically run a cleaning cycle with a dishwasher cleaner to remove mineral buildup and odors.
6.2 Cleaning Filters
- Locate the filter assembly at the bottom of the dishwasher tub.
- Twist and remove the filter. Rinse it under running water to remove trapped food particles.
- Reinstall the filter securely after cleaning.
6.3 Drying and Storage
The dishwasher's top vent design facilitates fresh air circulation, which aids in drying and prevents odors during storage. For extended periods of non-use, ensure the dishwasher is clean and dry, and leave the door slightly ajar to allow air circulation.

An illustration of the dishwasher's top vent design for fresh air exchange, drying, and antibacterial storage.
7. Troubleshooting
Before contacting customer service, please refer to the following table for common issues and solutions:
| Problem | Possible Cause | Solution |
|---|---|---|
| Dishwasher does not start | Power cord not plugged in; Door not closed properly; Program not selected. | Ensure power cord is securely plugged in; Close the door firmly; Select a wash program and press Start. |
| Dishes are not clean | Improper loading; Insufficient detergent; Clogged spray arms or filters. | Reload dishes correctly; Add more detergent; Clean spray arm nozzles and filters. |
| Water leaks | Loose hose connections; Damaged door seal; Overfilling (tank mode). | Check and tighten hose connections; Inspect door seal for damage; Do not exceed 5L capacity in tank mode. |
| Dishwasher is noisy | Dishes rattling; Foreign object in pump; Unit not level. | Rearrange dishes; Check for and remove foreign objects; Ensure dishwasher is on a level surface. |
8. Specifications
| Feature | Specification |
|---|---|
| Model Name | US MDW5CW01 |
| Form Factor | Countertop |
| Product Dimensions (D x W x H) | 16.93 x 17.32 x 18.11 inches |
| Item Weight | 27.6 pounds |
| Capacity | 5 Place Settings / 5 Liters (Water Tank) |
| Voltage | 120 Volts |
| Water Consumption | 1.32 Gallons per Hour |
| Noise Level | 55 Decibels |
| Number of Programs | 8 |
| Special Features | 360° Triple Spray Arm, Built-In Water Tank, Color Touch Screen, Portable, Timer Delay |
| Material Type | Glass, Plastic |
9. Warranty and Support
For warranty information and customer support, please refer to the warranty card included with your product or visit the official magicplux website. If you encounter any issues not covered in this manual, please contact magicplux customer service for assistance.